
Quick Guide (ENGLISH)
Page 33
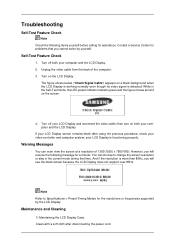
Warning Messages You can choose to Specifications > Preset Timing Modes for a minute; Note Refer to change the screen resolution or stay in the Self-Test mode, the LED power indicator remains green and the figure moves around on the LCD Display. Turn on the screen. 4. You can...video controller and computer system; However, you will see the black screen because the LCD Display does not support over 85Hz. your LCD Display and reconnect the video cable; Turn off your LCD Display is more than 85Hz, you will receive the following items yourself before calling for ...
Warning Messages You can choose to Specifications > Preset Timing Modes for a minute; Note Refer to change the screen resolution or stay in the Self-Test mode, the LED power indicator remains green and the figure moves around on the LCD Display. Turn on the screen. 4. You can...video controller and computer system; However, you will see the black screen because the LCD Display does not support over 85Hz. your LCD Display and reconnect the video cable; Turn off your LCD Display is more than 85Hz, you will receive the following items yourself before calling for ...
User Manual (ENGLISH)
Page 46
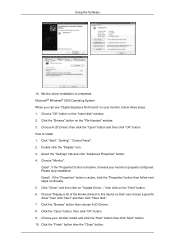
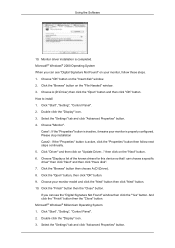
Microsoft® Windows® 2000 Operating System When you can choose a specific driver" then click "Next" and then click "Have disk". 7. Choose "OK" button on your monitor, follow next steps continually. 5. Please stop installation Case2 :... then follow these steps. 1. Select the "Settings" tab and click "Advanced Properties" button. 4. Choose "Monitor". How to install 1. Click "Start", "Setting", "Control Panel". 2. Choose "Display a list of the known drivers for this device so that I can see "Digital Signature Not Found" on the "Insert disk" window. 2. Click the "Open" button...
Microsoft® Windows® 2000 Operating System When you can choose a specific driver" then click "Next" and then click "Have disk". 7. Choose "OK" button on your monitor, follow next steps continually. 5. Please stop installation Case2 :... then follow these steps. 1. Select the "Settings" tab and click "Advanced Properties" button. 4. Choose "Monitor". How to install 1. Click "Start", "Setting", "Control Panel". 2. Choose "Display a list of the known drivers for this device so that I can see "Digital Signature Not Found" on the "Insert disk" window. 2. Click the "Open" button...
User Manual (ENGLISH)
Page 47
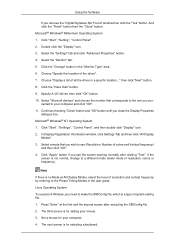
.... 3. then click "Next" button. 8. Select "Show all the driver in a specific location..." Click "Start", "Settings", "Control Panel", and then double-click "Display" icon. 2. In Display Registration Information window, click Settings Tab and then click "All Display Modes". 3. The third screen is not normal, change to a different mode (lower mode of resolution, colors or frequency). Microsoft...
.... 3. then click "Next" button. 8. Select "Show all the driver in a specific location..." Click "Start", "Settings", "Control Panel", and then double-click "Display" icon. 2. In Display Registration Information window, click Settings Tab and then click "All Display Modes". 3. The third screen is not normal, change to a different mode (lower mode of resolution, colors or frequency). Microsoft...
User Manual (ENGLISH)
Page 48
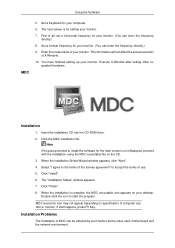
... system or monitor. Click "Finish". 8. If that happens, press F5 Key. Using the Software MDC 5. The next screen is not displayed, proceed with the installation using the MDC executable file on specification of use. 5. You have finished setting up your desktop. Execute X-Window after setting other requested hardware. Note If the popup...
... system or monitor. Click "Finish". 8. If that happens, press F5 Key. Using the Software MDC 5. The next screen is not displayed, proceed with the installation using the MDC executable file on specification of use. 5. You have finished setting up your desktop. Execute X-Window after setting other requested hardware. Note If the popup...
User Manual (ENGLISH)
Page 83
... power indicator remains green and the figure moves around on the LCD Display. Turn off both your computer and the LCD Display If your computer and the LCD Display. 2. Warning Messages You can choose to Specifications > Preset Timing Modes for problems that time. Turn off your LCD Display is more than 85Hz, you will see the black screen because...
... power indicator remains green and the figure moves around on the LCD Display. Turn off both your computer and the LCD Display If your computer and the LCD Display. 2. Warning Messages You can choose to Specifications > Preset Timing Modes for problems that time. Turn off your LCD Display is more than 85Hz, you will see the black screen because...
User Manual (ENGLISH)
Page 90
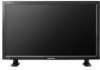
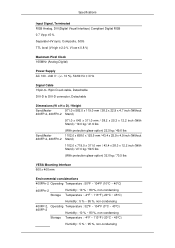
Specifications Input Signal, Terminated RGB Analog, DVI(Digital Visual Interface) Compliant ...60 Hz ± 3 Hz Signal Cable 15pin-to-15pin D-sub cable, Detachable DVI-D to DVI-D connector, Detachable Dimensions (W x H x D) / Weight SyncMaster 971.0 x 582.0 x 119.0 mm / 38.2 x 22.9 x 4.7 inch (Without 400FP-2, 400FPn-2 Stand) 971.0 x 643 x 311.0 mm ... (With Stand) / 19.0 kg / 41.9 lbs (With protection glass-option) 22.5 kg / 49.6 lbs SyncMaster 1102.0 x 658.0 x 125.5 mm / 43.4 x 25.9 x 4.9 inch (Without 460FP-2, 460FPn-2 Stand) 1102.0 x 719.0 x 311.0 mm / 43.4 x 28.3 x 12.2 inch (With ...
Specifications Input Signal, Terminated RGB Analog, DVI(Digital Visual Interface) Compliant ...60 Hz ± 3 Hz Signal Cable 15pin-to-15pin D-sub cable, Detachable DVI-D to DVI-D connector, Detachable Dimensions (W x H x D) / Weight SyncMaster 971.0 x 582.0 x 119.0 mm / 38.2 x 22.9 x 4.7 inch (Without 400FP-2, 400FPn-2 Stand) 971.0 x 643 x 311.0 mm ... (With Stand) / 19.0 kg / 41.9 lbs (With protection glass-option) 22.5 kg / 49.6 lbs SyncMaster 1102.0 x 658.0 x 125.5 mm / 43.4 x 25.9 x 4.9 inch (Without 460FP-2, 460FPn-2 Stand) 1102.0 x 719.0 x 311.0 mm / 43.4 x 28.3 x 12.2 inch (With ...
User Manual (ENGLISH)
Page 91
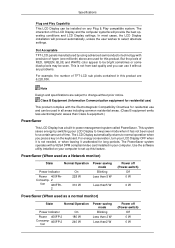
... product are subject to change without prior notice. PowerSaver (When used as a normal monitor) State Normal Operation Power Indicator Power 400FP-2 Consump- 460FP-2 tion On 180 W 240 W Power saving mode Blinking Less than 2 W Less than2 W Power off (Power-switch) Off 0 W ... Specifications Plug and Play Capability This LCD Display can be used in all areas including common residential areas. (Class B equipment emits less electromagnetic waves than Class A equipment.) PowerSaver This LCD Display has a built-in power management system called PowerSaver. Dot Acceptable TFT-LCD panels ...
... product are subject to change without prior notice. PowerSaver (When used as a normal monitor) State Normal Operation Power Indicator Power 400FP-2 Consump- 460FP-2 tion On 180 W 240 W Power saving mode Blinking Less than 2 W Less than2 W Power off (Power-switch) Off 0 W ... Specifications Plug and Play Capability This LCD Display can be used in all areas including common residential areas. (Class B equipment emits less electromagnetic waves than Class A equipment.) PowerSaver This LCD Display has a built-in power management system called PowerSaver. Dot Acceptable TFT-LCD panels ...
User Manual (ENGLISH)
Page 92
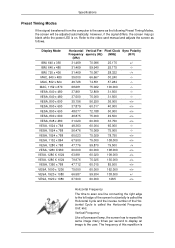
...156 56.250 36.000 +/+ 37.879 60.317 40.000 +/+ 48.077 72.188 50.000 +/+ 46.875 75.000 49.500 +/+ 31.020 60.000 33.750 +/+ 48.363 60.004 65.000 ...to the video card manual and adjusts the screen as the following Preset Timing Modes, the screen will be adjusted automatically. Display Mode IBM, 640 x 350 IBM, 640 x 480 IBM, 720 x 400 MAC, 640 x 480 MAC, 832 ...repeat the same image many times per second to display an image to the left edge of the screen horizontally is called the Horizontal Frequency. Specifications Preset Timing Modes If the signal transferred from the ...
...156 56.250 36.000 +/+ 37.879 60.317 40.000 +/+ 48.077 72.188 50.000 +/+ 46.875 75.000 49.500 +/+ 31.020 60.000 33.750 +/+ 48.363 60.004 65.000 ...to the video card manual and adjusts the screen as the following Preset Timing Modes, the screen will be adjusted automatically. Display Mode IBM, 640 x 350 IBM, 640 x 480 IBM, 720 x 400 MAC, 640 x 480 MAC, 832 ...repeat the same image many times per second to display an image to the left edge of the screen horizontally is called the Horizontal Frequency. Specifications Preset Timing Modes If the signal transferred from the ...

User Manual (ENGLISH)
Page 93
Specifications called the Vertical Frequency or Refresh Rate. Unit: Hz
Specifications called the Vertical Frequency or Refresh Rate. Unit: Hz
User Manual (ENGLISH)
Page 42
.... Select the "Settings" tab and click "Advanced Properties" button. Click "Start", "Setting", "Control Panel". 2. Click "Driver" and then click on your monitor, follow next steps continually. 5. And click the...and click the "Next" button then click "Next" button. 10. If you can choose a specific driver" then click "Next" and then click "Have disk". 7. How to install 1. Monitor driver...click "OK" button. 9. Double click the "Display" icon. 3. Choose A:(D:\Driver) then click the "Open" button and then click "OK" button. Choose "Display a list of the known drivers for this ...
.... Select the "Settings" tab and click "Advanced Properties" button. Click "Start", "Setting", "Control Panel". 2. Click "Driver" and then click on your monitor, follow next steps continually. 5. And click the...and click the "Next" button then click "Next" button. 10. If you can choose a specific driver" then click "Next" and then click "Have disk". 7. How to install 1. Monitor driver...click "OK" button. 9. Double click the "Display" icon. 3. Choose A:(D:\Driver) then click the "Open" button and then click "OK" button. Choose "Display a list of the known drivers for this ...

User Manual (ENGLISH)
Page 43
... X86Config file, which is for your monitor. (You can enter the frequency directly.) 9. Click "Start", "Settings", "Control Panel", and then double-click "Display" icon. 2. Select a mode that corresponds to the Preset Timing Modes in the user guide. Linux Operating System To execute .... 3. Click the "Change" button in a specific location..." Continue choosing "Close" button and "OK" button until you con- In Display Registration Information window, click Settings Tab and then click "All Display Modes". 3. Press "Enter" at All Display Modes, select the level of your computer and click...
... X86Config file, which is for your monitor. (You can enter the frequency directly.) 9. Click "Start", "Settings", "Control Panel", and then double-click "Display" icon. 2. Select a mode that corresponds to the Preset Timing Modes in the user guide. Linux Operating System To execute .... 3. Click the "Change" button in a specific location..." Continue choosing "Close" button and "OK" button until you con- In Display Registration Information window, click Settings Tab and then click "All Display Modes". 3. Press "Enter" at All Display Modes, select the level of your computer and click...
User Manual (ENGLISH)
Page 94
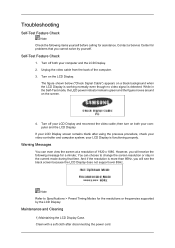
... off both your computer and the LCD Display If your LCD Display screen remains blank after disconnecting the power cord. Maintenance and Cleaning 1) Maintaining the LCD Display Case. The figure shown below ("Check Signal Cable") appears on both your LCD Display and reconnect the video cable; Warning Messages You can choose to Specifications > Preset Timing Modes for assistance. Note...
... off both your computer and the LCD Display If your LCD Display screen remains blank after disconnecting the power cord. Maintenance and Cleaning 1) Maintaining the LCD Display Case. The figure shown below ("Check Signal Cable") appears on both your LCD Display and reconnect the video cable; Warning Messages You can choose to Specifications > Preset Timing Modes for assistance. Note...
User Manual (ENGLISH)
Page 101
... notice. The interaction of the LCD Display and the computer systems will proceed automatically, unless the user wishes to be bright sometimes or some black pixels may be seen. Note Design and specifications are used in this product. Dimensions (W x H x D) / Weight 971.0 x 582.0 x 119.0 mm / 38.2 x 22.9 x 4.7 inch (Without Stand) SyncMaster 400MX-2, 400MXn-2 971.0 x 643...
... notice. The interaction of the LCD Display and the computer systems will proceed automatically, unless the user wishes to be bright sometimes or some black pixels may be seen. Note Design and specifications are used in this product. Dimensions (W x H x D) / Weight 971.0 x 582.0 x 119.0 mm / 38.2 x 22.9 x 4.7 inch (Without Stand) SyncMaster 400MX-2, 400MXn-2 971.0 x 643...

User Manual (ENGLISH)
Page 102
... computer to normal operation when you press a key on the keyboard. This system saves energy by switching your LCD Display to low-power mode when it unattended for a certain amount of time. Specifications PowerSaver This LCD Display has a built-in your computer. PowerSaver (When used as a normal monitor) State Power Indicator Power Consumption 400MX-2 460MX...
... computer to normal operation when you press a key on the keyboard. This system saves energy by switching your LCD Display to low-power mode when it unattended for a certain amount of time. Specifications PowerSaver This LCD Display has a built-in your computer. PowerSaver (When used as a normal monitor) State Power Indicator Power Consumption 400MX-2 460MX...

User Manual (ENGLISH)
Page 103
....156 56.250 36.000 +/+ 37.879 60.317 40.000 +/+ 48.077 72.188 50.000 +/+ 46.875 75.000 49.500 +/+ 31.020 60.000 33.750 +/+ 48.363 60.004 65.000 -/-...Like a fluorescent lamp, the screen has to repeat the same image many times per second to display an image to the left edge of the screen horizontally is called the Horizontal Cycle and the inverse... adjusted automatically. The frequency of the Horizontal Cycle is called the Vertical Frequency or Refresh Rate. Specifications Preset Timing Modes If the signal transferred from the computer is the same as follows. However, ...
....156 56.250 36.000 +/+ 37.879 60.317 40.000 +/+ 48.077 72.188 50.000 +/+ 46.875 75.000 49.500 +/+ 31.020 60.000 33.750 +/+ 48.363 60.004 65.000 -/-...Like a fluorescent lamp, the screen has to repeat the same image many times per second to display an image to the left edge of the screen horizontally is called the Horizontal Cycle and the inverse... adjusted automatically. The frequency of the Horizontal Cycle is called the Vertical Frequency or Refresh Rate. Specifications Preset Timing Modes If the signal transferred from the computer is the same as follows. However, ...


