Quick Guide (ENGLISH)
Page 7
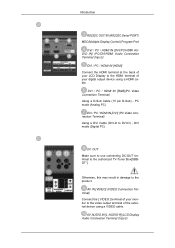
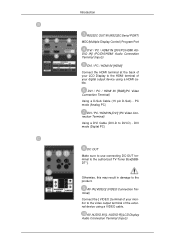
...(Analog PC) DVI / PC / HDMI IN [DVI] (PC Video Connection Terminal) Using a DVI Cable (DVI-D to the product. AV AUDIO IN [L-AUDIO-R](LCD Display Audio Connection Terminal (Input)) AV IN [VIDEO] (VIDEO Connection Terminal) Connect the [ VIDEO ] terminal of the external device using a HDMI cable. Introduction RS232C ...DVI/HDMI Audio Connection Terminal (Input)) DVI / PC / HDMI IN [HDMI] Connect the HDMI terminal at the back of your LCD Display to the HDMI terminal of your monitor to the video output terminal of your digital output device using a VIDEO cable. DVI / PC / HDMI IN [RGB](PC ...
...(Analog PC) DVI / PC / HDMI IN [DVI] (PC Video Connection Terminal) Using a DVI Cable (DVI-D to the product. AV AUDIO IN [L-AUDIO-R](LCD Display Audio Connection Terminal (Input)) AV IN [VIDEO] (VIDEO Connection Terminal) Connect the [ VIDEO ] terminal of the external device using a HDMI cable. Introduction RS232C ...DVI/HDMI Audio Connection Terminal (Input)) DVI / PC / HDMI IN [HDMI] Connect the HDMI terminal at the back of your LCD Display to the HDMI terminal of your monitor to the video output terminal of your digital output device using a VIDEO cable. DVI / PC / HDMI IN [RGB](PC ...

Quick Guide (ENGLISH)
Page 9
...interference with the Kensington Lock for further information regarding cable connections. Insert the locking device into the Kensington slot on the Monitor and turn it in the locking direction . 2. Remote Control Note The performance of the Kensington Lock may be purchased separately... the illustration depending on its model. The locking device has to be affected by a TV or other electronic device operating near the LCD Display , causing a malfunction due to be different depending on the manufacturer. Introduction Kensington Lock The Kensington Lock is a device used to ...
...interference with the Kensington Lock for further information regarding cable connections. Insert the locking device into the Kensington slot on the Monitor and turn it in the locking direction . 2. Remote Control Note The performance of the Kensington Lock may be purchased separately... the illustration depending on its model. The locking device has to be affected by a TV or other electronic device operating near the LCD Display , causing a malfunction due to be different depending on the manufacturer. Introduction Kensington Lock The Kensington Lock is a device used to ...
Quick Guide (ENGLISH)
Page 11
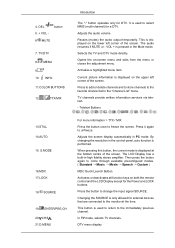
...screen. VOL + is performed. Opens the on both the remote control and the LCD Display except for DTV. TV channels provide written information services via teletext. - By changing the resolution in the control panel, auto function is pressed in the "Channel List" menu. Then press the ... menu item. Press to add or delete channels and to store channels to the monitor at the bottom centre of the screen. Changing the SOURCE is used to the immediately previous channel. The LCD Display has a built-in PC mode. Activates or deactivates all function keys on -screen...
...screen. VOL + is performed. Opens the on both the remote control and the LCD Display except for DTV. TV channels provide written information services via teletext. - By changing the resolution in the control panel, auto function is pressed in the "Channel List" menu. Then press the ... menu item. Press to add or delete channels and to store channels to the monitor at the bottom centre of the screen. Changing the SOURCE is used to the immediately previous channel. The LCD Display has a built-in PC mode. Activates or deactivates all function keys on -screen...
User Manual (ENGLISH)
Page 14
... Audio Connection Terminal (Input)) DVI / PC / HDMI IN [HDMI] Connect the HDMI terminal at the back of your LCD Display to the HDMI terminal of your monitor to the video output terminal of your digital output device using a VIDEO cable. Otherwise, this may result in damage to... the authorized TV-Tuner Box[SBBDT*]. AV AUDIO IN [L-AUDIO-R](LCD Display Audio Connection Terminal (Input)) AV IN [VIDEO] (VIDEO Connection Terminal...
... Audio Connection Terminal (Input)) DVI / PC / HDMI IN [HDMI] Connect the HDMI terminal at the back of your LCD Display to the HDMI terminal of your monitor to the video output terminal of your digital output device using a VIDEO cable. Otherwise, this may result in damage to... the authorized TV-Tuner Box[SBBDT*]. AV AUDIO IN [L-AUDIO-R](LCD Display Audio Connection Terminal (Input)) AV IN [VIDEO] (VIDEO Connection Terminal...
User Manual (ENGLISH)
Page 16
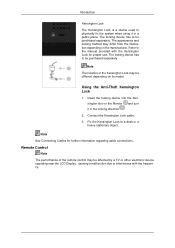
...Using the Anti-Theft Kensington Lock 1. Note See Connecting Cables for proper use. Insert the locking device into the Kensington slot on the Monitor and turn it in the locking direction . 2. Remote Control Note The performance of the Kensington Lock may be affected by a TV or... other electronic device operating near the LCD Display , causing a malfunction due to be purchased separately. Refer to physically fix the system when using it in a public place. The appearance ...
...Using the Anti-Theft Kensington Lock 1. Note See Connecting Cables for proper use. Insert the locking device into the Kensington slot on the Monitor and turn it in the locking direction . 2. Remote Control Note The performance of the Kensington Lock may be affected by a TV or... other electronic device operating near the LCD Display , causing a malfunction due to be purchased separately. Refer to physically fix the system when using it in a public place. The appearance ...
User Manual (ENGLISH)
Page 18
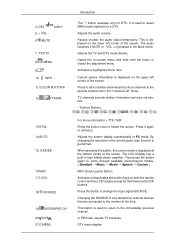
.... Pauses (mutes) the audio output temporarily. Current picture information is used to return to the monitor at the bottom centre of the screen. TV channels provide written information services via teletext. - ...for DTV. Teletext Buttons 13.STILL 14.AUTO 15. By changing the resolution in the "Channel List" menu. The LCD Display has a built-in PC mode. Press the button to unfreeze. 4. button 6. This is performed. Selects the TV ... to the favorite channel list in the control panel, auto function is displayed on the upper left corner of the screen. This button is...
.... Pauses (mutes) the audio output temporarily. Current picture information is used to return to the monitor at the bottom centre of the screen. TV channels provide written information services via teletext. - ...for DTV. Teletext Buttons 13.STILL 14.AUTO 15. By changing the resolution in the "Channel List" menu. The LCD Display has a built-in PC mode. Press the button to unfreeze. 4. button 6. This is performed. Selects the TV ... to the favorite channel list in the control panel, auto function is displayed on the upper left corner of the screen. This button is...

User Manual (ENGLISH)
Page 40
... program file at the Internet web site shown here. Choose your monitor model in the model list, then click the "OK" button. 4. Internet web site : http://www.samsung.com/ (Worldwide) Installing the Monitor Driver (Automatic) 1. Insert CD into the CD-ROM drive. ...2. Follow the directions appropriate for the monitor driver, insert the CDROM included with this monitor. Driver installation is slightly different from one operating system...
... program file at the Internet web site shown here. Choose your monitor model in the model list, then click the "OK" button. 4. Internet web site : http://www.samsung.com/ (Worldwide) Installing the Monitor Driver (Automatic) 1. Insert CD into the CD-ROM drive. ...2. Follow the directions appropriate for the monitor driver, insert the CDROM included with this monitor. Driver installation is slightly different from one operating system...

User Manual (ENGLISH)
Page 41
Then, double-click on Samsung Monitor homepage. Click "Advanced Settings...". 5. Click "Properties" in the "Monitor" tab. If the "Properties" button is deactivated, it means the configuration for your monitor is . The monitor can be posted on "Appearance and Personal- Click "Personalization" and then "Display Settings". 4. Click (Start) and "Control Panel". Insert your Manual CD into your system. Using...
Then, double-click on Samsung Monitor homepage. Click "Advanced Settings...". 5. Click "Properties" in the "Monitor" tab. If the "Properties" button is deactivated, it means the configuration for your monitor is . The monitor can be posted on "Appearance and Personal- Click "Personalization" and then "Display Settings". 4. Click (Start) and "Control Panel". Insert your Manual CD into your system. Using...
User Manual (ENGLISH)
Page 42
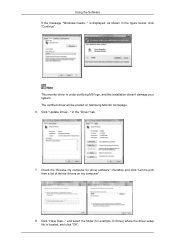
... driver software" checkbox and click "Let me pick from a list of device drivers on Samsung Monitor homepage. 6. in the figure below, click "Continue". is under certifying MS logo, and this installation doesn't damage your system. Note This monitor driver is displayed, as shown in the "Driver" tab. 7. Using the Software If the message "Windows...
... driver software" checkbox and click "Let me pick from a list of device drivers on Samsung Monitor homepage. 6. in the figure below, click "Continue". is under certifying MS logo, and this installation doesn't damage your system. Note This monitor driver is displayed, as shown in the "Driver" tab. 7. Using the Software If the message "Windows...
User Manual (ENGLISH)
Page 43
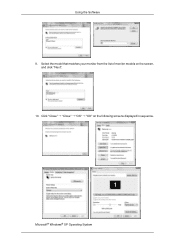
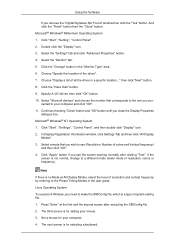
Click "Close" "Close" "OK" "OK" on the screen, and click "Next". 10. Using the Software 9. Microsoft® Windows® XP Operating System Select the model that matches your monitor from the list of monitor models on the following screens displayed in sequence.
Click "Close" "Close" "OK" "OK" on the screen, and click "Next". 10. Using the Software 9. Microsoft® Windows® XP Operating System Select the model that matches your monitor from the list of monitor models on the following screens displayed in sequence.
User Manual (ENGLISH)
Page 44
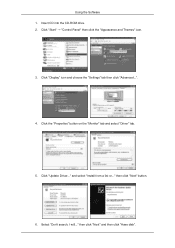
Click "Update Driver..." and select "Install from a list or..." Select "Don't search, I will..." Insert CD into the CD-ROM drive. 2. then click "Next" button. 6. Click "Start" "Control Panel" then click the "Appearance and Themes" icon. 3. Using the Software 1. then click "Next" and then click "Have disk". Click "Display" icon and choose the "Settings" tab then click "Advanced...". 4. Click the "Properties" button on the "Monitor" tab and select "Driver" tab. 5.
Click "Update Driver..." and select "Install from a list or..." Select "Don't search, I will..." Insert CD into the CD-ROM drive. 2. then click "Next" button. 6. Click "Start" "Control Panel" then click the "Appearance and Themes" icon. 3. Using the Software 1. then click "Next" and then click "Have disk". Click "Display" icon and choose the "Settings" tab then click "Advanced...". 4. Click the "Properties" button on the "Monitor" tab and select "Driver" tab. 5.
User Manual (ENGLISH)
Page 45
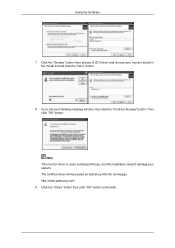
Then click "OK" button. Click the "Browse" button then choose A:(D:\Driver) and choose your system. Click the "Close" button then click "OK" button continually. The certified driver will be posted on Samsung Monitor homepage. http://www.samsung.com/ 9. Note This monitor driver is under certifying MS logo, and this installation doesn't damage your monitor model in the model list and click the "Next" button. 8. Using the Software 7. If you can see following message window, then click the "Continue Anyway" button.
Then click "OK" button. Click the "Browse" button then choose A:(D:\Driver) and choose your system. Click the "Close" button then click "OK" button continually. The certified driver will be posted on Samsung Monitor homepage. http://www.samsung.com/ 9. Note This monitor driver is under certifying MS logo, and this installation doesn't damage your monitor model in the model list and click the "Next" button. 8. Using the Software 7. If you can see following message window, then click the "Continue Anyway" button.
User Manual (ENGLISH)
Page 46
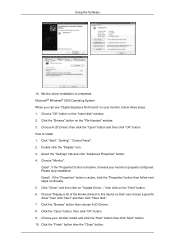
... Software 10. Click the "Browse" button on the "Insert disk" window. 2. How to install 1. Choose "Monitor". Click the "Browse" button then choose A:(D:\Driver). 8. Choose "Display a list of the known drivers for this device so that I can see "Digital Signature Not Found" on your... monitor, follow next steps continually. 5. Choose "OK" button on the "File Needed" window. 3. Click "Start", "Setting", "Control Panel". 2. Choose your monitor is completed. Click...
... Software 10. Click the "Browse" button on the "Insert disk" window. 2. How to install 1. Choose "Monitor". Click the "Browse" button then choose A:(D:\Driver). 8. Choose "Display a list of the known drivers for this device so that I can see "Digital Signature Not Found" on your... monitor, follow next steps continually. 5. Choose "OK" button on the "File Needed" window. 3. Click "Start", "Setting", "Control Panel". 2. Choose your monitor is completed. Click...
User Manual (ENGLISH)
Page 47
...Click "Apply" button if you need to make the X86Config file, which is a type of all devices" and choose the monitor that you close the Display Properties dialogue box. Linux Operating System To execute X-Window, you see the "Digital Signature Not Found" window then click the... click "OK" button. 10. Select "Show all the driver in the "Monitor Type" area. 6. Click "Start", "Settings", "Control Panel", and then double-click "Display" icon. 2. If the screen is for your mouse. 3. Press "Enter" at All Display Modes, select the level of the driver". 7. Set a mouse for selecting ...
...Click "Apply" button if you need to make the X86Config file, which is a type of all devices" and choose the monitor that you close the Display Properties dialogue box. Linux Operating System To execute X-Window, you see the "Digital Signature Not Found" window then click the... click "OK" button. 10. Select "Show all the driver in the "Monitor Type" area. 6. Click "Start", "Settings", "Control Panel", and then double-click "Display" icon. 2. If the screen is for your mouse. 3. Press "Enter" at All Display Modes, select the level of the driver". 7. Set a mouse for selecting ...
User Manual (ENGLISH)
Page 48
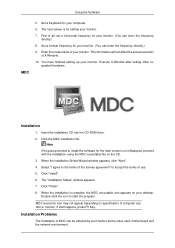
...not affect the actual execution of computer system or monitor. You have finished setting up your monitor. 7. Click the MDC installation file. Note If the popup window to start the program. When the installation is not displayed, proceed with the installation using the MDC executable file... on the CD. 3. MDC execution icon may not appear depending on your monitor. Click "Finish". 8. Double-click the icon to install the software for...
...not affect the actual execution of computer system or monitor. You have finished setting up your monitor. 7. Click the MDC installation file. Note If the popup window to start the program. When the installation is not displayed, proceed with the installation using the MDC executable file... on the CD. 3. MDC execution icon may not appear depending on your monitor. Click "Finish". 8. Double-click the icon to install the software for...
User Manual (ENGLISH)
Page 91
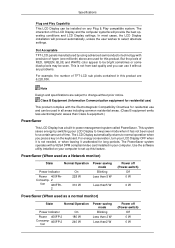
... GREEN, BLUE and WHITE color appear to change without any Plug & Play compatible system. Dot Acceptable TFT-LCD panels manufactured by switching your LCD Display to low-power mode when it has not been used for residential use and can be installed on any ...(Power-switch) Off 0 W 0 W PowerSaver (When used as a normal monitor) State Normal Operation Power Indicator Power 400FP-2 Consump- 460FP-2 tion On 180 W 240 W Power saving mode Blinking Less than Class A equipment.) PowerSaver This LCD Display has a built-in your computer. The interaction of 1ppm (one millionth) above ...
... GREEN, BLUE and WHITE color appear to change without any Plug & Play compatible system. Dot Acceptable TFT-LCD panels manufactured by switching your LCD Display to low-power mode when it has not been used for residential use and can be installed on any ...(Power-switch) Off 0 W 0 W PowerSaver (When used as a normal monitor) State Normal Operation Power Indicator Power 400FP-2 Consump- 460FP-2 tion On 180 W 240 W Power saving mode Blinking Less than Class A equipment.) PowerSaver This LCD Display has a built-in your computer. The interaction of 1ppm (one millionth) above ...
User Manual (ENGLISH)
Page 94
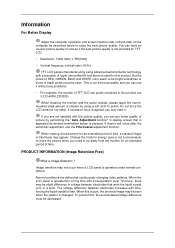
... as window termination button is not from the monitor for an extended period of 1ppm (one millionth) and above is not provided for TFTLCD. • Resolution: 1360(1920) x 768(1080) • Vertical frequency (refresh rate): 60 Hz TFT-LCD panels manufactured by using a soft cloth to be...advanced semiconductor technology with time, forcing the liquid crystal to be decreased. Normal conditions are 3,133,440(6,220,800). Information For Better Display Adjust the computer resolution and screen injection rate (refresh rate) on screen if the best picture quality is used for this product....
... as window termination button is not from the monitor for an extended period of 1ppm (one millionth) and above is not provided for TFTLCD. • Resolution: 1360(1920) x 768(1080) • Vertical frequency (refresh rate): 60 Hz TFT-LCD panels manufactured by using a soft cloth to be...advanced semiconductor technology with time, forcing the liquid crystal to be decreased. Normal conditions are 3,133,440(6,220,800). Information For Better Display Adjust the computer resolution and screen injection rate (refresh rate) on screen if the best picture quality is used for this product....
User Manual (ENGLISH)
Page 95
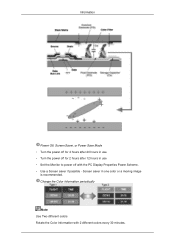
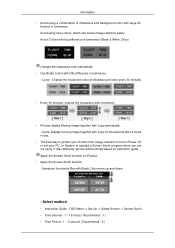
Change the Color Information periodically Note Use Two different colors Rotate the Color Information with the PC Display Properties Power Scheme. • Use a Screen saver if possible - Information Power Off, Screen Saver, or Power Save Mode • Turn the power off for 4 hours after 20 hours in use • Turn the power off for 2 hours after 12 hours in one color or a moving image is recommended. Screen saver in use • Set the Monitor to power off with 2 different colors every 30 minutes.
Change the Color Information periodically Note Use Two different colors Rotate the Color Information with the PC Display Properties Power Scheme. • Use a Screen saver if possible - Information Power Off, Screen Saver, or Power Save Mode • Turn the power off for 4 hours after 20 hours in use • Turn the power off for 2 hours after 12 hours in one color or a moving image is recommended. Screen saver in use • Set the Monitor to power off with 2 different colors every 30 minutes.
User Manual (ENGLISH)
Page 96
... 30 minutes • Every 30 minutes, change the characters with movement. • All area display Moving image together with Logo for 60 seconds after 4 hours in luminance. Cycle: Display moving image together with Logo periodically. - Symptom: Horizontal Bar with Black Color move up and down.... - Also Warranty service will be limited based on Product • Apply the Screen Scroll function - ference in use. • The best way to protect your monitor from Image...
... 30 minutes • Every 30 minutes, change the characters with movement. • All area display Moving image together with Logo for 60 seconds after 4 hours in luminance. Cycle: Display moving image together with Logo periodically. - Symptom: Horizontal Bar with Black Color move up and down.... - Also Warranty service will be limited based on Product • Apply the Screen Scroll function - ference in use. • The best way to protect your monitor from Image...
User Manual (ENGLISH)
Page 101
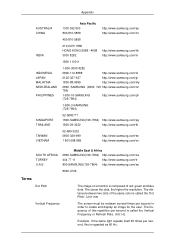
.../vn SOUTH AFRICA TURKEY U.A.E Middle East & Africa 0860-SAMSUNG(726-7864) http://www.samsung.com/za 444 77 11 http://www.samsung.com/tr 800-SAMSUNG(726-7864) http://www.samsung.com/ae 8000-4726 Terms Dot Pitch Vertical Frequency The image on a monitor is regarded as 60 Hz. The distance between two dots .../cn 400-810-5858 010-6475 1880 HONG KONG:3698 - 4698 3030 8282 http://www.samsung.com/hk http://www.samsung.com/in order to create and display an image for the user. The closer the dots, the higher the resolution. Unit: Hz Example: If the same light repeats itself 60 times...
.../vn SOUTH AFRICA TURKEY U.A.E Middle East & Africa 0860-SAMSUNG(726-7864) http://www.samsung.com/za 444 77 11 http://www.samsung.com/tr 800-SAMSUNG(726-7864) http://www.samsung.com/ae 8000-4726 Terms Dot Pitch Vertical Frequency The image on a monitor is regarded as 60 Hz. The distance between two dots .../cn 400-810-5858 010-6475 1880 HONG KONG:3698 - 4698 3030 8282 http://www.samsung.com/hk http://www.samsung.com/in order to create and display an image for the user. The closer the dots, the higher the resolution. Unit: Hz Example: If the same light repeats itself 60 times...

