User Manual (ENGLISH)
Page 13
... on your eyes depending on -screen menu and exits from the menu. You can easily select one of seven settings by simply pressing MagicBright™ control button. 1) Custom Although the values are carefully chosen by using the OSD menu. 2) Text For documentations or works involving heavy text. 3) Internet For working with...
... on your eyes depending on -screen menu and exits from the menu. You can easily select one of seven settings by simply pressing MagicBright™ control button. 1) Custom Although the values are carefully chosen by using the OSD menu. 2) Text For documentations or works involving heavy text. 3) Internet For working with...
User Manual (ENGLISH)
Page 20
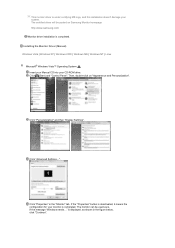
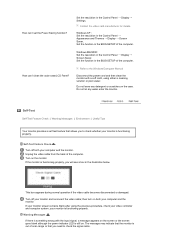
Click (Start) and "Control Panel". Click "Personalization" and then "Display Settings". If the "Properties" button is deactivated, it means the configuration for your monitor is displayed, as is. The ... will be used as shown in the "Monitor" tab. Click "Properties" in the figure below, click "Continue". is completed. Then, double-click on Samsung Monitor homepage http://www.samsung.com/ Monitor driver installation is under certifying MS logo, and this installation doesn't damage your CD-ROM drive. Click "Advanced Settings...". This monitor...
Click (Start) and "Control Panel". Click "Personalization" and then "Display Settings". If the "Properties" button is deactivated, it means the configuration for your monitor is displayed, as is. The ... will be used as shown in the "Monitor" tab. Click "Properties" in the figure below, click "Continue". is completed. Then, double-click on Samsung Monitor homepage http://www.samsung.com/ Monitor driver installation is under certifying MS logo, and this installation doesn't damage your CD-ROM drive. Click "Advanced Settings...". This monitor...

User Manual (ENGLISH)
Page 22
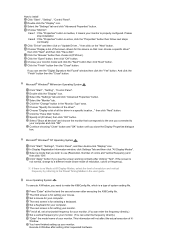
Microsoft® Windows® XP Operating System Insert CD into the CD-ROM drive. Click "Start" → "Control Panel" then click the "Appearance and Themes" icon. Click "Display" icon and choose the "Settings" tab then click "Advanced...". Click "Close"→ "Close" → "OK" → "OK" on the following screens displayed in sequence.
Microsoft® Windows® XP Operating System Insert CD into the CD-ROM drive. Click "Start" → "Control Panel" then click the "Appearance and Themes" icon. Click "Display" icon and choose the "Settings" tab then click "Advanced...". Click "Close"→ "Close" → "OK" → "OK" on the following screens displayed in sequence.
User Manual (ENGLISH)
Page 25
... have finished setting up your computer. Choose "Monitor". Microsoft® Windows® Millennium Operating System Click "Start" , "Setting" , "Control Panel". In Display Registration Information window, click Settings Tab and then click "All Display Modes". First of all, set a horizontal frequency for...location..." Click the "Have Disk" button. Linux Operating System To execute X-Window, you wish to install Click "Start" , "Setting" , "Control Panel". Continue choosing "Close" button and "OK" button until you see the "Digital Signature Not Found" window then click the "Yes" ...
... have finished setting up your computer. Choose "Monitor". Microsoft® Windows® Millennium Operating System Click "Start" , "Setting" , "Control Panel". In Display Registration Information window, click Settings Tab and then click "All Display Modes". First of all, set a horizontal frequency for...location..." Click the "Have Disk" button. Linux Operating System To execute X-Window, you wish to install Click "Start" , "Setting" , "Control Panel". Continue choosing "Close" button and "OK" button until you see the "Digital Signature Not Found" window then click the "Yes" ...
User Manual (ENGLISH)
Page 26
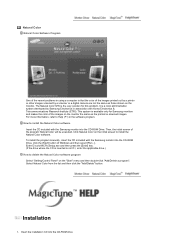
.... Installation 1. Click Natural Color on the monitor. Then, the initial screen of the images printed out by a printer or other images scanned by Samsung Electronics in the software program. Enter D:\color\NCProSetup.exe and then press the [Enter] key. (If the drive where the CD is inserted is...] button of the images on the monitor the same as those shown on the initial screen to delete the Natural Color software program Select "Setting/Control Panel" on the "Start" menu and then double-click "Add/Delete a program". It is not D:\, enter the applicable drive.) How to ...
.... Installation 1. Click Natural Color on the monitor. Then, the initial screen of the images printed out by a printer or other images scanned by Samsung Electronics in the software program. Enter D:\color\NCProSetup.exe and then press the [Enter] key. (If the drive where the CD is inserted is...] button of the images on the monitor the same as those shown on the initial screen to delete the Natural Color software program Select "Setting/Control Panel" on the "Start" menu and then double-click "Add/Delete a program". It is not D:\, enter the applicable drive.) How to ...
User Manual (ENGLISH)
Page 27
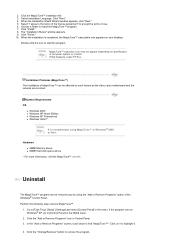
... the following steps remove MagicTune™. 1. Click on Windows® XP, go to [Task Tray] ' [Start] ' [Settings] and select [Control Panel] in Windows® 2000 or later. Choose a folder to highlight it to install the MagicTune™ program. 7. System Requirements OS z Windows...z Windows XP Professional z Windows Vista™ It is completed, the MagicTune™ executable icon appears on specification of the Windows® Control Panel. If the program runs on it . 4. Select installation Language, Click "Next". 4. When the installation is recommended using the "Add...
... the following steps remove MagicTune™. 1. Click on Windows® XP, go to [Task Tray] ' [Start] ' [Settings] and select [Control Panel] in Windows® 2000 or later. Choose a folder to highlight it to install the MagicTune™ program. 7. System Requirements OS z Windows...z Windows XP Professional z Windows Vista™ It is completed, the MagicTune™ executable icon appears on specification of the Windows® Control Panel. If the program runs on it . 4. Select installation Language, Click "Next". 4. When the installation is recommended using the "Add...
User Manual (ENGLISH)
Page 28
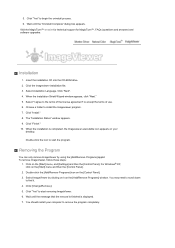
...the icon to accept the terms of the license agreement" to start removing ImageViewer. 6. Click on the [Start] menu and then the [Control Panel]. 2. Click "Yes" to remove the program completely. Wait until the "Uninstall Complete" dialog box appears. 5. For Windows® XP..., click on the [Start] menu, and [Settings] and then the [Control Panel]. Click [Change/Remove]. 5. You should restart your desktop. Installation 1. When the Installation Shield Wizard window appears, click "Next." 5. Removing...
...the icon to accept the terms of the license agreement" to start removing ImageViewer. 6. Click on the [Start] menu and then the [Control Panel]. 2. Click "Yes" to remove the program completely. Wait until the "Uninstall Complete" dialog box appears. 5. For Windows® XP..., click on the [Start] menu, and [Settings] and then the [Control Panel]. Click [Change/Remove]. 5. You should restart your desktop. Installation 1. When the Installation Shield Wizard window appears, click "Next." 5. Removing...
User Manual (ENGLISH)
Page 29
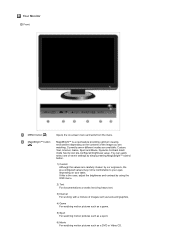
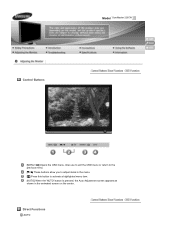
Also use to exit the OSD menu or return to the previous menu. [ ] These buttons allow you to adjust items in the menu. [ ] Press this button to activate a highlighted menu item. [AUTO] When the 'AUTO' button is pressed, the Auto Adjustment screen appears as shown in the animated screen on the center. Direct Functions AUTO Model SyncMaster 226CW Control Buttons [MENU / ] Opens the OSD menu.
Also use to exit the OSD menu or return to the previous menu. [ ] These buttons allow you to adjust items in the menu. [ ] Press this button to activate a highlighted menu item. [AUTO] When the 'AUTO' button is pressed, the Auto Adjustment screen appears as shown in the animated screen on the center. Direct Functions AUTO Model SyncMaster 226CW Control Buttons [MENU / ] Opens the OSD menu.
User Manual (ENGLISH)
Page 30
... make the automatic adjustment function sharper, execute the 'AUTO' function while the AUTO PATTERN is pressed, the Auto Adjustment screen appears as shown in the control panel, auto function will be executed automatically. Menu AUTO Description When the 'AUTO' button is on the center.
... make the automatic adjustment function sharper, execute the 'AUTO' function while the AUTO PATTERN is pressed, the Auto Adjustment screen appears as shown in the control panel, auto function will be executed automatically. Menu AUTO Description When the 'AUTO' button is on the center.

User Manual (ENGLISH)
Page 33
SOURCE Menu SOURCE Description Selects the Video signal while the OSD is off. (Analog/Digital) OSD Function Picture Brightness Color Color Innovation Image Coarse OSD Language Setup Auto Source Information Contrast Color Control Gamma Fine H-Position Image Reset Sharpness V-Position Color Reset H-Position Transparency RTA V-Position Display Time Picture : Not available in MagicBright mode of Dynamic Contrast.
SOURCE Menu SOURCE Description Selects the Video signal while the OSD is off. (Analog/Digital) OSD Function Picture Brightness Color Color Innovation Image Coarse OSD Language Setup Auto Source Information Contrast Color Control Gamma Fine H-Position Image Reset Sharpness V-Position Color Reset H-Position Transparency RTA V-Position Display Time Picture : Not available in MagicBright mode of Dynamic Contrast.
User Manual (ENGLISH)
Page 35
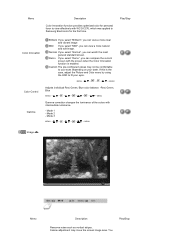
Play/Stop Color Innovation Color Control Gamma Brilliant If you select "Brilliant", you can view a more natural and soft image. Custom The pre-configured values may move the screen image area. ... of the colors with the screen when the Color Innovation function is the case, adjust the Picture and Color menu by using the OSD to Samsung Electronics for the first time. Demo If you select "Demo", you can view a more clear and vibrant image Mild If you select "Mild", you can...
Play/Stop Color Innovation Color Control Gamma Brilliant If you select "Brilliant", you can view a more natural and soft image. Custom The pre-configured values may move the screen image area. ... of the colors with the screen when the Color Innovation function is the case, adjust the Picture and Color menu by using the OSD to Samsung Electronics for the first time. Demo If you select "Demo", you can view a more clear and vibrant image Mild If you select "Mild", you can...

User Manual (ENGLISH)
Page 36
.... MENU MENU Changes the horizontal position of the OSD. If the noise persists even after fine tuning, repeat it to the center using the horizontal control menu. MENU MENU Changes the clearance of the monitor's entire display. Coarse Fine Sharpness H-Position V-Position OSD may relocate it after adjusting the frequency (clock...
.... MENU MENU Changes the horizontal position of the OSD. If the noise persists even after fine tuning, repeat it to the center using the horizontal control menu. MENU MENU Changes the clearance of the monitor's entire display. Coarse Fine Sharpness H-Position V-Position OSD may relocate it after adjusting the frequency (clock...
User Manual (ENGLISH)
Page 40
... see the On Screen Display. Set the video card by referring to the Preset Timing Modes). Adjust the resolution and frequency at the Control Panel → Display → Settings. Have the Windows colors been set properly? Windows ME/2000 : Set the resolution at the video... the screen colors become unbalanced. Have you installed the monitor driver? Readjust Position by pressing the [MENU / ] button for at the Control Panel → Appearance and Themes → Display → Settings. The screen suddenly has become strange after changing the video card. Make...
... see the On Screen Display. Set the video card by referring to the Preset Timing Modes). Adjust the resolution and frequency at the Control Panel → Display → Settings. Have the Windows colors been set properly? Windows ME/2000 : Set the resolution at the video... the screen colors become unbalanced. Have you installed the monitor driver? Readjust Position by pressing the [MENU / ] button for at the Control Panel → Appearance and Themes → Display → Settings. The screen suddenly has become strange after changing the video card. Make...
User Manual (ENGLISH)
Page 41
... when booting. (If it , reboot the computer, and then install the program again. Q & A Question How can be changed your monitor. Control Panel → Performance and Maintenance → System → Hardware → Device Manager → Monitors → After deleting Plug and Play monitor...find 'Plug and Play monitor' by reconfiguring the video card. http://www.samsung.com/monitor/magictune MagicTune™ doesn't work properly. The program can be downloaded http://www.samsung.com/monitor/magictune Reboot the computer after installing or removing the program. Check...
... when booting. (If it , reboot the computer, and then install the program again. Q & A Question How can be changed your monitor. Control Panel → Performance and Maintenance → System → Hardware → Device Manager → Monitors → After deleting Plug and Play monitor...find 'Plug and Play monitor' by reconfiguring the video card. http://www.samsung.com/monitor/magictune MagicTune™ doesn't work properly. The program can be downloaded http://www.samsung.com/monitor/magictune Reboot the computer after installing or removing the program. Check...
User Manual (ENGLISH)
Page 42
...scratches on . your monitor is functioning properly. Contact the video card manufacturer for details. Set the function in the Control Panel → Display → Screen Saver. Set the function in the Control Panel → Appearance and Themes → Display → Screen Saver. Unplug the video cable from the back ...of scan range or that the monitor is still on the case. The message may indicate that you will see a box in the Control Panel → Display → Settings. Windows XP : Set the resolution in the BIOS-SETUP of the computer. Turn off both your video...
...scratches on . your monitor is functioning properly. Contact the video card manufacturer for details. Set the function in the Control Panel → Display → Screen Saver. Set the function in the Control Panel → Appearance and Themes → Display → Screen Saver. Unplug the video cable from the back ...of scan range or that the monitor is still on the case. The message may indicate that you will see a box in the Control Panel → Display → Settings. Windows XP : Set the resolution in the BIOS-SETUP of the computer. Turn off both your video...

User Manual (ENGLISH)
Page 52
... Warranty does not cover any damage caused by the warranty. Turn the power off for specific applications Ex) Airports, Transit Stations, Stock Markets, Banks, and Controlling Systems We recommend that you follow the suggestions below : Display Information together with Logo or Moving image cycle. Suggestions for 4 hours after 12 hours in...
... Warranty does not cover any damage caused by the warranty. Turn the power off for specific applications Ex) Airports, Transit Stations, Stock Markets, Banks, and Controlling Systems We recommend that you follow the suggestions below : Display Information together with Logo or Moving image cycle. Suggestions for 4 hours after 12 hours in...


