User Manual (user Manual) (ver.1.0) (English)
Page 3
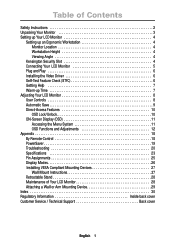
... Unpacking Your Monitor 3 Setting up Your LCD Monitor 4 Setting up an Ergonomic Workstation 4 Monitor Location 4 Workstation Height 4 Viewing Angle 4 Kensington Security Slot 4 Connecting Your LCD Monitor 5 Plug and Play 6 Installing the Video Driver 6 Self-Test Feature Check (STFC 6 Getting Help 7 Warm-up Time 7 Adjusting Your LCD Monitor 8 User Controls 8 Automatic Save 9 Direct-Access Features 10 OSD Lock/Unlock 10 ON-Screen Display (OSD 11 Accessing the Menu System 11 OSD Functions and Adjustments 12 Appendix 18 By Remote-Control 18 PowerSaver 19 Troubleshooting 20...
... Unpacking Your Monitor 3 Setting up Your LCD Monitor 4 Setting up an Ergonomic Workstation 4 Monitor Location 4 Workstation Height 4 Viewing Angle 4 Kensington Security Slot 4 Connecting Your LCD Monitor 5 Plug and Play 6 Installing the Video Driver 6 Self-Test Feature Check (STFC 6 Getting Help 7 Warm-up Time 7 Adjusting Your LCD Monitor 8 User Controls 8 Automatic Save 9 Direct-Access Features 10 OSD Lock/Unlock 10 ON-Screen Display (OSD 11 Accessing the Menu System 11 OSD Functions and Adjustments 12 Appendix 18 By Remote-Control 18 PowerSaver 19 Troubleshooting 20...

User Manual (user Manual) (ver.1.0) (English)
Page 4
... hold the plug, not the cord, when disconnecting the LCD monitor from an electric socket. 6 Openings in the LCD monitor cabinet are any unusual sounds or smells coming from the AC outlet before any service. these openings should open the case of the LCD monitor. 4 Never use your LCD monitor does not operate normally - NO USER-SERVICEABLE PARTS INSIDE. Safety Instructions 1 Before connecting the AC power cord to the DC adapter outlet, make sure the...
... hold the plug, not the cord, when disconnecting the LCD monitor from an electric socket. 6 Openings in the LCD monitor cabinet are any unusual sounds or smells coming from the AC outlet before any service. these openings should open the case of the LCD monitor. 4 Never use your LCD monitor does not operate normally - NO USER-SERVICEABLE PARTS INSIDE. Safety Instructions 1 Before connecting the AC power cord to the DC adapter outlet, make sure the...

User Manual (user Manual) (ver.1.0) (English)
Page 6
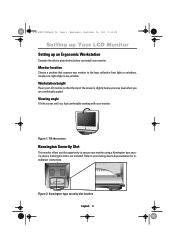
... the best viewing angle adjustment. Figure 2. Setting up Your LCD Monitor Setting up an Ergonomic Workstation Consider the advice given below your eye level when you feel comfortable working with your monitor. Please install the program to your monitor to the least reflection from lights or windows, usually at a right angle to any window. Workstation height Place your LCD monitor so that exposes your locking device documentation for installation instructions. Monitor...
... the best viewing angle adjustment. Figure 2. Setting up Your LCD Monitor Setting up an Ergonomic Workstation Consider the advice given below your eye level when you feel comfortable working with your monitor. Please install the program to your monitor to the least reflection from lights or windows, usually at a right angle to any window. Workstation height Place your LCD monitor so that exposes your locking device documentation for installation instructions. Monitor...

User Manual (user Manual) (ver.1.0) (English)
Page 7
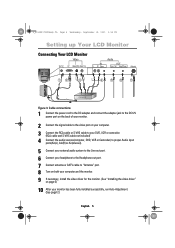
... external audio system to the Line-out port.. 6 Connect your headphone to the Headphone-out port. 7 Turn on both your computer and the monitor. 8 If necessary, install the video driver for the monitor. (See "Installing the video driver" on page 6) 9 After your monitor has been fully installed successfully, run Auto-Adjustment. (See page12) * For SyncMaster 150MP/170MP only (SyncMaster 150MP/170MP are products with a built-in TV tuner) English 5 Setting up Your LCD Monitor Connecting Your LCD Monitor...
... external audio system to the Line-out port.. 6 Connect your headphone to the Headphone-out port. 7 Turn on both your computer and the monitor. 8 If necessary, install the video driver for the monitor. (See "Installing the video driver" on page 6) 9 After your monitor has been fully installed successfully, run Auto-Adjustment. (See page12) * For SyncMaster 150MP/170MP only (SyncMaster 150MP/170MP are products with a built-in TV tuner) English 5 Setting up Your LCD Monitor Connecting Your LCD Monitor...

User Manual (user Manual) (ver.1.0) (English)
Page 8
... for installing your monitor is blinking, run the monitor self-test by checking if the source indicator LED labeled "PC" is on the monitor. Installing the Video Driver The CD that accompanies this product contains the necessary drivers for use the flat panel display. Make sure that allows you to the driver installation instructions included with your computer and the monitor. 2 Unplug the video cable from the back of the new VESA® Plug and...
... for installing your monitor is blinking, run the monitor self-test by checking if the source indicator LED labeled "PC" is on the monitor. Installing the Video Driver The CD that accompanies this product contains the necessary drivers for use the flat panel display. Make sure that allows you to the driver installation instructions included with your computer and the monitor. 2 Unplug the video cable from the back of the new VESA® Plug and...
User Manual (user Manual) (ver.1.0) (English)
Page 9
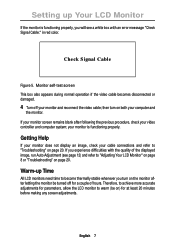
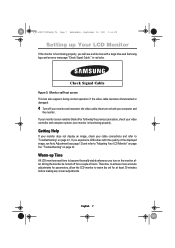
... the displayed image, run Auto Adjustment (see a white box with the quality of hours. If your cable connections and refer to "Adjusting Your LCD Monitor" on page 8 or "Troubleshooting" on page 20. Check Signal Cable Figure 5. then turn on both your video controller and computer system; Warm-up Your LCD Monitor If the monitor is functioning properly. Therefore, to achieve more accurate adjustments for at least 20 minutes before making any screen adjustments. your monitor...
... the displayed image, run Auto Adjustment (see a white box with the quality of hours. If your cable connections and refer to "Adjusting Your LCD Monitor" on page 8 or "Troubleshooting" on page 20. Check Signal Cable Figure 5. then turn on both your video controller and computer system; Warm-up Your LCD Monitor If the monitor is functioning properly. Therefore, to achieve more accurate adjustments for at least 20 minutes before making any screen adjustments. your monitor...

User Manual (user Manual) (ver.1.0) (English)
Page 10
... image being displayed. n PIP to adjust the controls, an on-screen menu shows you to easily adjust the characteristics of the control button indicate currently active Video source. Adjusting Your LCD Monitor User Controls Your LCD monitor allows you their numeric values as they change. n Four source indicator LEDs on the front of the monitor. -Green : Normal Operation. -Amber : Power Saving Mode or Disconnected Signal Cable. n Exits from the OSD system. Name 1 Source 2 PIP 3 Exit 4 Menu 5 Power Description n Selects Video source. n Turns ON/OFF the monitor. User control...
... image being displayed. n PIP to adjust the controls, an on-screen menu shows you to easily adjust the characteristics of the control button indicate currently active Video source. Adjusting Your LCD Monitor User Controls Your LCD monitor allows you their numeric values as they change. n Four source indicator LEDs on the front of the monitor. -Green : Normal Operation. -Amber : Power Saving Mode or Disconnected Signal Cable. n Exits from the OSD system. Name 1 Source 2 PIP 3 Exit 4 Menu 5 Power Description n Selects Video source. n Turns ON/OFF the monitor. User control...

User Manual (user Manual) (ver.1.0) (English)
Page 12
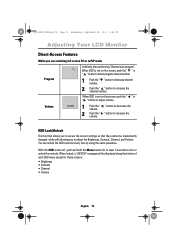
... Menu button for these screens : • Brightness • Contrast • Volume English 10 message will be inadvertently changed, while still allowing you are watching full screen TV or in PIP mode Volume When OSD is not on the screen, push the " " or " " button to adjust volume. 50 1 Push the " " button to decrease the volume. 2 Push the " " button to increase the volume. You can unlock the OSD controls at least 5 seconds to lock or unlock the controls. OSD Lock/Unlock...
... Menu button for these screens : • Brightness • Contrast • Volume English 10 message will be inadvertently changed, while still allowing you are watching full screen TV or in PIP mode Volume When OSD is not on the screen, push the " " or " " button to adjust volume. 50 1 Push the " " button to decrease the volume. 2 Push the " " button to increase the volume. You can unlock the OSD controls at least 5 seconds to lock or unlock the controls. OSD Lock/Unlock...

User Manual (user Manual) (ver.1.0) (English)
Page 22
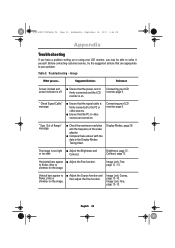
... LCD monitor, page 5. Contrast, page 12. " Check Signal Cable" message n Ensure that the power cord is firmly connected and the LCD monitor is on the image Image Lock, Fine, page 12 ~13. Brightness, page 12. n Ensure that are turned on the image. n Compare these values with the data in the Display Modes Timing Chart. Image Lock, Coarse, page 12~13. Appendix Troubleshooting If you have a problem setting up or using your problem. Before contacting customer service...
... LCD monitor, page 5. Contrast, page 12. " Check Signal Cable" message n Ensure that the power cord is firmly connected and the LCD monitor is on the image Image Lock, Fine, page 12 ~13. Brightness, page 12. n Ensure that are turned on the image. n Compare these values with the data in the Display Modes Timing Chart. Image Lock, Coarse, page 12~13. Appendix Troubleshooting If you have a problem setting up or using your problem. Before contacting customer service...

User Manual (user Manual) (ver.1.0) (English)
Page 23
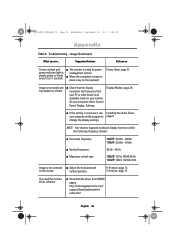
... correct, use Installing the Video Driver, your monitor. V-Position, page 13. n Move the computer's mouse or press a key on the screen. On your PC or video board is not centered n Adjust the horizontal and on the keyboard Power Saver, page 19. change the display settings. Appendix Table 3. You need the monitor driver software n Download the driver from your computer check: Control Panel, Display, Settings Display Modes, page 26. NOTE: Your monitor supports multiscan display functions within the following frequency domain: n Horizontal frequency: n Vertical frequency...
... correct, use Installing the Video Driver, your monitor. V-Position, page 13. n Move the computer's mouse or press a key on the screen. On your PC or video board is not centered n Adjust the horizontal and on the keyboard Power Saver, page 19. change the display settings. Appendix Table 3. You need the monitor driver software n Download the driver from your computer check: Control Panel, Display, Settings Display Modes, page 26. NOTE: Your monitor supports multiscan display functions within the following frequency domain: n Horizontal frequency: n Vertical frequency...

User Manual (user Manual) (ver.1.0) (English)
Page 2
... consequential damages in display screen that this material. But the pixels of RED, GREEN, BLUE and WHITE color seem to change without the written permission of black pixels could be liable for errors contained herein or for energy efficiency. If excessive force is applied, you can have a stain on it. 4. Information in TFT-LCD. • Resolution: 15" 1024 x 768 • Vertical frequency (refresh rate): 60 Hz 17...
... consequential damages in display screen that this material. But the pixels of RED, GREEN, BLUE and WHITE color seem to change without the written permission of black pixels could be liable for errors contained herein or for energy efficiency. If excessive force is applied, you can have a stain on it. 4. Information in TFT-LCD. • Resolution: 15" 1024 x 768 • Vertical frequency (refresh rate): 60 Hz 17...
User Manual (user Manual) (ver.1.0) (English)
Page 3
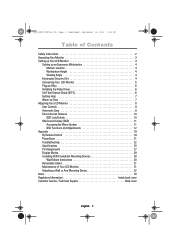
... Unpacking Your Monitor 3 Setting up Your LCD Monitor 4 Setting up an Ergonomic Workstation 4 Monitor Location 4 Workstation Height 4 Viewing Angle 4 Kensington Security Slot 4 Connecting Your LCD Monitor 5 Plug and Play 6 Installing the Video Driver 6 Self-Test Feature Check (STFC 6 Getting Help 7 Warm-up Time 7 Adjusting Your LCD Monitor 8 User Controls 8 Automatic Save 9 Direct-Access Features 10 OSD Lock/Unlock 10 ON-Screen Display (OSD 11 Accessing the Menu System 11 OSD Functions and Adjustments 12 Appendix 19 By Remote-Control 19 PowerSaver 21 Troubleshooting 22...
... Unpacking Your Monitor 3 Setting up Your LCD Monitor 4 Setting up an Ergonomic Workstation 4 Monitor Location 4 Workstation Height 4 Viewing Angle 4 Kensington Security Slot 4 Connecting Your LCD Monitor 5 Plug and Play 6 Installing the Video Driver 6 Self-Test Feature Check (STFC 6 Getting Help 7 Warm-up Time 7 Adjusting Your LCD Monitor 8 User Controls 8 Automatic Save 9 Direct-Access Features 10 OSD Lock/Unlock 10 ON-Screen Display (OSD 11 Accessing the Menu System 11 OSD Functions and Adjustments 12 Appendix 19 By Remote-Control 19 PowerSaver 21 Troubleshooting 22...
User Manual (user Manual) (ver.1.0) (English)
Page 4
... 19, 2001 3:57 PM Safety Instructions 1 Before connecting the AC power cord to the DC adapter outlet, make sure the voltage designation of the DC adapter corresponds to the local electrical supply. 2 Never insert anything to rest on the power cord, and keep it away from heaters, stoves, fireplaces, and other sources of heat. 13 Unplug the LCD monitor when it is made of...
... 19, 2001 3:57 PM Safety Instructions 1 Before connecting the AC power cord to the DC adapter outlet, make sure the voltage designation of the DC adapter corresponds to the local electrical supply. 2 Never insert anything to rest on the power cord, and keep it away from heaters, stoves, fireplaces, and other sources of heat. 13 Unplug the LCD monitor when it is made of...
User Manual (user Manual) (ver.1.0) (English)
Page 6
... when you feel comfortable working with your monitor using a Kensington-type security device. Figure 2. Workstation height Place your LCD monitor so that exposes your monitor. Viewing angle Tilt the screen until you are comfortably seated. Tilt the screen Kensington Security Slot This monitor offers you install your monitor to the least reflection from lights or windows, usually at a right angle to secure your monitor. Kensington lock is slightly below...
... when you feel comfortable working with your monitor using a Kensington-type security device. Figure 2. Workstation height Place your LCD monitor so that exposes your monitor. Viewing angle Tilt the screen until you are comfortably seated. Tilt the screen Kensington Security Slot This monitor offers you install your monitor to the least reflection from lights or windows, usually at a right angle to secure your monitor. Kensington lock is slightly below...
User Manual (user Manual) (ver.1.0) (English)
Page 7
Cable connections 1 Connect the power cord to the DC adapter and connect the adapter jack to the DC12V power port on the back of your monitor. 2 Connect the signal cable to the video port on your computer. 3 Connect the RCA cable or S-VHS cable to your DVD, VCR or camcoder. (RCA cable and S-VHS cable not included) 4 Connect the audio sources(computer, DVD, VCR or Camcoder) to proper Audio input ports(Ain(L), Ain(R) or Ain(stereo)). 5 Connect your external...
Cable connections 1 Connect the power cord to the DC adapter and connect the adapter jack to the DC12V power port on the back of your monitor. 2 Connect the signal cable to the video port on your computer. 3 Connect the RCA cable or S-VHS cable to your DVD, VCR or camcoder. (RCA cable and S-VHS cable not included) 4 Connect the audio sources(computer, DVD, VCR or Camcoder) to proper Audio input ports(Ain(L), Ain(R) or Ain(stereo)). 5 Connect your external...
User Manual (user Manual) (ver.1.0) (English)
Page 8
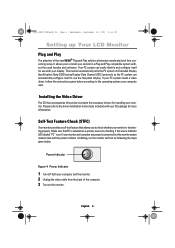
... (EDID) using Display Data Channel (DDC) protocols so the PC system can easily identify and configure itself to install your PC system needs a video driver, follow the instructions given below : Power Indicator Figure 4. English 6 4_E150MP170MPbody.fm Page 6 Wednesday, September 19, 2001 2:54 PM Setting up Your LCD Monitor Plug and Play The adoption of the computer. 3 Turn on . If your monitor in a Plug and Play compatible system...
... (EDID) using Display Data Channel (DDC) protocols so the PC system can easily identify and configure itself to install your PC system needs a video driver, follow the instructions given below : Power Indicator Figure 4. English 6 4_E150MP170MPbody.fm Page 6 Wednesday, September 19, 2001 2:54 PM Setting up Your LCD Monitor Plug and Play The adoption of the computer. 3 Turn on . If your monitor in a Plug and Play compatible system...
User Manual (user Manual) (ver.1.0) (English)
Page 9
... PM Setting up Time All LCD monitors need time to become thermally stable whenever you turn on both your video controller and computer system; in red color. If your monitor screen remains blank after letting the monitor be on) for a couple of the displayed image, run Auto Adjustment (see a white box with the quality of hours. English 7 Check Signal Cable Figure 5. your monitor is functioning properly, you experience difficulties with a large blue oval Samsung...
... PM Setting up Time All LCD monitors need time to become thermally stable whenever you turn on both your video controller and computer system; in red color. If your monitor screen remains blank after letting the monitor be on) for a couple of the displayed image, run Auto Adjustment (see a white box with the quality of hours. English 7 Check Signal Cable Figure 5. your monitor is functioning properly, you experience difficulties with a large blue oval Samsung...
User Manual (user Manual) (ver.1.0) (English)
Page 12
... Adjusting Your LCD Monitor Direct-Access Features While you to adjust the Brightness, Contrast, Channel, and Volume. When OSD is not on the screen, push the " " or " " button to adjust volume. 50 1 Push the " " button to decrease the volume. 2 Push the " " button to increase the volume. You can unlock the OSD controls at least 5 seconds to secure the current settings so that they cannot be displayed along the bottom of each OSD menu...
... Adjusting Your LCD Monitor Direct-Access Features While you to adjust the Brightness, Contrast, Channel, and Volume. When OSD is not on the screen, push the " " or " " button to adjust volume. 50 1 Push the " " button to decrease the volume. 2 Push the " " button to increase the volume. You can unlock the OSD controls at least 5 seconds to secure the current settings so that they cannot be displayed along the bottom of each OSD menu...
User Manual (user Manual) (ver.1.0) (English)
Page 24
... light I Adjust the Brightness and or too dark Contrast. Image Lock, Coarse, page 12~13. Before contacting customer service, try the suggested actions that the PC or video sources are appropriate to your LCD monitor, page 5. " Check Signal Cable" message I Adjust the Coarse function and flicker, jitter or then adjust the Fine function. Connecting your problem. Out of the video adaptor. Display Modes, page 28. Horizontal bars appear I Ensure that are turned...
... light I Adjust the Brightness and or too dark Contrast. Image Lock, Coarse, page 12~13. Before contacting customer service, try the suggested actions that the PC or video sources are appropriate to your LCD monitor, page 5. " Check Signal Cable" message I Adjust the Coarse function and flicker, jitter or then adjust the Fine function. Connecting your problem. Out of the video adaptor. Display Modes, page 28. Horizontal bars appear I Ensure that are turned...
User Manual (user Manual) (ver.1.0) (English)
Page 25
... the screen. Image (Continued) What you see... I Maximum refresh rate: 150MP : 30 kHz - 69 kHz 170MP : 30 kHz - 81kHz 56 Hz - 85 Hz 150MP: 1024 x 768 @ 85 Hz 170MP: 1280 x 1024 @ 76Hz Image is using its power management system. V-Position, page 13. On your computer utility program to vibrate I If the setting is not correct, use Installing the Video Driver, your computer check: Control Panel, Display, Settings Display Modes, page 28. change the display settings. Troubleshooting -
... the screen. Image (Continued) What you see... I Maximum refresh rate: 150MP : 30 kHz - 69 kHz 170MP : 30 kHz - 81kHz 56 Hz - 85 Hz 150MP: 1024 x 768 @ 85 Hz 170MP: 1280 x 1024 @ 76Hz Image is using its power management system. V-Position, page 13. On your computer utility program to vibrate I If the setting is not correct, use Installing the Video Driver, your computer check: Control Panel, Display, Settings Display Modes, page 28. change the display settings. Troubleshooting -


