User Manual (ENGLISH)
Page 2
Main Page Safety Instructions Notational Power Installation Cleaning Other Introduction Unpacking Front Rear Setup Connecting Your Monitor Installing the Monitor Driver Automatic Manual Installing VESA compliant mounting On-Screen Display Troubleshooting Check List Q & A Self-Test Feature Check Specifications General Specifications PowerSaver Preset Display Modes Information Service Terms Regulatory Natural Color For Better Display Authority
Main Page Safety Instructions Notational Power Installation Cleaning Other Introduction Unpacking Front Rear Setup Connecting Your Monitor Installing the Monitor Driver Automatic Manual Installing VESA compliant mounting On-Screen Display Troubleshooting Check List Q & A Self-Test Feature Check Specifications General Specifications PowerSaver Preset Display Modes Information Service Terms Regulatory Natural Color For Better Display Authority
User Manual (ENGLISH)
Page 11
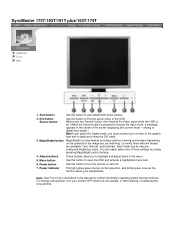
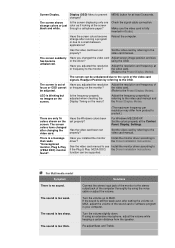
... 'Source' button, then Selects the Video signal while the OSD is off . 7. Adjust buttons These buttons allow you are available: Text, Internet, and Entertain. analog or digital input signal.) Note:If you select the Digital mode, you must connect your adjustments. Power button Use this button to the graphic card with a digital port using the DVI cable. 3. Currently three different modes are watching. Power indicator This light glows green during normal operation, and blinks green once as the monitor saves your monitor to auto adjustment direct access. 2. SyncMaster...
... 'Source' button, then Selects the Video signal while the OSD is off . 7. Adjust buttons These buttons allow you are available: Text, Internet, and Entertain. analog or digital input signal.) Note:If you select the Digital mode, you must connect your adjustments. Power button Use this button to the graphic card with a digital port using the DVI cable. 3. Currently three different modes are watching. Power indicator This light glows green during normal operation, and blinks green once as the monitor saves your monitor to auto adjustment direct access. 2. SyncMaster...
User Manual (ENGLISH)
Page 15
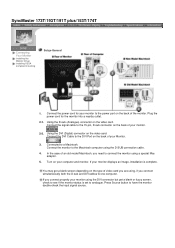
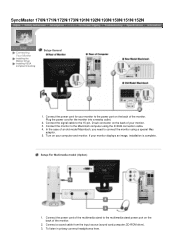
... image, installation is set to the Macintosh computer using a special Mac adaptor. 5. Connected to have the monitor double-check the input signal source. Connect the power cord for the monitor into a nearby outlet. 2-1. Using the D-sub (Analogue) connector on the video card. Plug the power cord for your monitor to the power port on the back of video card you are using, if you connect simultaneously both the D-sub and DVI cables to the 15-pin, D-sub connector on your Monitor. 3. Using the DVI (Digital) connector on the video card. Turn...
... image, installation is set to the Macintosh computer using a special Mac adaptor. 5. Connected to have the monitor double-check the input signal source. Connect the power cord for the monitor into a nearby outlet. 2-1. Using the D-sub (Analogue) connector on the video card. Plug the power cord for your monitor to the power port on the back of video card you are using, if you connect simultaneously both the D-sub and DVI cables to the 15-pin, D-sub connector on your Monitor. 3. Using the DVI (Digital) connector on the video card. Turn...
User Manual (ENGLISH)
Page 17
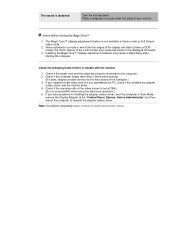
... monitor. 2. Connect the power cord of the multimedia stand to the 15-pin, D-sub connector on the back of your monitor. 3. In the case of the monitor. Turn on the back of an old model Macintosh, you need to the Macintosh computer using a special Mac adaptor. 5. Connect a sound cable from the input source (sound card,computer,CD-ROM drive). 3. Plug the power cord for your monitor to the power port on your monitor displays an image, installation is complete. Connect the monitor to connect...
... monitor. 2. Connect the power cord of the multimedia stand to the 15-pin, D-sub connector on the back of your monitor. 3. In the case of the monitor. Turn on the back of an old model Macintosh, you need to the Macintosh computer using a special Mac adaptor. 5. Connect a sound cable from the input source (sound card,computer,CD-ROM drive). 3. Plug the power cord for your monitor to the power port on your monitor displays an image, installation is complete. Connect the monitor to connect...
User Manual (ENGLISH)
Page 19
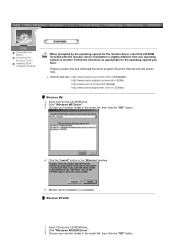
...-ROM drive. 2. Choose your monitor model in the "Warning" window. 5. Follow the directions as appropriate for the monitor driver, insert the CD-ROM included with this monitor. Click "Windows XP/2000 Driver". 3. Connecting Your Monitor Installing the Monitor Driver Installing VESA compliant mounting When prompted by the operating system for the operating system you have. Driver installation is completed. Click the "Install" button in the model list, then click the "OK...
...-ROM drive. 2. Choose your monitor model in the "Warning" window. 5. Follow the directions as appropriate for the monitor driver, insert the CD-ROM included with this monitor. Click "Windows XP/2000 Driver". 3. Connecting Your Monitor Installing the Monitor Driver Installing VESA compliant mounting When prompted by the operating system for the operating system you have. Driver installation is completed. Click the "Install" button in the model list, then click the "OK...
User Manual (ENGLISH)
Page 21
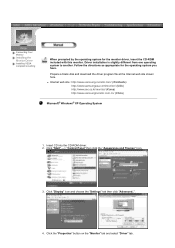
...) http://www.samsungmonitor.com.cn/ (China) Microsoft® Windows® XP Operating System 1. Click "Display" icon and choose the "Settings" tab then click "Advanced..". 4. Follow the directions as appropriate for the monitor driver, insert the CD-ROM included with this monitor. Connecting Your Monitor Installing the Monitor Driver Installing VESA compliant mounting When prompted by the operating system for the operating system you have...
...) http://www.samsungmonitor.com.cn/ (China) Microsoft® Windows® XP Operating System 1. Click "Display" icon and choose the "Settings" tab then click "Advanced..". 4. Follow the directions as appropriate for the monitor driver, insert the CD-ROM included with this monitor. Connecting Your Monitor Installing the Monitor Driver Installing VESA compliant mounting When prompted by the operating system for the operating system you have...
User Manual (ENGLISH)
Page 23
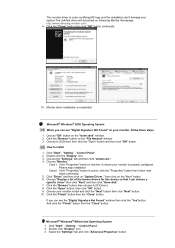
... disk" window. 2. Click the "Open" button, then click "OK" button. 9. Choose "OK" button on "Update Driver.." Click the "Browse" button then choose A:(D:\Driver). 8. Choose your monitor is completed. Click "Start" , "Setting" , "Control Panel". 2. Monitor driver installation is properly configured. Click the "Browse" button on the "Next" button. 6. then click on the "File Needed" window. 3. If you can see the "Digital Signature Not Found" window then click the "Yes"button. How to install 1. Choose "Monitor". Choose "Display a list...
... disk" window. 2. Click the "Open" button, then click "OK" button. 9. Choose "OK" button on "Update Driver.." Click the "Browse" button then choose A:(D:\Driver). 8. Choose your monitor is completed. Click "Start" , "Setting" , "Control Panel". 2. Monitor driver installation is properly configured. Click the "Browse" button on the "Next" button. 6. then click on the "File Needed" window. 3. If you can see the "Digital Signature Not Found" window then click the "Yes"button. How to install 1. Choose "Monitor". Choose "Display a list...
User Manual (ENGLISH)
Page 24
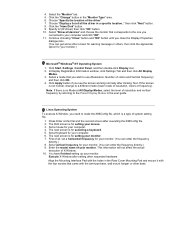
... the screen working normally after setting other base. The next screen is no Mode at the first and the second screen after executing the X86Config file. 2. The next screen is a type of your monitor. (You can enter the frequency directly.) 9. Set a vertical frequency for setting your monitor.) Microsoft® Windows® NT Operating System 1. Click the "Change" button in the Rear Cover Mounting Pad and secure it with the four screws...
... the screen working normally after setting other base. The next screen is no Mode at the first and the second screen after executing the X86Config file. 2. The next screen is a type of your monitor. (You can enter the frequency directly.) 9. Set a vertical frequency for setting your monitor.) Microsoft® Windows® NT Operating System 1. Click the "Change" button in the Rear Cover Mounting Pad and secure it with the four screws...
User Manual (ENGLISH)
Page 25
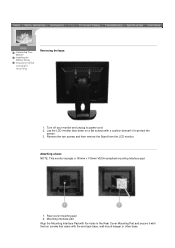
Connecting Your Monitor Installing the Monitor Driver Installing VESA compliant mounting Removing the base 1. Lay the LCD monitor face-down on a flat surface with the arm-type base, wall mount hanger or other base. Rear cover mounting pad 2. Mounting interface pad Align the Mounting Interface Pad with the holes in the Rear Cover Mounting Pad and secure it with the four screws that came with a cushion beneath it to protect the screen. 3. Remove the two screws and then...
Connecting Your Monitor Installing the Monitor Driver Installing VESA compliant mounting Removing the base 1. Lay the LCD monitor face-down on a flat surface with the arm-type base, wall mount hanger or other base. Rear cover mounting pad 2. Mounting interface pad Align the Mounting Interface Pad with the holes in the Rear Cover Mounting Pad and secure it with the four screws that came with a cushion beneath it to protect the screen. 3. Remove the two screws and then...
User Manual (ENGLISH)
Page 26
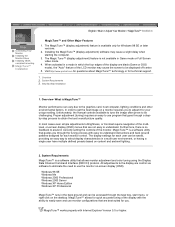
... based on the desktop. MagicTune™ works properly with the ability to be accessed through the tuning process with easy to adjust it for each monitor control. The MagicTune™ (display adjustment) feature is a software utility that are control via software to eliminate the need to select display characteristics in Game mode or Full Screen video mode. 4. English > Main > Adjust Your Monitor > MagicTune™ Installation Connecting Your Monitor Installing the Monitor Driver Installing VESA compliant mounting MagicTune™ Installation...
... based on the desktop. MagicTune™ works properly with the ability to be accessed through the tuning process with easy to adjust it for each monitor control. The MagicTune™ (display adjustment) feature is a software utility that are control via software to eliminate the need to select display characteristics in Game mode or Full Screen video mode. 4. English > Main > Adjust Your Monitor > MagicTune™ Installation Connecting Your Monitor Installing the Monitor Driver Installing VESA compliant mounting MagicTune™ Installation...
User Manual (ENGLISH)
Page 42
... is set to analogue. Connect the DVI cable and then reboot the system. If the power is no image, press the 'Source' button. Adjust the maximum resolution and frequency that the monitor can properly handle. Have you do not send out video signals. Then press any problems yourself. Unlock the OSD by pressing the If you locked the On Screen If there is in PowerSaver mode. I cannot turn on the screen? The monitor...
... is set to analogue. Connect the DVI cable and then reboot the system. If the power is no image, press the 'Source' button. Adjust the maximum resolution and frequency that the monitor can properly handle. Have you do not send out video signals. Then press any problems yourself. Unlock the OSD by pressing the If you locked the On Screen If there is in PowerSaver mode. I cannot turn on the screen? The monitor...
User Manual (ENGLISH)
Page 43
...frequency to the video card manual. the video card. (Refer to if the Plug & Play (VESA DDC) the Driver Installation Instructions. Adjust the frequency properly by using the voice cable or adjust the volume. See the video card manual to see Install the monitor driver according to the Preset Display Modes). changes? The screen suddenly has become strange after setting the volume on the monitor? The screen shows strange colors or just black and white. Have you installed the monitor driver? Set the video card by referring to the monitor? Check the signal cable connection...
...frequency to the video card manual. the video card. (Refer to if the Plug & Play (VESA DDC) the Driver Installation Instructions. Adjust the frequency properly by using the voice cable or adjust the volume. See the video card manual to see Install the monitor driver according to the Preset Display Modes). changes? The screen suddenly has become strange after setting the volume on the monitor? The screen shows strange colors or just black and white. Have you installed the monitor driver? Set the video card by referring to the monitor? Check the signal cable connection...
User Manual (ENGLISH)
Page 44
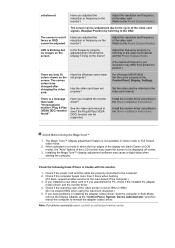
... service center. If you installed a new video card or if you have problems in installing the adapter (video) driver, boot the computer in Safe Mode, remove the Display Adapter at 75Hz. (Do not exceed 60Hz when using the maximum resolution.) 5. Check the following items if there is distorted Turn the volume down. The sound is trouble with the monitor. 1. When activated in a mode in Game mode or Full Screen video mode. 2. Check if the power cord and the cable are black...
... service center. If you installed a new video card or if you have problems in installing the adapter (video) driver, boot the computer in Safe Mode, remove the Display Adapter at 75Hz. (Do not exceed 60Hz when using the maximum resolution.) 5. Check the following items if there is distorted Turn the volume down. The sound is trouble with the monitor. 1. When activated in a mode in Game mode or Full Screen video mode. 2. Check if the power cord and the cable are black...
User Manual (ENGLISH)
Page 45
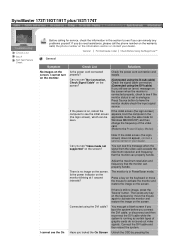
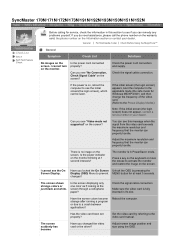
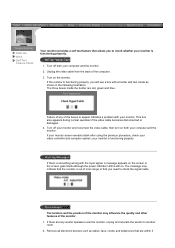
... Connection, Check Signal Cable" on the screen. Check the power cord connection and supply. I cannot turn on the screen. Have you see the On Screen Display. Make sure the video card is no image on the screen? Adjust screen image position and size using the OSD. General | For Multimedia model | Check Before Using the MagicTune™ General Symptom Check List Solutions No images on the monitor. Can you locked the On Screen Unlock the OSD by referring to the Preset Display Modes) Note: If the initial screen (the login screen...
... Connection, Check Signal Cable" on the screen. Check the power cord connection and supply. I cannot turn on the screen. Have you see the On Screen Display. Make sure the video card is no image on the screen? Adjust screen image position and size using the OSD. General | For Multimedia model | Check Before Using the MagicTune™ General Symptom Check List Solutions No images on the monitor. Can you locked the On Screen Unlock the OSD by referring to the Preset Display Modes) Note: If the initial screen (the login screen...
User Manual (ENGLISH)
Page 46
... Position by referring to the Driver Installation Instructions. The screen colors have problems in installing the adapter (video) driver, boot the computer in Safe Mode, remove the Display Adapter at the Control Panel, Display, Settings. Have you adjusted the resolution or frequency on the screen. Install the monitor driver according to the OSD. Note: If problems repeatedly occur, contact an authorized service center. Have you assembled the PC, check if the installed the adapter (video) driver and the monitor driver. 4. LED is a message that reads "Unrecognized monitor, Plug...
... Position by referring to the Driver Installation Instructions. The screen colors have problems in installing the adapter (video) driver, boot the computer in Safe Mode, remove the Display Adapter at the Control Panel, Display, Settings. Have you adjusted the resolution or frequency on the screen. Install the monitor driver according to the OSD. Note: If problems repeatedly occur, contact an authorized service center. Have you assembled the PC, check if the installed the adapter (video) driver and the monitor driver. 4. LED is a message that reads "Unrecognized monitor, Plug...
User Manual (ENGLISH)
Page 48
... power indicator LED is functioning properly. Turn off both your video controller and computer system; Unplug the video cable from the back of scan range or that you to another room. 2. If your monitor screen remains blank after using the previous procedure, check your computer and the monitor. The location and the position of the monitor may indicate that are within 3 If there are red, green and blue. Remove...
... power indicator LED is functioning properly. Turn off both your video controller and computer system; Unplug the video cable from the back of scan range or that you to another room. 2. If your monitor screen remains blank after using the previous procedure, check your computer and the monitor. The location and the position of the monitor may indicate that are within 3 If there are red, green and blue. Remove...
User Manual (ENGLISH)
Page 50
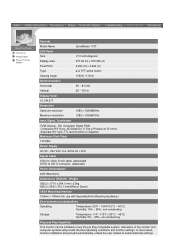
..., monitor installation will provide the best operating conditions and monitor settings. General PowerSaver Preset Timing Modes General Model Name SyncMaster 173T LCD Panel Size 17.0 inch diagonal Display area 337.92 (H) x 270.336 (V) Pixel Pitch 0.264 (H) x 0.264 (V) Type a-si TFT active matrix Viewing Angle 170(H) / 170(V) Synchronization Horizontal 30 ~ 81 kHz Vertical 56 ~ 75 Hz Display Color 16,194,277 Resolution Optimum resolution 1280 x 1024@60Hz Maximum resolution 1280 x 1024@75Hz Input Signal, Terminated RGB Analog , DVI Compliant Digital RGB.
..., monitor installation will provide the best operating conditions and monitor settings. General PowerSaver Preset Timing Modes General Model Name SyncMaster 173T LCD Panel Size 17.0 inch diagonal Display area 337.92 (H) x 270.336 (V) Pixel Pitch 0.264 (H) x 0.264 (V) Type a-si TFT active matrix Viewing Angle 170(H) / 170(V) Synchronization Horizontal 30 ~ 81 kHz Vertical 56 ~ 75 Hz Display Color 16,194,277 Resolution Optimum resolution 1280 x 1024@60Hz Maximum resolution 1280 x 1024@75Hz Input Signal, Terminated RGB Analog , DVI Compliant Digital RGB.
User Manual (ENGLISH)
Page 60
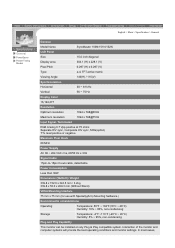
... Modes English > Main > Specification > General General Model Name SyncMaster 150N/151N/152N LCD Panel Size 15.0 inch diagonal Display area 304.1 (H) x 228.1 (V) Pixel Pitch 0.297 (H) x 0.297 (V) Type a-si TFT active matrix Viewing Angle 140(H) / 115(V) Synchronization Horizontal 30 ~ 61 kHz Vertical 56 ~ 75 Hz Display Color 16,194,277 Resolution Optimum resolution 1024 x 768@60Hz Maximum resolution 1024 x 768@75Hz Input Signal, Terminated RGB Analog 0.7 Vpp positive at 75 ohms Separate H/V sync, Composite H/V sync, SOG(option) TTL level positive...
... Modes English > Main > Specification > General General Model Name SyncMaster 150N/151N/152N LCD Panel Size 15.0 inch diagonal Display area 304.1 (H) x 228.1 (V) Pixel Pitch 0.297 (H) x 0.297 (V) Type a-si TFT active matrix Viewing Angle 140(H) / 115(V) Synchronization Horizontal 30 ~ 61 kHz Vertical 56 ~ 75 Hz Display Color 16,194,277 Resolution Optimum resolution 1024 x 768@60Hz Maximum resolution 1024 x 768@75Hz Input Signal, Terminated RGB Analog 0.7 Vpp positive at 75 ohms Separate H/V sync, Composite H/V sync, SOG(option) TTL level positive...

User Manual (ENGLISH)
Page 62
... Timing Modes English > Main > Specification > General General Model Name SyncMaster 174T LCD Panel Size 17.0 inch diagonal Display area 337.92 (H) x 270.336 (V) Pixel Pitch 0.264 (H) x 0.264 (V) Type a-si TFT active matrix Synchronization Horizontal 30 ~ 81 kHz Vertical 56 ~ 75 Hz Display Color 16,194,277 (Non TCO'03 model) 16,777,216 (TCO'03 applied model) Resolution Optimum resolution 1280 x 1024@60Hz Maximum resolution 1280 x 1024@75Hz Input Signal, Terminated RGB Analog , DVI Compliant Digital RGB. Composite H/V Sync...
... Timing Modes English > Main > Specification > General General Model Name SyncMaster 174T LCD Panel Size 17.0 inch diagonal Display area 337.92 (H) x 270.336 (V) Pixel Pitch 0.264 (H) x 0.264 (V) Type a-si TFT active matrix Synchronization Horizontal 30 ~ 81 kHz Vertical 56 ~ 75 Hz Display Color 16,194,277 (Non TCO'03 model) 16,777,216 (TCO'03 applied model) Resolution Optimum resolution 1280 x 1024@60Hz Maximum resolution 1280 x 1024@75Hz Input Signal, Terminated RGB Analog , DVI Compliant Digital RGB. Composite H/V Sync...
User Manual (ENGLISH)
Page 79
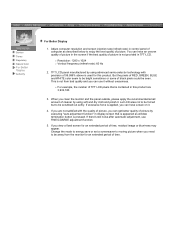
... a stain on it . Service Terms Regulatory Natural Color For Better Display Authority For Better Display 1. But the pixels of RED, GREEN, BLUE and WHITE color seem to moving picture when you view a fixed screen for this product are not satisfied with precision of 99.999% above is used for an extended period of time, residual image or blurriness may appear. Adjust computer resolution and screen injection rate (refresh rate) in this product.
... a stain on it . Service Terms Regulatory Natural Color For Better Display Authority For Better Display 1. But the pixels of RED, GREEN, BLUE and WHITE color seem to moving picture when you view a fixed screen for this product are not satisfied with precision of 99.999% above is used for an extended period of time, residual image or blurriness may appear. Adjust computer resolution and screen injection rate (refresh rate) in this product.

