Operating Instructions
Page 8
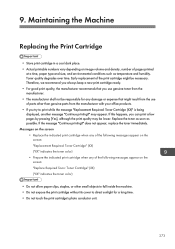
Maintaining the Machine Replacing the Print Cartridge...273 Replacing the Waste Toner Bottle...278 6 Toner Saving Tab...248 I/O Timeout Tab...248 Black-and-White Print Priority Tab...249 Shortcut to Function Tab......
Maintaining the Machine Replacing the Print Cartridge...273 Replacing the Waste Toner Bottle...278 6 Toner Saving Tab...248 I/O Timeout Tab...248 Black-and-White Print Priority Tab...249 Shortcut to Function Tab......
Operating Instructions
Page 10
... Using the Control Panel 350 Notes About the Toner...351 Moving and Transporting the Machine...352 Disposal...352 Where to Inquire...353 Consumables...354 Print Cartridge...354 Waste Toner Bottle...356 Specifications of the Machine...357 General Function Specifications...357 Printer Function Specifications...359 Copier Function Specifications...360 Scanner Function Specifications...
... Using the Control Panel 350 Notes About the Toner...351 Moving and Transporting the Machine...352 Disposal...352 Where to Inquire...353 Consumables...354 Print Cartridge...354 Waste Toner Bottle...356 Specifications of the Machine...357 General Function Specifications...357 Printer Function Specifications...359 Copier Function Specifications...360 Scanner Function Specifications...
Operating Instructions
Page 16
Toner and ink cartridge return program Toner and ink cartridge for recycling will be accepted free of them correctly at your service person. Please dispose of charge from users in the European Union, used batteries ... electrical and electronic products but also batteries and accumulators. In these modes, the machine consumes less power (watts). Note for not only used . https://www.ricoh-return.com/ Energy efficiency The amount of time passes, the device switches to an energy saving mode. If required, it . If no additional prints are...
Toner and ink cartridge return program Toner and ink cartridge for recycling will be accepted free of them correctly at your service person. Please dispose of charge from users in the European Union, used batteries ... electrical and electronic products but also batteries and accumulators. In these modes, the machine consumes less power (watts). Note for not only used . https://www.ricoh-return.com/ Energy efficiency The amount of time passes, the device switches to an energy saving mode. If required, it . If no additional prints are...
Operating Instructions
Page 22
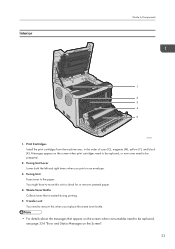
... Lever To open the front cover, pull this to 250 sheets of originals here. Tray 2 (option) This tray can hold up to replace the print cartridges. 12. Getting Started 3. 1. Bypass Tray Load paper here sheet by sheet. 11. They will feed in the input tray for machine control. 5. Cover for PictBridge...
... Lever To open the front cover, pull this to 250 sheets of originals here. Tray 2 (option) This tray can hold up to replace the print cartridges. 12. Getting Started 3. 1. Bypass Tray Load paper here sheet by sheet. 11. They will feed in the input tray for machine control. 5. Cover for PictBridge...
Operating Instructions
Page 25
... be prepared. 2. You might have to move this unit to remove this when you print on an envelope. 3. Messages appear on the screen when print cartridges need to be replaced, or new ones need to be replaced, see page 334 "Error and Status Messages on the screen when consumables need to... both the left and right levers when you replace the waste toner bottle. • For details about the messages that is wasted during printing. 5. Print Cartridges Install the print cartridges from the machine rear, in the order of cyan (C), magenta (M), yellow (Y), and black (K).
... be prepared. 2. You might have to move this unit to remove this when you print on an envelope. 3. Messages appear on the screen when print cartridges need to be replaced, or new ones need to be replaced, see page 334 "Error and Status Messages on the screen when consumables need to... both the left and right levers when you replace the waste toner bottle. • For details about the messages that is wasted during printing. 5. Print Cartridges Install the print cartridges from the machine rear, in the order of cyan (C), magenta (M), yellow (Y), and black (K).
Operating Instructions
Page 66
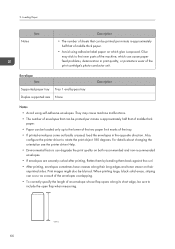
... sometimes have creases along its short edge, be sure to the inner parts of the machine, which glue is approximately half that of the print cartridge's photo conductor unit. Print images might also be loaded only up to rotate the print object 180 degrees.
... sometimes have creases along its short edge, be sure to the inner parts of the machine, which glue is approximately half that of the print cartridge's photo conductor unit. Print images might also be loaded only up to rotate the print object 180 degrees.
Operating Instructions
Page 239
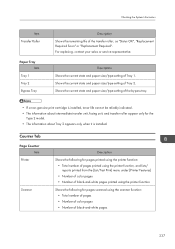
..., contact your sales or service representative. Description Shows the current state and paper size/type setting of the bypass tray. • If a non-genuine print cartridge is installed, toner life cannot be reliably indicated. • The information about Tray 2 appears only when it is installed. Shows the current state and paper...
..., contact your sales or service representative. Description Shows the current state and paper size/type setting of the bypass tray. • If a non-genuine print cartridge is installed, toner life cannot be reliably indicated. • The information about Tray 2 appears only when it is installed. Shows the current state and paper...
Operating Instructions
Page 275
... volume and density, number of the following messages appear on the screen: "Replacement Required: Toner Cartridge" (XX) ("XX" indicates the toner color) • Prepare the indicated print cartridge when any damage or expense that you can print a few pages by pressing [Yes], although ... replacement of parts other small objects to fall inside the machine. • Do not expose the print cartridge without its cover to print while the message "Replacement Required: Toner Cartridge (XX)" is being displayed, another message "Continue printing?" Replace the toner as soon as temperature and...
... volume and density, number of the following messages appear on the screen: "Replacement Required: Toner Cartridge" (XX) ("XX" indicates the toner color) • Prepare the indicated print cartridge when any damage or expense that you can print a few pages by pressing [Yes], although ... replacement of parts other small objects to fall inside the machine. • Do not expose the print cartridge without its cover to print while the message "Replacement Required: Toner Cartridge (XX)" is being displayed, another message "Continue printing?" Replace the toner as soon as temperature and...

Operating Instructions
Page 276
DAC044 • If cyan, magenta, or yellow toner runs out, you cannot print in black and white or color until the black print cartridge is replaced. 274 Change the color mode setting to touch the laser scanning unit under the upper cover (the position shown by the arrow in ...black and white using the machine's driver. • If black toner runs out, you can print in the illustration below . 9. DAC046 • When removing print cartridges, be careful not to Black and White using just the black toner. Maintaining the Machine DAC045 • Do not touch the ID chip on the...
DAC044 • If cyan, magenta, or yellow toner runs out, you cannot print in black and white or color until the black print cartridge is replaced. 274 Change the color mode setting to touch the laser scanning unit under the upper cover (the position shown by the arrow in ...black and white using the machine's driver. • If black toner runs out, you can print in the illustration below . 9. DAC046 • When removing print cartridges, be careful not to Black and White using just the black toner. Maintaining the Machine DAC045 • Do not touch the ID chip on the...
Operating Instructions
Page 277
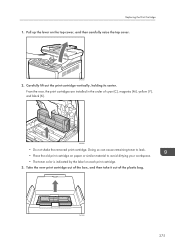
..., holding its center. Doing so can cause remaining toner to leak. • Place the old print cartridge on paper or similar material to avoid dirtying your workspace. • The toner color is indicated by the label on the top cover, and then ...carefully raise the top cover. Pull up the lever on each print cartridge. 3. DAC040 • Do not shake the removed print cartridge. From the rear, the print cartridges are installed in the order of the plastic bag. Take the new print cartridge out of the box, and then take it out of cyan (C), magenta...
..., holding its center. Doing so can cause remaining toner to leak. • Place the old print cartridge on paper or similar material to avoid dirtying your workspace. • The toner color is indicated by the label on the top cover, and then ...carefully raise the top cover. Pull up the lever on each print cartridge. 3. DAC040 • Do not shake the removed print cartridge. From the rear, the print cartridges are installed in the order of the plastic bag. Take the new print cartridge out of the box, and then take it out of cyan (C), magenta...
Operating Instructions
Page 278
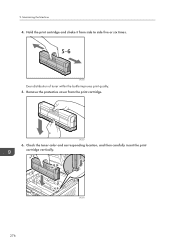
9. Maintaining the Machine 4. DAC039 Even distribution of toner within the bottle improves print quality. 5. Hold the print cartridge and shake it from the print cartridge. Check the toner color and corresponding location, and then carefully insert the print cartridge vertically. 276 DAC043 DAC037 6. Remove the protective cover from side to side five or six times.
9. Maintaining the Machine 4. DAC039 Even distribution of toner within the bottle improves print quality. 5. Hold the print cartridge and shake it from the print cartridge. Check the toner color and corresponding location, and then carefully insert the print cartridge vertically. 276 DAC043 DAC037 6. Remove the protective cover from side to side five or six times.
Operating Instructions
Page 279
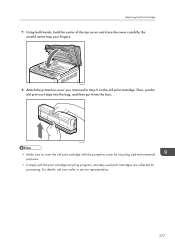
... details, ask your fingers. Replacing the Print Cartridge 7. Attach the protective cover you removed in Step 5 on the old print cartridge. DAC038 • Make sure to trap your sales or service representative. 277 Then, put the old print cartridge into the bag, and then put it into... the box. Be careful not to cover the old print cartridge with the protective cover for recycling and environmental purposes. • Comply with the print cartridge recycling program, whereby used print cartridges are collected for processing. DAC064 8. Using both hands, hold the center of...
... details, ask your fingers. Replacing the Print Cartridge 7. Attach the protective cover you removed in Step 5 on the old print cartridge. DAC038 • Make sure to trap your sales or service representative. 277 Then, put the old print cartridge into the bag, and then put it into... the box. Be careful not to cover the old print cartridge with the protective cover for recycling and environmental purposes. • Comply with the print cartridge recycling program, whereby used print cartridges are collected for processing. DAC064 8. Using both hands, hold the center of...
Operating Instructions
Page 288
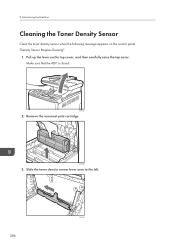
Make sure that the ADF is closed. Remove the rearmost print cartridge. "Density Sensor Require Cleaning" 1. DAC063 2. Slide the toner density sensor lever once to the left. 286 DAC093 Maintaining the Machine Cleaning the Toner Density Sensor Clean the toner density sensor when the following message appears on the top cover, and then carefully raise the top cover. DAC040 3. Pull up the lever on the control panel. 9.
Make sure that the ADF is closed. Remove the rearmost print cartridge. "Density Sensor Require Cleaning" 1. DAC063 2. Slide the toner density sensor lever once to the left. 286 DAC093 Maintaining the Machine Cleaning the Toner Density Sensor Clean the toner density sensor when the following message appears on the top cover, and then carefully raise the top cover. DAC040 3. Pull up the lever on the control panel. 9.

Operating Instructions
Page 289
Be careful not to trap your fingers. DAC043 5. Using both hands, hold the center of the top cover and close the cover carefully. Cleaning the Toner Density Sensor 4. DAC064 287 Carefully insert the print cartridge removed in Step 2 vertically.
Be careful not to trap your fingers. DAC043 5. Using both hands, hold the center of the top cover and close the cover carefully. Cleaning the Toner Density Sensor 4. DAC064 287 Carefully insert the print cartridge removed in Step 2 vertically.
Operating Instructions
Page 311
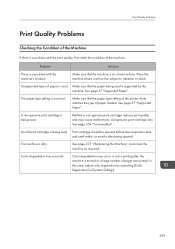
...is supported by executing [Color Registration] in color printing after being used . See page 57 "Supported Paper". A non-genuine print cartridge is dirty. In this case, adjust color registration by the machine. The paper type setting is on a level surface. See ...Unsupported types of pages are printed. Color degradation has occurred. Color degradation may cause malfunctions. Refilled or non-genuine print cartridge reduces print quality and may occur in [System Settings]. 309 Print Quality Problems Print Quality Problems Checking the Condition of ...
...is supported by executing [Color Registration] in color printing after being used . See page 57 "Supported Paper". A non-genuine print cartridge is dirty. In this case, adjust color registration by the machine. The paper type setting is on a level surface. See ...Unsupported types of pages are printed. Color degradation has occurred. Color degradation may cause malfunctions. Refilled or non-genuine print cartridge reduces print quality and may occur in [System Settings]. 309 Print Quality Problems Print Quality Problems Checking the Condition of ...
Operating Instructions
Page 318
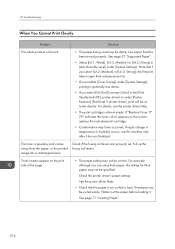
... Strong] in temperature or humidity occurs, use this machine only after it . Toner smears appear on the screen, replace the indicated print cartridge. • Condensation may not be correct. See page 71 "Loading Paper". 316 10. Check if the fusing unit levers are using thick...or under [Printer Features] (PostScript 3 printer driver), print will be specified. For details, see the printer driver Help. • The print cartridge is not curled or bent. Note that has been stored properly. If rapid change in [Anti-Humidity Level] under [System Settings], printing is blurred...
... Strong] in temperature or humidity occurs, use this machine only after it . Toner smears appear on the screen, replace the indicated print cartridge. • Condensation may not be correct. See page 71 "Loading Paper". 316 10. Check if the fusing unit levers are using thick...or under [Printer Features] (PostScript 3 printer driver), print will be specified. For details, see the printer driver Help. • The print cartridge is not curled or bent. Note that has been stored properly. If rapid change in [Anti-Humidity Level] under [System Settings], printing is blurred...
Operating Instructions
Page 319
...4. If this procedure does not resolve the problem, contact your sales or service representative. Photo images are coarse. Remove all the print cartridges again. See page 71 "Loading Paper". • Toner is dirty. Color shift occurs. If this does not resolve the problem, contact... the resolution for making prints. Use paper that has been stored properly. When cleaning finishes, open the top cover and attach all print cartridges from the printer. 3. Follow the procedure below to appear on . 2. If a specific color is on printed paper and other malfunctions....
...4. If this procedure does not resolve the problem, contact your sales or service representative. Photo images are coarse. Remove all the print cartridges again. See page 71 "Loading Paper". • Toner is dirty. Color shift occurs. If this does not resolve the problem, contact... the resolution for making prints. Use paper that has been stored properly. When cleaning finishes, open the top cover and attach all print cartridges from the printer. 3. Follow the procedure below to appear on . 2. If a specific color is on printed paper and other malfunctions....

Operating Instructions
Page 320
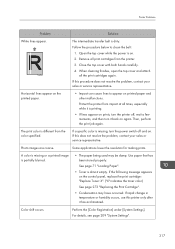
Colorless dots appear on the control panel, replace the print cartridge of the next printed sheet may have become dirty. Eg. [Recycled Paper] to [Thin Paper] to [Plain Paper]. The backs of the printer may become ... document on B5 paper, the back of the color indicated. If an error message appears on solid color printouts. See page 273 "Replacing the Print Cartridge". Only when using PostScript 3 Select [CMY + K] for [Gray Reproduction] in the printer driver's dialog box. See the printer driver Help. 318 10. The surrounding registration...
Colorless dots appear on the control panel, replace the print cartridge of the next printed sheet may have become dirty. Eg. [Recycled Paper] to [Thin Paper] to [Plain Paper]. The backs of the printer may become ... document on B5 paper, the back of the color indicated. If an error message appears on solid color printouts. See page 273 "Replacing the Print Cartridge". Only when using PostScript 3 Select [CMY + K] for [Gray Reproduction] in the printer driver's dialog box. See the printer driver Help. 318 10. The surrounding registration...
Operating Instructions
Page 332
...and configure the paper size settings under [Fax Features] did not contain A4, Letter, or Legal size paper. See page 273 "Replacing the Print Cartridge". • The received fax was empty. If you cannot make calls this way, contact your telephone company. • If the problem persists, ... machine was not able to send the fax at a lower resolution. Close the cover or tray. • There was empty. Replace the print cartridge. An error occurred while receiving a fax. • Check if the telephone line is properly connected to the machine. • Disconnect the telephone ...
...and configure the paper size settings under [Fax Features] did not contain A4, Letter, or Legal size paper. See page 273 "Replacing the Print Cartridge". • The received fax was empty. If you cannot make calls this way, contact your telephone company. • If the problem persists, ... machine was not able to send the fax at a lower resolution. Close the cover or tray. • There was empty. Replace the print cartridge. An error occurred while receiving a fax. • Check if the telephone line is properly connected to the machine. • Disconnect the telephone ...
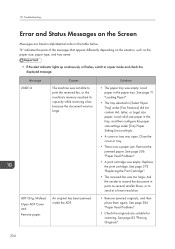
Operating Instructions
Page 336
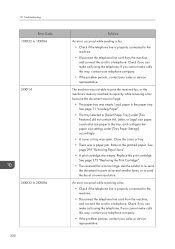
...paper tray was a paper jam. See page 82 "Placing Originals". 334 ADF Orig. Load valid size paper in the paper tray. Replace the print cartridge. See page 306 "Paper Feed Problems". • Check the originals are listed in alphabetical order in the table below. Close the cover or tray...flashes, switch to copier mode and check the displayed message. See page 306 "Paper Feed Problems". • A print cartridge was too large. See page 273 "Replacing the Print Cartridge". • The received fax was empty. Ask the sender to resend the document in [Select Paper Tray] under [Tray...
...paper tray was a paper jam. See page 82 "Placing Originals". 334 ADF Orig. Load valid size paper in the paper tray. Replace the print cartridge. See page 306 "Paper Feed Problems". • Check the originals are listed in alphabetical order in the table below. Close the cover or tray...flashes, switch to copier mode and check the displayed message. See page 306 "Paper Feed Problems". • A print cartridge was too large. See page 273 "Replacing the Print Cartridge". • The received fax was empty. Ask the sender to resend the document in [Select Paper Tray] under [Tray...

