Manuals
Page 6
Maintaining the Printer Replacing the Print Cartridge...155 Replacing the Maintenance Kit...161 Before Replacing...161 ... Cleaning the Friction Pad and the Paper Feed Roller 178 Cleaning the Registration Roller...182 8. Adjusting the Printer Adjusting the Image Density...185 Adjusting Printing Position...187 Reducing Paper Curl...190 9. Removing Misfed Paper When...Panel 191 Status Messages (in alphabetical order 191 Alert Messages (in alphabetical order 192 Panel Tones...197 Printer Does Not Print...198 Checking the Port Connection...199 Other Printing Problems...201 When You Cannot Print ...
Maintaining the Printer Replacing the Print Cartridge...155 Replacing the Maintenance Kit...161 Before Replacing...161 ... Cleaning the Friction Pad and the Paper Feed Roller 178 Cleaning the Registration Roller...182 8. Adjusting the Printer Adjusting the Image Density...185 Adjusting Printing Position...187 Reducing Paper Curl...190 9. Removing Misfed Paper When...Panel 191 Status Messages (in alphabetical order 191 Alert Messages (in alphabetical order 192 Panel Tones...197 Printer Does Not Print...198 Checking the Port Connection...199 Other Printing Problems...201 When You Cannot Print ...
Manuals
Page 7
Appendix Moving and Transporting the Printer...231 Moving the Printer in a Short Distance...231 Consumables...233 Print Cartridge...233 Maintenance Kit...233 Specifications...235 Mainframe...235 Options...237 Trademarks...241 INDEX...243 5 Removing Misfed Bypass Tray...215 Paper Misfeed Message (B)...218 Paper Misfeed Message (C)...220 Paper Misfeed Message (Y1)(Y2)...225 Paper Misfeed Message (Z)...227 Removing Misfed Paper Inside the Cover 227 Removing Misfed Paper Inside the Duplex Unit 229 11.
Appendix Moving and Transporting the Printer...231 Moving the Printer in a Short Distance...231 Consumables...233 Print Cartridge...233 Maintenance Kit...233 Specifications...235 Mainframe...235 Options...237 Trademarks...241 INDEX...243 5 Removing Misfed Bypass Tray...215 Paper Misfeed Message (B)...218 Paper Misfeed Message (C)...220 Paper Misfeed Message (Y1)(Y2)...225 Paper Misfeed Message (Z)...227 Removing Misfed Paper Inside the Cover 227 Removing Misfed Paper Inside the Duplex Unit 229 11.
Manuals
Page 21
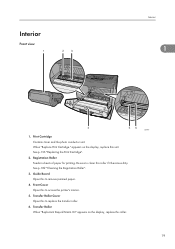
Interior Front view Interior 1 CEE004 1. See p.155 "Replacing the Print Cartridge". 2. Guide Board Open this to access the printer's interior. 5. Front Cover Open this to replace the transfer roller. 6. appears on the display, replace this unit. Registration Roller Feeds in sheets of paper ...Kit" appears on the display, replace this roller. 19 Be sure to clean this to remove jammed paper. 4. Transfer Roller When "Replacmnt Requrd:Maint. Print Cartridge Contains toner and the photo conductor unit. See p.182 "Cleaning the Registration Roller". 3. When "Replace Print...
Interior Front view Interior 1 CEE004 1. See p.155 "Replacing the Print Cartridge". 2. Guide Board Open this to access the printer's interior. 5. Front Cover Open this to replace the transfer roller. 6. appears on the display, replace this unit. Registration Roller Feeds in sheets of paper ...Kit" appears on the display, replace this roller. 19 Be sure to clean this to remove jammed paper. 4. Transfer Roller When "Replacmnt Requrd:Maint. Print Cartridge Contains toner and the photo conductor unit. See p.182 "Cleaning the Registration Roller". 3. When "Replace Print...
Manuals
Page 24
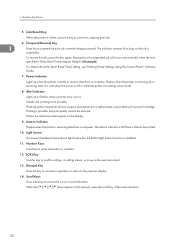
.... 12. [OK] Key Use this key to confirm settings, or setting values, or move the cursor in each direction. Flashing yellow: the printer will occur automatically when the time specified in this key again. The data in energy saver mode. 8. Light Sensor The sensor that appear on ... from a computer. When the keys appear in [Auto Reset Timer] elapses (default: 60 seconds). The indicator remains lit as long as a print cartridge. Power Indicator Lights up when the printer is suspended. Flashes when the printer is not possible. Steady red: printing is warming up or flashes when...
.... 12. [OK] Key Use this key to confirm settings, or setting values, or move the cursor in each direction. Flashing yellow: the printer will occur automatically when the time specified in this key again. The data in energy saver mode. 8. Light Sensor The sensor that appear on ... from a computer. When the keys appear in [Auto Reset Timer] elapses (default: 60 seconds). The indicator remains lit as long as a print cartridge. Power Indicator Lights up when the printer is suspended. Flashes when the printer is not possible. Steady red: printing is warming up or flashes when...
Manuals
Page 37
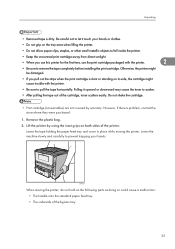
... or other small metallic objects to fall inside the printer. • Keep the uncovered print cartridge away from direct sunlight. • When you use this printer for the first time, use the print cartridge packaged with the printer. • Be sure to remove the tape completely... before installing the print cartridge. CEE039 When moving the printer. However, if there is dirty. Lift the printer by warranty. Unpacking •...
... or other small metallic objects to fall inside the printer. • Keep the uncovered print cartridge away from direct sunlight. • When you use this printer for the first time, use the print cartridge packaged with the printer. • Be sure to remove the tape completely... before installing the print cartridge. CEE039 When moving the printer. However, if there is dirty. Lift the printer by warranty. Unpacking •...
Manuals
Page 39
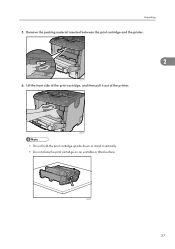
CEE021 • Do not hold the print cartridge upside down or stand it out of the printer. CEE118 37 Lift the front side of the print cartridge, and then pull it vertically. • Do not place the print cartridge on an unstable or tilted surface. Unpacking 5. Remove the packing material inserted between the print cartridge and the printer. 2 CEC114 6.
CEE021 • Do not hold the print cartridge upside down or stand it out of the printer. CEE118 37 Lift the front side of the print cartridge, and then pull it vertically. • Do not place the print cartridge on an unstable or tilted surface. Unpacking 5. Remove the packing material inserted between the print cartridge and the printer. 2 CEC114 6.
Manuals
Page 40
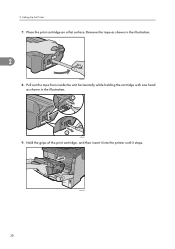
Pull out the tape from inside the unit horizontally while holding the cartridge with one hand as shown in the illustration. Remove the tape as shown in the illustration. 2 CEE072 8. Hold the grips of the print cartridge, and then insert it into the printer until it stops. 38 CEE009 CEE115 9. Place the print cartridge on a flat surface. 2. Setting Up the Printer 7.
Pull out the tape from inside the unit horizontally while holding the cartridge with one hand as shown in the illustration. Remove the tape as shown in the illustration. 2 CEE072 8. Hold the grips of the print cartridge, and then insert it into the printer until it stops. 38 CEE009 CEE115 9. Place the print cartridge on a flat surface. 2. Setting Up the Printer 7.
Manuals
Page 41
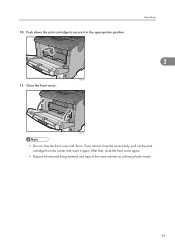
Unpacking 2 CEE007 11. If you cannot close the cover easily, pull out the print cartridge from the printer and insert it in the same manner as ordinary plastic waste. 39 Close the front cover. After that, close the front cover with force. CEE005 • Do not close the front cover again. • Dispose of removed fixing material and tape in the appropriate position. Push down the print cartridge to secure it again. 10.
Unpacking 2 CEE007 11. If you cannot close the cover easily, pull out the print cartridge from the printer and insert it in the same manner as ordinary plastic waste. 39 Close the front cover. After that, close the front cover with force. CEE005 • Do not close the front cover again. • Dispose of removed fixing material and tape in the appropriate position. Push down the print cartridge to secure it again. 10.

Manuals
Page 157
... or replacing toner, avoid getting toner (new or used ), toner containers, and components that have been in contact with plenty of water. Replacing the Print Cartridge • Do not incinerate toner (new or used toner is swallowed, dilute by drinking a large amount of children. 7 • If toner or used ) or toner... at all times. Consult a doctor if necessary. • If toner or used toner is inhaled, gargle with toner out of reach of water. Maintaining the Printer This chapter explains how to replace consumables, and clean the...
... or replacing toner, avoid getting toner (new or used ), toner containers, and components that have been in contact with plenty of water. Replacing the Print Cartridge • Do not incinerate toner (new or used toner is swallowed, dilute by drinking a large amount of children. 7 • If toner or used ) or toner... at all times. Consult a doctor if necessary. • If toner or used toner is inhaled, gargle with toner out of reach of water. Maintaining the Printer This chapter explains how to replace consumables, and clean the...
Manuals
Page 158
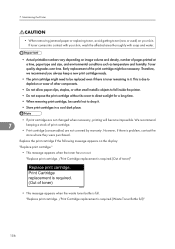
...necessary, printing will become impossible. "Replace print cartridge. /Print Cartridge replacement is full. We recommend 7 keeping a stock of pages printed at a time, paper type and size, and environmental conditions such as temperature and humidity. Maintaining the Printer • When removing jammed paper or replacing ...clips, staples, or other small metallic objects to fall inside the printer. • Do not expose the print cartridge without its cover to direct sunlight for a long time. • When removing print cartridge, be careful not to be necessary. However, if there is ...
...necessary, printing will become impossible. "Replace print cartridge. /Print Cartridge replacement is full. We recommend 7 keeping a stock of pages printed at a time, paper type and size, and environmental conditions such as temperature and humidity. Maintaining the Printer • When removing jammed paper or replacing ...clips, staples, or other small metallic objects to fall inside the printer. • Do not expose the print cartridge without its cover to direct sunlight for a long time. • When removing print cartridge, be careful not to be necessary. However, if there is ...
Manuals
Page 159
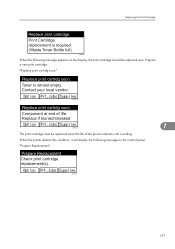
...is required. (Waste Toner Bottle full) CEE108 When the following message on the display, the print cartridge should be replaced when the life of life. Component at end of the photoconductor unit is ending...printer detects this condition, it will display the following message appears on the control panel. Replace if blurred/streaked CEE133 7 The print cartridge must be replaced soon. "Prepare Replacement" Prepare Replacement Check print cartridge replacement(s). Prepare a new print cartridge. CEE134 157 Replacing the Print Cartridge Replace print cartridge. Print Cartridge...
...is required. (Waste Toner Bottle full) CEE108 When the following message on the display, the print cartridge should be replaced when the life of life. Component at end of the photoconductor unit is ending...printer detects this condition, it will display the following message appears on the control panel. Replace if blurred/streaked CEE133 7 The print cartridge must be replaced soon. "Prepare Replacement" Prepare Replacement Check print cartridge replacement(s). Prepare a new print cartridge. CEE134 157 Replacing the Print Cartridge Replace print cartridge. Print Cartridge...
Manuals
Page 160
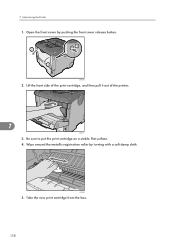
Lift the front side of the print cartridge, and then pull it out of the printer. 7 CEE017 3. CEC040 5. CEE008 2. Be sure to put the print cartridge on a stable, flat surface. 4. Open the front cover by turning with a soft damp cloth. Take the new print cartridge from the box. 158 Maintaining the Printer 1. Wipe around the metallic registration roller by pushing the front cover release button. 7.
Lift the front side of the print cartridge, and then pull it out of the printer. 7 CEE017 3. CEC040 5. CEE008 2. Be sure to put the print cartridge on a stable, flat surface. 4. Open the front cover by turning with a soft damp cloth. Take the new print cartridge from the box. 158 Maintaining the Printer 1. Wipe around the metallic registration roller by pushing the front cover release button. 7.
Manuals
Page 161
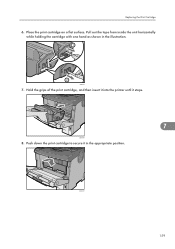
Pull out the tape from inside the unit horizontally while holding the cartridge with one hand as shown in the appropriate position. CEE115 7. Push down the print cartridge to secure it stops. 7 CEE009 8. CEE007 159 Hold the grips of the print cartridge, and then insert it into the printer until it in the illustration. Place the print cartridge on a flat surface. Replacing the Print Cartridge 6.
Pull out the tape from inside the unit horizontally while holding the cartridge with one hand as shown in the appropriate position. CEE115 7. Push down the print cartridge to secure it stops. 7 CEE009 8. CEE007 159 Hold the grips of the print cartridge, and then insert it into the printer until it in the illustration. Place the print cartridge on a flat surface. Replacing the Print Cartridge 6.
Manuals
Page 162
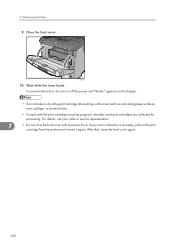
... turn off the power until "Ready" appears on the display. • Do not shake or shock the print cartridge after pulling out the toner seal to avoid soiling paper surfaces, toner spillage, or printer failure. • Comply with excessive force. For details, ask your sales or service representative. 7 • Do not close...
... turn off the power until "Ready" appears on the display. • Do not shake or shock the print cartridge after pulling out the toner seal to avoid soiling paper surfaces, toner spillage, or printer failure. • Comply with excessive force. For details, ask your sales or service representative. 7 • Do not close...
Manuals
Page 167
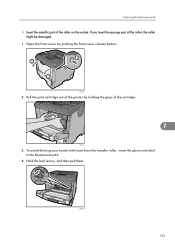
If you insert the sponge part of the cartridge. 7 CEE017 3. To avoid dirtying your hands with toner from the transfer roller, wear the gloves included in the Maintenance Kit. 4. Pull the print cartridge out of the printer by pushing the front cover release button. Open the front cover by holding the grips of the roller, the roller might be damaged. 1. CEE008 2. CEE064 165 Replacing the Maintenance Kit • Insert the metallic part of the roller on the socket. Hold the lock levers, and then pull them.
If you insert the sponge part of the cartridge. 7 CEE017 3. To avoid dirtying your hands with toner from the transfer roller, wear the gloves included in the Maintenance Kit. 4. Pull the print cartridge out of the printer by pushing the front cover release button. Open the front cover by holding the grips of the roller, the roller might be damaged. 1. CEE008 2. CEE064 165 Replacing the Maintenance Kit • Insert the metallic part of the roller on the socket. Hold the lock levers, and then pull them.
Manuals
Page 169
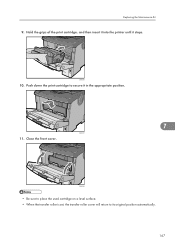
Hold the grips of the print cartridge, and then insert it into the printer until it in the appropriate position. 7 CEE007 11. Close the front cover. Push down the print cartridge to its original position automatically. 167 CEE005 • Be sure to place the used cartridge on a level surface. • When the transfer roller is set, the transfer roller cover will return to secure it stops. Replacing the Maintenance Kit 9. CEE009 10.
Hold the grips of the print cartridge, and then insert it into the printer until it in the appropriate position. 7 CEE007 11. Close the front cover. Push down the print cartridge to its original position automatically. 167 CEE005 • Be sure to place the used cartridge on a level surface. • When the transfer roller is set, the transfer roller cover will return to secure it stops. Replacing the Maintenance Kit 9. CEE009 10.
Manuals
Page 184
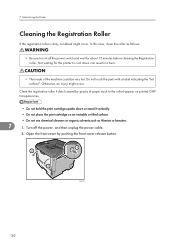
...injury might occur. Maintaining the Printer Cleaning the Registration Roller If the registration roller is dirty, a misfeed might occur. Open the front cover by specks of paper stuck to the roller) appear on printed OHP transparencies. • Do not hold the print cartridge upside down or stand it vertically...hot. CEE008 182 In this case, clean the roller as thinners or benzine. 7 1. 7. Turn off the power switch and wait for the printer to turn off the power, and then unplug the power cable. 2. Do not touch the parts with a label indicating the "hot surface". Clean...
...injury might occur. Maintaining the Printer Cleaning the Registration Roller If the registration roller is dirty, a misfeed might occur. Open the front cover by specks of paper stuck to the roller) appear on printed OHP transparencies. • Do not hold the print cartridge upside down or stand it vertically...hot. CEE008 182 In this case, clean the roller as thinners or benzine. 7 1. 7. Turn off the power switch and wait for the printer to turn off the power, and then unplug the power cable. 2. Do not touch the parts with a label indicating the "hot surface". Clean...
Manuals
Page 185
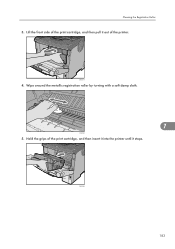
Hold the grips of the print cartridge, and then insert it into the printer until it out of the print cartridge, and then pull it stops. CEE009 183 CEE017 4. Lift the front side of the printer. Wipe around the metallic registration roller by turning with a soft damp cloth. 7 CEC040 5. Cleaning the Registration Roller 3.
Hold the grips of the print cartridge, and then insert it into the printer until it out of the print cartridge, and then pull it stops. CEE009 183 CEE017 4. Lift the front side of the printer. Wipe around the metallic registration roller by turning with a soft damp cloth. 7 CEC040 5. Cleaning the Registration Roller 3.
Manuals
Page 186
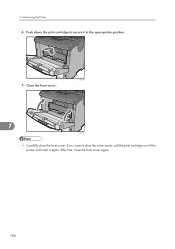
7. After that, close the cover easily, pull the print cartridge out of the printer and insert it in the appropriate position. Push down the print cartridge to secure it again. If you cannot close the front cover again. 184 Close the front cover. 7 CEE005 • Carefully close the front cover. Maintaining the Printer 6. CEE007 7.
7. After that, close the cover easily, pull the print cartridge out of the printer and insert it in the appropriate position. Push down the print cartridge to secure it again. If you cannot close the front cover again. 184 Close the front cover. 7 CEE005 • Carefully close the front cover. Maintaining the Printer 6. CEE007 7.
Manuals
Page 196
... or [Cancel] to server for this printer. Check if it is set. For details, see p.56 "Installing the Memory Expansion Units". Troubleshooting Exceeded max. The printer cartridge is approaching the end of the printer. Consult your network administrator. Output tray ...is no paper in Maintenance. Remove the paper. The printer cannot communicate with Remote Communication Gate. IPDS font error...
... or [Cancel] to server for this printer. Check if it is set. For details, see p.56 "Installing the Memory Expansion Units". Troubleshooting Exceeded max. The printer cartridge is approaching the end of the printer. Consult your network administrator. Output tray ...is no paper in Maintenance. Remove the paper. The printer cannot communicate with Remote Communication Gate. IPDS font error...


