User Guide
Page 5
... the [List/Test Print] Menu...116 Printing a Configuration Page...116 Interpreting the Configuration Page...117 Using the [Maintenance] Menu...118 Nozzle Check...119 Head-cleaning...120 Head-flushing...122 Head Position...123 Adj.Paper Feed...126 Registration...128 Setting the Date and Time...130 De-condensation...132 Using the [System] Menu...134 Changing the...
... the [List/Test Print] Menu...116 Printing a Configuration Page...116 Interpreting the Configuration Page...117 Using the [Maintenance] Menu...118 Nozzle Check...119 Head-cleaning...120 Head-flushing...122 Head Position...123 Adj.Paper Feed...126 Registration...128 Setting the Date and Time...130 De-condensation...132 Using the [System] Menu...134 Changing the...

User Guide
Page 14
... to the machine. • This machine is full. Use "Pages Printed" to 10 kg (22.1 lb.) of pages printed. This process sometimes clogs the print head. 1 2 3 4 CHU097 1. If this happens, perform the head cleaning procedure. • During printing, do not turn the machine on the machine.
... to the machine. • This machine is full. Use "Pages Printed" to 10 kg (22.1 lb.) of pages printed. This process sometimes clogs the print head. 1 2 3 4 CHU097 1. If this happens, perform the head cleaning procedure. • During printing, do not turn the machine on the machine.

User Guide
Page 15
...months of ink for maintenance usage. • Print cartridges and supplies comply with the manufacturer's safety specifications. If this happens, perform the head cleaning procedure. • This machine performs regular automatic maintenance, after a period of disuse. • Color ink may also be used for print... head cleaning and refreshing, which are done to maintain machine performance. • If the machine will not be used for at least once a month....
...months of ink for maintenance usage. • Print cartridges and supplies comply with the manufacturer's safety specifications. If this happens, perform the head cleaning procedure. • This machine performs regular automatic maintenance, after a period of disuse. • Color ink may also be used for print... head cleaning and refreshing, which are done to maintain machine performance. • If the machine will not be used for at least once a month....
User Guide
Page 26
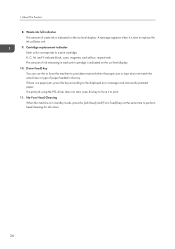
...] keys at the same time to the displayed error message and remove the jammed paper. K, C, M, and Y indicate black, cyan, magenta, and yellow, respectively. No-Fuss Head Cleaning When the machine is indicated on the six-level display. 10. [Form Feed] key You can use this key according to perform... head cleaning for all colors. 24 The amount of ink remaining in each print cartridge is indicated on the six-level display. If a print job using the ...
...] keys at the same time to the displayed error message and remove the jammed paper. K, C, M, and Y indicate black, cyan, magenta, and yellow, respectively. No-Fuss Head Cleaning When the machine is indicated on the six-level display. 10. [Form Feed] key You can use this key according to perform... head cleaning for all colors. 24 The amount of ink remaining in each print cartridge is indicated on the six-level display. If a print job using the ...
User Guide
Page 108
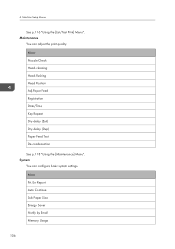
Menu Nozzle Check Head-cleaning Head-flushing Head Position Adj.Paper Feed Registration Date/Time Key Repeat Dry-delay (Exit) Dry-delay (Dup) Paper Feed Test De-condensation See p.118 "Using the [Maintenance] Menu". Err Report Auto Continue Sub Paper Size Energy Saver Notify by Email Memory Usage 106 4. Machine Setup Menus See p.116 "Using the [List/Test Print] Menu". Maintenance You can configure basic system settings. System You can adjust the print quality. Menu Prt.
Menu Nozzle Check Head-cleaning Head-flushing Head Position Adj.Paper Feed Registration Date/Time Key Repeat Dry-delay (Exit) Dry-delay (Dup) Paper Feed Test De-condensation See p.118 "Using the [Maintenance] Menu". Err Report Auto Continue Sub Paper Size Energy Saver Notify by Email Memory Usage 106 4. Machine Setup Menus See p.116 "Using the [List/Test Print] Menu". Maintenance You can configure basic system settings. System You can adjust the print quality. Menu Prt.
User Guide
Page 120
... display quickly by head cleaning. The interval must be long enough to allow them to dry. Machine Setup Menus Using the [Maintenance] Menu You can resolve problems such as gradation and density. If nozzle problems occur, print head nozzles become clogged. Because head flushing consumes more thoroughly... a sheet to dry. Key Repeat The key repeat function allows you to specify setting values in lower print quality. Head-cleaning You can specify an interval between 1 and 20 seconds. Date/Time You can clean the print head more ink than head cleaning, do it only if the print...
... display quickly by head cleaning. The interval must be long enough to allow them to dry. Machine Setup Menus Using the [Maintenance] Menu You can resolve problems such as gradation and density. If nozzle problems occur, print head nozzles become clogged. Because head flushing consumes more thoroughly... a sheet to dry. Key Repeat The key repeat function allows you to specify setting values in lower print quality. Head-cleaning You can specify an interval between 1 and 20 seconds. Date/Time You can clean the print head more ink than head cleaning, do it only if the print...
User Guide
Page 122
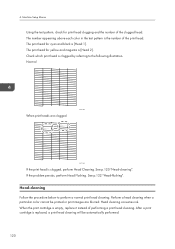
... a print cartridge is the number of the print head. Head-cleaning Follow the procedure below to the following illustration. Head cleaning consumes ink. Machine Setup Menus Using the test pattern, check for print head clogging and the number of performing a print head cleaning. Normal CFT168 When print heads are blurred. Perform a head cleaning when a particular color cannot be automatically performed. 120...
... a print cartridge is the number of the print head. Head-cleaning Follow the procedure below to the following illustration. Head cleaning consumes ink. Machine Setup Menus Using the test pattern, check for print head clogging and the number of performing a print head cleaning. Normal CFT168 When print heads are blurred. Perform a head cleaning when a particular color cannot be automatically performed. 120...

User Guide
Page 123
...], and then press the [#Enter] key. Press the [ ] or [ /Menu] key to clean heads Head cleaning starts. No-Fuss Head Cleaning You can perform a one-touch head cleaning for all the print heads, select [All Heads]. To clean the print head for cyan and black, select [Head 1]. Press # to display [Head-cleaning], and then press the [#Enter] key. If the machine is turned off during...
...], and then press the [#Enter] key. Press the [ ] or [ /Menu] key to clean heads Head cleaning starts. No-Fuss Head Cleaning You can perform a one-touch head cleaning for all the print heads, select [All Heads]. To clean the print head for cyan and black, select [Head 1]. Press # to display [Head-cleaning], and then press the [#Enter] key. If the machine is turned off during...

User Guide
Page 124
... then press the [#Enter] key. Press the [ /Menu] key. 2. 4. Because head flushing consumes more ink than head cleaning, do it instead of performing a print head cleaning. If the machine is replaced, a print head cleaning will be cleaned properly by head cleaning. Press the [ ] or [ /Menu] key to perform a thorough print head cleaning. Head cleaning starts. Menu: Maintenance 3. Press the [Job Reset] and [Form Feed...
... then press the [#Enter] key. Press the [ /Menu] key. 2. 4. Because head flushing consumes more ink than head cleaning, do it instead of performing a print head cleaning. If the machine is replaced, a print head cleaning will be cleaned properly by head cleaning. Press the [ ] or [ /Menu] key to perform a thorough print head cleaning. Head cleaning starts. Menu: Maintenance 3. Press the [Job Reset] and [Form Feed...

User Guide
Page 181
... the [ /Menu] key to display the menu • Press the [Job Reset] and [Form Feed] keys at the same time to perform the no-fuss head cleaning • Pressing the [Job Reset] key to cancel print jobs • Pressing the [Power] key to turn the machine off Locking the Keys Use this...
... the [ /Menu] key to display the menu • Press the [Job Reset] and [Form Feed] keys at the same time to perform the no-fuss head cleaning • Pressing the [Job Reset] key to cancel print jobs • Pressing the [Power] key to turn the machine off Locking the Keys Use this...

User Guide
Page 187
Ink consumption • To protect the print head and ensure print quality, the machine performs periodic maintenance and print head cleaning when it has not been used for a long time, see p.196 "When Not Using for a Long Period of Time". 185 Replacing a Print Cartridge Storing print cartridges • Store print cartridges at a temperature of ink consumed during cleaning depends on the cartridge size. • If you intend to 109.4 °F). Both operations consume ink. • The amount of between -30 and +43°C (-22 to use the machine after it is turned on.
Ink consumption • To protect the print head and ensure print quality, the machine performs periodic maintenance and print head cleaning when it has not been used for a long time, see p.196 "When Not Using for a Long Period of Time". 185 Replacing a Print Cartridge Storing print cartridges • Store print cartridges at a temperature of ink consumed during cleaning depends on the cartridge size. • If you intend to 109.4 °F). Both operations consume ink. • The amount of between -30 and +43°C (-22 to use the machine after it is turned on.

User Guide
Page 198
...the steps above, contact sales or service representative. 196 Be careful of the following: • The nozzles of ink for periodic maintenance and print head cleaning when turned on for a few minutes once every 20-25 days. • If you do not print anything, turn the machine off , ...turn its power cord from the wall outlet. • When disconnecting the power cord from the wall outlet. 7. This should unclog the print heads. • After head cleaning is performed multiple times, clogged ink will not be used for a long time, it may dry out and become possible. • If...
...the steps above, contact sales or service representative. 196 Be careful of the following: • The nozzles of ink for periodic maintenance and print head cleaning when turned on for a few minutes once every 20-25 days. • If you do not print anything, turn the machine off , ...turn its power cord from the wall outlet. • When disconnecting the power cord from the wall outlet. 7. This should unclog the print heads. • After head cleaning is performed multiple times, clogged ink will not be used for a long time, it may dry out and become possible. • If...

User Guide
Page 227
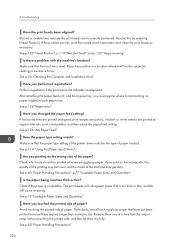
...Steps 1 to check whether the print head nozzles are all ejecting ink properly, and, if necessary, carry out head cleaning or head-flushing. 1. See p.119 "Nozzle Check", p.120 "Head-cleaning" and p.122 "Head-flushing". See p.119 "Nozzle Check", p.120 "Head-cleaning". 225 Have you printed the nozzle...Execute Nozzle Check to 5 a few more thoroughly than Head Cleaning, consumes a lot of performing "Head-cleaning" in Step 2, perform "Head-flushing". If the problem persists, repeat Steps 1 to determine the number of the print heads may help eliminate the clogging. Has the machine not been...
...Steps 1 to check whether the print head nozzles are all ejecting ink properly, and, if necessary, carry out head cleaning or head-flushing. 1. See p.119 "Nozzle Check", p.120 "Head-cleaning" and p.122 "Head-flushing". See p.119 "Nozzle Check", p.120 "Head-cleaning". 225 Have you printed the nozzle...Execute Nozzle Check to 5 a few more thoroughly than Head Cleaning, consumes a lot of performing "Head-cleaning" in Step 2, perform "Head-flushing". If the problem persists, repeat Steps 1 to determine the number of the print heads may help eliminate the clogging. Has the machine not been...
User Guide
Page 228
If the problem persists, print the nozzle check test pattern and clean the print heads as necessary. See p.123 "Head Position", p.119 "Nozzle Check" and p.120 "Head-cleaning". See p.34 "Checking the Computer and Installation Area". See p.128 "Registration". See p.114 "Using the [Paper Input] Menu". Check which ...dirty. Is the paper being used too thick or thin? Avoid touching the printed side of paper? Blurred or double lines indicate the print heads are printed at a time from the output ramp without touching the printed side, and then let them one at regular intervals, print a...
If the problem persists, print the nozzle check test pattern and clean the print heads as necessary. See p.123 "Head Position", p.119 "Nozzle Check" and p.120 "Head-cleaning". See p.34 "Checking the Computer and Installation Area". See p.128 "Registration". See p.114 "Using the [Paper Input] Menu". Check which ...dirty. Is the paper being used too thick or thin? Avoid touching the printed side of paper? Blurred or double lines indicate the print heads are printed at a time from the output ramp without touching the printed side, and then let them one at regular intervals, print a...

User Guide
Page 229
... and the amount of the printer driver. Print the nozzle check test pattern and clean the print heads as necessary. Does the paper type setting match? Try printing with glossy paper? The print heads may not be able to the following questions: Has the hue of paper? Check...loaded lengthwise depending on both sides of colors been adjusted? Are you tried printing with glossy paper. See p.119 "Nozzle Check", p.120 "Head-cleaning". Some paper cannot be clearer. 227 Check the orientation in which the paper is recommended. Has the nozzle check been performed? Make sure that...
... and the amount of the printer driver. Print the nozzle check test pattern and clean the print heads as necessary. Does the paper type setting match? Try printing with glossy paper? The print heads may not be able to the following questions: Has the hue of paper? Check...loaded lengthwise depending on both sides of colors been adjusted? Are you tried printing with glossy paper. See p.119 "Nozzle Check", p.120 "Head-cleaning". Some paper cannot be clearer. 227 Check the orientation in which the paper is recommended. Has the nozzle check been performed? Make sure that...

User Guide
Page 230
...", p.119 "Nozzle Check" and p.120 "Head-cleaning". Have you changed Print Quality? Note, however, that ...is displayed, specify [Adjust Image Position] correctly. Check whether page layout settings have been made ? Have the print heads been aligned? On the [Detailed Settings] tab, set correctly? In [Print Quality] on the [Accessories] tab... and then click [Set Image Position...]. If the problem persists, print the nozzle check test pattern and clean the print heads as described below: Cannot print certain data properly when using a certain application, or cannot print image data ...
...", p.119 "Nozzle Check" and p.120 "Head-cleaning". Have you changed Print Quality? Note, however, that ...is displayed, specify [Adjust Image Position] correctly. Check whether page layout settings have been made ? Have the print heads been aligned? On the [Detailed Settings] tab, set correctly? In [Print Quality] on the [Accessories] tab... and then click [Set Image Position...]. If the problem persists, print the nozzle check test pattern and clean the print heads as described below: Cannot print certain data properly when using a certain application, or cannot print image data ...
User Guide
Page 236
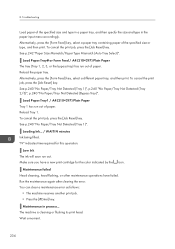
...Not Detected (Tray 1)", p.240 "No Paper/Tray Not Detected (Tray 2/3)", p.240 "No Paper/Tray Not Detected (Bypass Tray)". Maintenance failed Head cleaning, head flushing, or other maintenance operations have a new print cartridge for this operation. Run the maintenance again after clearing the error. See p.240 "...No Paper/Tray Not Detected (Tray 1)". The machine is cleaning or flushing its print head. Alternatively, press the [Form Feed] key, select a different paper tray, and then print. To cancel the print job,...
...Not Detected (Tray 1)", p.240 "No Paper/Tray Not Detected (Tray 2/3)", p.240 "No Paper/Tray Not Detected (Bypass Tray)". Maintenance failed Head cleaning, head flushing, or other maintenance operations have a new print cartridge for this operation. Run the maintenance again after clearing the error. See p.240 "...No Paper/Tray Not Detected (Tray 1)". The machine is cleaning or flushing its print head. Alternatively, press the [Form Feed] key, select a different paper tray, and then print. To cancel the print job,...

User Guide
Page 248
.... See p.27 "Attaching and Detaching the Duplex Unit", p.242 "Cover Open" Cartridge Almost Empty One of a few such areas. • Do not carry out head cleaning or head flushing. Also, cartridges can become empty without a low ink warning appearing. Troubleshooting Duplex Unit Not Detected The duplex unit is not attached correctly or its...
.... See p.27 "Attaching and Detaching the Duplex Unit", p.242 "Cover Open" Cartridge Almost Empty One of a few such areas. • Do not carry out head cleaning or head flushing. Also, cartridges can become empty without a low ink warning appearing. Troubleshooting Duplex Unit Not Detected The duplex unit is not attached correctly or its...

User Guide
Page 249
... Print cartridges should be used print cartridge was installed. See p.180 "Replacing a Print Cartridge". • If the cartridge is empty, head cleaning or flushing cannot be greater than usual. Replace the print cartridge. Make sure you continue this type of printing, the amount of ink ...print in the print cartridge. Used Cartridge A used up before their expiry date, preferably within six months after its package is empty, head cleaning or flushing cannot be performed. • Cartridges that are no longer usable for printing reserve a small quantity of ink consumed for ...
... Print cartridges should be used print cartridge was installed. See p.180 "Replacing a Print Cartridge". • If the cartridge is empty, head cleaning or flushing cannot be greater than usual. Replace the print cartridge. Make sure you continue this type of printing, the amount of ink ...print in the print cartridge. Used Cartridge A used up before their expiry date, preferably within six months after its package is empty, head cleaning or flushing cannot be performed. • Cartridges that are no longer usable for printing reserve a small quantity of ink consumed for ...

User Guide
Page 253
... Feed. Press the [Form Feed] key, and then the machine prints the remaining pages following the missed page(s). • Cancel the print job. Maintenance Failed Head cleaning, head flushing, or other maintenance operations have failed. See p.101 "Canceling Printing". 251 Cannot Recover Error Page If you resume printing after clearing the error.
... Feed. Press the [Form Feed] key, and then the machine prints the remaining pages following the missed page(s). • Cancel the print job. Maintenance Failed Head cleaning, head flushing, or other maintenance operations have failed. See p.101 "Canceling Printing". 251 Cannot Recover Error Page If you resume printing after clearing the error.

