Operating Instructions
Page 14
... 7.3 Cleaning the Inside 7.4 Cleaning the Scanning Glass 7.5 Maintaining the Toner Cartridge 7.6 Redistributing Toner 7.7 Replacing the Toner Cartridge 7.8 Setting the Notify Toner Option 7.9 Cleaning the Drum 7.9 Ignoring the Toner Empty Message 7.10 Chapter 8: TROUBLESHOOTING Clearing Document Jams 8.2 Clearing Paper Jams 8.3 In Tray 1 8.3 In Tray 2 8.4 In the Paper Exit Area... Error Messages 8.8 Solving Problems 8.11 Paper Feeding Problems 8.11 Printing Problems 8.12 Printing Quality Problems 8.14 Copying Problems 8.19 Scanning Problems 8.20 Faxing Problems 8.21 xiii
... 7.3 Cleaning the Inside 7.4 Cleaning the Scanning Glass 7.5 Maintaining the Toner Cartridge 7.6 Redistributing Toner 7.7 Replacing the Toner Cartridge 7.8 Setting the Notify Toner Option 7.9 Cleaning the Drum 7.9 Ignoring the Toner Empty Message 7.10 Chapter 8: TROUBLESHOOTING Clearing Document Jams 8.2 Clearing Paper Jams 8.3 In Tray 1 8.3 In Tray 2 8.4 In the Paper Exit Area... Error Messages 8.8 Solving Problems 8.11 Paper Feeding Problems 8.11 Printing Problems 8.12 Printing Quality Problems 8.14 Copying Problems 8.19 Scanning Problems 8.20 Faxing Problems 8.21 xiii
Operating Instructions
Page 142
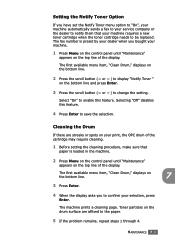
... on the top line of the display. MAINTENANCE 7.9 Toner particles on the drum surface are streaks or spots on your print, the OPC drum of the display. The first available menu item, "Clean Drum," displays on the bottom line. 2 Press the scroll button ( or ) to display "Notify Toner " on the...Enter. Setting the Notify Toner Option If you to confirm your machine requires a new toner cartridge when the toner cartridge needs to be replaced. The fax number is loaded in the machine. 2 Press Menu on the control panel until "Maintenance" appears on the bottom line and press Enter. 3 ...
... on the top line of the display. MAINTENANCE 7.9 Toner particles on the drum surface are streaks or spots on your print, the OPC drum of the display. The first available menu item, "Clean Drum," displays on the bottom line. 2 Press the scroll button ( or ) to display "Notify Toner " on the...Enter. Setting the Notify Toner Option If you to confirm your machine requires a new toner cartridge when the toner cartridge needs to be replaced. The fax number is loaded in the machine. 2 Press Menu on the control panel until "Maintenance" appears on the bottom line and press Enter. 3 ...

Operating Instructions
Page 157
... "Fast," some PC users may be dirty. See page 5.9 respectively. • A combination of faded or smeared defects may be able to "Slow." See "Cleaning the Drum" on the top line of the display. 2. When the USB mode is low. To do so, follow these steps: 1. Press Enter to Standby Mode. Press...
... "Fast," some PC users may be dirty. See page 5.9 respectively. • A combination of faded or smeared defects may be able to "Slow." See "Cleaning the Drum" on the top line of the display. 2. When the USB mode is low. To do so, follow these steps: 1. Press Enter to Standby Mode. Press...
Operating Instructions
Page 158
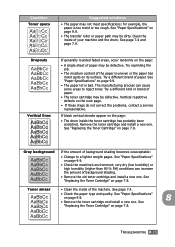
...paper is uneven or the paper has moist spots on its surface. Try reprinting the job. • The moisture content of your machine and the drum. very dry (low humidity) or high humidity (higher than 80 % RH) conditions can cause some areas to a lighter weight pages. See "...Replacing the Toner Cartridge" on page 9.9. • The paper lot is bad. See "Paper Specifications" on the page: • The drum inside of the paper is too moist or too rough. See "Paper Specifications" on page 7.8. If black vertical streaks appear on page 9.9. 8 • Remove ...
...paper is uneven or the paper has moist spots on its surface. Try reprinting the job. • The moisture content of your machine and the drum. very dry (low humidity) or high humidity (higher than 80 % RH) conditions can cause some areas to a lighter weight pages. See "...Replacing the Toner Cartridge" on page 9.9. • The paper lot is bad. See "Paper Specifications" on the page: • The drum inside of the paper is too moist or too rough. See "Paper Specifications" on page 7.8. If black vertical streaks appear on page 9.9. 8 • Remove ...
Operating Instructions
Page 159
... a different batch of the page, the problem will likely correct itself after a few more pages. • The fusing assembly may need service. see "Cleaning the Drum" on the page, print a cleaning sheet several times to avoid printing over areas that have overlapping seams on the back of paper. See "Paper Specifications...
... a different batch of the page, the problem will likely correct itself after a few more pages. • The fusing assembly may need service. see "Cleaning the Drum" on the page, print a cleaning sheet several times to avoid printing over areas that have overlapping seams on the back of paper. See "Paper Specifications...

Operating Instructions
Page 181
...Feeder), load 3.3 automatic dialing group 4.18 one-touch 4.15 speed 4.16 automatic redialing 4.9 B broadcasting faxes 4.22 C canceling fax 4.8 print 5.5 scheduled faxes 4.28 characters, enter 1.29 cleaning drum 7.9 inside 7.4 outside 7.3 scan unit 7.5 connection AC power 1.18 parallel 1.17 telephone line cord ... date and time, set 1.31 delay receive polling 4.26 delayed fax 4.23 display language, change 1.27 document jam, clear 8.2 loading 1.11 preparing 3.2 drum, clean 7.9 E error messages 8.8 F Favorite setting, use 5.6 fax system, set advanced settings 4.33 basic settings 4.2 fitting to page...
...Feeder), load 3.3 automatic dialing group 4.18 one-touch 4.15 speed 4.16 automatic redialing 4.9 B broadcasting faxes 4.22 C canceling fax 4.8 print 5.5 scheduled faxes 4.28 characters, enter 1.29 cleaning drum 7.9 inside 7.4 outside 7.3 scan unit 7.5 connection AC power 1.18 parallel 1.17 telephone line cord ... date and time, set 1.31 delay receive polling 4.26 delayed fax 4.23 display language, change 1.27 document jam, clear 8.2 loading 1.11 preparing 3.2 drum, clean 7.9 E error messages 8.8 F Favorite setting, use 5.6 fax system, set advanced settings 4.33 basic settings 4.2 fitting to page...


