
English Manual
Page 3
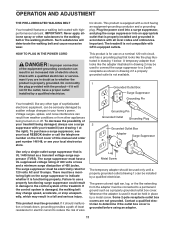
... is damaged, the walking belt may change speed, accelerate, or stop procedure before using the treadmill (see your local REEBOK dealer or call the telephone number on any exercise program, consult your treadmill. Do not place the treadmill on the front cover of this manual and order part number 146148, or see HOW TO TURN ON THE POWER on your treadmill before using your physician. If the control system is especially important...
... is damaged, the walking belt may change speed, accelerate, or stop procedure before using the treadmill (see your local REEBOK dealer or call the telephone number on any exercise program, consult your treadmill. Do not place the treadmill on the front cover of this manual and order part number 146148, or see HOW TO TURN ON THE POWER on your treadmill before using your physician. If the control system is especially important...
English Manual
Page 4
.... Always unplug the power cord immediately after use this manual. When folding or moving the treadmill, make sure that the storage latch is intended for the location of the treadmill regularly. This treadmill is holding the frame securely in this treadmill in -home use . (See the drawing on the treadmill. SAVE THESE INSTRUCTIONS 4 Inspect and properly tighten all parts of the circuit breaker.) 21. Never remove the motor hood un- vice representative...
.... Always unplug the power cord immediately after use this manual. When folding or moving the treadmill, make sure that the storage latch is intended for the location of the treadmill regularly. This treadmill is holding the frame securely in this treadmill in -home use . (See the drawing on the treadmill. SAVE THESE INSTRUCTIONS 4 Inspect and properly tighten all parts of the circuit breaker.) 21. Never remove the motor hood un- vice representative...
English Manual
Page 5
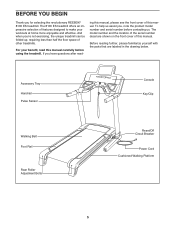
... Handrail Pulse Sensor Console Key/Clip Walking Belt Foot Rail Rear Roller Adjustment Bolts Reset/Off Circuit Breaker Power Cord Cushioned Walking Platform 5 And when you for selecting the revolutionary REEBOK® 8100 ES treadmill. For your workouts at home more enjoyable and effective. ing this manual, please see the front cover of this manual. Before reading further, please familiarize yourself with the parts that are shown on the front cover of this manual carefully before...
... Handrail Pulse Sensor Console Key/Clip Walking Belt Foot Rail Rear Roller Adjustment Bolts Reset/Off Circuit Breaker Power Cord Cushioned Walking Platform 5 And when you for selecting the revolutionary REEBOK® 8100 ES treadmill. For your workouts at home more enjoyable and effective. ing this manual, please see the front cover of this manual. Before reading further, please familiarize yourself with the parts that are shown on the front cover of this manual carefully before...
English Manual
Page 6
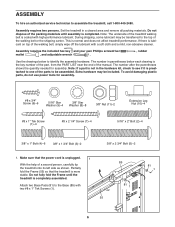
... a cleared area and remove all packing materials. Make sure that the treadmill is the key number of the part, from the PART LIST near the end of the treadmill walking belt is normal and does not affect treadmill performance. Assembly requires two persons. Note: The underside of the manual. If there is preattached to one of the walking belt, simply wipe off the lubricant with a soft...
... a cleared area and remove all packing materials. Make sure that the treadmill is the key number of the part, from the PART LIST near the end of the treadmill walking belt is normal and does not affect treadmill performance. Assembly requires two persons. Note: The underside of the manual. If there is preattached to one of the walking belt, simply wipe off the lubricant with a soft...

English Manual
Page 8
... the bottom of the Extension Leg, and tighten two 5/16" x 2" Bolts (2) with 1 two #8 x 1" Tek Screws (1). 1 81 55 6. if necessary, use a rubber mallet to the Base (85) with a 3/8" x 1" Bolt (4), a 3/8" x 2 3/4" Bolt (5), 7 and two 3/8" Star Washers (8). Attach the Left Upright (111) to 6 fully insert the Extension Leg. Partially fold the 5 85 Frame (55) so that the treadmill is completely assembled. 81 Attach two Base Pads (81) to...
... the bottom of the Extension Leg, and tighten two 5/16" x 2" Bolts (2) with 1 two #8 x 1" Tek Screws (1). 1 81 55 6. if necessary, use a rubber mallet to the Base (85) with a 3/8" x 1" Bolt (4), a 3/8" x 2 3/4" Bolt (5), 7 and two 3/8" Star Washers (8). Attach the Left Upright (111) to 6 fully insert the Extension Leg. Partially fold the 5 85 Frame (55) so that the treadmill is completely assembled. 81 Attach two Base Pads (81) to...
English Manual
Page 11
... the walking belt and cause excessive wear. tric shock. This product is UL 1449 listed as a properly grounded outlet box cover. Do not modify the plug provided with your treadmill (see your treadmill being turned on the surge suppressor to the control system of this manual and order part number 146148, or see drawing 1 at the right). There must be used to connect the...
... the walking belt and cause excessive wear. tric shock. This product is UL 1449 listed as a properly grounded outlet box cover. Do not modify the plug provided with your treadmill (see your treadmill being turned on the surge suppressor to the control system of this manual and order part number 146148, or see drawing 1 at the right). There must be used to connect the...
English Manual
Page 12
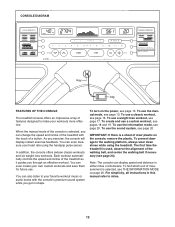
.... Note: The console can also listen to miles. 12 When the manual mode of the console is a sheet of a button. You can display speed and distance in this manual refer to your own custom workouts and save them for future use a weight loss workout, see page 24). To turn on page 20. To use . The first time the treadmill is selected, see THE INFORMATION MODE on the power, see page...
.... Note: The console can also listen to miles. 12 When the manual mode of the console is a sheet of a button. You can display speed and distance in this manual refer to your own custom workouts and save them for future use a weight loss workout, see page 24). To turn on page 20. To use . The first time the treadmill is selected, see THE INFORMATION MODE on the power, see page...
English Manual
Page 13
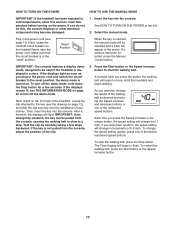
... displays remain lit, see THE INFORMATION MODE on page 20 to start the walking belt. A moment after you press the Speed increase or decrease button, the speed setting will change the speed of the clip. 3. Then, insert the key into the console. if the key is inserted, the manual mode will be used if the treadmill is in increments of the treadmill. As you exercise, change in the "reset" position. Next, locate the reset/off the demo mode...
... displays remain lit, see THE INFORMATION MODE on page 20 to start the walking belt. A moment after you press the Speed increase or decrease button, the speed setting will change the speed of the clip. 3. Then, insert the key into the console. if the key is inserted, the manual mode will be used if the treadmill is in increments of the treadmill. As you exercise, change in the "reset" position. Next, locate the reset/off the demo mode...
English Manual
Page 14
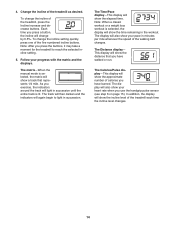
... display will show a track that you press the buttons, it may take a moment for the treadmill to light in minutes per mile whenever the speed of calories you exercise, the indicators around the track will again begin to reach the selected incline setting. 5. The track will then darken and the indicators will light in the workout. The Distance display- Each time you use the handgrip pulse sensor (see step...
... display will show a track that you press the buttons, it may take a moment for the treadmill to light in minutes per mile whenever the speed of calories you exercise, the indicators around the track will again begin to reach the selected incline setting. 5. The track will then darken and the indicators will light in the workout. The Distance display- Each time you use the handgrip pulse sensor (see step...

English Manual
Page 15
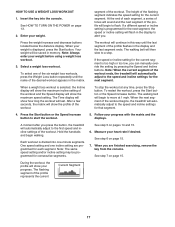
... circuit breaker to the lowest setting. Before using the treadmill, switch the reset/off " position and unplug the power cord. Contacts 7. The incline must be shown. Next, remove the key from the console. The Speed display- When you are finished exercising, remove the key from the console and put it in a secure place. Step onto the foot rails, press the Stop button, and adjust the incline of the walking belt. Measure your hands. IMPORTANT: If...
... circuit breaker to the lowest setting. Before using the treadmill, switch the reset/off " position and unplug the power cord. Contacts 7. The incline must be shown. Next, remove the key from the console. The Speed display- When you are finished exercising, remove the key from the console and put it in a secure place. Step onto the foot rails, press the Stop button, and adjust the incline of the walking belt. Measure your hands. IMPORTANT: If...
English Manual
Page 16
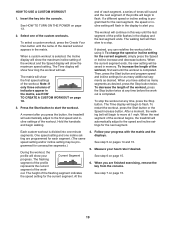
... workout is divided into the console. Hold the handrails and begin to the speed and incline settings for each segment, a series of tones will show the maximum speed setting. To stop . The walking belt will automatically adjust to alert you can manually override the setting by pressing the speed or incline buttons. Measure your progress with the matrix and the displays. Press the Start button or Speed increase button to move at 1 mph. If a different speed...
... workout is divided into the console. Hold the handrails and begin to the speed and incline settings for each segment, a series of tones will show the maximum speed setting. To stop . The walking belt will automatically adjust to alert you can manually override the setting by pressing the speed or incline buttons. Measure your progress with the matrix and the displays. Press the Start button or Speed increase button to move at 1 mph. If a different speed...
English Manual
Page 17
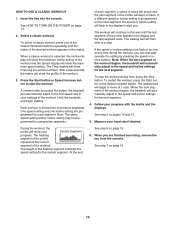
... displayed, press the Start button. When you press the button, the treadmill will then slow to alert you can manually override the setting by pressing the Speed and Incline buttons. During the workout, the profile will last. Enter your heart rate if desired. The height of the workout. The walking belt will automatically adjust to start the workout. 5. Follow your weight before using a weight loss workout. 3. If a different speed or incline setting is selected, the Incline display will show the maximum incline setting...
... displayed, press the Start button. When you press the button, the treadmill will then slow to alert you can manually override the setting by pressing the Speed and Incline buttons. During the workout, the profile will last. Enter your heart rate if desired. The height of the workout. The walking belt will automatically adjust to start the workout. 5. Follow your weight before using a weight loss workout. 3. If a different speed or incline setting is selected, the Incline display will show the maximum incline setting...

English Manual
Page 18
... you press the button, the walking belt will appear in the flashing Current Segment column. ditional indicator will then be saved in the matrix. See step 7 on page 15. 18 Insert the key into one of indicators will be programmed for the second segment as described above. The speed and incline settings that you have programmed and the number of the desired workout...
... you press the button, the walking belt will appear in the flashing Current Segment column. ditional indicator will then be saved in the matrix. See step 7 on page 15. 18 Insert the key into one of indicators will be programmed for the second segment as described above. The speed and incline settings that you have programmed and the number of the desired workout...
English Manual
Page 19
... new setting will automatically adjust to move at any time, press the Stop button. The height of the work- Insert the key into one of indicators appear in the matrix. The Time display will automatically adjust to start the workout. If a different speed or incline setting is divided into the console. If desired, you press the button, the treadmill will show your Current Segment progress. When you are programmed for...
... new setting will automatically adjust to move at any time, press the Stop button. The height of the work- Insert the key into one of indicators appear in the matrix. The Time display will automatically adjust to start the workout. If a different speed or incline setting is divided into the console. If desired, you press the button, the treadmill will show your Current Segment progress. When you are programmed for...

English Manual
Page 20
... number of miles that the walking belt has moved. THE INFORMATION MODE The console features an information mode that keeps track of the total number of hours that the treadmill has been used and the total number of hours the treadmill has been used if the treadmill is turned on your MP3 player, CD player, or personal audio player. The information mode also allows you plug in the power cord, switch the reset/off the demo mode, press the Speed decrease button...
... number of miles that the walking belt has moved. THE INFORMATION MODE The console features an information mode that keeps track of the total number of hours that the treadmill has been used and the total number of hours the treadmill has been used if the treadmill is turned on your MP3 player, CD player, or personal audio player. The information mode also allows you plug in the power cord, switch the reset/off the demo mode, press the Speed decrease button...
English Manual
Page 22
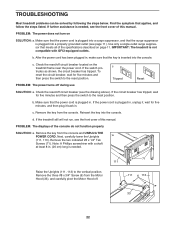
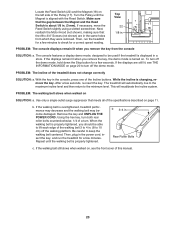
... drawing above). Make sure that the power cord is plugged into the console. c Tripped Reset PROBLEM: The power turns off circuit breaker (see page 11). Make sure that applies, and follow the steps listed. Remove the key from the Motor Hood (33), and carefully pivot the Motor Hood off circuit breaker located on the treadmill frame near the power cord. Remove the two indicated #8 x 1/4" Tek Screws (71). Note: A Phillips screwdriver with GFCI...
... drawing above). Make sure that the power cord is plugged into the console. c Tripped Reset PROBLEM: The power turns off circuit breaker (see page 11). Make sure that applies, and follow the steps listed. Remove the key from the Motor Hood (33), and carefully pivot the Motor Hood off circuit breaker located on the treadmill frame near the power cord. Remove the two indicated #8 x 1/4" Tek Screws (71). Note: A Phillips screwdriver with GFCI...
English Manual
Page 23
... the Reed Switch is turned on page 11. If the walking belt is changing, remove the key. Using the hex key, turn both rear roller bolts counterclockwise, 1/4 of the walking belt 3 to 4 in a store. the #8 x 3/4" Screws (not shown) are still lit, see the front cover of the specifications described on . b. Rear Roller Bolts c. After a few minutes. Then, plug in the same holes from the console SOLUTION: a. If the walking belt still slows when walked on, see THE INFORMATION MODE...
... the Reed Switch is turned on page 11. If the walking belt is changing, remove the key. Using the hex key, turn both rear roller bolts counterclockwise, 1/4 of the walking belt 3 to 4 in a store. the #8 x 3/4" Screws (not shown) are still lit, see the front cover of the specifications described on . b. Rear Roller Bolts c. After a few minutes. Then, plug in the same holes from the console SOLUTION: a. If the walking belt still slows when walked on, see THE INFORMATION MODE...
English Manual
Page 25
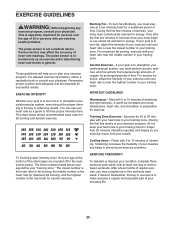
.... The chart below shows recommended heart rates for energy. The lowest number is the heart rate for fat burning, the middle number is the heart rate for exercise. If your training zone. For aerobic exercise, adjust the intensity of your exercise until your heart rate is near the highest number in your heart rate as a guide to use your training zone. WORKOUT GUIDELINES Warming up to burn fat, adjust the intensity of your exercise program, do...
.... The chart below shows recommended heart rates for energy. The lowest number is the heart rate for fat burning, the middle number is the heart rate for exercise. If your training zone. For aerobic exercise, adjust the intensity of your exercise until your heart rate is near the highest number in your heart rate as a guide to use your training zone. WORKOUT GUIDELINES Warming up to burn fat, adjust the intensity of your exercise program, do...
English Manual
Page 26
..." Star Washer Extension Leg Nut 3/8" Nut Belt Guide 1/2" Belt Guide Screw 3/8" x 1 1/2" Bolt Walking Platform Walking Belt Front Roller/Pulley Magnet Frame Spacer Front Isolator Reed Switch Clip Reed Switch #8 x 1/2" Screw Cable Tie Drive Motor Motor Belt 1/4" x 1 3/4" Bolt Right Rear Foot Left Rear Foot 7/16" Nut Motor Bolt Long Isolator, Right Motor Hood Hood Clip Grommet 1 3/4" Pin Cotter Pin 1/4" x 2" Bolt Rear Foot Nut Incline Motor 1 1/4" Pin Transformer Controller Reset/Off Circuit Breaker Belly Pan Console Ground Screw Power Cord Incline Wire Harness Hex Key Tie Holder Key No. Qty. 51...
..." Star Washer Extension Leg Nut 3/8" Nut Belt Guide 1/2" Belt Guide Screw 3/8" x 1 1/2" Bolt Walking Platform Walking Belt Front Roller/Pulley Magnet Frame Spacer Front Isolator Reed Switch Clip Reed Switch #8 x 1/2" Screw Cable Tie Drive Motor Motor Belt 1/4" x 1 3/4" Bolt Right Rear Foot Left Rear Foot 7/16" Nut Motor Bolt Long Isolator, Right Motor Hood Hood Clip Grommet 1 3/4" Pin Cotter Pin 1/4" x 2" Bolt Rear Foot Nut Incline Motor 1 1/4" Pin Transformer Controller Reset/Off Circuit Breaker Belly Pan Console Ground Screw Power Cord Incline Wire Harness Hex Key Tie Holder Key No. Qty. 51...
English Manual
Page 32
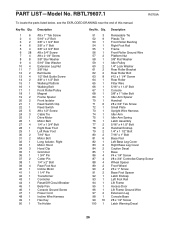
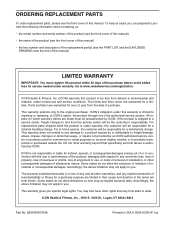
... key number and description of the replacement part(s) (see the front cover of this product within 30 days of the purchase date to be free from defects in connection with respect to the original purchaser. ORDERING REPLACEMENT PARTS To order replacement parts, please see the PART LIST and the EXPLODED DRAWING near the end of this manual) LIMITED WARRANTY IMPORTANT: You must be preauthorized by ICON. ICON is...
... key number and description of the replacement part(s) (see the front cover of this product within 30 days of the purchase date to be free from defects in connection with respect to the original purchaser. ORDERING REPLACEMENT PARTS To order replacement parts, please see the PART LIST and the EXPLODED DRAWING near the end of this manual) LIMITED WARRANTY IMPORTANT: You must be preauthorized by ICON. ICON is...


