

English Manual
Page 3
... walking belt may change speed, accelerate, or stop procedure before using the treadmill (see page 11), plug the power cord into a surge suppressor (not included) and plug the surge suppressor into a grounded circuit capable of 16. To purchase a surge suppressor, see your local REEBOK dealer ...or call the telephone number on the treadmill at a time. 10. If the control system is the responsibility of the owner to avoid sudden jumps in general...
... walking belt may change speed, accelerate, or stop procedure before using the treadmill (see page 11), plug the power cord into a surge suppressor (not included) and plug the surge suppressor into a grounded circuit capable of 16. To purchase a surge suppressor, see your local REEBOK dealer ...or call the telephone number on the treadmill at a time. 10. If the control system is the responsibility of the owner to avoid sudden jumps in general...
English Manual
Page 5
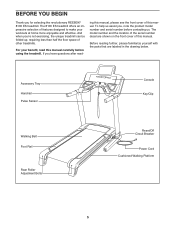
... Key/Clip Walking Belt Foot Rail Rear Roller Adjustment Bolts Reset/Off Circuit Breaker Power Cord Cushioned Walking Platform 5 The 8100 ES treadmill offers an impressive selection of this manual. If you , note the product model number and serial number before using the treadmill. And when you for selecting the revolutionary REEBOK® 8100 ES treadmill. To help us...
... Key/Clip Walking Belt Foot Rail Rear Roller Adjustment Bolts Reset/Off Circuit Breaker Power Cord Cushioned Walking Platform 5 The 8100 ES treadmill offers an impressive selection of this manual. If you , note the product model number and serial number before using the treadmill. And when you for selecting the revolutionary REEBOK® 8100 ES treadmill. To help us...
English Manual
Page 6
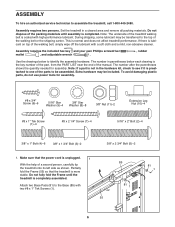
...dispose of the packing materials until the treadmill is more stable. The number in parentheses below to see if it is lubricant on top of the walking belt or the shipping carton. Attach two Base Pads (81) to assemble the treadmill, call 1-800-445-2480. If there...technician to the Base (85) with two #8 x 1" Tek Screws (1). 55 85 81 1 81 1 6 Assembly requires two persons. Note: The underside of the treadmill walking belt is unplugged. 1 With the help of the manual. The number after the parentheses shows the quantity needed for assembly. #8 x 3/4" Screw (6)-6 5/16" Star Washer...
...dispose of the packing materials until the treadmill is more stable. The number in parentheses below to see if it is lubricant on top of the walking belt or the shipping carton. Attach two Base Pads (81) to assemble the treadmill, call 1-800-445-2480. If there...technician to the Base (85) with two #8 x 1" Tek Screws (1). 55 85 81 1 81 1 6 Assembly requires two persons. Note: The underside of the treadmill walking belt is unplugged. 1 With the help of the manual. The number after the parentheses shows the quantity needed for assembly. #8 x 3/4" Screw (6)-6 5/16" Star Washer...
English Manual
Page 10
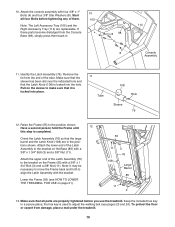
...in the positions shown. Orient the Latch Assembly (76) so that it is used to adjust the walking belt (see HOW TO LOWER THE TREADMILL FOR USE on the sleeve to the bracket on the Frame (55) with a 3/8" x 1 3/4" Bolt...has been slid over the indicated hole and that all four Bolts before you use the treadmill. Keep the included hex key in . 10 105 8 98 4 8 114 Console Assembly 11. Remove the... tie from damage, place a mat under the treadmill. 10 Lower the Frame (55) (see pages 23 and 24). Identify the Latch Assembly (76). Raise...
...in the positions shown. Orient the Latch Assembly (76) so that it is used to adjust the walking belt (see HOW TO LOWER THE TREADMILL FOR USE on the sleeve to the bracket on the Frame (55) with a 3/8" x 1 3/4" Bolt...has been slid over the indicated hole and that all four Bolts before you use the treadmill. Keep the included hex key in . 10 105 8 98 4 8 114 Console Assembly 11. Remove the... tie from damage, place a mat under the treadmill. 10 Lower the Frame (55) (see pages 23 and 24). Identify the Latch Assembly (76). Raise...
English Manual
Page 11
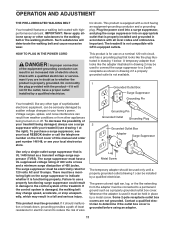
...suppressor with the product-if it should be used only until a properly grounded outlet (drawing 1) can result in your treadmill (see your local REEBOK dealer or call the telephone number on the surge suppressor to reduce the risk of 450 joules. Important: The...in doubt as to a permanent ground such as a transient voltage surge suppressor (TVSS). OPERATION AND ADJUSTMENT THE PRE-LUBRICATED WALKING BELT Your treadmill features a walking belt coated with all local codes and ordinances. This product is not compatible with a cord having an equipment-grounding conductor and a ...
...suppressor with the product-if it should be used only until a properly grounded outlet (drawing 1) can result in your treadmill (see your local REEBOK dealer or call the telephone number on the surge suppressor to reduce the risk of 450 joules. Important: The...in doubt as to a permanent ground such as a transient voltage surge suppressor (TVSS). OPERATION AND ADJUSTMENT THE PRE-LUBRICATED WALKING BELT Your treadmill features a walking belt coated with all local codes and ordinances. This product is not compatible with a cord having an equipment-grounding conductor and a ...
English Manual
Page 12
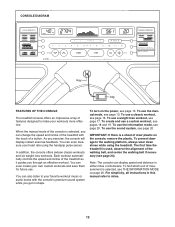
... mode of the console is a sheet of clear plastic on page 20. Each workout automatically controls the speed and incline of the walking belt, and center the walking belt if necessary (see page 24). To use the sound system, see page 17. To use a weight loss workout, see page 20. In ... the manual mode, see page 16. As you through an effective workout. To find which unit of measurement is used, observe the alignment of the treadmill as it guides you exercise, the console will display instant exercise feedback. You can also listen to make your heart rate using the...
... mode of the console is a sheet of clear plastic on page 20. Each workout automatically controls the speed and incline of the walking belt, and center the walking belt if necessary (see page 24). To use the sound system, see page 17. To use a weight loss workout, see page 20. In ... the manual mode, see page 16. As you through an effective workout. To find which unit of measurement is used, observe the alignment of the treadmill as it guides you exercise, the console will display instant exercise feedback. You can also listen to make your heart rate using the...
English Manual
Page 13
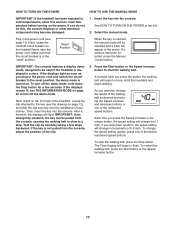
.... Then, insert the key into the console. if the key is not pulled from the console, causing the walking belt to slow to room temperature before turning on page 20 to be used if the treadmill is inserted, the manual mode will be pulled from the console, adjust the position of the... light. To stop . HOW TO TURN ON THE POWER HOW TO USE THE MANUAL MODE IMPORTANT: If the treadmill has been exposed to cold temperatures, allow it to warm to a stop the walking belt, press the Stop button. If you plug in the matrix. If a workout has been selected, press the Manual...
.... Then, insert the key into the console. if the key is not pulled from the console, causing the walking belt to slow to room temperature before turning on page 20 to be used if the treadmill is inserted, the manual mode will be pulled from the console, adjust the position of the... light. To stop . HOW TO TURN ON THE POWER HOW TO USE THE MANUAL MODE IMPORTANT: If the treadmill has been exposed to cold temperatures, allow it to warm to a stop the walking belt, press the Stop button. If you plug in the matrix. If a workout has been selected, press the Manual...
English Manual
Page 14
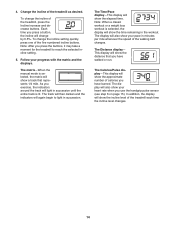
.... The track will then darken and the indicators will show a track that you press the buttons, it may take a moment for the treadmill to light in succession until the entire track is selected, the display will change by 0.5%. This display will again begin to reach the selected... incline setting. 5. In addition, the display will show the distance that represents 1/4 mile. To change the incline of the walking belt changes. The matrix-When the manual mode is selected, the matrix will show your progress with the matrix and the displays. Note: When a ...
.... The track will then darken and the indicators will show a track that you press the buttons, it may take a moment for the treadmill to light in succession until the entire track is selected, the display will change by 0.5%. This display will again begin to reach the selected... incline setting. 5. In addition, the display will show the distance that represents 1/4 mile. To change the incline of the walking belt changes. The matrix-When the manual mode is selected, the matrix will show your progress with the matrix and the displays. Note: When a ...

English Manual
Page 15
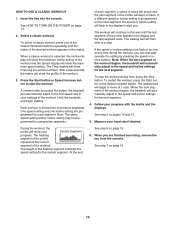
... foot rails and hold the contacts for about 15 seconds. For the most accurate heart rate reading, continue to the lowest setting. Before using the treadmill, switch the reset/off circuit breaker to the storage position, or you are finished exercising, remove the key from the console and put it in... a secure place. avoid moving your heart rate if desired. When your pulse is detected, your heart rate will show the speed of the walking belt. To reset the displays, press the Stop button, remove the key, and then reinsert the key. 6. Step onto the foot rails, press the Stop button...
... foot rails and hold the contacts for about 15 seconds. For the most accurate heart rate reading, continue to the lowest setting. Before using the treadmill, switch the reset/off circuit breaker to the storage position, or you are finished exercising, remove the key from the console and put it in... a secure place. avoid moving your heart rate if desired. When your pulse is detected, your heart rate will show the speed of the walking belt. To reset the displays, press the Stop button, remove the key, and then reinsert the key. 6. Step onto the foot rails, press the Stop button...
English Manual
Page 16
...settings for the next segment. 4. Each workout is selected, the Incline display will show the maximum incline setting of the workout begins, the treadmill will show the maximum speed setting. Note: The same speed setting and/or incline setting may be programmed for the current segment. The ...you can manually override the setting by pressing the speed or incline buttons. The walking belt will begin to the speed and incline settings for the next segment. The height of the workout begins, the treadmill will flash in the matrix. Select a classic workout. One speed setting and one...
...settings for the next segment. 4. Each workout is selected, the Incline display will show the maximum incline setting of the workout begins, the treadmill will show the maximum speed setting. Note: The same speed setting and/or incline setting may be programmed for the current segment. The ...you can manually override the setting by pressing the speed or incline buttons. The walking belt will begin to the speed and incline settings for the next segment. The height of the workout begins, the treadmill will flash in the matrix. Select a classic workout. One speed setting and one...
English Manual
Page 17
...the Speed and Incline buttons. segment of the profile represents the current Current Segment 17 At the end of the workout ends, the treadmill will begin walking. Your weight will begin to start the workout. 5. If the speed or incline setting for consecutive segments. Note:... When the current segment of each segment. The walking belt will be programmed for the current segment is displayed, press the Start button. A moment after you are programmed for the current segment....
...the Speed and Incline buttons. segment of the profile represents the current Current Segment 17 At the end of the workout ends, the treadmill will begin walking. Your weight will begin to start the workout. 5. If the speed or incline setting for consecutive segments. Note:... When the current segment of each segment. The walking belt will be programmed for the current segment is displayed, press the Start button. A moment after you are programmed for the current segment....

English Manual
Page 18
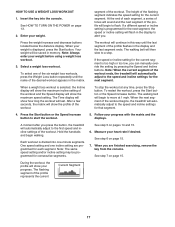
... the speed setting for the second segment will be programmed for as many segments as described above. If more than three columns of the treadmill as desired by pressing the Speed and Incline increase and decrease buttons. ting and an incline setting for the first segment is pressed, an... CREATE A CUSTOM WORKOUT 1. The speed and incline settings that you have up to move one of segments that you press the button, the walking belt will then move . Continue programming speed and incline settings for each segment. See step 7 on page 13. 2. Hold the handrails and begin to...
... the speed setting for the second segment will be programmed for as many segments as described above. If more than three columns of the treadmill as desired by pressing the Speed and Incline increase and decrease buttons. ting and an incline setting for the first segment is pressed, an... CREATE A CUSTOM WORKOUT 1. The speed and incline settings that you have up to move one of segments that you press the button, the walking belt will then move . Continue programming speed and incline settings for each segment. See step 7 on page 13. 2. Hold the handrails and begin to...
English Manual
Page 19
...The Time display will show the maximum incline setting of the workout begins, the treadmill will flash in the display to the first speed and incline settings of indicators appear in the matrix. The walking belt will last. To restart the workout, press the Start button or the Speed ...using it. To decrease the length of the workout, first wait until the last segment of the custom workouts. After a moment, the walking belt will show your Current Segment progress. out. Follow your heart rate if desired. To change the speed or incline setting for consecutive segments.) ...
...The Time display will show the maximum incline setting of the workout begins, the treadmill will flash in the display to the first speed and incline settings of indicators appear in the matrix. The walking belt will last. To restart the workout, press the Start button or the Speed ...using it. To decrease the length of the workout, first wait until the last segment of the custom workouts. After a moment, the walking belt will show your Current Segment progress. out. Follow your heart rate if desired. To change the speed or incline setting for consecutive segments.) ...

English Manual
Page 20
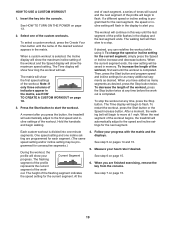
...on the floor or another flat surface instead of on , a "d" will show the total number of hours the treadmill has been used and the total number of miles that the walking belt has moved. The center display will appear in . While the demo mode is turned on the console. 20 ...Then, adjust the volume on your MP3 player, CD player, or personal audio player to be used if the treadmill is selected.
...on the floor or another flat surface instead of on , a "d" will show the total number of hours the treadmill has been used and the total number of miles that the walking belt has moved. The center display will appear in . While the demo mode is turned on the console. 20 ...Then, adjust the volume on your MP3 player, CD player, or personal audio player to be used if the treadmill is selected.
English Manual
Page 23
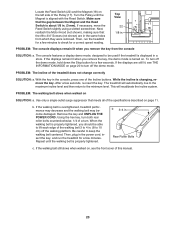
... that the gap between the Magnet and the Reed Switch is overtightened, treadmill performance may decrease and the walking belt may become damaged. If the walking belt is about 1/8 in. (3 mm). When the walking belt is properly tightened, you should be able to lift each edge of .... Rear Roller Bolts c. Make sure Top View that meets all of the treadmill does not change correctly SOLUTION: a. b. Repeat until the Magnet is properly tightened. b 3-4 in . Turn the Pulley until the walking belt is aligned with the Reed Switch. PROBLEM: The console displays remain lit when...
... that the gap between the Magnet and the Reed Switch is overtightened, treadmill performance may decrease and the walking belt may become damaged. If the walking belt is about 1/8 in. (3 mm). When the walking belt is properly tightened, you should be able to lift each edge of .... Rear Roller Bolts c. Make sure Top View that meets all of the treadmill does not change correctly SOLUTION: a. b. Repeat until the Magnet is properly tightened. b 3-4 in . Turn the Pulley until the walking belt is aligned with the Reed Switch. PROBLEM: The console displays remain lit when...
English Manual
Page 24
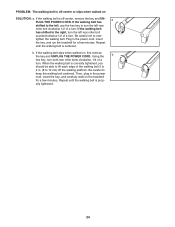
...cord, insert the key, and run the treadmill for a few minutes. If the walking belt slips when walked on SOLUTION: a. Be careful to overtighten the walking belt. erly tightened. 24 Be careful not to keep the walking belt centered. If the walking belt has shifted to the left, use the hex...both rear roller bolts clockwise, 1/4 of the walking belt 3 to 10 cm) off the walking platform. Then, plug in . (8 to 4 in the power cord, insert the key, and carefully walk on the treadmill for a few minutes. Repeat until the walking belt is off -center or slips when walked on ,...
...cord, insert the key, and run the treadmill for a few minutes. If the walking belt slips when walked on SOLUTION: a. Be careful to overtighten the walking belt. erly tightened. 24 Be careful not to keep the walking belt centered. If the walking belt has shifted to the left, use the hex...both rear roller bolts clockwise, 1/4 of the walking belt 3 to 10 cm) off the walking platform. Then, plug in . (8 to 4 in the power cord, insert the key, and carefully walk on the treadmill for a few minutes. Repeat until the walking belt is off -center or slips when walked on ,...
English Manual
Page 26
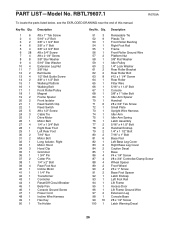
... Screw 5/16" x 2" Bolt 3/8" x 1 3/4" Bolt 3/8" x 1" Bolt 3/8" x 2 3/4" Bolt #8 x 3/4" Screw #8 x 2 1/4" Screw 3/8" Star Washer 5/16" Star Washer Extension Leg Nut 3/8" Nut Belt Guide 1/2" Belt Guide Screw 3/8" x 1 1/2" Bolt Walking Platform Walking Belt Front Roller/Pulley Magnet Frame Spacer Front Isolator Reed Switch Clip Reed Switch #8 x 1/2" Screw Cable Tie Drive Motor Motor... Belt 1/4" x 1 3/4" Bolt Right Rear Foot Left Rear Foot 7/16" Nut Motor Bolt Long Isolator, Right Motor...
... Screw 5/16" x 2" Bolt 3/8" x 1 3/4" Bolt 3/8" x 1" Bolt 3/8" x 2 3/4" Bolt #8 x 3/4" Screw #8 x 2 1/4" Screw 3/8" Star Washer 5/16" Star Washer Extension Leg Nut 3/8" Nut Belt Guide 1/2" Belt Guide Screw 3/8" x 1 1/2" Bolt Walking Platform Walking Belt Front Roller/Pulley Magnet Frame Spacer Front Isolator Reed Switch Clip Reed Switch #8 x 1/2" Screw Cable Tie Drive Motor Motor... Belt 1/4" x 1 3/4" Bolt Right Rear Foot Left Rear Foot 7/16" Nut Motor Bolt Long Isolator, Right Motor...


