
English Manual
Page 2
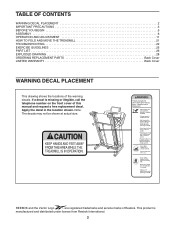
... BEGIN 5 ASSEMBLY 6 OPERATION AND ADJUSTMENT 11 HOW TO FOLD AND MOVE THE TREADMILL 21 TROUBLESHOOTING 22 EXERCISE GUIDELINES 25 PART LIST 26 EXPLODED DRAWING 28 ORDERING REPLACEMENT PARTS Back Cover LIMITED WARRANTY Back Cover WARNING DECAL PLACEMENT This drawing shows the locations of Reebok. If a decal is manufactured and distributed under license from...
... BEGIN 5 ASSEMBLY 6 OPERATION AND ADJUSTMENT 11 HOW TO FOLD AND MOVE THE TREADMILL 21 TROUBLESHOOTING 22 EXERCISE GUIDELINES 25 PART LIST 26 EXPLODED DRAWING 28 ORDERING REPLACEMENT PARTS Back Cover LIMITED WARRANTY Back Cover WARNING DECAL PLACEMENT This drawing shows the locations of Reebok. If a decal is manufactured and distributed under license from...
English Manual
Page 3
...shoes. The pulse sensor is not working properly. (See TROUBLESHOOTING on the same circuit. structions in sandals. 11. No other appliance should not be on page 22 if the treadmill is not a medical device. Do not operate the treadmill where aerosol products are adequately informed of clearance behind it...personal injury or property damage sustained by persons weighing more than one person on the treadmill at all warnings on page 13). 17. Always hold the handrails while using your local REEBOK dealer or call the telephone number on the front cover of this manual and ...
...shoes. The pulse sensor is not working properly. (See TROUBLESHOOTING on the same circuit. structions in sandals. 11. No other appliance should not be on page 22 if the treadmill is not a medical device. Do not operate the treadmill where aerosol products are adequately informed of clearance behind it...personal injury or property damage sustained by persons weighing more than one person on the treadmill at all warnings on page 13). 17. Always hold the handrails while using your local REEBOK dealer or call the telephone number on the front cover of this manual and ...
English Manual
Page 22
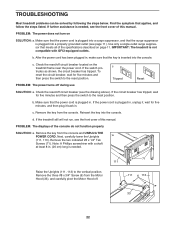
... (111, 113). Remove the three #8 x 3/4" Screw (6) from the Motor Hood (33), and carefully pivot the Motor Hood off circuit breaker located on the treadmill frame near the power cord. Check the reset/off . 71 111 111 6 113 33 22 d. Remove the two indicated #8 x 1/4" Tek Screws (71). ...the front cover of the console do not function properly SOLUTION: a. Remove the key from the console and UNPLUG THE POWER CORD. TROUBLESHOOTING Most treadmill problems can be solved by following the steps below. If the switch protrudes as shown, the circuit breaker has tripped. Find the ...
... (111, 113). Remove the three #8 x 3/4" Screw (6) from the Motor Hood (33), and carefully pivot the Motor Hood off circuit breaker located on the treadmill frame near the power cord. Check the reset/off . 71 111 111 6 113 33 22 d. Remove the two indicated #8 x 1/4" Tek Screws (71). ...the front cover of the console do not function properly SOLUTION: a. Remove the key from the console and UNPLUG THE POWER CORD. TROUBLESHOOTING Most treadmill problems can be solved by following the steps below. If the switch protrudes as shown, the circuit breaker has tripped. Find the ...