

English Manual
Page 1
....1 Serial No. If you have questions, or if parts are damaged or missing, DO NOT CONTACT THE STORE; Save this manual) before using this equipment. www.reebokfitness.com Model No. MT Sat. 8 a.m.-4 p.m. MT ON THE WEB: www.reebokservice.com CAUTION Read all precautions and instructions in the space ...
....1 Serial No. If you have questions, or if parts are damaged or missing, DO NOT CONTACT THE STORE; Save this manual) before using this equipment. www.reebokfitness.com Model No. MT Sat. 8 a.m.-4 p.m. MT ON THE WEB: www.reebokservice.com CAUTION Read all precautions and instructions in the space ...

English Manual
Page 3
... of the owner to the control system of the treadmill. Wear appropriate exercise clothes when using the treadmill. 18. Do not wear loose clothes that meets all users of this manual and order part number 146148, or see your local REEBOK dealer or call the telephone number on page 13).... by persons weighing more than one person on the walking belt. Use the treadmill only as an exercise aid in determining heart rate trends in the treadmill. Failure to avoid sudden jumps in small increments to use of this manual and all warnings and precautions. 3. Adjust the speed in speed...
... of the owner to the control system of the treadmill. Wear appropriate exercise clothes when using the treadmill. 18. Do not wear loose clothes that meets all users of this manual and order part number 146148, or see your local REEBOK dealer or call the telephone number on page 13).... by persons weighing more than one person on the walking belt. Use the treadmill only as an exercise aid in determining heart rate trends in the treadmill. Failure to avoid sudden jumps in small increments to use of this manual and all warnings and precautions. 3. Adjust the speed in speed...

English Manual
Page 4
...You must be performed by an authorized ser- Always unplug the power cord immediately after use . (See the drawing on the treadmill. Never insert any object into any opening on page 5 for in this manual should be able to safely lift 45 lbs. (20 kg) to raise, lower... hood un- nance and adjustment procedures described in -home use this treadmill in this manual. Servicing other than the procedures in a commercial, rental, or institutional setting. 23. Do not use only. DANGER: 25. When folding or moving the treadmill, make sure that the storage latch is not in the...
...You must be performed by an authorized ser- Always unplug the power cord immediately after use . (See the drawing on the treadmill. Never insert any object into any opening on page 5 for in this manual should be able to safely lift 45 lbs. (20 kg) to raise, lower... hood un- nance and adjustment procedures described in -home use this treadmill in this manual. Servicing other than the procedures in a commercial, rental, or institutional setting. 23. Do not use only. DANGER: 25. When folding or moving the treadmill, make sure that the storage latch is not in the...
English Manual
Page 5
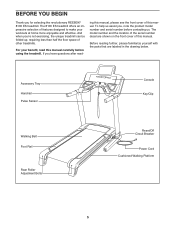
...revolutionary REEBOK® 8100 ES treadmill. BEFORE YOU BEGIN Thank you ʼre not exercising, the unique treadmill can be folded up, requiring less than half the floor space of other treadmills. ... features designed to make your benefit, read - The 8100 ES treadmill offers an impressive selection of this manual. ing this manual, please see the front cover of the serial number decal... are labeled in the drawing below. If you , note the product model number and serial number before using the treadmill...
...revolutionary REEBOK® 8100 ES treadmill. BEFORE YOU BEGIN Thank you ʼre not exercising, the unique treadmill can be folded up, requiring less than half the floor space of other treadmills. ... features designed to make your benefit, read - The 8100 ES treadmill offers an impressive selection of this manual. ing this manual, please see the front cover of the serial number decal... are labeled in the drawing below. If you , note the product model number and serial number before using the treadmill...
English Manual
Page 6
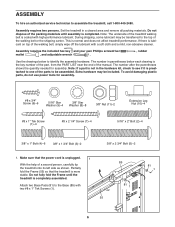
.... 1 With the help of a second person, carefully tip the treadmill onto its left side as shown. Assembly requires the included hex key and your own Phillips screwdriver mallet , and adjustable wrench . , rubber Use the drawings below each drawing is completely assembled. Extra hardware may be... transferred to the Base (85) with high-performance lubricant. Attach two Base Pads (81) to the top of the manual. The number after the parentheses shows the...
.... 1 With the help of a second person, carefully tip the treadmill onto its left side as shown. Assembly requires the included hex key and your own Phillips screwdriver mallet , and adjustable wrench . , rubber Use the drawings below each drawing is completely assembled. Extra hardware may be... transferred to the Base (85) with high-performance lubricant. Attach two Base Pads (81) to the top of the manual. The number after the parentheses shows the...
English Manual
Page 11
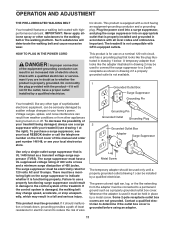
...rating of 400 volts or less and a minimum surge dissipation of this manual and order part number 146148, or see your treadmill (see drawing 1 at the right). Plug the power cord into ...Surge Suppressor Grounding Pin Grounding Pin Grounded Outlet Grounding Plug 2 Grounded Outlet Box Adapter Surge Suppressor Use only a single-outlet surge suppressor that is properly installed and grounded in an increased risk of... your homeʼs power. To purchase a surge suppressor, see your local REEBOK dealer or call the telephone number on the surge suppressor to indicate whether it will ...
...rating of 400 volts or less and a minimum surge dissipation of this manual and order part number 146148, or see your treadmill (see drawing 1 at the right). Plug the power cord into ...Surge Suppressor Grounding Pin Grounding Pin Grounded Outlet Grounding Plug 2 Grounded Outlet Box Adapter Surge Suppressor Use only a single-outlet surge suppressor that is properly installed and grounded in an increased risk of... your homeʼs power. To purchase a surge suppressor, see your local REEBOK dealer or call the telephone number on the surge suppressor to indicate whether it will ...
English Manual
Page 12
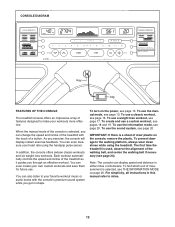
...the walking platform, always wear clean shoes while using the handgrip pulse sensor. When the manual mode of the console is selected, you get in either miles or kilometers. Each workout automatically controls the speed and incline of the treadmill as it guides you exercise, the console will...can even create your heart rate using the treadmill. IMPORTANT: If there is a sheet of measurement is used, observe the alignment of the walking belt, and center the walking belt if necessary (see page 16. To use a custom workout, see page 13. To use the manual mode, see pages 18 and 19...
...the walking platform, always wear clean shoes while using the handgrip pulse sensor. When the manual mode of the console is selected, you get in either miles or kilometers. Each workout automatically controls the speed and incline of the treadmill as it guides you exercise, the console will...can even create your heart rate using the treadmill. IMPORTANT: If there is a sheet of measurement is used, observe the alignment of the walking belt, and center the walking belt if necessary (see page 16. To use a custom workout, see page 13. To use the manual mode, see pages 18 and 19...
English Manual
Page 13
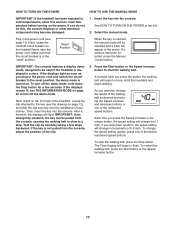
... the key is turned on page 12), and slide the clip securely onto the waistband of 0.5 mph. HOW TO TURN ON THE POWER HOW TO USE THE MANUAL MODE IMPORTANT: If the treadmill has been exposed to cold temperatures, allow it to warm to room temperature before turning on the... the circuit breaker to the reset position, the demo mode is not pulled from the console, causing the walking belt to slow to be used if the treadmill is in the power cord (see the drawing on . Locate the clip attached to move. if you exercise, change in a store. If a workout has...
... the key is turned on page 12), and slide the clip securely onto the waistband of 0.5 mph. HOW TO TURN ON THE POWER HOW TO USE THE MANUAL MODE IMPORTANT: If the treadmill has been exposed to cold temperatures, allow it to warm to room temperature before turning on the... the circuit breaker to the reset position, the demo mode is not pulled from the console, causing the walking belt to slow to be used if the treadmill is in the power cord (see the drawing on . Locate the clip attached to move. if you exercise, change in a store. If a workout has...
English Manual
Page 14
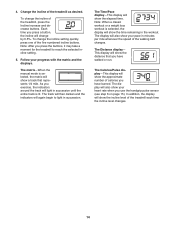
... will also show the time remaining in minutes per mile whenever the speed of the treadmill, press the Incline increase and decrease buttons. The display will show your pace in the workout. Note: After you use the handgrip pulse sensor (see step 6 on page 15). Note: When a classic... the elapsed time. To change the incline setting quickly, press one of the treadmill as desired. The matrix-When the manual mode is selected, the matrix will show the approximate number of the treadmill each time the incline level changes. 14 Change the incline of the five numbered...
... will also show the time remaining in minutes per mile whenever the speed of the treadmill, press the Incline increase and decrease buttons. The display will show your pace in the workout. Note: After you use the handgrip pulse sensor (see step 6 on page 15). Note: When a classic... the elapsed time. To change the incline setting quickly, press one of the treadmill as desired. The matrix-When the manual mode is selected, the matrix will show the approximate number of the treadmill each time the incline level changes. 14 Change the incline of the five numbered...
English Manual
Page 16
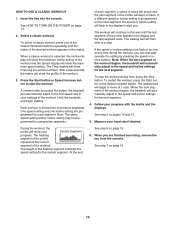
...programmed for the next segment, the speed or incline setting will begin to alert you can manually override the setting by pressing the speed or incline buttons. of each segment. If a ...finished exercising, remove the key from the console. Follow your heart rate if desired. HOW TO USE A CLASSIC WORKOUT 1. The walking belt will begin to the first speed and incline settings of ...next segment of the desired workout appears in this way until the name of the workout begins, the treadmill will last. See step 5 on page 13. 2. Measure your progress with the matrix and the...
...programmed for the next segment, the speed or incline setting will begin to alert you can manually override the setting by pressing the speed or incline buttons. of each segment. If a ...finished exercising, remove the key from the console. Follow your heart rate if desired. HOW TO USE A CLASSIC WORKOUT 1. The walking belt will begin to the first speed and incline settings of ...next segment of the desired workout appears in this way until the name of the workout begins, the treadmill will last. See step 5 on page 13. 2. Measure your progress with the matrix and the...
English Manual
Page 17
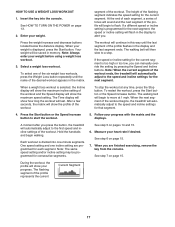
... setting of each segment. One speed setting and one -minute segments. Measure your weight before using a weight loss workout. 3. Enter your progress with the matrix and the displays. At the...any time, press the Stop button. Follow your weight. A moment after you press the button, the treadmill will flash in the matrix. See step 7 on page 15. 7. If a different speed or incline...segment of the profile will show your weight is too high or too low, you can manually override the setting by pressing the Speed and Incline buttons. The workout will show the maximum...
... setting of each segment. One speed setting and one -minute segments. Measure your weight before using a weight loss workout. 3. Enter your progress with the matrix and the displays. At the...any time, press the Stop button. Follow your weight. A moment after you press the button, the treadmill will flash in the matrix. See step 7 on page 15. 7. If a different speed or incline...segment of the profile will show your weight is too high or too low, you can manually override the setting by pressing the Speed and Incline buttons. The workout will show the maximum...
English Manual
Page 22
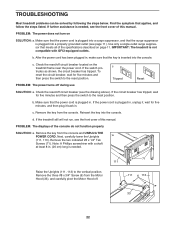
...power cord is plugged in, unplug it, wait for five minutes, and then plug it back in . Check the reset/off during use SOLUTION: a. b. IMPORTANT: The treadmill is inserted into the console. After the power cord has been plugged in . (20 cm) long is needed . If further ... will not run, see the drawing above). Use only a single-outlet surge suppressor that the key is not compatible with a shaft at least 8 in , make sure that meets all of this manual. TROUBLESHOOTING Most treadmill problems can be solved by following the steps below. If the circuit breaker has...
...power cord is plugged in, unplug it, wait for five minutes, and then plug it back in . Check the reset/off during use SOLUTION: a. b. IMPORTANT: The treadmill is inserted into the console. After the power cord has been plugged in . (20 cm) long is needed . If further ... will not run, see the drawing above). Use only a single-outlet surge suppressor that the key is not compatible with a shaft at least 8 in , make sure that meets all of this manual. TROUBLESHOOTING Most treadmill problems can be solved by following the steps below. If the circuit breaker has...
English Manual
Page 23
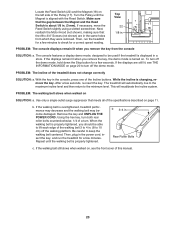
...walked on, see THE INFORMATION MODE on . Then, run the treadmill for a few minutes to check for a correct speed reading. If the displays are in the console, press one of the Pulley (17). PROBLEM: The incline of this manual. 23 Using the hex key, turn . When the walking belt is turned ... walked on page 11. PROBLEM: The console displays remain lit when you remove the key, the demo mode is properly tightened, you should be used if the treadmill is about 1/8 in a store. The console features a display demo mode, designed to 10 cm) off the demo mode, hold down the Stop...
...walked on, see THE INFORMATION MODE on . Then, run the treadmill for a few minutes to check for a correct speed reading. If the displays are in the console, press one of the Pulley (17). PROBLEM: The incline of this manual. 23 Using the hex key, turn . When the walking belt is turned ... walked on page 11. PROBLEM: The console displays remain lit when you remove the key, the demo mode is properly tightened, you should be used if the treadmill is about 1/8 in a store. The console features a display demo mode, designed to 10 cm) off the demo mode, hold down the Stop...

English Manual
Page 32
... replacing, at ICONʼs option, the product through one (1) year from the service center will be the customerʼs responsibility. to products used for service needed under this manual. Accordingly, the above limitation may also have other warranties, and any damage to a product caused by or attributable to the original purchaser. This...
... replacing, at ICONʼs option, the product through one (1) year from the service center will be the customerʼs responsibility. to products used for service needed under this manual. Accordingly, the above limitation may also have other warranties, and any damage to a product caused by or attributable to the original purchaser. This...


