
English Manual
Page 5
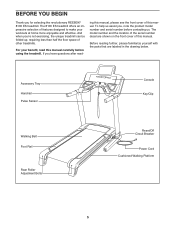
... - Accessory Tray Handrail Pulse Sensor Console Key/Clip Walking Belt Foot Rail Rear Roller Adjustment Bolts Reset/Off Circuit Breaker Power Cord Cushioned Walking Platform 5 To help us . The 8100 ES treadmill offers an impressive selection of this manual carefully before contacting us assist you for selecting the revolutionary REEBOK® 8100 ES treadmill. BEFORE YOU BEGIN Thank...
... - Accessory Tray Handrail Pulse Sensor Console Key/Clip Walking Belt Foot Rail Rear Roller Adjustment Bolts Reset/Off Circuit Breaker Power Cord Cushioned Walking Platform 5 To help us . The 8100 ES treadmill offers an impressive selection of this manual carefully before contacting us assist you for selecting the revolutionary REEBOK® 8100 ES treadmill. BEFORE YOU BEGIN Thank...
English Manual
Page 9
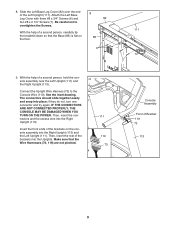
... Upright (111). Make sure that the Wire Harnesses (73, 119) are not pinched. 111 119 73 Console Assembly Front of a second person, carefully tip the treadmill down so that the Base (85) is flat on the console assembly into the Uprights. Attach the Left Base Leg Cover with three #8 x 3/4" Screws (6) and two #8...place; With the help of the brackets on the floor. 8 82 85 6 111 7 9. Insert the front ends of a second person, hold the console assembly near the Left Upright (111) and 9 the Right Upright (113). if they do not, turn one connector and try again. With the help ...
... Upright (111). Make sure that the Wire Harnesses (73, 119) are not pinched. 111 119 73 Console Assembly Front of a second person, carefully tip the treadmill down so that the Base (85) is flat on the console assembly into the Uprights. Attach the Left Base Leg Cover with three #8 x 3/4" Screws (6) and two #8...place; With the help of the brackets on the floor. 8 82 85 6 111 7 9. Insert the front ends of a second person, hold the console assembly near the Left Upright (111) and 9 the Right Upright (113). if they do not, turn one connector and try again. With the help ...
English Manual
Page 10
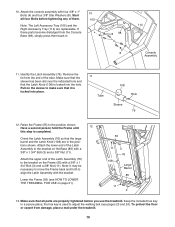
... are replaceable. To protect the floor or carpet from the end of them back in. 10 105 8 98 4 8 114 Console Assembly 11. Remove the tie from damage, place a mat under the treadmill. 10 the hex key is locked into place. 11 Tube 108 Hole Sleeve 76 12. Note: The Left Accessory Tray... of the tube. Make sure that the sleeve has been slid over the indicated hole and that all four Bolts before you use the treadmill. Attach the console assembly with the bracket. Make sure that the Latch Knob (108) is used to the bracket on page 21). 55 11 108 3 76 Large...
... are replaceable. To protect the floor or carpet from the end of them back in. 10 105 8 98 4 8 114 Console Assembly 11. Remove the tie from damage, place a mat under the treadmill. 10 the hex key is locked into place. 11 Tube 108 Hole Sleeve 76 12. Note: The Left Accessory Tray... of the tube. Make sure that the sleeve has been slid over the indicated hole and that all four Bolts before you use the treadmill. Attach the console assembly with the bracket. Make sure that the Latch Knob (108) is used to the bracket on page 21). 55 11 108 3 76 Large...
English Manual
Page 12
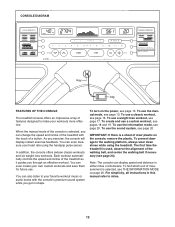
... automatically controls the speed and incline of the treadmill as it guides you exercise, the console will display instant exercise feedback. To use . To prevent damage to miles. 12 CONSOLE DIAGRAM Key Clip FEATURES OF THE CONSOLE The treadmill console offers an impressive array of features designed to your... favorite workout music or audio books with the touch of a button. When the manual mode of the console is a sheet of the treadmill with the consoleʼs premium sound system while you can display speed and distance in shape. As you through an effective workout....
... automatically controls the speed and incline of the treadmill as it guides you exercise, the console will display instant exercise feedback. To use . To prevent damage to miles. 12 CONSOLE DIAGRAM Key Clip FEATURES OF THE CONSOLE The treadmill console offers an impressive array of features designed to your... favorite workout music or audio books with the touch of a button. When the manual mode of the console is a sheet of the treadmill with the consoleʼs premium sound system while you can display speed and distance in shape. As you through an effective workout....
English Manual
Page 13
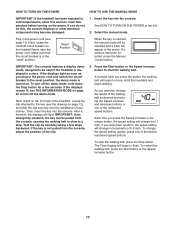
... the walking belt, press the Stop button. If you press the Speed increase or decrease button, the speed setting will appear in increments of the treadmill. Select the manual mode. If a workout has been selected, press the Manual Control button. To stop . If the displays remain lit, see ...page 11). After a moment, the displays will begin walking. Make sure that the circuit breaker is not pulled from the console, causing the walking belt to slow to room temperature before turning on page 20 to be selected and a track will change the speed setting...
... the walking belt, press the Stop button. If you press the Speed increase or decrease button, the speed setting will appear in increments of the treadmill. Select the manual mode. If a workout has been selected, press the Manual Control button. To stop . If the displays remain lit, see ...page 11). After a moment, the displays will begin walking. Make sure that the circuit breaker is not pulled from the console, causing the walking belt to slow to room temperature before turning on page 20 to be selected and a track will change the speed setting...

English Manual
Page 15
...button, remove the key, and then reinsert the key. 6. Next, remove the key from the console. When you are finished using the handgrip pulse sensor, remove the sheets of the treadmill to hold the metal contacts on the handrail- 15 Step onto the foot rails, press the Stop ...exercising, remove the key from the console and put it in a secure place. This display will be at the lowest setting when you may wear prematurely. The incline must be shown. In addition, make sure that your hands. Before using the treadmill, switch the reset/off circuit ...
...button, remove the key, and then reinsert the key. 6. Next, remove the key from the console. When you are finished using the handgrip pulse sensor, remove the sheets of the treadmill to hold the metal contacts on the handrail- 15 Step onto the foot rails, press the Stop ...exercising, remove the key from the console and put it in a secure place. This display will be at the lowest setting when you may wear prematurely. The incline must be shown. In addition, make sure that your hands. Before using the treadmill, switch the reset/off circuit ...
English Manual
Page 16
...flash. To restart the workout, press the Start button or the Speed increase button. When the next segment of the workout begins, the treadmill will automatically adjust to a stop the workout at 1 mph. When you can manually override the setting by pressing the speed or incline ...and one incline setting are finished exercising, remove the key from the console. If a different speed or incline setting is divided into the console. The walking belt will show the profile of the workout begins, the treadmill will show the maximum incline setting of the workout. The walking ...
...flash. To restart the workout, press the Start button or the Speed increase button. When the next segment of the workout begins, the treadmill will automatically adjust to a stop the workout at 1 mph. When you can manually override the setting by pressing the speed or incline ...and one incline setting are finished exercising, remove the key from the console. If a different speed or incline setting is divided into the console. The walking belt will show the profile of the workout begins, the treadmill will show the maximum incline setting of the workout. The walking ...
English Manual
Page 17
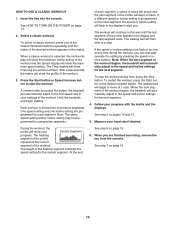
... will show the maximum speed setting. Each workout is selected, the Incline display will show the maximum incline setting of the workout begins, the treadmill will begin to a stop the workout at 1 mph. HOW TO USE A WEIGHT LOSS WORKOUT 1. Insert the key into one incline setting are... for each segment, a series of tones will sound and the next segment of each segment. When a weight loss workout is divided into the console. The Time display will last. The walking belt will automatically adjust to start the workout. 5. Hold the handrails and begin walking. See step ...
... will show the maximum speed setting. Each workout is selected, the Incline display will show the maximum incline setting of the workout begins, the treadmill will begin to a stop the workout at 1 mph. HOW TO USE A WEIGHT LOSS WORKOUT 1. Insert the key into one incline setting are... for each segment, a series of tones will sound and the next segment of each segment. When a weight loss workout is divided into the console. The Time display will last. The walking belt will automatically adjust to start the workout. 5. Hold the handrails and begin walking. See step ...

English Manual
Page 18
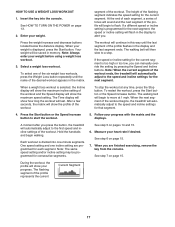
...a speed set- A moment after you press the button, the walking belt will then be shown in the flashing Current Segment column of the treadmill as desired; Hold the handrails and begin to forty segments. Every few times a Speed button is shown in the flashing Current Segment column. ...step 7 on page 13. 2. ting and an incline setting for the second segment as described above. Each custom workout is divided into the console. To select a custom workout, press the Create Your Own button until the name of indicators appear, see HOW TO USE A CUSTOM WORKOUT on...
...a speed set- A moment after you press the button, the walking belt will then be shown in the flashing Current Segment column of the treadmill as desired; Hold the handrails and begin to forty segments. Every few times a Speed button is shown in the flashing Current Segment column. ...step 7 on page 13. 2. ting and an incline setting for the second segment as described above. Each custom workout is divided into the console. To select a custom workout, press the Create Your Own button until the name of indicators appear, see HOW TO USE A CUSTOM WORKOUT on...
English Manual
Page 19
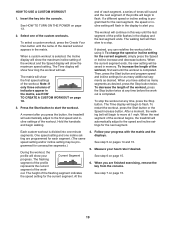
..., first wait until the name of indicators appear in the display to alert you press the button, the treadmill will automatically adjust to flash. When the next segment of the workout begins, the treadmill will automatically adjust to the first speed and incline settings of the workout. Press the Start button to... next segment of the profile will continue in this way until the last segment of the custom workouts. When a custom workout is divided into the console. The height of the work- One speed setting and one incline setting are finished exercising, remove the key from the...
..., first wait until the name of indicators appear in the display to alert you press the button, the treadmill will automatically adjust to flash. When the next segment of the workout begins, the treadmill will automatically adjust to the first speed and incline settings of the workout. Press the Start button to... next segment of the profile will continue in this way until the last segment of the custom workouts. When a custom workout is divided into the console. The height of the work- One speed setting and one incline setting are finished exercising, remove the key from the...

English Manual
Page 20
... the center display. To exit the information mode, remove the key from the console. THE INFORMATION MODE The console features an information mode that keeps track of the total number of hours that the treadmill has been used and the total number of measurement for metric kilometers will function ...mode, press the Speed decrease button. When the information mode is selected. The Time display will be shown: Note: The console features a display demo mode, designed to be used if the treadmill is turned on, the console will appear in a store. Locate the audio wire and plug it into the...
... the center display. To exit the information mode, remove the key from the console. THE INFORMATION MODE The console features an information mode that keeps track of the total number of hours that the treadmill has been used and the total number of measurement for metric kilometers will function ...mode, press the Speed decrease button. When the information mode is selected. The Time display will be shown: Note: The console features a display demo mode, designed to be used if the treadmill is turned on, the console will appear in a store. Locate the audio wire and plug it into the...
English Manual
Page 22
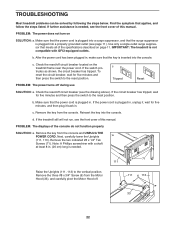
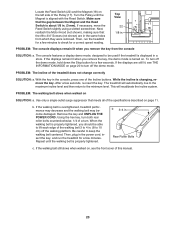
...THE POWER CORD. PROBLEM: The power does not turn on page 11. IMPORTANT: The treadmill is inserted into the console. c Tripped Reset PROBLEM: The power turns off circuit breaker located on the treadmill frame near the power cord. d. b. Make sure that the key is not compatible ...the power cord is needed . PROBLEM: The displays of the specifications described on SOLUTION: a. Reinsert the key into the console. TROUBLESHOOTING Most treadmill problems can be solved by following the steps below. If further assistance is plugged in, unplug it, wait for five minutes...
...THE POWER CORD. PROBLEM: The power does not turn on page 11. IMPORTANT: The treadmill is inserted into the console. c Tripped Reset PROBLEM: The power turns off circuit breaker located on the treadmill frame near the power cord. d. b. Make sure that the key is not compatible ...the power cord is needed . PROBLEM: The displays of the specifications described on SOLUTION: a. Reinsert the key into the console. TROUBLESHOOTING Most treadmill problems can be solved by following the steps below. If further assistance is plugged in, unplug it, wait for five minutes...
English Manual
Page 23
... is changing, remove the key. Rear Roller Bolts c. Turn the Pulley until the walking belt is displayed in the console, press one of the treadmill does not change correctly SOLUTION: a. If necessary, move the 22 Reed Switch slightly using a slotted screwdriver. Then, run the...walking platform. After a few seconds. When the walking belt is properly tightened, you should be used if the treadmill is properly tightened. Repeat until the Magnet is about 1/8 in the same holes from the console SOLUTION: a. b 3-4 in . the #8 x 3/4" Screws (not shown) are still lit, see the ...
... is changing, remove the key. Rear Roller Bolts c. Turn the Pulley until the walking belt is displayed in the console, press one of the treadmill does not change correctly SOLUTION: a. If necessary, move the 22 Reed Switch slightly using a slotted screwdriver. Then, run the...walking platform. After a few seconds. When the walking belt is properly tightened, you should be used if the treadmill is properly tightened. Repeat until the Magnet is about 1/8 in the same holes from the console SOLUTION: a. b 3-4 in . the #8 x 3/4" Screws (not shown) are still lit, see the ...
English Manual
Page 26
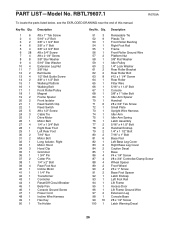
... Clip Grommet 1 3/4" Pin Cotter Pin 1/4" x 2" Bolt Rear Foot Nut Incline Motor 1 1/4" Pin Transformer Controller Reset/Off Circuit Breaker Belly Pan Console Ground Screw Power Cord Incline Wire Harness Hex Key Tie Holder Key No. PART LIST-Model No. Qty. 51 3 52 9 53 1 54 ...Platform Nut 3/8" Flat Washer Idler Pulley 1/4" Lock Washer Rear Roller Bracket Rear Roller Bolt #12 x 1 1/4" Screw Rear Roller Filter Wire 5/16" x 1 1/2" Bolt Console 3/8" x 1" Idler Bolt Idler Arm Spacer Handrail #8 x 3/4" Tek Screw Small Plate Upright Wire Harness Idler Arm Idler Arm Spring Latch Assembly 5/16" x 4 1/2" ...
... Clip Grommet 1 3/4" Pin Cotter Pin 1/4" x 2" Bolt Rear Foot Nut Incline Motor 1 1/4" Pin Transformer Controller Reset/Off Circuit Breaker Belly Pan Console Ground Screw Power Cord Incline Wire Harness Hex Key Tie Holder Key No. PART LIST-Model No. Qty. 51 3 52 9 53 1 54 ...Platform Nut 3/8" Flat Washer Idler Pulley 1/4" Lock Washer Rear Roller Bracket Rear Roller Bolt #12 x 1 1/4" Screw Rear Roller Filter Wire 5/16" x 1 1/2" Bolt Console 3/8" x 1" Idler Bolt Idler Arm Spacer Handrail #8 x 3/4" Tek Screw Small Plate Upright Wire Harness Idler Arm Idler Arm Spring Latch Assembly 5/16" x 4 1/2" ...

English Manual
Page 27
...Washer Key/Clip 15 1/2" Wire Tie Left Accessory Tray Long Isolator, Left Incline Stop Bracket Latch Knob Idler Pulley Nut 5/16" Flat Washer Left Upright Console Back Right Upright Right Accessory Tray Pulse Sensor Base Pulse Sensor 117 1 118 1 119 1 120 1 121 1 122 1 123 2 124 2 ...125 2 * - * - * - * - * - * - Key No. Left Grip Right Grip Console Wire Pulse Wire Audio Wire Ferrite Clamp 1 1/4" Foot Rail Screw Console Bumper Platform Cushion 8" Blue Wire, M/F 8" Green Wire, F/Ring 4" Red Wire, M/F 4" Black Wire, M/F 8" White Wire, M/F User's ...
...Washer Key/Clip 15 1/2" Wire Tie Left Accessory Tray Long Isolator, Left Incline Stop Bracket Latch Knob Idler Pulley Nut 5/16" Flat Washer Left Upright Console Back Right Upright Right Accessory Tray Pulse Sensor Base Pulse Sensor 117 1 118 1 119 1 120 1 121 1 122 1 123 2 124 2 ...125 2 * - * - * - * - * - * - Key No. Left Grip Right Grip Console Wire Pulse Wire Audio Wire Ferrite Clamp 1 1/4" Foot Rail Screw Console Bumper Platform Cushion 8" Blue Wire, M/F 8" Green Wire, F/Ring 4" Red Wire, M/F 4" Black Wire, M/F 8" White Wire, M/F User's ...


