
English Manual
Page 4
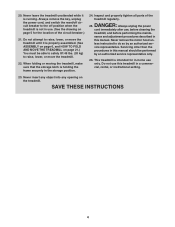
... page 21.) You must be performed by an authorized ser- Always unplug the power cord immediately after use this treadmill in use only. vice representative. Never remove the motor hood un- This treadmill is not in a commercial, rental, or institutional setting. 23. nance and adjustment procedures described in this manual. Always remove the...
... page 21.) You must be performed by an authorized ser- Always unplug the power cord immediately after use this treadmill in use only. vice representative. Never remove the motor hood un- This treadmill is not in a commercial, rental, or institutional setting. 23. nance and adjustment procedures described in this manual. Always remove the...
English Manual
Page 22
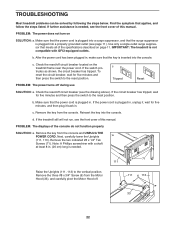
... protrudes as shown, the circuit breaker has tripped. b. c. Remove the key from the Motor Hood (33), and carefully pivot the Motor Hood off circuit breaker located on page 11. Next, carefully lower the Uprights a (111, 113). TROUBLESHOOTING Most treadmill problems can be solved by following the steps below. c Tripped Reset PROBLEM: The power...
... protrudes as shown, the circuit breaker has tripped. b. c. Remove the key from the Motor Hood (33), and carefully pivot the Motor Hood off circuit breaker located on page 11. Next, carefully lower the Uprights a (111, 113). TROUBLESHOOTING Most treadmill problems can be solved by following the steps below. c Tripped Reset PROBLEM: The power...
English Manual
Page 23
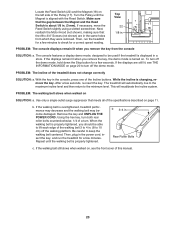
... on. Rear Roller Bolts c. If the displays are in the power cord, insert the key, and run the treadmill for a correct speed reading. Next, 17 18 reattach the Motor Hood (not shown), making sure that meets all of a turn off the demo mode. Turn the Pulley until ... move the 22 Reed Switch slightly using a slotted screwdriver. Locate the Reed Switch (22) and the Magnet (18) on the left side of the treadmill does not change correctly SOLUTION: a. The console features a display demo mode, designed to check for a few seconds. PROBLEM: The incline of the Pulley...
... on. Rear Roller Bolts c. If the displays are in the power cord, insert the key, and run the treadmill for a correct speed reading. Next, 17 18 reattach the Motor Hood (not shown), making sure that meets all of a turn off the demo mode. Turn the Pulley until ... move the 22 Reed Switch slightly using a slotted screwdriver. Locate the Reed Switch (22) and the Magnet (18) on the left side of the treadmill does not change correctly SOLUTION: a. The console features a display demo mode, designed to check for a few seconds. PROBLEM: The incline of the Pulley...
English Manual
Page 26
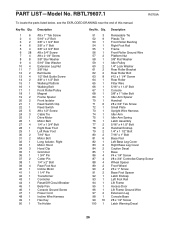
... Spacer Front Isolator Reed Switch Clip Reed Switch #8 x 1/2" Screw Cable Tie Drive Motor Motor Belt 1/4" x 1 3/4" Bolt Right Rear Foot Left Rear Foot 7/16" Nut Motor Bolt Long Isolator, Right Motor Hood Hood Clip Grommet 1 3/4" Pin Cotter Pin 1/4" x 2" Bolt Rear Foot Nut Incline Motor 1 1/4" Pin Transformer Controller Reset/Off Circuit Breaker Belly Pan Console Ground Screw...
... Spacer Front Isolator Reed Switch Clip Reed Switch #8 x 1/2" Screw Cable Tie Drive Motor Motor Belt 1/4" x 1 3/4" Bolt Right Rear Foot Left Rear Foot 7/16" Nut Motor Bolt Long Isolator, Right Motor Hood Hood Clip Grommet 1 3/4" Pin Cotter Pin 1/4" x 2" Bolt Rear Foot Nut Incline Motor 1 1/4" Pin Transformer Controller Reset/Off Circuit Breaker Belly Pan Console Ground Screw...
English Manual
Page 32
... all other rights that specifically set forth herein. or to www.reebokservice.com/registration. damages with the use and service conditions. The frame and drive motor are made must register this product within 30 days of incidental or consequential damages. ICONʼs obligation under normal use or performance of the product...
... all other rights that specifically set forth herein. or to www.reebokservice.com/registration. damages with the use and service conditions. The frame and drive motor are made must register this product within 30 days of incidental or consequential damages. ICONʼs obligation under normal use or performance of the product...


