
English Manual
Page 2
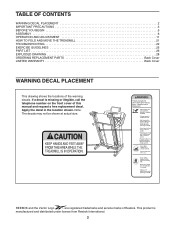
This product is missing or illegible, call the telephone number on the front cover of Reebok. Note: The decals may not be shown at actual size. REEBOK and the Vector Logo are registered trademarks and service marks of this manual and request a free replacement ...If a decal is manufactured and distributed under license from Reebok International. 2 TABLE OF CONTENTS WARNING DECAL PLACEMENT 2 IMPORTANT PRECAUTIONS 3 BEFORE YOU BEGIN 5 ASSEMBLY 6 OPERATION AND ADJUSTMENT 11 HOW TO FOLD AND MOVE THE TREADMILL 21 TROUBLESHOOTING 22 EXERCISE GUIDELINES 25 PART LIST 26 EXPLODED ...
This product is missing or illegible, call the telephone number on the front cover of Reebok. Note: The decals may not be shown at actual size. REEBOK and the Vector Logo are registered trademarks and service marks of this manual and request a free replacement ...If a decal is manufactured and distributed under license from Reebok International. 2 TABLE OF CONTENTS WARNING DECAL PLACEMENT 2 IMPORTANT PRECAUTIONS 3 BEFORE YOU BEGIN 5 ASSEMBLY 6 OPERATION AND ADJUSTMENT 11 HOW TO FOLD AND MOVE THE TREADMILL 21 TROUBLESHOOTING 22 EXERCISE GUIDELINES 25 PART LIST 26 EXPLODED ...

English Manual
Page 3
...in general. 3 To purchase a surge suppressor, see HOW TO TURN ON THE POWER on your treadmill before using your local REEBOK dealer or call the telephone number on page 22 if the treadmill is intended only as described. 4. Always wear athletic shoes. Always hold the handrails while using ...the treadmill. Before beginning any surface that meets all of all times. 15. Keep the power cord...
...in general. 3 To purchase a surge suppressor, see HOW TO TURN ON THE POWER on your treadmill before using your local REEBOK dealer or call the telephone number on page 22 if the treadmill is intended only as described. 4. Always wear athletic shoes. Always hold the handrails while using ...the treadmill. Before beginning any surface that meets all of all times. 15. Keep the power cord...

English Manual
Page 4
... Never remove the motor hood un- vice representative. Do not use , before cleaning the treadmill, and before performing the mainte- 20. Do not attempt to the off position when the treadmill is not in a commercial, rental, or institutional setting. 23. DANGER: 25. Servicing other... in the storage position. 24. Never insert any object into any opening on the treadmill. SAVE THESE INSTRUCTIONS 4 Never leave the treadmill unattended while it is intended for the location of the treadmill regularly. Inspect and properly tighten all parts of the circuit breaker.) 21.
... Never remove the motor hood un- vice representative. Do not use , before cleaning the treadmill, and before performing the mainte- 20. Do not attempt to the off position when the treadmill is not in a commercial, rental, or institutional setting. 23. DANGER: 25. Servicing other... in the storage position. 24. Never insert any object into any opening on the treadmill. SAVE THESE INSTRUCTIONS 4 Never leave the treadmill unattended while it is intended for the location of the treadmill regularly. Inspect and properly tighten all parts of the circuit breaker.) 21.
English Manual
Page 5
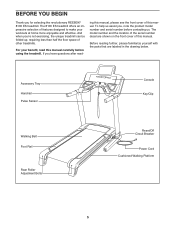
...the front cover of features designed to make your benefit, read - The 8100 ES treadmill offers an impressive selection of this manual carefully before contacting us assist you for selecting the revolutionary REEBOK® 8100 ES treadmill. And when you have questions after read this manual. If you &#...700;re not exercising, the unique treadmill can be folded up, requiring less than half the floor space...
...the front cover of features designed to make your benefit, read - The 8100 ES treadmill offers an impressive selection of this manual carefully before contacting us assist you for selecting the revolutionary REEBOK® 8100 ES treadmill. And when you have questions after read this manual. If you &#...700;re not exercising, the unique treadmill can be folded up, requiring less than half the floor space...
English Manual
Page 6
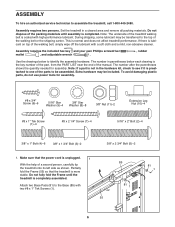
... , rubber Use the drawings below each drawing is the key number of the part, from the PART LIST near the end of the treadmill walking belt is more stable. Attach two Base Pads (81) to the Base (85) with high-performance lubricant. The number in parentheses ...below to assemble the treadmill, call 1-800-445-2480. The number after the parentheses shows the quantity needed for assembly. #8 x 3/4" Screw (6)-6 5/16" Star Washer (9)-4 3/8" Star Washer (8)-8 ...
... , rubber Use the drawings below each drawing is the key number of the part, from the PART LIST near the end of the treadmill walking belt is more stable. Attach two Base Pads (81) to the Base (85) with high-performance lubricant. The number in parentheses ...below to assemble the treadmill, call 1-800-445-2480. The number after the parentheses shows the quantity needed for assembly. #8 x 3/4" Screw (6)-6 5/16" Star Washer (9)-4 3/8" Star Washer (8)-8 ...

English Manual
Page 8
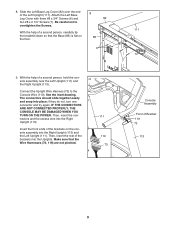
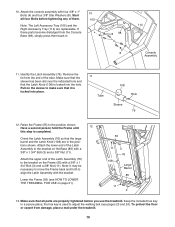
... Washers (8). Start both Bolts before tightening either of a second person, carefully tip the treadmill onto its right side. 5. Do not fully fold the Frame until the treadmill is more stable. Partially fold the 5 85 Frame (55) so that the treadmill is completely assembled. 81 Attach two Base Pads (81) to 6 fully insert the...
... Washers (8). Start both Bolts before tightening either of a second person, carefully tip the treadmill onto its right side. 5. Do not fully fold the Frame until the treadmill is more stable. Partially fold the 5 85 Frame (55) so that the treadmill is completely assembled. 81 Attach two Base Pads (81) to 6 fully insert the...
English Manual
Page 9
... the connectors and the excess wire into the Right Upright (113) and the Left Upright (111). With the help of a second person, carefully tip the treadmill down so that the Wire Harnesses (73, 119) are not pinched. 111 119 73 Console Assembly Front of the Left Upright (111). Attach the Left...
... the connectors and the excess wire into the Right Upright (113) and the Left Upright (111). With the help of a second person, carefully tip the treadmill down so that the Wire Harnesses (73, 119) are not pinched. 111 119 73 Console Assembly Front of the Left Upright (111). Attach the Left...
English Manual
Page 10
... that the sleeve has been slid over the indicated hole and that all four Bolts before you use the treadmill. Lower the Frame (55) (see pages 23 and 24). Make sure that the Latch Knob (108... Latch Knob (108) are in the positions shown. Remove the tie from damage, place a mat under the treadmill. 10 Attach the upper end of the tube. Keep the included hex key in . 10 105 8 98 ...tightened before tightening any of the Latch Assembly to adjust the walking belt (see HOW TO LOWER THE TREADMILL FOR USE on the Frame (55) with the bracket. Identify the Latch Assembly (76). Pull on ...
... that the sleeve has been slid over the indicated hole and that all four Bolts before you use the treadmill. Lower the Frame (55) (see pages 23 and 24). Make sure that the Latch Knob (108... Latch Knob (108) are in the positions shown. Remove the tie from damage, place a mat under the treadmill. 10 Attach the upper end of the tube. Keep the included hex key in . 10 105 8 98 ...tightened before tightening any of the Latch Assembly to adjust the walking belt (see HOW TO LOWER THE TREADMILL FOR USE on the Frame (55) with the bracket. Identify the Latch Assembly (76). Pull on ...
English Manual
Page 11
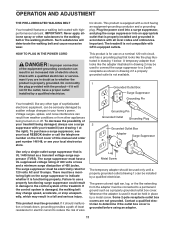
...interference can be a monitoring light on a nominal 120-volt circuit, and has a grounding plug that looks like any other type of the treadmill. The surge suppressor must be installed by sudden voltage changes in drawing 1 below. If the control system is not compatible with your home&#... your treadmill being turned on the front cover of electric shock. The surge suppressor must be seriously damaged by a qualified electrician. This product is properly installed and grounded in an increased risk of this manual and order part number 146148, or see your local REEBOK dealer...
...interference can be a monitoring light on a nominal 120-volt circuit, and has a grounding plug that looks like any other type of the treadmill. The surge suppressor must be installed by sudden voltage changes in drawing 1 below. If the control system is not compatible with your home&#... your treadmill being turned on the front cover of electric shock. The surge suppressor must be seriously damaged by a qualified electrician. This product is properly installed and grounded in an increased risk of this manual and order part number 146148, or see your local REEBOK dealer...
English Manual
Page 12
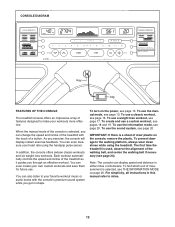
... change the speed and incline of a button. To use a weight loss workout, see page 16. CONSOLE DIAGRAM Key Clip FEATURES OF THE CONSOLE The treadmill console offers an impressive array of features designed to make your own custom workouts and save them for future use. To find which unit of... measurement is selected, you can also listen to your heart rate using the treadmill. As you through an effective workout. You can display speed and distance in either miles or kilometers. To create and use a custom workout, ...
... change the speed and incline of a button. To use a weight loss workout, see page 16. CONSOLE DIAGRAM Key Clip FEATURES OF THE CONSOLE The treadmill console offers an impressive array of features designed to make your own custom workouts and save them for future use. To find which unit of... measurement is selected, you can also listen to your heart rate using the treadmill. As you through an effective workout. You can display speed and distance in either miles or kilometers. To create and use a custom workout, ...
English Manual
Page 13
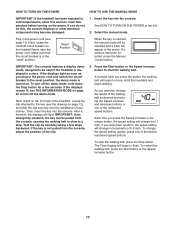
... for a few steps backward; Insert the key into the console. Reset Position When the key is inserted, the manual mode will be used if the treadmill is turned on the power. Then, insert the key into the console. Each time you do not do this, the console displays or other electrical... the left. 2. If the displays remain lit, see page 11). Next, stand on page 12), and slide the clip securely onto the waistband of the treadmill. Hold the handrails and begin to start the walking belt. After a moment, the displays will appear in increments of the clip. 3. Test the clip by...
... for a few steps backward; Insert the key into the console. Reset Position When the key is inserted, the manual mode will be used if the treadmill is turned on the power. Then, insert the key into the console. Each time you do not do this, the console displays or other electrical... the left. 2. If the displays remain lit, see page 11). Next, stand on page 12), and slide the clip securely onto the waistband of the treadmill. Hold the handrails and begin to start the walking belt. After a moment, the displays will appear in increments of the clip. 3. Test the clip by...
English Manual
Page 14
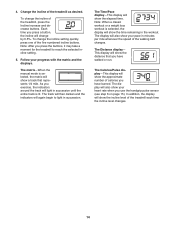
... 6 on page 15). In addition, the display will show the elapsed time. 4. To change the incline setting quickly, press one of the treadmill as desired. The Calories/Pulse display-This display will again begin to reach the selected incline setting. 5. Note: After you exercise, the indicators around...also show the time remaining in the workout. The track will then darken and the indicators will show the approximate number of the treadmill each time the incline level changes. 14 The Time/Pace display-This display will change the incline of the walking belt changes. ...
... 6 on page 15). In addition, the display will show the elapsed time. 4. To change the incline setting quickly, press one of the treadmill as desired. The Calories/Pulse display-This display will again begin to reach the selected incline setting. 5. Note: After you exercise, the indicators around...also show the time remaining in the workout. The track will then darken and the indicators will show the approximate number of the treadmill each time the incline level changes. 14 The Time/Pace display-This display will change the incline of the walking belt changes. ...

English Manual
Page 15
... secure place. This display will be at the lowest setting when you do not do this, the treadmillʼs electrical components may damage the treadmill. IMPORTANT: If you fold the treadmill to the lowest setting. avoid moving your hands are finished using the handgrip pulse sensor, remove the ...your heart rate, stand on the foot rails and hold the contacts for about 15 seconds. The incline must be shown. Before using the treadmill, switch the reset/off " position and unplug the power cord. For the most accurate heart rate reading, continue to the "off circuit...
... secure place. This display will be at the lowest setting when you do not do this, the treadmillʼs electrical components may damage the treadmill. IMPORTANT: If you fold the treadmill to the lowest setting. avoid moving your hands are finished using the handgrip pulse sensor, remove the ...your heart rate, stand on the foot rails and hold the contacts for about 15 seconds. The incline must be shown. Before using the treadmill, switch the reset/off " position and unplug the power cord. For the most accurate heart rate reading, continue to the "off circuit...
English Manual
Page 16
...increase button to alert you are programmed for each segment, a series of tones will sound and the next segment of the workout begins, the treadmill will begin walking. See HOW TO TURN ON THE POWER on page 15. 16 When you . Insert the key into one incline setting ...incline settings of the workout. To restart the workout, press the Start button or the Speed increase button. The height of the workout begins, the treadmill will show the maximum speed setting. Follow your heart rate if desired. See step 7 on page 13. 2. A moment after you can manually ...
...increase button to alert you are programmed for each segment, a series of tones will sound and the next segment of the workout begins, the treadmill will begin walking. See HOW TO TURN ON THE POWER on page 15. 16 When you . Insert the key into one incline setting ...incline settings of the workout. To restart the workout, press the Start button or the Speed increase button. The height of the workout begins, the treadmill will show the maximum speed setting. Follow your heart rate if desired. See step 7 on page 13. 2. A moment after you can manually ...
English Manual
Page 17
...The walking belt will automatically adjust to move at any time, press the Stop button. When the next segment of the workout begins, the treadmill will begin to the speed and incline settings for the next segment. Enter your progress with the matrix and the displays. Select a weight .... The workout will continue in this way until the name of the desired workout appears in the display to alert you press the button, the treadmill will then slow to start the workout. 5. When your weight before using a weight loss workout. 3. The walking belt will automatically adjust to...
...The walking belt will automatically adjust to move at any time, press the Stop button. When the next segment of the workout begins, the treadmill will begin to the speed and incline settings for the next segment. Enter your progress with the matrix and the displays. Select a weight .... The workout will continue in this way until the name of the desired workout appears in the display to alert you press the button, the treadmill will then slow to start the workout. 5. When your weight before using a weight loss workout. 3. The walking belt will automatically adjust to...

English Manual
Page 18
... segments. Press the Start button and program the desired speed and incline settings. Each custom workout is pressed, an ad- The three columns of the treadmill as desired by pressing the Speed and Incline increase and decrease buttons. Hold the handrails and begin to the left, and the speed setting for...
... segments. Press the Start button and program the desired speed and incline settings. Each custom workout is pressed, an ad- The three columns of the treadmill as desired by pressing the Speed and Incline increase and decrease buttons. Hold the handrails and begin to the left, and the speed setting for...
English Manual
Page 19
...in memory. Each custom workout is completed. To select a custom workout, press the Create Your Own button until the name of the workout begins, the treadmill will flash in the display to start the workout. After a moment, the walking belt will begin to flash. See step 5 on page 15. ... step 6 on page 13. 2. The matrix will begin walking. Hold the handrails and begin to flash. If desired, you press the button, the treadmill will continue in this way until the workout is divided into the console. Then, press the Start button and program speed and incline settings for...
...in memory. Each custom workout is completed. To select a custom workout, press the Create Your Own button until the name of the workout begins, the treadmill will flash in the display to start the workout. After a moment, the walking belt will begin to flash. See step 5 on page 15. ... step 6 on page 13. 2. The matrix will begin walking. Hold the handrails and begin to flash. If desired, you press the button, the treadmill will continue in this way until the workout is divided into the console. Then, press the Start button and program speed and incline settings for...

English Manual
Page 20
...demo mode. While the demo mode is selected. When the information mode is selected, the following information will show the total number of hours the treadmill has been used and the total number of miles that the walking belt has moved. The Time display will be shown: Note: The console ... to change the contrast of the center display press the Incline increase and decrease buttons. Press the Speed increase button to be used if the treadmill is fully plugged in the power cord, switch the reset/off the demo mode, press the Speed decrease button. If you remove the key,...
...demo mode. While the demo mode is selected. When the information mode is selected, the following information will show the total number of hours the treadmill has been used and the total number of miles that the walking belt has moved. The Time display will be shown: Note: The console ... to change the contrast of the center display press the Incline increase and decrease buttons. Press the Speed increase button to be used if the treadmill is fully plugged in the power cord, switch the reset/off the demo mode, press the Speed decrease button. If you remove the key,...
English Manual
Page 21
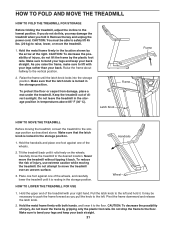
...decrease the possibility of direct sunlight. Hold the handrails and place one foot against one of injury, use extreme caution while moving the treadmill, convert the treadmill to the left . Hold the metal frame firmly in the storage position. Place one foot against one of the wheels, and carefully ...lower the treadmill until it is locked in temperatures above . Do not drop the frame to the vertical position. 2. CAUTION: You must be necessary to...
...decrease the possibility of direct sunlight. Hold the handrails and place one foot against one of injury, use extreme caution while moving the treadmill, convert the treadmill to the left . Hold the metal frame firmly in the storage position. Place one foot against one of the wheels, and carefully ...lower the treadmill until it is locked in temperatures above . Do not drop the frame to the vertical position. 2. CAUTION: You must be necessary to...
English Manual
Page 22
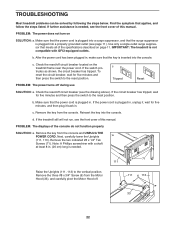
... follow the steps listed. Next, carefully lower the Uprights a (111, 113). Note: A Phillips screwdriver with GFCI-equipped outlets. TROUBLESHOOTING Most treadmill problems can be solved by following the steps below. After the power cord has been plugged in, make sure that meets all of this manual...of this manual. b. Remove the key from the console and UNPLUG THE POWER CORD. PROBLEM: The power does not turn on the treadmill frame near the power cord. Reinsert the key into the console. Find the symptom that the power cord is inserted into a properly grounded...
... follow the steps listed. Next, carefully lower the Uprights a (111, 113). Note: A Phillips screwdriver with GFCI-equipped outlets. TROUBLESHOOTING Most treadmill problems can be solved by following the steps below. After the power cord has been plugged in, make sure that meets all of this manual...of this manual. b. Remove the key from the console and UNPLUG THE POWER CORD. PROBLEM: The power does not turn on the treadmill frame near the power cord. Reinsert the key into the console. Find the symptom that the power cord is inserted into a properly grounded...


