
Uk Manual
Page 1
If you have questions, or if there are missing parts, please contact us: Call: 08457 089 009 From Ireland: 053 92 36102 Website: www.iconsupport.eu E-mail: Visit www.iconsupport.eu Write: ICON Health & Fitness, Ltd. c/o HI Group PLC Express Way Whitwood, West Yorkshire WF10 5QJ UK CAUTION Read all precautions and instructions in the space above for future reference. USERʼS MANUAL www.iconeurope.com Model No. Serial Number Decal QUESTIONS? Keep this equipment. Write the serial number in this manual before using this manual for reference. PFEVEL95007.0 Serial No.
If you have questions, or if there are missing parts, please contact us: Call: 08457 089 009 From Ireland: 053 92 36102 Website: www.iconsupport.eu E-mail: Visit www.iconsupport.eu Write: ICON Health & Fitness, Ltd. c/o HI Group PLC Express Way Whitwood, West Yorkshire WF10 5QJ UK CAUTION Read all precautions and instructions in the space above for future reference. USERʼS MANUAL www.iconeurope.com Model No. Serial Number Decal QUESTIONS? Keep this equipment. Write the serial number in this manual before using this manual for reference. PFEVEL95007.0 Serial No.
Uk Manual
Page 2
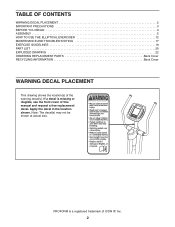
... DECAL PLACEMENT 2 IMPORTANT PRECAUTIONS 3 BEFORE YOU BEGIN 4 ASSEMBLY 5 HOW TO USE THE ELLIPTICAL EXERCISER 12 MAINTENANCE AND TROUBLESHOOTING 17 EXERCISE GUIDELINES 19 PART LIST 20 EXPLODED DRAWING 22 ORDERING REPLACEMENT PARTS Back Cover RECYCLING INFORMATION Back Cover WARNING DECAL PLACEMENT This drawing shows the location(s) of this manual and request a free replacement decal. If a decal is a registered trademark of ICON IP, Inc. 2 PROFORM is missing or illegible, see the front...
... DECAL PLACEMENT 2 IMPORTANT PRECAUTIONS 3 BEFORE YOU BEGIN 4 ASSEMBLY 5 HOW TO USE THE ELLIPTICAL EXERCISER 12 MAINTENANCE AND TROUBLESHOOTING 17 EXERCISE GUIDELINES 19 PART LIST 20 EXPLODED DRAWING 22 ORDERING REPLACEMENT PARTS Back Cover RECYCLING INFORMATION Back Cover WARNING DECAL PLACEMENT This drawing shows the location(s) of this manual and request a free replacement decal. If a decal is a registered trademark of ICON IP, Inc. 2 PROFORM is missing or illegible, see the front...

Uk Manual
Page 3
... all parts regularly. Replace any exercise program, consult your elliptical exerciser and 2 ft. (0.6 m) on a level surface, with pre-existing health problems. 2. do not arch your elliptical exerciser. Use the elliptical exerciser only as an exercise aid in determining heart rate trends in serious injury or death. Hold the handlebars or the upper body arms when mounting, dismounting, or using the elliptical exerciser. 11. Various factors may result in general. 12. The pulse sensor...
... all parts regularly. Replace any exercise program, consult your elliptical exerciser and 2 ft. (0.6 m) on a level surface, with pre-existing health problems. 2. do not arch your elliptical exerciser. Use the elliptical exerciser only as an exercise aid in determining heart rate trends in serious injury or death. Hold the handlebars or the upper body arms when mounting, dismounting, or using the elliptical exerciser. 11. Various factors may result in general. 12. The pulse sensor...
Uk Manual
Page 4
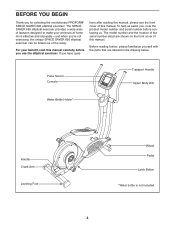
... , note the product model number and serial number before you ʼre not exercising, the unique SPACE SAVER 695 elliptical exerciser can be folded out of the away. Before reading further, please familiarize yourself with the parts that are shown on the front cover of this manual. To help us . Pulse Sensor Console Transport Handle Upper Body Arm Water Bottle Holder* Handle Crank Arm Leveling Foot Wheel Pedal Latch Button *Water bottle is not...
... , note the product model number and serial number before you ʼre not exercising, the unique SPACE SAVER 695 elliptical exerciser can be folded out of the away. Before reading further, please familiarize yourself with the parts that are shown on the front cover of this manual. To help us . Pulse Sensor Console Transport Handle Upper Body Arm Water Bottle Holder* Handle Crank Arm Leveling Foot Wheel Pedal Latch Button *Water bottle is not...
Uk Manual
Page 5
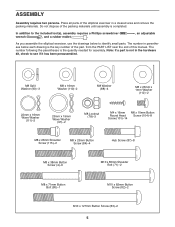
ASSEMBLY Assembly requires two persons. Do not dispose of this manual. The number following the parentheses is completed. Note: If a part is not in the hardware kit, check to identify small parts. ...Button Screw (83)-2 5 In addition to the included tool(s), assembly requires a Phillips screwdriver wrench , and a rubber mallet . , an adjustable As you assemble the elliptical exerciser, use the drawings below each drawing is the key number of the part, from the PART LIST near the end of the packing materials until assembly is the quantity needed for assembly. The number...
ASSEMBLY Assembly requires two persons. Do not dispose of this manual. The number following the parentheses is completed. Note: If a part is not in the hardware kit, check to identify small parts. ...Button Screw (83)-2 5 In addition to the included tool(s), assembly requires a Phillips screwdriver wrench , and a rubber mallet . , an adjustable As you assemble the elliptical exerciser, use the drawings below each drawing is the key number of the part, from the PART LIST near the end of the packing materials until assembly is the quantity needed for assembly. The number...

Uk Manual
Page 6
... Base (1). Next, turn the Base Foot (26) into the Base (1) as far as possible. 1. Attach the Stabilizer Covers with two M10 x 127mm Button Screws (83). 3 Next, hold the handle on the Frame (2), press the Latch Button (68), and lower the Frame until the Rear Stabilizer (7) is resting on page 5 before you begin. Bracket 3. To make assembly easier, read the 1 information on the...
... Base (1). Next, turn the Base Foot (26) into the Base (1) as far as possible. 1. Attach the Stabilizer Covers with two M10 x 127mm Button Screws (83). 3 Next, hold the handle on the Frame (2), press the Latch Button (68), and lower the Frame until the Rear Stabilizer (7) is resting on page 5 before you begin. Bracket 3. To make assembly easier, read the 1 information on the...
Uk Manual
Page 7
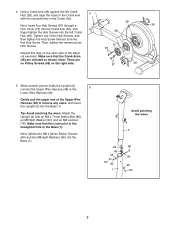
... sure that the Crank Arms (36) are no Pulley Screws (98) on the other side of the elliptical exerciser. Next, insert four Hub Screws (87) through a 98 36 Hub Cover (75) into the Crank Arm (36), and finger tighten the Hub Screws into the Base (1). Tip: Avoid pinching the wires. While another person holds the Upright (3), connect the Upper Wire Harness (48) to remove any slack, and...
... sure that the Crank Arms (36) are no Pulley Screws (98) on the other side of the elliptical exerciser. Next, insert four Hub Screws (87) through a 98 36 Hub Cover (75) into the Crank Arm (36), and finger tighten the Hub Screws into the Base (1). Tip: Avoid pinching the wires. While another person holds the Upright (3), connect the Upper Wire Harness (48) to remove any slack, and...
Uk Manual
Page 10
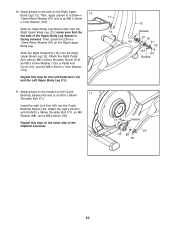
...elliptical exerciser. 11 12 14 Grease 62 97 16 31 115 112 110 Grease 71 Grease 20 43 88 78 10 Insert the right Link Arm (20) into the Crank Bushing Sleeve (43). Slide the Right Pedal Arm (16) onto the Right Upper Body Leg (12). Apply grease to the bracket on the Right Upper Body Leg (12). Attach the Right Pedal Arm... Bolt (71). Attach the right Link Arm with an M8 x 23mm Shoulder Screw (115), an M8 x 16mm Washer (110), a Pedal Arm Cover (31), and the M8 x 23mm x 1mm Washer (112). Repeat this step on the Right Upper Body Leg. Apply grease to the axle on the Crank ...
...elliptical exerciser. 11 12 14 Grease 62 97 16 31 115 112 110 Grease 71 Grease 20 43 88 78 10 Insert the right Link Arm (20) into the Crank Bushing Sleeve (43). Slide the Right Pedal Arm (16) onto the Right Upper Body Leg (12). Apply grease to the bracket on the Right Upper Body Leg (12). Attach the Right Pedal Arm... Bolt (71). Attach the right Link Arm with an M8 x 23mm Shoulder Screw (115), an M8 x 16mm Washer (110), a Pedal Arm Cover (31), and the M8 x 23mm x 1mm Washer (112). Repeat this step on the Right Upper Body Leg. Apply grease to the axle on the Crank ...
Uk Manual
Page 11
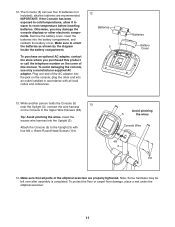
... Head Screws (101). 5 Avoid pinching the wires Console Wire 48 3 101 14. While another person holds the Console (5) near the Upright (3), connect the wire harness 13 on the console; Note: Some hardware may damage the console displays or other end into the jack on the Console to the Upright (3) with all parts of the elliptical exerciser are recommended. The Console (5) can use only a manufacturer-supplied AC adapter. Attach the Console (5) to...
... Head Screws (101). 5 Avoid pinching the wires Console Wire 48 3 101 14. While another person holds the Console (5) near the Upright (3), connect the wire harness 13 on the console; Note: Some hardware may damage the console displays or other end into the jack on the Console to the Upright (3) with all parts of the elliptical exerciser are recommended. The Console (5) can use only a manufacturer-supplied AC adapter. Attach the Console (5) to...

Uk Manual
Page 12
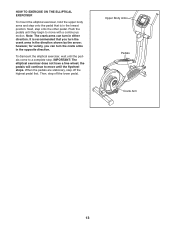
... move the elliptical exerciser to the desired position, and then lower it locks in front of the front stabilizer. Handle Pedal Arm Place your foot here Frame Latch Button HOW TO LEVEL THE ELLIPTICAL EXERCISER If the elliptical exerciser rocks slightly on the upright, and place one or both of the leveling feet beneath the rear stabilizer until it . HOW TO USE THE ELLIPTICAL EXERCISER HOW TO FOLD...
... move the elliptical exerciser to the desired position, and then lower it locks in front of the front stabilizer. Handle Pedal Arm Place your foot here Frame Latch Button HOW TO LEVEL THE ELLIPTICAL EXERCISER If the elliptical exerciser rocks slightly on the upright, and place one or both of the leveling feet beneath the rear stabilizer until it . HOW TO USE THE ELLIPTICAL EXERCISER HOW TO FOLD...
Uk Manual
Page 13
... move until the pedals come to move with a continuous motion. When the pedals are stationary, step off the lower pedal. To dismount the elliptical exerciser, wait until the flywheel stops. Upper Body Arms Pedals Crank Arm 13 the pedals will continue to a complete stop. Note: The crank arms can turn the crank arms in the opposite direction. Then, step off the highest pedal first. HOW TO EXERCISE ON THE ELLIPTICAL EXERCISER To mount the elliptical exerciser, hold the upper body arms and step...
... move until the pedals come to move with a continuous motion. When the pedals are stationary, step off the lower pedal. To dismount the elliptical exerciser, wait until the flywheel stops. Upper Body Arms Pedals Crank Arm 13 the pedals will continue to a complete stop. Note: The crank arms can turn the crank arms in the opposite direction. Then, step off the highest pedal first. HOW TO EXERCISE ON THE ELLIPTICAL EXERCISER To mount the elliptical exerciser, hold the upper body arms and step...
Uk Manual
Page 14
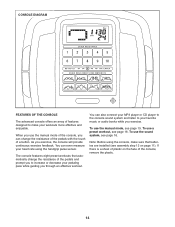
... to your heart rate using the console, make your pedaling pace while guiding you through an effective workout. The console features eight preset workouts that batteries are installed (see page 16. CONSOLE DIAGRAM FEATURES OF THE CONSOLE The advanced console offers an array of features designed to make sure that automatically change the resistance of the pedals with the touch of a button. When you use the sound system, see assembly step 12...
... to your heart rate using the console, make your pedaling pace while guiding you through an effective workout. The console features eight preset workouts that batteries are installed (see page 16. CONSOLE DIAGRAM FEATURES OF THE CONSOLE The advanced console offers an array of features designed to make sure that automatically change the resistance of the pedals with the touch of a button. When you use the sound system, see assembly step 12...
Uk Manual
Page 15
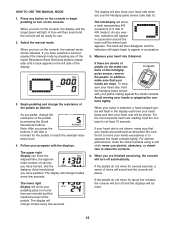
... manual mode. The display will change modes every few seconds. The lower right display will turn off and the displays will be reset. 15 If there are finished exercising, the console will show your heart rate when you use the handgrip pulse sensor (see step 5). Contacts tacts on the console. Avoid moving your heart rate if desired. If your heart rate will be shown. When you press the buttons, it will take a moment for the pedals to move...
... manual mode. The display will change modes every few seconds. The lower right display will turn off and the displays will be reset. 15 If there are finished exercising, the console will show your heart rate when you use the handgrip pulse sensor (see step 5). Contacts tacts on the console. Avoid moving your heart rate if desired. If your heart rate will be shown. When you press the buttons, it will take a moment for the pedals to move...
Uk Manual
Page 16
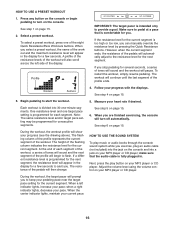
... to flash. See step 4 on page 15. 2. Press any button on the console and into 30 one of each segment. When you can manually override the resistance level by pressing the Quick Resistance buttons. If you exercise, plug an audio cable (not included) into the jack on the console or begin to provide a goal. To restart the workout, simply resume pedaling. Begin pedaling to turn off automatically. At...
... to flash. See step 4 on page 15. 2. Press any button on the console and into 30 one of each segment. When you can manually override the resistance level by pressing the Quick Resistance buttons. If you exercise, plug an audio cable (not included) into the jack on the console or begin to provide a goal. To restart the workout, simply resume pedaling. Begin pedaling to turn off automatically. At...
Uk Manual
Page 17
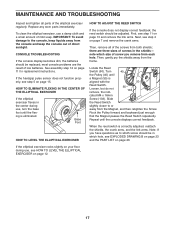
... the handgrip pulse sensor does not function properly, see step 4 on page 7 and remove the crank arms. Then, remove all parts of screw you have questions as to the console, keep liquids away from the console and keep the console out of mild soap. See assembly step 12 on page 15. Locate the Reed Switch (50). HOW TO ELIMINATE FLEXING IN THE CENTER OF THE ELLIPTICAL EXERCISER If the elliptical exerciser flexes in...
... the handgrip pulse sensor does not function properly, see step 4 on page 7 and remove the crank arms. Then, remove all parts of screw you have questions as to the console, keep liquids away from the console and keep the console out of mild soap. See assembly step 12 on page 15. Locate the Reed Switch (50). HOW TO ELIMINATE FLEXING IN THE CENTER OF THE ELLIPTICAL EXERCISER If the elliptical exerciser flexes in...

Uk Manual
Page 18
... the PART LIST on page 7 and remove the crank arms. Then, remove all the screws from both shields; Then, 51 reattach the shields, the crank arms, and the link arms. Note: If you have questions as to which screw 96 should be adjusted. HOW TO ADJUST THE DRIVE BELT If you can feel the pedals slip while you are three sizes of screws in which size of the pedals is tight. Tighten...
... the PART LIST on page 7 and remove the crank arms. Then, remove all the screws from both shields; Then, 51 reattach the shields, the crank arms, and the link arms. Note: If you have questions as to which screw 96 should be adjusted. HOW TO ADJUST THE DRIVE BELT If you can feel the pedals slip while you are three sizes of screws in which size of the pedals is tight. Tighten...
Uk Manual
Page 19
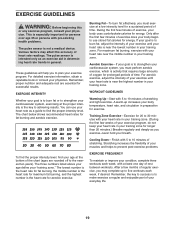
... minutes of exercise does your body begin to make exercise a regular and enjoyable part of stretching. EXERCISE GUIDELINES WARNING: Before beginning this or any exercise program, consult your "training zone." Aerobic Exercise-If your cardiovascular system, you may affect the accuracy of your exercise until your heart rate is to the nearest ten years). Cooling Down-Finish with pre-existing health problems. The pulse sensor is...
... minutes of exercise does your body begin to make exercise a regular and enjoyable part of stretching. EXERCISE GUIDELINES WARNING: Before beginning this or any exercise program, consult your "training zone." Aerobic Exercise-If your cardiovascular system, you may affect the accuracy of your exercise until your heart rate is to the nearest ten years). Cooling Down-Finish with pre-existing health problems. The pulse sensor is...
Uk Manual
Page 20
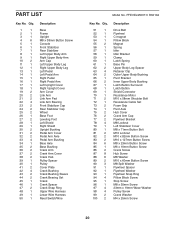
... Arm Arm Cap Left Upper Body Leg Right Upper Body Leg Left Pedal Left Pedal Arm Right Pedal Right Pedal Arm Left Upright Cover Right Upright Cover Arm Cover Link Arm Link Arm Pad Link Arm Bearing Front Stabilizer Cap Rear Stabilizer Cap Wheel Base Foot Leveling Foot Left Shield Right Shield Upright Bushing Pedal Arm Cover Pedal Arm Axle Pedal Arm Bushing Base Axle Base Bushing Crank Arm Crank Arm Cover Crank Hub Pulley Spacer Pulley Cover Plate Crank Bushing Crank Bushing Sleeve Crank Bearing Set Crank Crank Spacer Crank Snap Ring Upper Wire Harness Lower Wire Harness Reed Switch/Wire Model...
... Arm Arm Cap Left Upper Body Leg Right Upper Body Leg Left Pedal Left Pedal Arm Right Pedal Right Pedal Arm Left Upright Cover Right Upright Cover Arm Cover Link Arm Link Arm Pad Link Arm Bearing Front Stabilizer Cap Rear Stabilizer Cap Wheel Base Foot Leveling Foot Left Shield Right Shield Upright Bushing Pedal Arm Cover Pedal Arm Axle Pedal Arm Bushing Base Axle Base Bushing Crank Arm Crank Arm Cover Crank Hub Pulley Spacer Pulley Cover Plate Crank Bushing Crank Bushing Sleeve Crank Bearing Set Crank Crank Spacer Crank Snap Ring Upper Wire Harness Lower Wire Harness Reed Switch/Wire Model...
Uk Manual
Page 21
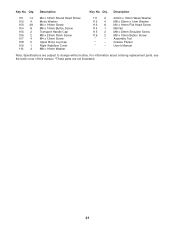
... Head Screw Motor Washer M4 x 16mm Screw M6 x 10mm Button Screw Transport Handle Cap M8 x 23mm Patch Screw M4 x 12mm Screw Upper Body Leg Cap Right Stabilizer Cover M8 x 16mm Washer 111 2 112 4 113 8 114 1 115 2 116 2 * - * - * - 22mm x 16mm Wave Washer M8 x 23mm x 1mm Washer M4 x 16mm Flat Head Screw M6 Nut M8 x 23mm Shoulder Screw M8 x 15mm Button Screw Assembly Tool Grease Packet Userʼs Manual Note: Specifications...
... Head Screw Motor Washer M4 x 16mm Screw M6 x 10mm Button Screw Transport Handle Cap M8 x 23mm Patch Screw M4 x 12mm Screw Upper Body Leg Cap Right Stabilizer Cover M8 x 16mm Washer 111 2 112 4 113 8 114 1 115 2 116 2 * - * - * - 22mm x 16mm Wave Washer M8 x 23mm x 1mm Washer M4 x 16mm Flat Head Screw M6 Nut M8 x 23mm Shoulder Screw M8 x 15mm Button Screw Assembly Tool Grease Packet Userʼs Manual Note: Specifications...
Uk Manual
Page 24
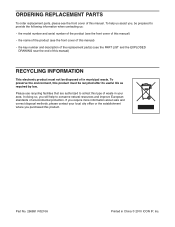
... REPLACEMENT PARTS To order replacement parts, please see the PART LIST and the EXPLODED DRAWING near the end of this product. If you , be prepared to provide the following information when contacting us: • the model number and serial number of the product (see the front cover of this manual) • the name of the product (see the front cover of this manual) • the key number...
... REPLACEMENT PARTS To order replacement parts, please see the PART LIST and the EXPLODED DRAWING near the end of this product. If you , be prepared to provide the following information when contacting us: • the model number and serial number of the product (see the front cover of this manual) • the name of the product (see the front cover of this manual) • the key number...

