
Uk Manual
Page 2
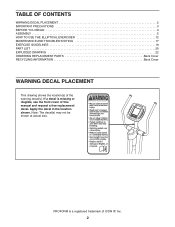
Apply the decal in the location shown. PROFORM is missing or illegible, see the front cover of this manual and request a free replacement decal. TABLE OF CONTENTS WARNING DECAL PLACEMENT 2 IMPORTANT PRECAUTIONS 3 BEFORE YOU BEGIN 4 ASSEMBLY 5 HOW TO USE THE ELLIPTICAL EXERCISER 12 MAINTENANCE AND TROUBLESHOOTING 17 EXERCISE GUIDELINES 19 PART LIST 20...
Apply the decal in the location shown. PROFORM is missing or illegible, see the front cover of this manual and request a free replacement decal. TABLE OF CONTENTS WARNING DECAL PLACEMENT 2 IMPORTANT PRECAUTIONS 3 BEFORE YOU BEGIN 4 ASSEMBLY 5 HOW TO USE THE ELLIPTICAL EXERCISER 12 MAINTENANCE AND TROUBLESHOOTING 17 EXERCISE GUIDELINES 19 PART LIST 20...

Uk Manual
Page 3
...or through the use of this product. 1. The pulse sensor is intended for foot protection while exercising. 10. Keep the elliptical exerciser indoors, away from the elliptical exerciser at least 3 ft. (0.9 m) of clearance in a commercial, rental, or institutional setting. 5. Inspect and properly ...of serious injury, read all important precautions and instructions in this manual. 3. Wear appropriate clothes while exercising; Use the elliptical exerciser only as an exercise aid in determining heart rate trends in serious injury or death. Keep children under age 12 ...
...or through the use of this product. 1. The pulse sensor is intended for foot protection while exercising. 10. Keep the elliptical exerciser indoors, away from the elliptical exerciser at least 3 ft. (0.9 m) of clearance in a commercial, rental, or institutional setting. 5. Inspect and properly ...of serious injury, read all important precautions and instructions in this manual. 3. Wear appropriate clothes while exercising; Use the elliptical exerciser only as an exercise aid in determining heart rate trends in serious injury or death. Keep children under age 12 ...
Uk Manual
Page 4
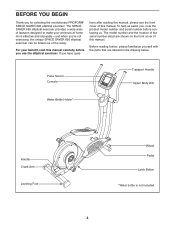
...shown on the front cover of the away. If you , note the product model number and serial number before you for selecting the revolutionary PROFORM® SPACE SAVER 695 elliptical exerciser. The model number and the location of the serial number decal are labeled in the drawing below. To help us assist you have ...tions after reading this manual, please see the front cover of features designed to make your benefit, read this manual carefully before contacting us. The SPACE SAVER 695 elliptical exerciser provides a wide array of this manual. BEFORE YOU BEGIN Thank you use the...
...shown on the front cover of the away. If you , note the product model number and serial number before you for selecting the revolutionary PROFORM® SPACE SAVER 695 elliptical exerciser. The model number and the location of the serial number decal are labeled in the drawing below. To help us assist you have ...tions after reading this manual, please see the front cover of features designed to make your benefit, read this manual carefully before contacting us. The SPACE SAVER 695 elliptical exerciser provides a wide array of this manual. BEFORE YOU BEGIN Thank you use the...
Uk Manual
Page 5
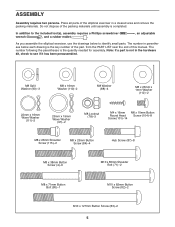
... Button Screw (83)-2 5 The number in parentheses below to identify small parts. ASSEMBLY Assembly requires two persons. Do not dispose of the elliptical exerciser in the hardware kit, check to the included tool(s), assembly requires a Phillips screwdriver wrench , and a rubber mallet . , an adjustable ...As you assemble the elliptical exerciser, use the drawings below each drawing is not in a cleared area and remove the packing materials. In addition to see if it...
... Button Screw (83)-2 5 The number in parentheses below to identify small parts. ASSEMBLY Assembly requires two persons. Do not dispose of the elliptical exerciser in the hardware kit, check to the included tool(s), assembly requires a Phillips screwdriver wrench , and a rubber mallet . , an adjustable ...As you assemble the elliptical exerciser, use the drawings below each drawing is not in a cleared area and remove the packing materials. In addition to see if it...
Uk Manual
Page 7
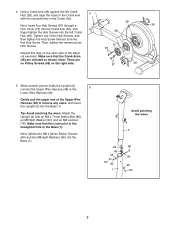
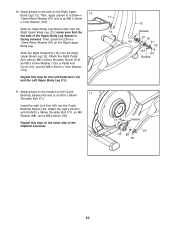
... finger tighten the Hub Screws into the Base (1). Make sure that the Locknut is in the hexagonal hole in the Base (1). Tighten one of the elliptical exerciser. Tip: Avoid pinching the wires. Avoid pinching the wires 3 48 49 78 84 90 1 80 90 90 84 7 Then, tighten the remaining two Hub...
... finger tighten the Hub Screws into the Base (1). Make sure that the Locknut is in the hexagonal hole in the Base (1). Tighten one of the elliptical exerciser. Tip: Avoid pinching the wires. Avoid pinching the wires 3 48 49 78 84 90 1 80 90 90 84 7 Then, tighten the remaining two Hub...
Uk Manual
Page 10
... a 23mm x 10 19mm Wave Washer (97) and to the bracket on the Right Upper Body Leg (12). make sure that the flat side of the elliptical exerciser. 11 12 14 Grease 62 97 16 31 115 112 110 Grease 71 Grease 20 43 88 78 10 Slide the Right Pedal Arm...
... a 23mm x 10 19mm Wave Washer (97) and to the bracket on the Right Upper Body Leg (12). make sure that the flat side of the elliptical exerciser. 11 12 14 Grease 62 97 16 31 115 112 110 Grease 71 Grease 20 43 88 78 10 Slide the Right Pedal Arm...
Uk Manual
Page 11
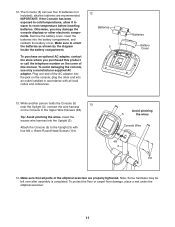
... Note: Some hardware may damage the console displays or other end into the jack on the Console to the Upright (3) with all parts of the elliptical exerciser are recommended. To purchase an optional AC adapter, contact the store where you may be left over after assembly is completed. Make sure to... room temperature before inserting batteries. To protect the floor or carpet from damage, place a mat under the elliptical exerciser. 11 plug the other electronic components. alkaline batteries are properly tightened.
... Note: Some hardware may damage the console displays or other end into the jack on the Console to the Upright (3) with all parts of the elliptical exerciser are recommended. To purchase an optional AC adapter, contact the store where you may be left over after assembly is completed. Make sure to... room temperature before inserting batteries. To protect the floor or carpet from damage, place a mat under the elliptical exerciser. 11 plug the other electronic components. alkaline batteries are properly tightened.

Uk Manual
Page 12
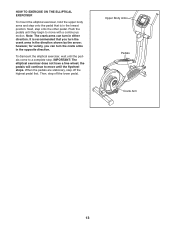
... will roll on the front wheels. Handle Pedal Arm Place your foot here Frame Latch Button HOW TO LEVEL THE ELLIPTICAL EXERCISER If the elliptical exerciser rocks slightly on the rear stabilizer and lift the frame until it locks in use , turn one foot against the center of the way. ...To fold the elliptical exerciser, hold the transport handle on the upright, and place one or both of the elliptical exerciser, hold the handle on your floor during use , the frame can be folded out of the...
... will roll on the front wheels. Handle Pedal Arm Place your foot here Frame Latch Button HOW TO LEVEL THE ELLIPTICAL EXERCISER If the elliptical exerciser rocks slightly on the rear stabilizer and lift the frame until it locks in use , turn one foot against the center of the way. ...To fold the elliptical exerciser, hold the transport handle on the upright, and place one or both of the elliptical exerciser, hold the handle on your floor during use , the frame can be folded out of the...
Uk Manual
Page 13
... pedal. however, for variety, you turn the crank arms in the direction shown by the arrow; HOW TO EXERCISE ON THE ELLIPTICAL EXERCISER To mount the elliptical exerciser, hold the upper body arms and step onto the pedal that is recommended that you can turn in either direction. It ... crank arms can turn the crank arms in the lowest position. Push the pedals until the pedals come to a complete stop. To dismount the elliptical exerciser, wait until they begin to move with a continuous motion. the pedals will continue to move until the flywheel stops. Next, step onto the...
... pedal. however, for variety, you turn the crank arms in the direction shown by the arrow; HOW TO EXERCISE ON THE ELLIPTICAL EXERCISER To mount the elliptical exerciser, hold the upper body arms and step onto the pedal that is recommended that you can turn in either direction. It ... crank arms can turn the crank arms in the lowest position. Push the pedals until the pedals come to a complete stop. To dismount the elliptical exerciser, wait until they begin to move with a continuous motion. the pedals will continue to move until the flywheel stops. Next, step onto the...
Uk Manual
Page 17
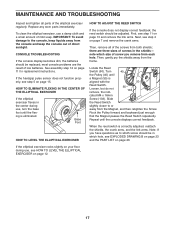
... there are the result of screws in the shields- See assembly step 12 on page 15. Base Foot HOW TO LEVEL THE ELLIPTICAL EXERCISER If the elliptical exerciser rocks slightly on page 20. 17 First, see step 11 on page 10 and remove the link arms. Next, see EXPLODED...). Replace any worn parts immediately. Rock the Pulley forward and backward just enough that the Magnet passes the Reed Switch repeatedly. To clean the elliptical exerciser, use , see step 5 on page 11 for replacement instructions. most console problems are three sizes of low batteries. CONSOLE TROUBLESHOOTING If ...
... there are the result of screws in the shields- See assembly step 12 on page 15. Base Foot HOW TO LEVEL THE ELLIPTICAL EXERCISER If the elliptical exerciser rocks slightly on page 20. 17 First, see step 11 on page 10 and remove the link arms. Next, see EXPLODED...). Replace any worn parts immediately. Rock the Pulley forward and backward just enough that the Magnet passes the Reed Switch repeatedly. To clean the elliptical exerciser, use , see step 5 on page 11 for replacement instructions. most console problems are three sizes of low batteries. CONSOLE TROUBLESHOOTING If ...


