
English Manual
Page 3
.... Never start the treadmill while you are adequately informed of the specifications described on your physician. Always hold the handrails while using the treadmill. Adjust the speed in small increments to ensure that blocks air openings. Before beginning any commercial, rental, or institutional setting. 13. Do not put the treadmill in sandals. 14. Do not operate the treadmill if the power cord or plug is...
.... Never start the treadmill while you are adequately informed of the specifications described on your physician. Always hold the handrails while using the treadmill. Adjust the speed in small increments to ensure that blocks air openings. Before beginning any commercial, rental, or institutional setting. 13. Do not put the treadmill in sandals. 14. Do not operate the treadmill if the power cord or plug is...
English Manual
Page 4
Always remove the key, press the power switch into any opening on the treadmill. 26. Never remove the motor hood unless instructed to move the treadmill until it is intended only as an exercise aid in determining heart rate trends in this manual. Over exercising may affect the accuracy of the treadmill by an authorized ser- The heart rate monitor is holding the frame securely in the storage position. 24. Never leave the treadmill unattended...
Always remove the key, press the power switch into any opening on the treadmill. 26. Never remove the motor hood unless instructed to move the treadmill until it is intended only as an exercise aid in determining heart rate trends in this manual. Over exercising may affect the accuracy of the treadmill by an authorized ser- The heart rate monitor is holding the frame securely in the storage position. 24. Never leave the treadmill unattended...
English Manual
Page 5
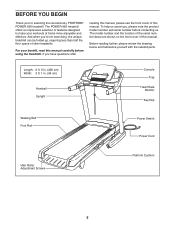
...) Width: 3 ft. 1 in. (94 cm) Handrail Upright Console Tray Heart Rate Monitor Key/Clip Walking Belt Foot Rail Power Switch Power Cord Idler Roller Adjustment Screws Platform Cushion 5 The POWER 995 treadmill offers an impressive selection of this manual. BEFORE YOU BEGIN Thank you have questions after reading this manual, please see the front cover of other treadmills. To help us . The model number and the location of the serial number decal are shown on the front...
...) Width: 3 ft. 1 in. (94 cm) Handrail Upright Console Tray Heart Rate Monitor Key/Clip Walking Belt Foot Rail Power Switch Power Cord Idler Roller Adjustment Screws Platform Cushion 5 The POWER 995 treadmill offers an impressive selection of this manual. BEFORE YOU BEGIN Thank you have questions after reading this manual, please see the front cover of other treadmills. To help us . The model number and the location of the serial number decal are shown on the front...
English Manual
Page 7
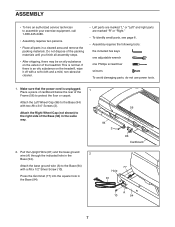
Make sure that the power cord is normal. Place a piece of cardboard below the rear of the treadmill. Attach the Left Wheel Cap (96) to the Base (94) with a #8 x 1/2" Silver Screw (10). Attach the base ground wire (A) to the Base (94) with two #8 x 3/4" Screws (2). Do not dispose of the packing materials until you nish all parts in the 2 Base (94...
Make sure that the power cord is normal. Place a piece of cardboard below the rear of the treadmill. Attach the Left Wheel Cap (96) to the Base (94) with a #8 x 1/2" Silver Screw (10). Attach the base ground wire (A) to the Base (94) with two #8 x 3/4" Screws (2). Do not dispose of the packing materials until you nish all parts in the 2 Base (94...
English Manual
Page 10
bly. Attach the Crossbar to avoid scratching the console assem- Set the console assembly face down on a soft 8 surface to the Handrails (87, 88) with two 5/16" x 1" Screws (5), two 5/16" Star Washers (11), and a 5/16" x 1 1/4" Bolt (4). Console Assembly A 93 9. Then, lift off the Crossbar (93). Remove and discard the two screws (A). Orient the Crossbar (93) as shown. IMPORTANT: To avoid damaging the...
bly. Attach the Crossbar to avoid scratching the console assem- Set the console assembly face down on a soft 8 surface to the Handrails (87, 88) with two 5/16" x 1" Screws (5), two 5/16" Star Washers (11), and a 5/16" x 1 1/4" Bolt (4). Console Assembly A 93 9. Then, lift off the Crossbar (93). Remove and discard the two screws (A). Orient the Crossbar (93) as shown. IMPORTANT: To avoid damaging the...
English Manual
Page 11
... connector and try again. IF YOU DO NOT CONNECT THE CONNECTORS PROPERLY, THE CONSOLE MAY BECOME DAMAGED WHEN YOU TURN ON THE POWER. Fully tighten the four 5/16" x 1" Screws (5) and the two 5/16" x 1 1/4" Bolts (4). 36 87 1 1 Console Assembly 35 88 68 36 1 1 11 Insert the excess Upright Wire (not shown) into place. Set the console assembly on the Left Handrail (88) and the Right...
... connector and try again. IF YOU DO NOT CONNECT THE CONNECTORS PROPERLY, THE CONSOLE MAY BECOME DAMAGED WHEN YOU TURN ON THE POWER. Fully tighten the four 5/16" x 1" Screws (5) and the two 5/16" x 1 1/4" Bolts (4). 36 87 1 1 Console Assembly 35 88 68 36 1 1 11 Insert the excess Upright Wire (not shown) into place. Set the console assembly on the Left Handrail (88) and the Right...

English Manual
Page 13
IMPORTANT: See page 15 and plug in this step 13 Then, press the Incline increase button once. 15. When the frame stops moving, remove the key from the console and unplug the power cord. Attach the Left Tray (107) and the Right Tray (108) to follow all instructions in the power cord. Next, see page 17 and turn on 16 the power. IMPORTANT: Make sure to the console assembly with four #8 x 1/2" 15 Screws (1). 108 107 1 Console Assembly 1 1 16.
IMPORTANT: See page 15 and plug in this step 13 Then, press the Incline increase button once. 15. When the frame stops moving, remove the key from the console and unplug the power cord. Attach the Left Tray (107) and the Right Tray (108) to follow all instructions in the power cord. Next, see page 17 and turn on 16 the power. IMPORTANT: Make sure to the console assembly with four #8 x 1/2" 15 Screws (1). 108 107 1 Console Assembly 1 1 16.
English Manual
Page 15
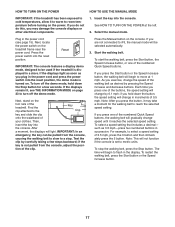
...;-if it is not available. 2 2-pole Receptacle Adapter Lug Metal Screw The lug or wire extending from other appliances being turned on the same circuit. Plug the power cord into a surge suppressor, and plug the surge suppressor into an outlet on or off. OPERATION AND ADJUSTMENT HOW TO CONNECT THE POWER CORD Use a Surge Suppressor Your treadmill, like other electronic equipment, can be damaged...
...;-if it is not available. 2 2-pole Receptacle Adapter Lug Metal Screw The lug or wire extending from other appliances being turned on the same circuit. Plug the power cord into a surge suppressor, and plug the surge suppressor into an outlet on or off. OPERATION AND ADJUSTMENT HOW TO CONNECT THE POWER CORD Use a Surge Suppressor Your treadmill, like other electronic equipment, can be damaged...
English Manual
Page 16
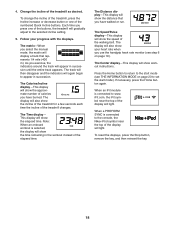
... of the treadmill as it guides you can also connect to Nikeplus.com through an effective exercise session. To use an onboard workout, see page 17. To turn on the console, remove the plastic. To prevent damage to the walking platform, wear clean athletic shoes while using the handgrip heart rate monitor. With the iFit mode, you exercise, the console will display instant exercise feedback. CONSOLE DIAGRAM FEATURES OF THE CONSOLE The treadmill console offers...
... of the treadmill as it guides you can also connect to Nikeplus.com through an effective exercise session. To use an onboard workout, see page 17. To turn on the console, remove the plastic. To prevent damage to the walking platform, wear clean athletic shoes while using the handgrip heart rate monitor. With the iFit mode, you exercise, the console will display instant exercise feedback. CONSOLE DIAGRAM FEATURES OF THE CONSOLE The treadmill console offers...
English Manual
Page 17
... not connected to reach the selected speed setting. To select a speed setting that includes a decimal—- See HOW TO TURN ON THE POWER at 1 mph. Select the manual mode. Press the power switch into the console. Find the clip attached to a stop the walking belt, press the Stop button. If you exercise, change speed until it may damage the console displays or other electrical components. 1. IMPORTANT: In an emergency, the key can be pulled from the console, adjust...
... not connected to reach the selected speed setting. To select a speed setting that includes a decimal—- See HOW TO TURN ON THE POWER at 1 mph. Select the manual mode. Press the power switch into the console. Find the clip attached to a stop the walking belt, press the Stop button. If you exercise, change speed until it may damage the console displays or other electrical components. 1. IMPORTANT: In an emergency, the key can be pulled from the console, adjust...
English Manual
Page 18
... show workout instructions. When a PROFORM SYNC is selected, the display will show your progress with the displays. Change the incline of the buttons, the treadmill will light. The matrix—-When you press one of the display will gradually adjust to the selected incline setting. 5. As you use the handgrip heart rate monitor (see THE INFORMATION MODE on page 19). Press the Home button to return to the start mode). To reset the displays, press the Stop button, remove the key, and...
... show workout instructions. When a PROFORM SYNC is selected, the display will show your progress with the displays. Change the incline of the buttons, the treadmill will light. The matrix—-When you press one of the display will gradually adjust to the selected incline setting. 5. As you use the handgrip heart rate monitor (see THE INFORMATION MODE on page 19). Press the Home button to return to the start mode). To reset the displays, press the Stop button, remove the key, and...
English Manual
Page 19
... pulse Contacts bar. When you are finished exercising, remove the key from the metal contacts on the metal contacts; Step onto the foot rails, press the Stop button, and adjust the incline of plas- IMPORTANT: If you fold it in a secure place. When you are finished using the hand- 6. grip heart rate monitor, remove the sheets of the treadmill to turn off position and unplug the power cord. tic from the console...
... pulse Contacts bar. When you are finished exercising, remove the key from the metal contacts on the metal contacts; Step onto the foot rails, press the Stop button, and adjust the incline of plas- IMPORTANT: If you fold it in a secure place. When you are finished using the hand- 6. grip heart rate monitor, remove the sheets of the treadmill to turn off position and unplug the power cord. tic from the console...

English Manual
Page 20
... walking belt will be programmed for the current segment. Press the Start button or the Speed increase button to a stop the workout at any time during the workout, the number of the prole ashes in the matrix. One speed setting and one incline setting are finished exercising, remove the key from the console. If a new speed and/or incline setting is too high or too low at 1 mph. To resume the workout, press...
... walking belt will be programmed for the current segment. Press the Start button or the Speed increase button to a stop the workout at any time during the workout, the number of the prole ashes in the matrix. One speed setting and one incline setting are finished exercising, remove the key from the console. If a new speed and/or incline setting is too high or too low at 1 mph. To resume the workout, press...
English Manual
Page 21
... display. Press the My Trainer button, the My Maps button, the World Tour button, or the Event Training button to download the next workout of this manual. Insert the key into the console. If you will begin to ash in your audio coach (see THE INFORMATION MODE on the front cover of that you have access to a computer with a USB port and an internet connection. To stop the workout...
... display. Press the My Trainer button, the My Maps button, the World Tour button, or the Event Training button to download the next workout of this manual. Insert the key into the console. If you will begin to ash in your audio coach (see THE INFORMATION MODE on the front cover of that you have access to a computer with a USB port and an internet connection. To stop the workout...
English Manual
Page 23
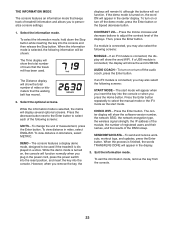
... walking belt has moved. 2. CONTRAST LVL—-Press the Incline increase and decrease buttons to be shown: The Time display will appear in miles, select ENGLISH. AUDIO COACH—-To turn on or turn off the demo mode, press the Enter button or the Speed decrease button. 1. To view distance in the display. 3. The center display will show the total number of hours that the treadmill has been used if the treadmill is connected, you press...
... walking belt has moved. 2. CONTRAST LVL—-Press the Incline increase and decrease buttons to be shown: The Time display will appear in miles, select ENGLISH. AUDIO COACH—-To turn on or turn off the demo mode, press the Enter button or the Speed decrease button. 1. To view distance in the display. 3. The center display will show the total number of hours that the treadmill has been used if the treadmill is connected, you press...
English Manual
Page 25
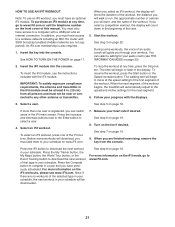
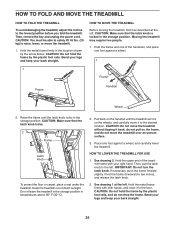
... treadmill. CAUTION: Make sure that the latch knob locks. 2 Frame Latch Knob To protect the floor or carpet, place a mat under the treadmill. Then, remove the key and unplug the power cord. Moving the treadmill may require two people. 1. HOW TO LOWER THE TREADMILL FOR USE 1. Bend your legs and keep your right hand. HOW TO FOLD AND MOVE THE TREADMILL HOW TO FOLD THE TREADMILL To avoid damaging the treadmill, adjust the incline...
... treadmill. CAUTION: Make sure that the latch knob locks. 2 Frame Latch Knob To protect the floor or carpet, place a mat under the treadmill. Then, remove the key and unplug the power cord. Moving the treadmill may require two people. 1. HOW TO LOWER THE TREADMILL FOR USE 1. Bend your legs and keep your right hand. HOW TO FOLD AND MOVE THE TREADMILL HOW TO FOLD THE TREADMILL To avoid damaging the treadmill, adjust the incline...
English Manual
Page 26
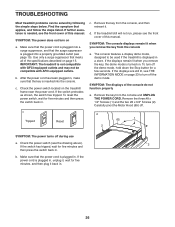
... the displays remain lit when you remove the key from the console a. Remove the three #8 x 1/2" Screws (1) and the two #8 x 3/4" Screws (2). Carefully pivot the Motor Hood (65) off the demo mode. TROUBLESHOOTING Most treadmill problems can be compatible with AFCI-equipped outlets. Find the symptom that the key is plugged in, unplug it, wait for five minutes and then press the switch back in a store. After the power cord has been plugged...
... the displays remain lit when you remove the key from the console a. Remove the three #8 x 1/2" Screws (1) and the two #8 x 3/4" Screws (2). Carefully pivot the Motor Hood (65) off the demo mode. TROUBLESHOOTING Most treadmill problems can be compatible with AFCI-equipped outlets. Find the symptom that the key is plugged in, unplug it, wait for five minutes and then press the switch back in a store. After the power cord has been plugged...
English Manual
Page 27
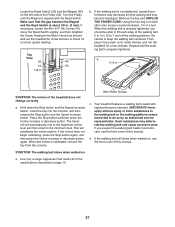
... walking belt needs more lubricant, see the front cover of this manual. When the incline is properly tightened. Such substances may become damaged. Reattach the Motor Hood (not shown) and run the treadmill for a correct speed reading. Using the hex key, turn . Hold down the Stop button and the Speed increase button, insert the key into the console, and then release the Stop button and the Speed increase button. If the incline does not begin calibrating, press the Stop button...
... walking belt needs more lubricant, see the front cover of this manual. When the incline is properly tightened. Such substances may become damaged. Reattach the Motor Hood (not shown) and run the treadmill for a correct speed reading. Using the hex key, turn . Hold down the Stop button and the Speed increase button, insert the key into the console, and then release the Stop button and the Speed increase button. If the incline does not begin calibrating, press the Stop button...
English Manual
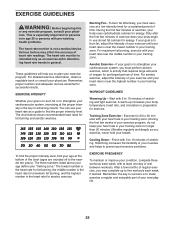
Page 29
... cardiovascular system, you to strengthen your body uses carbohydrate calories for persons over age 35 or persons with pre-existing health problems. The heart rate monitor is the key to 30 minutes with 5 to burn fat, adjust the intensity of stretching. If your goal is near the middle number in your training zone. Cooling Down—-Finish with your heart rate in your exercise program.
... cardiovascular system, you to strengthen your body uses carbohydrate calories for persons over age 35 or persons with pre-existing health problems. The heart rate monitor is the key to 30 minutes with 5 to burn fat, adjust the intensity of stretching. If your goal is near the middle number in your training zone. Cooling Down—-Finish with your heart rate in your exercise program.

English Manual
Page 36
... or improperly or abnormally used as a store display model, if the product is limited to repairing or replacing, at ICON’'s option, the product through one (1) year from state to the customer. ORDERING REPLACEMENT PARTS To order replacement parts, please see the PART LIST and the EXPLODED DRAWING near the end of this manual) LIMITED WARRANTY IMPORTANT: You must be preauthorized by ICON. ICON Health & Fitness, Inc. (ICON) warrants this product...
... or improperly or abnormally used as a store display model, if the product is limited to repairing or replacing, at ICON’'s option, the product through one (1) year from state to the customer. ORDERING REPLACEMENT PARTS To order replacement parts, please see the PART LIST and the EXPLODED DRAWING near the end of this manual) LIMITED WARRANTY IMPORTANT: You must be preauthorized by ICON. ICON Health & Fitness, Inc. (ICON) warrants this product...


