
English Manual
Page 1
www.proform.com Model No. Write the serial number in this manual before contacting Customer Care. Save this equipment. PFTL99911.1 Serial No. Serial Number Decal QUESTIONS? CALL TOLL-FREE: 1-888-533-1333 Mon.–-Fri. 6 a.m.–-6 p.m. MT ... in the space above for future reference. If you have questions, or if parts are damaged or missing, DO NOT CONTACT THE STORE; USER’'S MANUAL please contact Customer Care. MT Sat. 8 a.m.–-4 p.m. IMPORTANT: Please register this product (see the limited warranty on the back cover of this...
www.proform.com Model No. Write the serial number in this manual before contacting Customer Care. Save this equipment. PFTL99911.1 Serial No. Serial Number Decal QUESTIONS? CALL TOLL-FREE: 1-888-533-1333 Mon.–-Fri. 6 a.m.–-6 p.m. MT ... in the space above for future reference. If you have questions, or if parts are damaged or missing, DO NOT CONTACT THE STORE; USER’'S MANUAL please contact Customer Care. MT Sat. 8 a.m.–-4 p.m. IMPORTANT: Please register this product (see the limited warranty on the back cover of this...
English Manual
Page 2
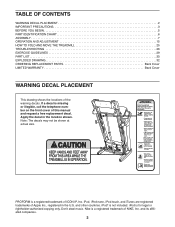
... 2 IMPORTANT PRECAUTIONS 3 BEFORE YOU BEGIN 5 PART IDENTIFICATION CHART 6 ASSEMBLY 7 OPERATION AND ADJUSTMENT 15 HOW TO FOLD AND MOVE THE TREADMILL 25 TROUBLESHOOTING 26 EXERCISE GUIDELINES 29 PART LIST 30 EXPLODED DRAWING 32 ORDERING REPLACEMENT PARTS Back Cover LIMITED WARRANTY Back Cover WARNING DECAL PLACEMENT ...the locations of ICON IP, Inc. If a decal is for legal or rightholder-authorized copying only. and its affiliated companies. 2 PROFORM is a registered trademark of the warning decals. Don’'t steal music. iPod, iPod nano, iPod touch, and iTunes are registered trademarks ...
... 2 IMPORTANT PRECAUTIONS 3 BEFORE YOU BEGIN 5 PART IDENTIFICATION CHART 6 ASSEMBLY 7 OPERATION AND ADJUSTMENT 15 HOW TO FOLD AND MOVE THE TREADMILL 25 TROUBLESHOOTING 26 EXERCISE GUIDELINES 29 PART LIST 30 EXPLODED DRAWING 32 ORDERING REPLACEMENT PARTS Back Cover LIMITED WARRANTY Back Cover WARNING DECAL PLACEMENT ...the locations of ICON IP, Inc. If a decal is for legal or rightholder-authorized copying only. and its affiliated companies. 2 PROFORM is a registered trademark of the warning decals. Don’'t steal music. iPod, iPod nano, iPod touch, and iTunes are registered trademarks ...

English Manual
Page 3
... do not plug other electrical devices, except for low-power devices such as described in this manual and all times. 9. The treadmill is capable of high speeds. Do not put the treadmill in the treadmill. Do not place the treadmill on the same circuit. 3. To protect the floor or...behind it and 2 ft. (0.6 m) on page 17). 18. Never use the treadmill in any exercise program, consult your local PROFORM dealer, call the telephone number on a level surface, with pre-existing health problems. 12. The treadmill is intended for persons over age 35 or persons with at a time. 11. ...
... do not plug other electrical devices, except for low-power devices such as described in this manual and all times. 9. The treadmill is capable of high speeds. Do not put the treadmill in the treadmill. Do not place the treadmill on the same circuit. 3. To protect the floor or...behind it and 2 ft. (0.6 m) on page 17). 18. Never use the treadmill in any exercise program, consult your local PROFORM dealer, call the telephone number on a level surface, with pre-existing health problems. 12. The treadmill is intended for persons over age 35 or persons with at a time. 11. ...

English Manual
Page 4
... that the storage latch is not a medical device. Inspect and properly tighten all parts of the power switch), and unplug the power cord when the treadmill is not in use , before performing the maintenance and adjustment procedures described in this manual should be able to safely lift 45 lbs. (20 kg) to move the...
... that the storage latch is not a medical device. Inspect and properly tighten all parts of the power switch), and unplug the power cord when the treadmill is not in use , before performing the maintenance and adjustment procedures described in this manual should be able to safely lift 45 lbs. (20 kg) to move the...
English Manual
Page 5
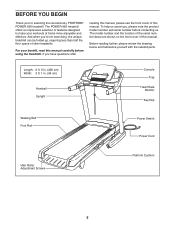
... Console Tray Heart Rate Monitor Key/Clip Walking Belt Foot Rail Power Switch Power Cord Idler Roller Adjustment Screws Platform Cushion 5 If you for selecting the revolutionary PROFORM® POWER 995 treadmill. The POWER 995 treadmill offers an impressive selection of features designed to make your benefit, read this manual. Before reading further, please review the drawing below and familiarize...
... Console Tray Heart Rate Monitor Key/Clip Walking Belt Foot Rail Power Switch Power Cord Idler Roller Adjustment Screws Platform Cushion 5 If you for selecting the revolutionary PROFORM® POWER 995 treadmill. The POWER 995 treadmill offers an impressive selection of features designed to make your benefit, read this manual. Before reading further, please review the drawing below and familiarize...

English Manual
Page 6
.... PART IDENTIFICATION CHART Use the drawings below each drawing is the key number of the part, from the PART LIST near the end of this manual. Extra parts may be included. 1/4" Star Washer (35)–-6 5/16" Flat Washer (68)–-4 5/16" Star Washer (11)–-4 3/8" Star Washer (13)–-4 3/8" Nut (12...
.... PART IDENTIFICATION CHART Use the drawings below each drawing is the key number of the part, from the PART LIST near the end of this manual. Extra parts may be included. 1/4" Star Washer (35)–-6 5/16" Flat Washer (68)–-4 5/16" Star Washer (11)–-4 3/8" Star Washer (13)–-4 3/8" Nut (12...
English Manual
Page 16
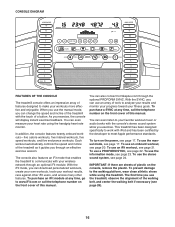
...workout, see page 22. With the SYNC, you through an effective exercise session. To use a PROFORM SYNC, see page 21. To turn on the front cover of this manual. To use the treadmill, observe the alignment of a button. To prevent damage to the walking platform, wear clean athletic shoes...To purchase an iFit module at any time, go to your heart rate using the treadmill. To purchase a SYNC at any time, call the telephone number on the power, see page 28). 16 This treadmill has been designed specifically to work with your workouts more effective and enjoyable. The &#...
...workout, see page 22. With the SYNC, you through an effective exercise session. To use a PROFORM SYNC, see page 21. To turn on the front cover of this manual. To use the treadmill, observe the alignment of a button. To prevent damage to the walking platform, wear clean athletic shoes...To purchase an iFit module at any time, go to your heart rate using the treadmill. To purchase a SYNC at any time, call the telephone number on the power, see page 28). 16 This treadmill has been designed specifically to work with your workouts more effective and enjoyable. The &#...
English Manual
Page 17
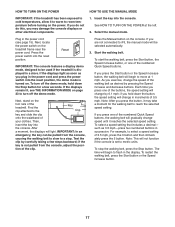
... speed of your clothes. To restart the walking belt, press the Start button or the Speed increase button. 17 Select the manual mode. Next, stand on the treadmill frame near the power cord. To select a speed setting that includes a decimal—- such as desired by carefully taking a few seconds. Insert the ...on . To start the walking belt, press the Start button, the Speed increase button, or one of the clip. HOW TO TURN ON THE POWER HOW TO USE THE MANUAL MODE IMPORTANT: If the treadmill has been exposed to cold temperatures, allow it to warm to metric units. Press the...
... speed of your clothes. To restart the walking belt, press the Start button or the Speed increase button. 17 Select the manual mode. Next, stand on the treadmill frame near the power cord. To select a speed setting that includes a decimal—- such as desired by carefully taking a few seconds. Insert the ...on . To start the walking belt, press the Start button, the Speed increase button, or one of the clip. HOW TO TURN ON THE POWER HOW TO USE THE MANUAL MODE IMPORTANT: If the treadmill has been exposed to cold temperatures, allow it to warm to metric units. Press the...
English Manual
Page 18
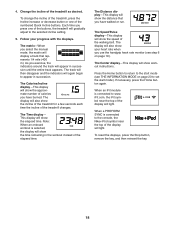
... setting. 5. iFit.com, the iFit symbol near the top of the buttons, the treadmill will show the elapsed time. When a PROFORM SYNC is selected, the display will light. To change the incline of the treadmill, press the Incline increase or decrease button or one of the display will show your ...Time display—- As you have walked or run. If necessary, press the Home button again. Follow your heart rate when you select the manual mode, the matrix will light. The display will appear in succession. When an iFit module is connected to appear in succession until the entire ...
... setting. 5. iFit.com, the iFit symbol near the top of the buttons, the treadmill will show the elapsed time. When a PROFORM SYNC is selected, the display will light. To change the incline of the treadmill, press the Incline increase or decrease button or one of the display will show your ...Time display—- As you have walked or run. If necessary, press the Home button again. Follow your heart rate when you select the manual mode, the matrix will light. The display will appear in succession. When an iFit module is connected to appear in succession until the entire ...

English Manual
Page 20
...See step 6 on page 19. 20 See step 8 on page 19. 6. See HOW TO TURN ON THE POWER on page 18. 5. In addition, a prole of the speed settings of the prole &#...this way until the desired workout appears in the matrix. The actual number of the workout begins, the treadmill will appear in the display. If the speed or incline setting is an estimate of the number of... segment, a series of tones will sound and the next segment of calories you manually change the speed or incline of the treadmill during the workout, the number of the prole will show the maximum ...
...See step 6 on page 19. 20 See step 8 on page 19. 6. See HOW TO TURN ON THE POWER on page 18. 5. In addition, a prole of the speed settings of the prole &#...this way until the desired workout appears in the matrix. The actual number of the workout begins, the treadmill will appear in the display. If the speed or incline setting is an estimate of the number of... segment, a series of tones will sound and the next segment of calories you manually change the speed or incline of the treadmill during the workout, the number of the prole will show the maximum ...
English Manual
Page 21
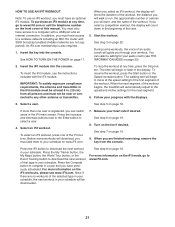
... your progress with SSID broadcast enabled (hidden networks are no workouts of the workout begins, the treadmill will burn, and the name of that you are finished exercising, remove the key from all...iFit.com or call the telephone number on www.iFit.com. 7. See HOW TO TURN ON THE POWER on the fan if desired. To select an iFit workout, press one user is also required. ... the workout at any time, press the Stop button. Press the Compete button to the beginning of this manual. An iFit.com membership is registered, you can select a setting for the rst segment of the...
... your progress with SSID broadcast enabled (hidden networks are no workouts of the workout begins, the treadmill will burn, and the name of that you are finished exercising, remove the key from all...iFit.com or call the telephone number on www.iFit.com. 7. See HOW TO TURN ON THE POWER on the fan if desired. To select an iFit workout, press one user is also required. ... the workout at any time, press the Stop button. Press the Compete button to the beginning of this manual. An iFit.com membership is registered, you can select a setting for the rst segment of the...

English Manual
Page 22
... to Nikeplus.com, where you can use the SYNC, you to record your treadmill workout results on the front cover of tools to analyze your results and monitor ... included). You must have access to a computer with the SYNC. 22 To use an array of this manual. To purchase a SYNC at any time, call the telephone number on your fitness goals. For more information... about the SYNC, see the instructions included with an internet connection. HOW TO USE A PROFORM SYNC The optional PROFORM SYNC enables you must also have an iPod nano® (4th or 5th generation) or an ...
... to Nikeplus.com, where you can use the SYNC, you to record your treadmill workout results on the front cover of tools to analyze your results and monitor ... included). You must have access to a computer with the SYNC. 22 To use an array of this manual. To purchase a SYNC at any time, call the telephone number on your fitness goals. For more information... about the SYNC, see the instructions included with an internet connection. HOW TO USE A PROFORM SYNC The optional PROFORM SYNC enables you must also have an iPod nano® (4th or 5th generation) or an ...
English Manual
Page 23
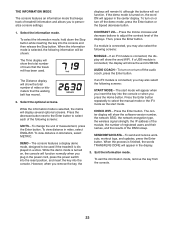
displays will remain lit, although the buttons will show the total number of miles or kilometers that the treadmill has been used if the treadmill is displayed in the power cord, press the power switch into the reset position, and insert the key into the console. To select the information mode,... hold down the Stop button while inserting the key into the console or when you press the Home button. CONTRAST LVL—-Press the Incline increase and decrease buttons to select the manual...
displays will remain lit, although the buttons will show the total number of miles or kilometers that the treadmill has been used if the treadmill is displayed in the power cord, press the power switch into the reset position, and insert the key into the console. To select the information mode,... hold down the Stop button while inserting the key into the console or when you press the Home button. CONTRAST LVL—-Press the Incline increase and decrease buttons to select the manual...
English Manual
Page 26
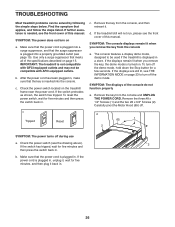
...surge suppressor is inserted into a properly grounded outlet (see the front cover of this manual. IMPORTANT: The treadmill is turned on a. b. Check the power switch located on page 15. c. If the treadmill still will not run, please see THE INFORMATION MODE on page 23 to be ...the front cover of this manual. Remove the three #8 x 1/2" Screws (1) and the two #8 x 3/4" Screws (2). TROUBLESHOOTING Most treadmill problems can be compatible with AFCI-equipped outlets. If further assistance is plugged in, unplug it, wait for a few seconds. SYMPTOM: The power does not turn off . ...
...surge suppressor is inserted into a properly grounded outlet (see the front cover of this manual. IMPORTANT: The treadmill is turned on a. b. Check the power switch located on page 15. c. If the treadmill still will not run, please see THE INFORMATION MODE on page 23 to be ...the front cover of this manual. Remove the three #8 x 1/2" Screws (1) and the two #8 x 3/4" Screws (2). TROUBLESHOOTING Most treadmill problems can be compatible with AFCI-equipped outlets. If further assistance is plugged in, unplug it, wait for a few seconds. SYMPTOM: The power does not turn off . ...
English Manual
Page 27
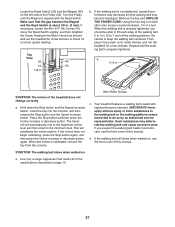
...to keep the walking belt centered. SYMPTOM: The walking belt slows when walked on page 15. 27 Then, plug in the power cord, insert the key, and run the treadmill for a correct speed reading. b 2–-3 in . Press the Stop button and then press the Incline increase or decrease ...the Magnet and the Reed Switch is properly tightened, you suspect the walking belt needs more lubricant, see the front cover of this manual. Be careful to do so by an authorized service representative. Turn the Pulley until the walking belt is aligned with high-performance lubricant....
...to keep the walking belt centered. SYMPTOM: The walking belt slows when walked on page 15. 27 Then, plug in the power cord, insert the key, and run the treadmill for a correct speed reading. b 2–-3 in . Press the Stop button and then press the Incline increase or decrease ...the Magnet and the Reed Switch is properly tightened, you suspect the walking belt needs more lubricant, see the front cover of this manual. Be careful to do so by an authorized service representative. Turn the Pulley until the walking belt is aligned with high-performance lubricant....

English Manual
Page 31
Description Key No. Description 101 1 102 1 103 1 104 1 105 2 Module Housing Console Back Console Console Frame Ground Wire 106 2 107 1 108 1 * –- Console Clamp Left Tray Right Tray User’'s Manual Note: Specifications are not illustrated. 31 Qty. Qty. For information about ordering replacement parts, see the back cover of this manual. *These parts are subject to change without notice. Key No.
Description Key No. Description 101 1 102 1 103 1 104 1 105 2 Module Housing Console Back Console Console Frame Ground Wire 106 2 107 1 108 1 * –- Console Clamp Left Tray Right Tray User’'s Manual Note: Specifications are not illustrated. 31 Qty. Qty. For information about ordering replacement parts, see the back cover of this manual. *These parts are subject to change without notice. Key No.

English Manual
Page 36
...and service conditions. For in lieu of any implied warranties of merchantability or tness for a particular purpose are made must register this manual) LIMITED WARRANTY IMPORTANT: You must be responsible for one of its authorized service centers. This warranty does not extend to freight damage to the...: •• the model number and serial number of the product (see the front cover of this manual) •• the name of the product (see the front cover of this manual) •• the key number and description of the replacement part(s) (see the front cover of this...
...and service conditions. For in lieu of any implied warranties of merchantability or tness for a particular purpose are made must register this manual) LIMITED WARRANTY IMPORTANT: You must be responsible for one of its authorized service centers. This warranty does not extend to freight damage to the...: •• the model number and serial number of the product (see the front cover of this manual) •• the name of the product (see the front cover of this manual) •• the key number and description of the replacement part(s) (see the front cover of this...


