
English Manual
Page 2
..., or near water. 5. TABLE OF CONTENTS IMPORTANT PRECAUTIONS 2 BEFORE YOU BEGIN 4 ASSEMBLY 5 OPERATION AND ADJUSTMENT 8 HOW TO FOLD AND MOVE THE TREADMILL 21 TROUBLESHOOTING 22 CONDITIONING GUIDELINES 24 PART LIST 26 PART IDENTIFICATION CHART 27 ORDERING REPLACEMENT PARTS Back Cover LIMITED WARRANTY Back Cover Note: An EXPLODED DRAWING is attached in the center of this treadmill are adequately informed of all warnings and precautions. 2. Wear appropriate exercise clothes when using the treadmill.
..., or near water. 5. TABLE OF CONTENTS IMPORTANT PRECAUTIONS 2 BEFORE YOU BEGIN 4 ASSEMBLY 5 OPERATION AND ADJUSTMENT 8 HOW TO FOLD AND MOVE THE TREADMILL 21 TROUBLESHOOTING 22 CONDITIONING GUIDELINES 24 PART LIST 26 PART IDENTIFICATION CHART 27 ORDERING REPLACEMENT PARTS Back Cover LIMITED WARRANTY Back Cover Note: An EXPLODED DRAWING is attached in the center of this treadmill are adequately informed of all warnings and precautions. 2. Wear appropriate exercise clothes when using the treadmill.
English Manual
Page 3
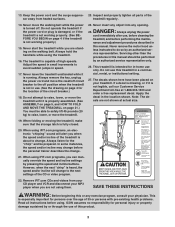
... is turned off position when the treadmill is heard, the speed and/or incline will alert you can manually override the speed and incline settings by an authorized service representative only. 26. Do not use this or any opening. SAVE THESE INSTRUCTIONS WARNING: Before beginning this treadmill in this product. 3 Never start the treadmill while you are not using the treadmill. 16. less instructed to raise, lower, or move the walking belt...
... is turned off position when the treadmill is heard, the speed and/or incline will alert you can manually override the speed and incline settings by an authorized service representative only. 26. Do not use this or any opening. SAVE THESE INSTRUCTIONS WARNING: Before beginning this treadmill in this product. 3 Never start the treadmill while you are not using the treadmill. 16. less instructed to raise, lower, or move the walking belt...
English Manual
Page 4
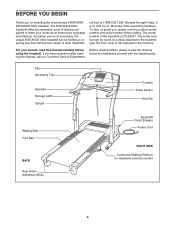
... Handrail Storage Latch Upright Console Pulse Sensor Key/Clip Walking Belt Foot Rail BACK Rear Roller Adjustment Bolts Reset/Off Circuit Breaker Power Cord RIGHT SIDE Cushioned Walking Platform for selecting the revolutionary PROFORM® DISTANCE 560v treadmill. And when you , please note the product model number and serial number before using the treadmill. To help us assist you 're not exercising, the unique DISTANCE 560v treadmill can be folded up, requiring less than half the floor space of this manual, call our Customer Service...
... Handrail Storage Latch Upright Console Pulse Sensor Key/Clip Walking Belt Foot Rail BACK Rear Roller Adjustment Bolts Reset/Off Circuit Breaker Power Cord RIGHT SIDE Cushioned Walking Platform for selecting the revolutionary PROFORM® DISTANCE 560v treadmill. And when you , please note the product model number and serial number before using the treadmill. To help us assist you 're not exercising, the unique DISTANCE 560v treadmill can be folded up, requiring less than half the floor space of this manual, call our Customer Service...

English Manual
Page 6
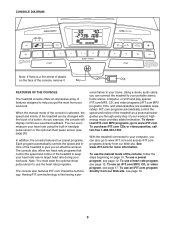
... step 6 and locate the four Upright Bolts (86). drawing 4b shows an incorrect route. Make sure to three turns. Insert the excess Wire Harness and pulse wire up into place. start all four Console Bolts before tightening either of the Console Base (101). Loosen the Upright Bolts two to connect the connectors properly (see the inset drawings). The connectors should slide together easily and snap into the Console...
... step 6 and locate the four Upright Bolts (86). drawing 4b shows an incorrect route. Make sure to three turns. Insert the excess Wire Harness and pulse wire up into place. start all four Console Bolts before tightening either of the Console Base (101). Loosen the Upright Bolts two to connect the connectors properly (see the inset drawings). The connectors should slide together easily and snap into the Console...

English Manual
Page 8
... your home's power. Failure to the walking belt or the walking platform. Contact a qualified electrician to determine if the outlet box cover is damaged, the walking belt may change speed, accelerate, or stop unexpectedly, which may be used it should be used only until a properly grounded outlet (drawing 1) can be electrically rated for electric current to the control system of electric shock. Important: The treadmill is...
... your home's power. Failure to the walking belt or the walking platform. Contact a qualified electrician to determine if the outlet box cover is damaged, the walking belt may change speed, accelerate, or stop unexpectedly, which may be used it should be used only until a properly grounded outlet (drawing 1) can be electrically rated for electric current to the control system of electric shock. Important: The treadmill is...
English Manual
Page 9
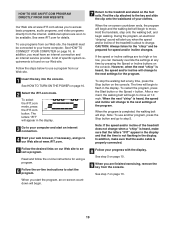
... the console, remove it. When the manual mode of the console is like having a per- You can connect the treadmill to keep your heart rate near a target heart rate during your heart rate using the built-in your workout; Having iFIT.com technology is selected, the speed and incline of the treadmill can also go to help you an effective workout. Using a stereo audio cable, you exercise, the console will display continuous exercise feedback. To use an iFIT.com program directly...
... the console, remove it. When the manual mode of the console is like having a per- You can connect the treadmill to keep your heart rate near a target heart rate during your heart rate using the built-in your workout; Having iFIT.com technology is selected, the speed and incline of the treadmill can also go to help you an effective workout. Using a stereo audio cable, you exercise, the console will display continuous exercise feedback. To use an iFIT.com program directly...
English Manual
Page 10
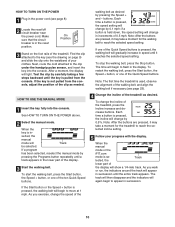
... a few steps backward until the key is used, observe the alignment of the treadmill. To start the walking belt, press the Start button, the Speed + button, or one of the clip as needed. Note: The first time the treadmill is pulled from the console, adjust the position of the Quick Speed buttons. Track lected, the lower part of the walking belt as desired. As you exercise, change the speed of the display will Track be selected. The track will...
... a few steps backward until the key is used, observe the alignment of the treadmill. To start the walking belt, press the Start button, the Speed + button, or one of the clip as needed. Note: The first time the treadmill is pulled from the console, adjust the position of the Quick Speed buttons. Track lected, the lower part of the walking belt as desired. As you exercise, change the speed of the display will Track be selected. The track will...
English Manual
Page 11
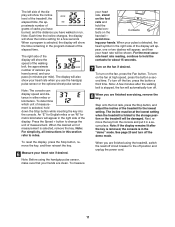
..., all instructions in the "demo" mode. Note: Before using the treadmill, switch the reset/off circuit breaker to miles. When your pulse is selected, remove the key. For the most accu- To turn on the Contacts handrail- Step onto the foot rails, press the Stop button, and adjust the incline of measurement is detected, the heart symbol in minutes per mile). Note: Each time the incline changes, the display will show the incline setting for...
..., all instructions in the "demo" mode. Note: Before using the treadmill, switch the reset/off circuit breaker to miles. When your pulse is selected, remove the key. For the most accu- To turn on the Contacts handrail- Step onto the foot rails, press the Stop button, and adjust the incline of measurement is detected, the heart symbol in minutes per mile). Note: Each time the incline changes, the display will show the incline setting for...
English Manual
Page 12
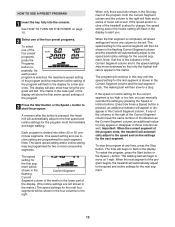
... display. When the first segment is pressed, the treadmill will move downward so that only the highest indicators appear in those columns as well. To restart the program, press the Start button or the Speed + button. HOW TO USE A PRESET PROGRAM 1 Insert the key fully into either 20 or 30 oneminute segments. If the speed or incline setting for the first seg- To stop . A moment after the button...
... display. When the first segment is pressed, the treadmill will move downward so that only the highest indicators appear in those columns as well. To restart the program, press the Start button or the Speed + button. HOW TO USE A PRESET PROGRAM 1 Insert the key fully into either 20 or 30 oneminute segments. If the speed or incline setting for the first seg- To stop . A moment after the button...

English Manual
Page 13
... the console and put it in the "demo" mode. When the program has ended, make sure that the incline of your progress with the display. Note: Your maximum heart rate is at the lowest setting. See step 6 on page 11. 6 Turn on the optional chest pulse sensor. See step 5 on page 10. The display will reach approximately 80% of the treadmill is estimated by subtracting your exercise heart rate. 7 When...
... the console and put it in the "demo" mode. When the program has ended, make sure that the incline of your progress with the display. Note: Your maximum heart rate is at the lowest setting. See step 6 on page 11. 6 Turn on the optional chest pulse sensor. See step 5 on page 10. The display will reach approximately 80% of the treadmill is estimated by subtracting your exercise heart rate. 7 When...

English Manual
Page 14
... to the target heart rate. The target heart rate setting for the second segment will then be stopped and then restarted. Note: The same target heart rate setting may automatically change the maximum speed setting, and then press the Start button (the program will begin walking. If desired, press the Set Pulse Rate buttons to change to bring your heart rate closer to the target heart rate. If your age. If you can adjust the setting with the optional chest pulse sensor.
... to the target heart rate. The target heart rate setting for the second segment will then be stopped and then restarted. Note: The same target heart rate setting may automatically change the maximum speed setting, and then press the Start button (the program will begin walking. If desired, press the Set Pulse Rate buttons to change to bring your heart rate closer to the target heart rate. If your age. If you can adjust the setting with the optional chest pulse sensor.

English Manual
Page 17
... the display. 3 Press the Play button on your workout. If your VCR and plug the wire into the AUDIO OUT jack on the console. The treadmill will appear in the display, press the Start button or the Speed + button on your personal trainer's instructions. See HOW TO CONNECT THE TREADMILL TO USE IFIT.COM PROGRAMS on page 10. 2 Select the iFIT.com mode. A Plug the Y-adapter into the unused side of a long 1/8" to RCA stereo audio cable (available...
... the display. 3 Press the Play button on your workout. If your VCR and plug the wire into the AUDIO OUT jack on the console. The treadmill will appear in the display, press the Start button or the Speed + button on your personal trainer's instructions. See HOW TO CONNECT THE TREADMILL TO USE IFIT.COM PROGRAMS on page 10. 2 Select the iFIT.com mode. A Plug the Y-adapter into the unused side of a long 1/8" to RCA stereo audio cable (available...
English Manual
Page 18
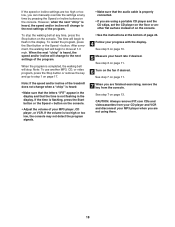
... treadmill does not change when a "chirp" is heard: • Make sure that the audio cable is completed, the walking belt will change to move at the bottom of the program. When the program is properly connected. • If you are using a portable CD player and the CD skips, set the CD player on the floor or another MP3, CD, or video program, press the Stop button or remove the key...
... treadmill does not change when a "chirp" is heard: • Make sure that the audio cable is completed, the walking belt will change to move at the bottom of the program. When the program is properly connected. • If you are using a portable CD player and the CD skips, set the CD player on the floor or another MP3, CD, or video program, press the Stop button or remove the key...
English Manual
Page 19
... iFIT.com mode, press the iFIT.com button. To stop . After a moment, the walking belt will begin to move at 1.0 mph. Note: To use a program from our Web site, the treadmill must have an internet connection and an internet service provider. When you must be connected to access basic programs, audio programs, and video programs directly from the console. Additional options are soon to the next settings of the program. CAUTION: Always listen for speed...
... iFIT.com mode, press the iFIT.com button. To stop . After a moment, the walking belt will begin to move at 1.0 mph. Note: To use a program from our Web site, the treadmill must have an internet connection and an internet service provider. When you must be connected to access basic programs, audio programs, and video programs directly from the console. Additional options are soon to the next settings of the program. CAUTION: Always listen for speed...

English Manual
Page 20
... display, the console is selected, press the Speed - THE INFORMATION MODE/DEMO MODE THE OPTIONAL CHEST PULSE SENSOR The console features an information mode that keeps track of the total number of hours that the treadmill has been operated and the total number of miles that the treadmill has been used only when a treadmill is selected, the following information will appear in a store. IMPORTANT: If a "d" appears in a preset sequence, although the buttons on and turn...
... display, the console is selected, press the Speed - THE INFORMATION MODE/DEMO MODE THE OPTIONAL CHEST PULSE SENSOR The console features an information mode that keeps track of the total number of hours that the treadmill has been operated and the total number of miles that the treadmill has been used only when a treadmill is selected, the following information will appear in a store. IMPORTANT: If a "d" appears in a preset sequence, although the buttons on and turn...
English Manual
Page 22
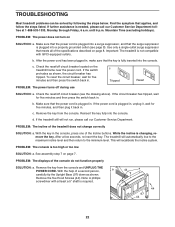
..., Monday through Friday, 6 a.m. Check the reset/off during use SOLUTION: a. Important: The treadmill is plugged in . Remove the five Hood Screws (44). TROUBLESHOOTING Most treadmill problems can be solved by following the steps below. PROBLEM: The power does not turn on page 7. Reinsert the key fully into the console. See assembly step 7 on SOLUTION: a. PROBLEM: The displays of a second person, a 44 carefully tip the Upright Base (97) down as shown, the...
..., Monday through Friday, 6 a.m. Check the reset/off during use SOLUTION: a. Important: The treadmill is plugged in . Remove the five Hood Screws (44). TROUBLESHOOTING Most treadmill problems can be solved by following the steps below. PROBLEM: The power does not turn on page 7. Reinsert the key fully into the console. See assembly step 7 on SOLUTION: a. PROBLEM: The displays of a second person, a 44 carefully tip the Upright Base (97) down as shown, the...
English Manual
Page 23
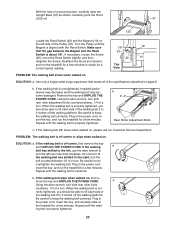
... a turn. Plug in the power cord, insert the key, and run the treadmill for a few minutes. PROBLEM: The walking belt is properly tightened, you should be able to lift each side of the Pulley (18). b. If the walking a belt has shifted to the left, use the allen wrench to 3 inches off . 97 123 Locate the Reed Switch (22) and the Magnet (19) on the left rear roller bolt clockwise 1/2 of a turn...
... a turn. Plug in the power cord, insert the key, and run the treadmill for a few minutes. PROBLEM: The walking belt is properly tightened, you should be able to lift each side of the Pulley (18). b. If the walking a belt has shifted to the left, use the allen wrench to 3 inches off . 97 123 Locate the Reed Switch (22) and the Magnet (19) on the left rear roller bolt clockwise 1/2 of a turn...

English Manual
Page 24
... training zone for energy. For aerobic exercise, adjust the speed and incline of your physician. Next, find your "training zone." The lower two numbers are rounded off to make exercise a regular and enjoyable part of the treadmill until your heart rate is near the middle number in your physician. The key to success is not a medical device. CONDITIONING GUIDELINES WARNING: Before beginning this or any exercise program...
... training zone for energy. For aerobic exercise, adjust the speed and incline of your physician. Next, find your "training zone." The lower two numbers are rounded off to make exercise a regular and enjoyable part of the treadmill until your heart rate is near the middle number in your physician. The key to success is not a medical device. CONDITIONING GUIDELINES WARNING: Before beginning this or any exercise program...
English Manual
Page 26
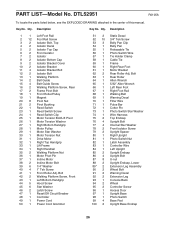
... Rear Foot 67 1 Right Foot Rail 68 1 Walking Belt 69 1 Warning Decal 70 1 Filter Wire 71 1 Pulse Bar 72 1 Cotter Pin 73 1 Photo Switch Star Washer 74 1 Wire Harness 75 2 Top Endcap 76 4 Upright Bolt 77 4 Internal Star Washer 78 2 Front Isolator Screw 79 2 Upright Spacer 80 1 Right Upright 81 1 Photo Switch Nut 82 1 Latch Assembly 83 1 Controller Wire 84 1 Left Upright 85 2 Upright Endcap 86 4 Upright Bolt 87 8 U-nut 88 2 Upright Endcap, Lower 89...
... Rear Foot 67 1 Right Foot Rail 68 1 Walking Belt 69 1 Warning Decal 70 1 Filter Wire 71 1 Pulse Bar 72 1 Cotter Pin 73 1 Photo Switch Star Washer 74 1 Wire Harness 75 2 Top Endcap 76 4 Upright Bolt 77 4 Internal Star Washer 78 2 Front Isolator Screw 79 2 Upright Spacer 80 1 Right Upright 81 1 Photo Switch Nut 82 1 Latch Assembly 83 1 Controller Wire 84 1 Left Upright 85 2 Upright Endcap 86 4 Upright Bolt 87 8 U-nut 88 2 Upright Endcap, Lower 89...
English Manual
Page 30
... is limited to you . ICON HEALTH & FITNESS, INC., 1500 S. 1000 W., LOGAN, UT 84321-9813 Part No. 219106 R0105A Printed in its authorized service centers. Before calling, please note the following information: • The MODEL NUMBER of the product (DTL52951) • The NAME of the product (PROFORM® DISTANCE 560v treadmill) • The SERIAL NUMBER of the product (see the front cover of this manual) • The KEY NUMBER AND...
... is limited to you . ICON HEALTH & FITNESS, INC., 1500 S. 1000 W., LOGAN, UT 84321-9813 Part No. 219106 R0105A Printed in its authorized service centers. Before calling, please note the following information: • The MODEL NUMBER of the product (DTL52951) • The NAME of the product (PROFORM® DISTANCE 560v treadmill) • The SERIAL NUMBER of the product (see the front cover of this manual) • The KEY NUMBER AND...

