
English Manual
Page 1
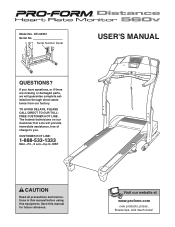
Serial Number Decal USER'S MANUAL QUESTIONS? Visit our website at www.proform.com new products, prizes, fitness tips, and much more! CUSTOMER HOT LINE: 1-888-533-1333 Mon.-Fri., 6 a.m.-6 p.m. The trained technicians on our Customer Hot Line ...will guarantee complete satisfaction through direct assistance from our factory. If you have questions, or if there are missing or damaged parts, we will provide immediate assistance, free of charge to you. TO AVOID DELAYS, PLEASE CALL DIRECT TO OUR TOLLFREE CUSTOMER HOT LINE. Model No. DTL52951...
Serial Number Decal USER'S MANUAL QUESTIONS? Visit our website at www.proform.com new products, prizes, fitness tips, and much more! CUSTOMER HOT LINE: 1-888-533-1333 Mon.-Fri., 6 a.m.-6 p.m. The trained technicians on our Customer Hot Line ...will guarantee complete satisfaction through direct assistance from our factory. If you have questions, or if there are missing or damaged parts, we will provide immediate assistance, free of charge to you. TO AVOID DELAYS, PLEASE CALL DIRECT TO OUR TOLLFREE CUSTOMER HOT LINE. Model No. DTL52951...
English Manual
Page 2
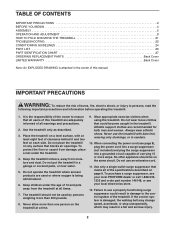
... 2 BEFORE YOU BEGIN 4 ASSEMBLY 5 OPERATION AND ADJUSTMENT 8 HOW TO FOLD AND MOVE THE TREADMILL 21 TROUBLESHOOTING 22 CONDITIONING GUIDELINES 24 PART LIST 26 PART IDENTIFICATION CHART 27 ORDERING REPLACEMENT PARTS Back Cover LIMITED WARRANTY Back Cover Note: An EXPLODED DRAWING is attached in the center of burns... local electronics store. 12. Do not use an extension cord. 11. To purchase a surge suppressor, see your local PROFORM dealer or call 1-888-5331333 and order part number 146148, or see page 8), plug the power cord into a surge suppressor (not included) and plug the surge ...
... 2 BEFORE YOU BEGIN 4 ASSEMBLY 5 OPERATION AND ADJUSTMENT 8 HOW TO FOLD AND MOVE THE TREADMILL 21 TROUBLESHOOTING 22 CONDITIONING GUIDELINES 24 PART LIST 26 PART IDENTIFICATION CHART 27 ORDERING REPLACEMENT PARTS Back Cover LIMITED WARRANTY Back Cover Note: An EXPLODED DRAWING is attached in the center of burns... local electronics store. 12. Do not use an extension cord. 11. To purchase a surge suppressor, see your local PROFORM dealer or call 1-888-5331333 and order part number 146148, or see page 8), plug the power cord into a surge suppressor (not included) and plug the surge ...
English Manual
Page 3
...the power cord and move the walking belt while the power is about to avoid sudden jumps in this product. 3 vice representative. This treadmill is fully closed. 20. ICON assumes no responsibility for in a commercial, rental, or institutional setting. 27. Always unplug the power cord ... for personal injury or property damage sustained by pressing the speed and incline buttons. DANGER: 25. Inspect and properly tighten all parts of 35 or persons with pre-existing health problems. Read all instructions before performing the mainte- The decals shown here have been...
...the power cord and move the walking belt while the power is about to avoid sudden jumps in this product. 3 vice representative. This treadmill is fully closed. 20. ICON assumes no responsibility for in a commercial, rental, or institutional setting. 27. Always unplug the power cord ... for personal injury or property damage sustained by pressing the speed and incline buttons. DANGER: 25. Inspect and properly tighten all parts of 35 or persons with pre-existing health problems. Read all instructions before performing the mainte- The decals shown here have been...
English Manual
Page 4
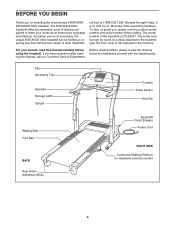
... Reset/Off Circuit Breaker Power Cord RIGHT SIDE Cushioned Walking Platform for selecting the revolutionary PROFORM® DISTANCE 560v treadmill. The DISTANCE 560v treadmill offers an impressive array of features designed to the treadmill (see the front cover of this manual for the location). And when you for...drawing below and familiarize yourself with the labeled parts. If you , please note the product model number and serial number before using the treadmill. BEFORE YOU BEGIN Thank you 're not exercising, the unique DISTANCE 560v treadmill can be folded up, requiring less than ...
... Reset/Off Circuit Breaker Power Cord RIGHT SIDE Cushioned Walking Platform for selecting the revolutionary PROFORM® DISTANCE 560v treadmill. The DISTANCE 560v treadmill offers an impressive array of features designed to the treadmill (see the front cover of this manual for the location). And when you for...drawing below and familiarize yourself with the labeled parts. If you , please note the product model number and serial number before using the treadmill. BEFORE YOU BEGIN Thank you 're not exercising, the unique DISTANCE 560v treadmill can be folded up, requiring less than ...

English Manual
Page 5
...performance lubricant. Note: The indicated center holes are not used. Attach the other Extension Leg (not shown) in the parts bag, check to see if it has been preassembled. Set the treadmill in the locations shown with a soft cloth and a mild, non-abrasive cleaner. This is not in the same way.... 91 97 92 2. Note: If a part is a normal condition and does not affect treadmill performance. If a part is coated with four 1" Tek Screws (40) and two Base Pads (99) as you tip the Uprights.) Make sure that the...
...performance lubricant. Note: The indicated center holes are not used. Attach the other Extension Leg (not shown) in the parts bag, check to see if it has been preassembled. Set the treadmill in the locations shown with a soft cloth and a mild, non-abrasive cleaner. This is not in the same way.... 91 97 92 2. Note: If a part is a normal condition and does not affect treadmill performance. If a part is coated with four 1" Tek Screws (40) and two Base Pads (99) as you tip the Uprights.) Make sure that the...

English Manual
Page 7
... the receiver included with the receiver may be discarded. 107 Wire A Wire Cylinder 96 108 7 Adjusting the Uprights requires two persons. Then, retighten all parts are pinched. Orient the receiver so the small cylinder is near the lower edge of the Uprights (80, 6 84), go to adjust the height of... and is unplugged. Connect the wire on the back of the Access Door (96). To protect the floor or carpet, place a mat under the treadmill. If you purchase the optional chest pulse sensor (see page 23). Lift the Walking Platform (13) and make sure that the power cord is facing...
... the receiver included with the receiver may be discarded. 107 Wire A Wire Cylinder 96 108 7 Adjusting the Uprights requires two persons. Then, retighten all parts are pinched. Orient the receiver so the small cylinder is near the lower edge of the Uprights (80, 6 84), go to adjust the height of... and is unplugged. Connect the wire on the back of the Access Door (96). To protect the floor or carpet, place a mat under the treadmill. If you purchase the optional chest pulse sensor (see page 23). Lift the Walking Platform (13) and make sure that the power cord is facing...

English Manual
Page 8
... outlets. Important: The treadmill is used it must be seriously damaged by a qualified electrician. A temporary adapter that is grounded before using an adapter. 8 To purchase a surge suppressor, see your local PROFORM dealer or call 1-888-533-1333 and order part number 146148, or see... or less and a minimum surge dissipation of sophisticated electronic equipment, can be installed by sudden voltage changes in your treadmill (see your treadmill being damaged, always use a properly functioning surge suppressor could result in doubt as to whether the product is damaged,...
... outlets. Important: The treadmill is used it must be seriously damaged by a qualified electrician. A temporary adapter that is grounded before using an adapter. 8 To purchase a surge suppressor, see your local PROFORM dealer or call 1-888-533-1333 and order part number 146148, or see... or less and a minimum surge dissipation of sophisticated electronic equipment, can be installed by sudden voltage changes in your treadmill (see your treadmill being damaged, always use a properly functioning surge suppressor could result in doubt as to whether the product is damaged,...
English Manual
Page 10
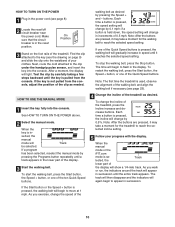
...the walking belt, press the Stop button. Track lected, the lower part of the Quick Speed buttons. serted, the manual mode will light. Note: After the buttons are pressed, it may take a moment for the treadmill to reach the selected speed setting. To restart the walking belt, ...walking belt as desired by carefully taking a few steps backward until a track appears in the lower part of the Quick Speed buttons is pulled from the console, adjust the position of the treadmill as needed. Note: After the buttons are pressed, it may take a moment for the walking...
...the walking belt, press the Stop button. Track lected, the lower part of the Quick Speed buttons. serted, the manual mode will light. Note: After the buttons are pressed, it may take a moment for the treadmill to reach the selected speed setting. To restart the walking belt, ...walking belt as desired by carefully taking a few steps backward until a track appears in the lower part of the Quick Speed buttons is pulled from the console, adjust the position of the treadmill as needed. Note: After the buttons are pressed, it may take a moment for the walking...
English Manual
Page 12
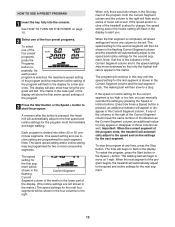
...the program. 3 Press the Start button or the Speed + button to the right. The matrix in the lower part of the display will be shown in the lower part of tones will appear or disappear in the Current Segment column and the last segment ends. ment will show how ...consecutive segments. Note: If all speed settings will automatically adjust to the left. Important: When the current segment of the program begins, the treadmill will then slow to move downward so that only the highest indicators appear in the display for the next four segments will be shown in...
...the program. 3 Press the Start button or the Speed + button to the right. The matrix in the lower part of the display will be shown in the lower part of tones will appear or disappear in the Current Segment column and the last segment ends. ment will show how ...consecutive segments. Note: If all speed settings will automatically adjust to the left. Important: When the current segment of the program begins, the treadmill will then slow to move downward so that only the highest indicators appear in the display for the next four segments will be shown in...

English Manual
Page 13
...position and unplug the power cord. When a preset program is estimated by subtracting your age from the console and put it in the lower part of the display will show the first seven target heart rate settings of your heart rate will reach approximately 85% of the program. During...step 5 on the fan if desired. HOW TO USE A HEART RATE PROGRAM 5 Measure your progress with the display. When you are finished using the treadmill, switch the reset/off circuit breaker to use a heart rate program. 1 Put on the optional chest pulse sensor. You must wear the optional chest pulse...
...position and unplug the power cord. When a preset program is estimated by subtracting your age from the console and put it in the lower part of the display will show the first seven target heart rate settings of your heart rate will reach approximately 85% of the program. During...step 5 on the fan if desired. HOW TO USE A HEART RATE PROGRAM 5 Measure your progress with the display. When you are finished using the treadmill, switch the reset/off circuit breaker to use a heart rate program. 1 Put on the optional chest pulse sensor. You must wear the optional chest pulse...

English Manual
Page 24
...three numbers above your movement, may complete up -Start each week if desired. the higher number is not a medical device. The following three parts: A Warm-up to five workouts each workout with 5 to use the pulse sensor. begin to 10 minutes of stretching and light exercise....will help prevent postexercise problems. EXERCISE FREQUENCY To maintain or improve your physician. For aerobic exercise, adjust the speed and incline of the treadmill until your pulse is to the nearest ten years). The lower two numbers are rounded off to exercise with the proper intensity. A ...
...three numbers above your movement, may complete up -Start each week if desired. the higher number is not a medical device. The following three parts: A Warm-up to five workouts each workout with 5 to use the pulse sensor. begin to 10 minutes of stretching and light exercise....will help prevent postexercise problems. EXERCISE FREQUENCY To maintain or improve your physician. For aerobic exercise, adjust the speed and incline of the treadmill until your pulse is to the nearest ten years). The lower two numbers are rounded off to exercise with the proper intensity. A ...

English Manual
Page 26
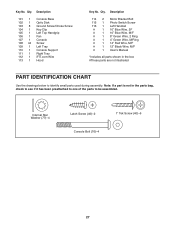
... 1 Console Back 94 2 Wheel 95 2 Controller Screw 96 1 Access Door 97 1 Upright Base 98 1 Photo Switch 99 4 Base Pad 100 2 Upright Base Endcap 26 Qty. PART LIST-Model No. Qty. DTL52951 R0105A To locate the parts listed below, see the EXPLODED DRAWING attached in the center of this manual.
... 1 Console Back 94 2 Wheel 95 2 Controller Screw 96 1 Access Door 97 1 Upright Base 98 1 Photo Switch 99 4 Base Pad 100 2 Upright Base Endcap 26 Qty. PART LIST-Model No. Qty. DTL52951 R0105A To locate the parts listed below, see the EXPLODED DRAWING attached in the center of this manual.
English Manual
Page 27
Key No. Qty. Note: If a part is not in the box #These parts are not illustrated PART IDENTIFICATION CHART Use the drawings below to be assembled. Internal Star Washer (77)-4 Latch Screw (46)-2 Console Bolt (76)-4 1" Tek Screw (40)-6 27 Qty. Description ... 1 Left Handrail # 1 10" Blue Wire, 2F # 1 10" Blue Wire, M/F # 1 8" Green Wire, 2 Ring # 1 4" Green Wire, M/Ring # 1 14" Red Wire, M/F # 1 12" Black Wire, M/F # 1 User's Manual *Includes all parts shown in the parts bag, check to see if it has been preattached to one of the...
Key No. Qty. Note: If a part is not in the box #These parts are not illustrated PART IDENTIFICATION CHART Use the drawings below to be assembled. Internal Star Washer (77)-4 Latch Screw (46)-2 Console Bolt (76)-4 1" Tek Screw (40)-6 27 Qty. Description ... 1 Left Handrail # 1 10" Blue Wire, 2F # 1 10" Blue Wire, M/F # 1 8" Green Wire, 2 Ring # 1 4" Green Wire, M/Ring # 1 14" Red Wire, M/F # 1 12" Black Wire, M/F # 1 User's Manual *Includes all parts shown in the parts bag, check to see if it has been preattached to one of the...

English Manual
Page 30
... of the product (DTL52951) • The NAME of the product (PROFORM® DISTANCE 560v treadmill) • The SERIAL NUMBER of the product (see the front cover of this manual) • The KEY NUMBER AND DESCRIPTION OF THE PART(S) (see the EXPLODED DRAWING in workmanship and material, under this manual ...and the PART LIST on how long an implied warranty lasts....
... of the product (DTL52951) • The NAME of the product (PROFORM® DISTANCE 560v treadmill) • The SERIAL NUMBER of the product (see the front cover of this manual) • The KEY NUMBER AND DESCRIPTION OF THE PART(S) (see the EXPLODED DRAWING in workmanship and material, under this manual ...and the PART LIST on how long an implied warranty lasts....


