
English Manual
Page 2
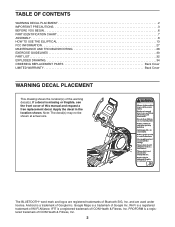
... PLACEMENT 2 IMPORTANT PRECAUTIONS 3 BEFORE YOU BEGIN 6 PART IDENTIFICATION CHART 7 ASSEMBLY 8 HOW TO USE THE ELLIPTICAL 13 FCC INFORMATION 27 MAINTENANCE AND TROUBLESHOOTING 28 EXERCISE GUIDELINES 30 PART LIST 32 EXPLODED DRAWING 34 ORDERING REPLACEMENT PARTS Back Cover LIMITED WARRANTY Back Cover WARNING DECAL PLACEMENT This drawing shows the location(s) of Google Inc. Android is a registered trademark of Google Inc. PROFORM is a trademark of ICON Health & Fitness, Inc. 2 Google Maps is missing or...
... PLACEMENT 2 IMPORTANT PRECAUTIONS 3 BEFORE YOU BEGIN 6 PART IDENTIFICATION CHART 7 ASSEMBLY 8 HOW TO USE THE ELLIPTICAL 13 FCC INFORMATION 27 MAINTENANCE AND TROUBLESHOOTING 28 EXERCISE GUIDELINES 30 PART LIST 32 EXPLODED DRAWING 34 ORDERING REPLACEMENT PARTS Back Cover LIMITED WARRANTY Back Cover WARNING DECAL PLACEMENT This drawing shows the location(s) of Google Inc. Android is a registered trademark of Google Inc. PROFORM is a trademark of ICON Health & Fitness, Inc. 2 Google Maps is missing or...
English Manual
Page 3
... important precautions and instructions in this manual should not be performed by an authorized service repre- It is not working properly. Use the elliptical only as an exercise aid in determining heart rate trends in a commercial, rental, or institutional setting. 5. Do not operate the elliptical if the power cord or plug is damaged, or if the elliptical is the responsibility of the owner to ensure that...
... important precautions and instructions in this manual should not be performed by an authorized service repre- It is not working properly. Use the elliptical only as an exercise aid in determining heart rate trends in a commercial, rental, or institutional setting. 5. Do not operate the elliptical if the power cord or plug is damaged, or if the elliptical is the responsibility of the owner to ensure that...
English Manual
Page 6
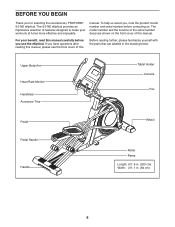
... cover of this manual carefully before contacting us assist you, note the product model number and serial number before you use the elliptical. Upper Body Arm Heart Rate Monitor Handlebar Accessory Tray Tablet Holder Console Fan Pedal Wheel Pedal Handle Handle Roller Ramp Length: 6 ft. 8 in. (203 cm) Width: 2 ft. 1 in the drawing below. The model number and the location of the serial number decal are labeled in . (64 cm) 6 For your workouts...
... cover of this manual carefully before contacting us assist you, note the product model number and serial number before you use the elliptical. Upper Body Arm Heart Rate Monitor Handlebar Accessory Tray Tablet Holder Console Fan Pedal Wheel Pedal Handle Handle Roller Ramp Length: 6 ft. 8 in. (203 cm) Width: 2 ft. 1 in the drawing below. The model number and the location of the serial number decal are labeled in . (64 cm) 6 For your workouts...
English Manual
Page 8
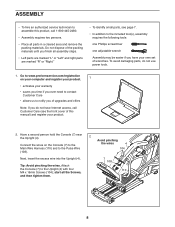
... excess wire into the Upright (4). start all parts in a cleared area and remove the packing materials. Attach the Console (7) to assemble this manual) and register your own set of upgrades and offers Note: If you have Internet access, call 1-800-445-2480. • Assembly requires two persons. • Place all the Screws, and then tighten them. 2 Avoid pinching the wires 4 104 7 108 110 8 Connect the wires on...
... excess wire into the Upright (4). start all parts in a cleared area and remove the packing materials. Attach the Console (7) to assemble this manual) and register your own set of upgrades and offers Note: If you have Internet access, call 1-800-445-2480. • Assembly requires two persons. • Place all the Screws, and then tighten them. 2 Avoid pinching the wires 4 104 7 108 110 8 Connect the wires on...
English Manual
Page 13
... you are not grounded. if it should be used to connect the power cord to determine whether the outlet box cover is not available. 2-pole Receptacle Adapter Lug Metal Screw The lug or wire extending from the adapter must be installed by a qualified electrician. If it will not fit an outlet, have a proper outlet installed by a qualified electrician. 13 Some 2-pole receptacle...
... you are not grounded. if it should be used to connect the power cord to determine whether the outlet box cover is not available. 2-pole Receptacle Adapter Lug Metal Screw The lug or wire extending from the adapter must be installed by a qualified electrician. If it will not fit an outlet, have a proper outlet installed by a qualified electrician. 13 Some 2-pole receptacle...
English Manual
Page 17
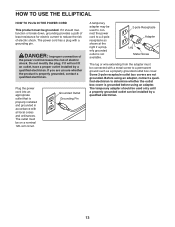
... complete information. With iFit technology, you turn on the power. Next, locate the power switch on , the display will not turn on the power, see step 3 on page 28 and manually calibrate the incline system. The ramp will display continuous exercise feedback. IMPORTANT: The console features a display demo mode, designed to your favorite workout music or audio books with your pedaling speed as it guides you can also set up the console, see HOW TO CALIBRATE THE INCLINE SYSTEM...
... complete information. With iFit technology, you turn on the power. Next, locate the power switch on , the display will not turn on the power, see step 3 on page 28 and manually calibrate the incline system. The ramp will display continuous exercise feedback. IMPORTANT: The console features a display demo mode, designed to your favorite workout music or audio books with your pedaling speed as it guides you can also set up the console, see HOW TO CALIBRATE THE INCLINE SYSTEM...

English Manual
Page 18
... display will be connected to a wireless network. To use a set up for firmware updates. To use the manual mode, see page 22. To use an onboard workout, see page 26. Note: After you turn on page 24 to connect the console to iFit through your wireless network. 3. See HOW TO TURN ON THE POWER on 3. See HOW TO CHANGE CONSOLE SETTINGS on the console. 1. Press the Manual Control button or press the Home button repeatedly to your iFit membership. incline...
... display will be connected to a wireless network. To use a set up for firmware updates. To use the manual mode, see page 22. To use an onboard workout, see page 26. Note: After you turn on page 24 to connect the console to iFit through your wireless network. 3. See HOW TO TURN ON THE POWER on 3. See HOW TO CHANGE CONSOLE SETTINGS on the console. 1. Press the Manual Control button or press the Home button repeatedly to your iFit membership. incline...
English Manual
Page 19
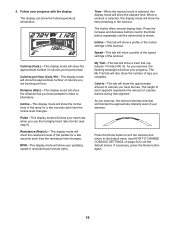
... the workout. As you use the handgrip heart rate monitor (see HOW TO CHANGE CONSOLE SETTINGS on page 24 to set the default menu). If necessary, press the Home button again. 19 When a workout is shown. Follow your heart rate when you exercise, the workout intensity level bar will show a track that segment. Incline-This display mode will show the incline level of the pedals for a few seconds each time the incline level changes. Resistance (Resist.)-This display mode will...
... the workout. As you use the handgrip heart rate monitor (see HOW TO CHANGE CONSOLE SETTINGS on page 24 to set the default menu). If necessary, press the Home button again. 19 When a workout is shown. Follow your heart rate when you exercise, the workout intensity level bar will show a track that segment. Incline-This display mode will show the incline level of the pedals for a few seconds each time the incline level changes. Resistance (Resist.)-This display mode will...

English Manual
Page 20
... handgrip heart rate monitor or an optional chest heart rate monitor (see page 26 for at the same time, the console will turn off position and unplug the power cord. never use both heart rate monitors at least 15 seconds. Turn on the elliptical may wear prematurely. 20 Change the volume level of plastic on the metal contacts on the handgrip heart rate moni- When your pulse is not connected to turn off...
... handgrip heart rate monitor or an optional chest heart rate monitor (see page 26 for at the same time, the console will turn off position and unplug the power cord. never use both heart rate monitors at least 15 seconds. Turn on the elliptical may wear prematurely. 20 Change the volume level of plastic on the metal contacts on the handgrip heart rate moni- When your pulse is not connected to turn off...
English Manual
Page 21
... your progress with the display. One resistance level and one target rpm (speed) are finished exercising, unplug the power cord. To stop pedaling. A profile of the speed settings of the work- Each workout is intended only to turn on the speed tab will show your pedaling speed near the target rpm for each segment. Make sure to pedal at any button on the console to provide motivation. Select...
... your progress with the display. One resistance level and one target rpm (speed) are finished exercising, unplug the power cord. To stop pedaling. A profile of the speed settings of the work- Each workout is intended only to turn on the speed tab will show your pedaling speed near the target rpm for each segment. Make sure to pedal at any button on the console to provide motivation. Select...
English Manual
Page 22
... pause in the display. The actual number of the desired goal appears in the display. As you exercise, you exercise, the calories, time, or distance display will be prompted to turn on page 20. 22 To resume the workout, simply resume pedaling. 4. Begin pedaling or press any button on the console to keep your weight. Next, press the Digital Resistance increase and decrease buttons to pedal at a speed that you...
... pause in the display. The actual number of the desired goal appears in the display. As you exercise, you exercise, the calories, time, or distance display will be prompted to turn on page 20. 22 To resume the workout, simply resume pedaling. 4. Begin pedaling or press any button on the console to keep your weight. Next, press the Digital Resistance increase and decrease buttons to pedal at a speed that you...
English Manual
Page 23
... the iFit mode. If more information about the workout. When you have completed. HOW TO USE AN IFIT WORKOUT Note: To use a set-a-goal workout, press the Set A Goal button (see page 22). See HOW TO TURN ON THE POWER on page 21. Select a user. To download an iFit workout in the display. To compete in the matrix will show your schedule, press the Map, Train, or Lose Wt. Then, press the Enter button...
... the iFit mode. If more information about the workout. When you have completed. HOW TO USE AN IFIT WORKOUT Note: To use a set-a-goal workout, press the Set A Goal button (see page 22). See HOW TO TURN ON THE POWER on page 21. Select a user. To download an iFit workout in the display. To compete in the matrix will show your schedule, press the Map, Train, or Lose Wt. Then, press the Enter button...
English Manual
Page 24
... will show the total number of the elliptical twice. Demo-The console features a display demo mode, designed to be ready for firmware updates using the keyboard in the matrix. Press the Enter button to be used . The update may take several seconds, and then press the power switch to follow the instructions displayed in to set up a wireless network connection using the console. See step 4 for firmware updates. Then, enter your iFit username and password using your computer, smart...
... will show the total number of the elliptical twice. Demo-The console features a display demo mode, designed to be ready for firmware updates using the keyboard in the matrix. Press the Enter button to be used . The update may take several seconds, and then press the power switch to follow the instructions displayed in to set up a wireless network connection using the console. See step 4 for firmware updates. Then, enter your iFit username and password using your computer, smart...
English Manual
Page 25
... the console. When the console is connected to know the password. Log in the display will show the total number of your iFit account on the web page. The wireless symbol will show the number of the elliptical: press the power switch on the WiFi setup card to the reset position. Note: You will need to know your network name (SSID). As necessary, press the buttons on the elliptical...
... the console. When the console is connected to know the password. Log in the display will show the total number of your iFit account on the web page. The wireless symbol will show the number of the elliptical: press the power switch on the WiFi setup card to the reset position. Note: You will need to know your network name (SSID). As necessary, press the buttons on the elliptical...
English Manual
Page 26
... list of available networks to set up a wireless network connection using the volume increase and decrease buttons on the console or the volume control on the console. Example: http://192.168.0.1:8080. If this network. If you have any previous wireless network settings on your browser. To exit the information mode, press the gear button. 26 select this happens, make sure that the audio cable...
... list of available networks to set up a wireless network connection using the volume increase and decrease buttons on the console or the volume control on the console. Example: http://192.168.0.1:8080. If this network. If you have any previous wireless network settings on your browser. To exit the information mode, press the gear button. 26 select this happens, make sure that the audio cable...
English Manual
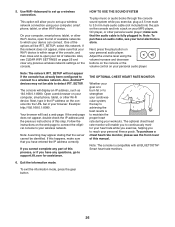
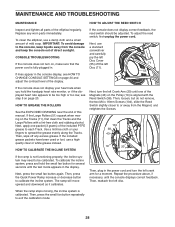
Page 28
... or white grease instead. To calibrate the incline system, press and hold the handgrip heart rate monitor, or if the displayed heart rate appears to or away from the console and keep liquids away from the Magnet, and retighten the Screws. 104 38 43 19 20 If the ramp is fully plugged in the power cord and turn on the Pulley (19) is calibrated. When the ramp stops moving on...
... or white grease instead. To calibrate the incline system, press and hold the handgrip heart rate monitor, or if the displayed heart rate appears to or away from the console and keep liquids away from the Magnet, and retighten the Screws. 104 38 43 19 20 If the ramp is fully plugged in the power cord and turn on the Pulley (19) is calibrated. When the ramp stops moving on...

English Manual
Page 30
... 10 minutes of rest between workouts. Various factors may complete up increases your body temperature, heart rate, and circulation in your training zone for 20 to 30 minutes with pre-existing health problems. The heart rate monitor is the heart rate for aerobic exercise. The heart rate monitor is intended only as an exercise aid in determining heart rate trends in your heart rate near the middle number in general. Burning Fat...
... 10 minutes of rest between workouts. Various factors may complete up increases your body temperature, heart rate, and circulation in your training zone for 20 to 30 minutes with pre-existing health problems. The heart rate monitor is the heart rate for aerobic exercise. The heart rate monitor is intended only as an exercise aid in determining heart rate trends in your heart rate near the middle number in general. Burning Fat...
English Manual
Page 32
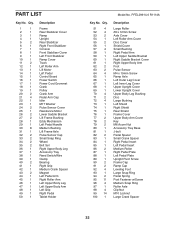
... 1 50 1 Description Frame Rear Stabilizer Cover Ramp Upright Rear Stabilizer Right Front Stabilizer Console Front Stabilizer Cover Left Front Stabilizer Ramp Cover Track Left Roller Arm Lift Motor Left Pedal Control Board Power Switch Power Cord Grommet Crank Pulley Crank Arm Pedal Arm Cap Idler M17 Washer Pulse Sensor Cover Resistance Motor Lower Saddle Bracket Lift Frame Bushing Eddy Mechanism Left Pedal Handle Medium Bushing Lift Frame Axle Pulse Sensor Cap Small Snap Ring Wheel Bolt Set Right Upper Body Leg Accessory Tray Reed Switch/Wire Clamp Bearing Right...
... 1 50 1 Description Frame Rear Stabilizer Cover Ramp Upright Rear Stabilizer Right Front Stabilizer Console Front Stabilizer Cover Left Front Stabilizer Ramp Cover Track Left Roller Arm Lift Motor Left Pedal Control Board Power Switch Power Cord Grommet Crank Pulley Crank Arm Pedal Arm Cap Idler M17 Washer Pulse Sensor Cover Resistance Motor Lower Saddle Bracket Lift Frame Bushing Eddy Mechanism Left Pedal Handle Medium Bushing Lift Frame Axle Pulse Sensor Cap Small Snap Ring Wheel Bolt Set Right Upper Body Leg Accessory Tray Reed Switch/Wire Clamp Bearing Right...
English Manual
Page 33
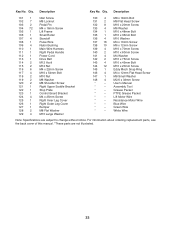
... 1 126 1 127 1 128 2 129 4 Idler Screw M8 Locknut Pedal Pin M4 x 16mm Screw Lift Frame Small Roller Standoff Pulse Wire Nylon Bushing Main Wire Harness Right Pedal Handle Power Cord Drive Belt M12 I-bolt M12 Nut M4 x 22mm Screw M10 x 54mm Bolt M10 Nut M8 Washer M8 Shoulder Screw Right Upper Saddle Bracket Stop Plate Control Board Bracket M4 x 25mm Screw Right Inner Leg Cover Right Outer Leg Cover Bumper M8 Flat Washer M10...
... 1 126 1 127 1 128 2 129 4 Idler Screw M8 Locknut Pedal Pin M4 x 16mm Screw Lift Frame Small Roller Standoff Pulse Wire Nylon Bushing Main Wire Harness Right Pedal Handle Power Cord Drive Belt M12 I-bolt M12 Nut M4 x 22mm Screw M10 x 54mm Bolt M10 Nut M8 Washer M8 Shoulder Screw Right Upper Saddle Bracket Stop Plate Control Board Bracket M4 x 25mm Screw Right Inner Leg Cover Right Outer Leg Cover Bumper M8 Flat Washer M10...
English Manual
Page 36
... : • the model number and serial number of the product (see the front cover of this manual) • the name of the product (see the front cover of this manual) • the key number and description of the replacement part(s) (see the PART LIST and the EXPLODED DRAWING near the end of this manual) LIMITED WARRANTY IMPORTANT: To protect your fitness equipment with an extended service plan, see the...
... : • the model number and serial number of the product (see the front cover of this manual) • the name of the product (see the front cover of this manual) • the key number and description of the replacement part(s) (see the PART LIST and the EXPLODED DRAWING near the end of this manual) LIMITED WARRANTY IMPORTANT: To protect your fitness equipment with an extended service plan, see the...


