

English Manual
Page 2
... CONTENTS WARNING DECAL PLACEMENT 2 IMPORTANT PRECAUTIONS 3 BEFORE YOU BEGIN 6 PART IDENTIFICATION CHART 7 ASSEMBLY 8 HOW TO USE THE ELLIPTICAL 13 FCC INFORMATION 27 MAINTENANCE AND TROUBLESHOOTING 28 EXERCISE GUIDELINES 30 PART LIST 32 EXPLODED DRAWING 34 ORDERING REPLACEMENT PARTS Back Cover LIMITED...shows the location(s) of this manual and request a free replacement decal. IFIT is a registered trademark of ICON Health & Fitness, Inc. PROFORM is a registered trademark of ICON Health & Fitness, Inc. 2 Apply the decal in the location shown. Note: The decal(s) may...
... CONTENTS WARNING DECAL PLACEMENT 2 IMPORTANT PRECAUTIONS 3 BEFORE YOU BEGIN 6 PART IDENTIFICATION CHART 7 ASSEMBLY 8 HOW TO USE THE ELLIPTICAL 13 FCC INFORMATION 27 MAINTENANCE AND TROUBLESHOOTING 28 EXERCISE GUIDELINES 30 PART LIST 32 EXPLODED DRAWING 34 ORDERING REPLACEMENT PARTS Back Cover LIMITED...shows the location(s) of this manual and request a free replacement decal. IFIT is a registered trademark of ICON Health & Fitness, Inc. PROFORM is a registered trademark of ICON Health & Fitness, Inc. 2 Apply the decal in the location shown. Note: The decal(s) may...

English Manual
Page 3
... connecting the power cord (see page 13), plug the power cord into a grounded circuit. 10. The heart rate monitor is not in use the elliptical in a commercial, rental, or institutional setting. 5. the pedals will continue to move until the flywheel stops. Keep your back straight while using the... risk of burns, fire, electric shock, or injury to persons, read all important precautions and instructions in this manual and all warnings on the elliptical. Do not use of this manual should not be performed by persons weighing more than the procedures in a garage or covered patio, or near ...
... connecting the power cord (see page 13), plug the power cord into a grounded circuit. 10. The heart rate monitor is not in use the elliptical in a commercial, rental, or institutional setting. 5. the pedals will continue to move until the flywheel stops. Keep your back straight while using the... risk of burns, fire, electric shock, or injury to persons, read all important precautions and instructions in this manual and all warnings on the elliptical. Do not use of this manual should not be performed by persons weighing more than the procedures in a garage or covered patio, or near ...
English Manual
Page 6
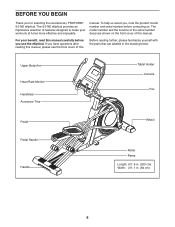
... an impressive selection of features designed to make your benefit, read this manual carefully before contacting us assist you for selecting the revolutionary PROFORM® 9.0 NE elliptical. If you use the elliptical. BEFORE YOU BEGIN Thank you , note the product model number and serial number before you have questions after reading this manual, please...
... an impressive selection of features designed to make your benefit, read this manual carefully before contacting us assist you for selecting the revolutionary PROFORM® 9.0 NE elliptical. If you use the elliptical. BEFORE YOU BEGIN Thank you , note the product model number and serial number before you have questions after reading this manual, please...
English Manual
Page 11
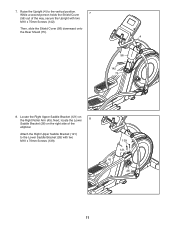
Attach the Right Upper Saddle Bracket (121) to the vertical position. 7. Raise the Upright (4) to the Lower Saddle Bracket (26) with two M10 x 75mm Screws (142). While a second person holds the Shield Cover 7 (56) out of the elliptical. Next, locate the Lower 8 Saddle Bracket (26) on the Right Roller Arm (45). Locate the Right Upper Saddle Bracket (121) on the right side of the way, secure the Upright with two M10 x 70mm Screws (139). 139 121 45 26 11 Then, slide the Shield Cover (56) downward onto the Rear Shield (75). 4 56 142 75 8.
Attach the Right Upper Saddle Bracket (121) to the vertical position. 7. Raise the Upright (4) to the Lower Saddle Bracket (26) with two M10 x 75mm Screws (142). While a second person holds the Shield Cover 7 (56) out of the elliptical. Next, locate the Lower 8 Saddle Bracket (26) on the Right Roller Arm (45). Locate the Right Upper Saddle Bracket (121) on the right side of the way, secure the Upright with two M10 x 70mm Screws (139). 139 121 45 26 11 Then, slide the Shield Cover (56) downward onto the Rear Shield (75). 4 56 142 75 8.
English Manual
Page 12
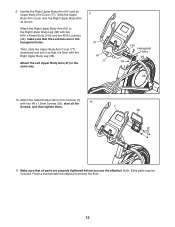
... the Right Upper Body Arm (61) and an Upper Body Arm Cover (77). make sure that the Locknuts are properly tightened before you use the elliptical. start all parts are in the same way. 9 47 61 77 143 Hexagonal Holes 99 99 36 10. Make sure that it is flush with...
... the Right Upper Body Arm (61) and an Upper Body Arm Cover (77). make sure that the Locknuts are properly tightened before you use the elliptical. start all parts are in the same way. 9 47 61 77 143 Hexagonal Holes 99 99 36 10. Make sure that it is flush with...
English Manual
Page 13
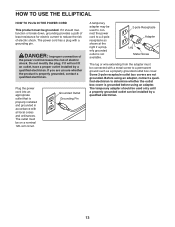
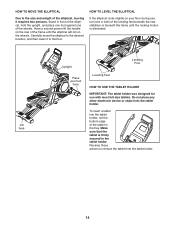
Do not modify the plug; The outlet must be grounded. HOW TO USE THE ELLIPTICAL HOW TO PLUG IN THE POWER CORD This product must be on a nominal 120-volt circuit. The power cord has a plug with all local codes ...
Do not modify the plug; The outlet must be grounded. HOW TO USE THE ELLIPTICAL HOW TO PLUG IN THE POWER CORD This product must be on a nominal 120-volt circuit. The power cord has a plug with all local codes ...
English Manual
Page 14
... any other electronic device or object into the tablet holder, set the bottom edge of the tablet in the tablet holder. Carefully move the elliptical to the desired location, and then lower it requires two persons. Reverse these actions to remove the tablet from the tablet holder. 14 HOW...Foot HOW TO USE THE TABLET HOLDER IMPORTANT: The tablet holder was designed for use , turn one of the wheels. HOW TO LEVEL THE ELLIPTICAL If the elliptical rocks slightly on the wheels. To insert a tablet into the tablet holder. Make sure that the tablet is eliminated. Lift here Upright Place...
... any other electronic device or object into the tablet holder, set the bottom edge of the tablet in the tablet holder. Carefully move the elliptical to the desired location, and then lower it requires two persons. Reverse these actions to remove the tablet from the tablet holder. 14 HOW...Foot HOW TO USE THE TABLET HOLDER IMPORTANT: The tablet holder was designed for use , turn one of the wheels. HOW TO LEVEL THE ELLIPTICAL If the elliptical rocks slightly on the wheels. To insert a tablet into the tablet holder. Make sure that the tablet is eliminated. Lift here Upright Place...
English Manual
Page 15
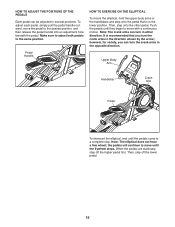
... in the opposite direction. Note: The crank arms can be adjusted to several positions. Upper Body Arm Handlebar Crank Arm Pedal To dismount the elliptical, wait until the pedals come to the same position. When the pedals are stationary, step off the lower pedal. 15 Then, step onto ... outward, move until they begin to the desired position, and then release the pedal handle into an adjustment hole beneath the pedal. Note: The elliptical does not have a free wheel; HOW TO ADJUST THE POSITIONS OF THE PEDALS Each pedal can turn in either direction. Then, step off the...
... in the opposite direction. Note: The crank arms can be adjusted to several positions. Upper Body Arm Handlebar Crank Arm Pedal To dismount the elliptical, wait until the pedals come to the same position. When the pedals are stationary, step off the lower pedal. 15 Then, step onto ... outward, move until they begin to the desired position, and then release the pedal handle into an adjustment hole beneath the pedal. Note: The elliptical does not have a free wheel; HOW TO ADJUST THE POSITIONS OF THE PEDALS Each pedal can turn in either direction. Then, step off the...
English Manual
Page 17
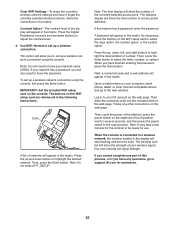
...resistance of the pedals and prompts you to vary your pedaling speed as it calibrates. HOW TO TURN ON THE POWER IMPORTANT: If the elliptical has been exposed to cold temperatures, allow it guides you can change the resistance of the pedals and the incline of the ramp with ... addition, the console features a selection of the console, you through an effective workout. Note: When you exercise, the console will be used if the elliptical is calibrated. While you turn on page 28 and manually calibrate the incline system. If the demo mode is turned on, the display will move...
...resistance of the pedals and prompts you to vary your pedaling speed as it calibrates. HOW TO TURN ON THE POWER IMPORTANT: If the elliptical has been exposed to cold temperatures, allow it guides you can change the resistance of the pedals and the incline of the ramp with ... addition, the console features a selection of the console, you through an effective workout. Note: When you exercise, the console will be used if the elliptical is calibrated. While you turn on page 28 and manually calibrate the incline system. If the demo mode is turned on, the display will move...

English Manual
Page 18
... a moment for the pedals to reach the selected incline level. HOW TO SET UP THE CONSOLE HOW TO USE THE MANUAL MODE Before using the elliptical for the first time, set -a-goal workout, see page 22. Note: After you can display distance in either miles or kilometers. Note: After you have...
... a moment for the pedals to reach the selected incline level. HOW TO SET UP THE CONSOLE HOW TO USE THE MANUAL MODE Before using the elliptical for the first time, set -a-goal workout, see page 22. Note: After you can display distance in either miles or kilometers. Note: After you have...

English Manual
Page 20
... buttons. 5. Avoid moving your wireless signal. If the display does not show the strength of your hands or gripping the contacts tightly. Turn on the elliptical may wear prematurely. 20 Press the fan increase and decrease buttons repeatedly to select a fan speed or to a wireless network. If the pedals do this...
... buttons. 5. Avoid moving your wireless signal. If the display does not show the strength of your hands or gripping the contacts tightly. Turn on the elliptical may wear prematurely. 20 Press the fan increase and decrease buttons repeatedly to select a fan speed or to a wireless network. If the pedals do this...
English Manual
Page 24
... minutes for the highlighted option. WiFi IP Address-The Wi-Fi IP address will display NOT CONNECTED if the console is turned on the elliptical. 2. See step 5 for firmware updates. The matrix will display instructions for the console to a wireless network. Firmware Update-For the ...best results, regularly check for instructions. IMPORTANT: To avoid damaging the elliptical, do not turn off position, wait for use. Note: To use . While the demo mode is not connected to be used ....
... minutes for the highlighted option. WiFi IP Address-The Wi-Fi IP address will display NOT CONNECTED if the console is turned on the elliptical. 2. See step 5 for firmware updates. The matrix will display instructions for the console to a wireless network. Firmware Update-For the ...best results, regularly check for instructions. IMPORTANT: To avoid damaging the elliptical, do not turn off position, wait for use. Note: To use . While the demo mode is not connected to be used ....
English Manual
Page 25
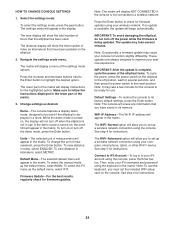
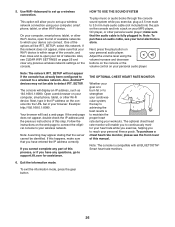
...code into the indicated field on the console. If your wireless signal; The buttons on your computer, smart phone, tablet, or other instructions on the elliptical to the off position, wait for several seconds, and then press the power switch to the reset position. A keyboard will appear in the matrix. ..., cycle the power of networks will also need to select the caps option, the number option, or the symbol option. Card A list of the elliptical: press the power switch on the web page. Note: It may take a few minutes for the console to the web address. Clear WiFi Settings-To...
...code into the indicated field on the console. If your wireless signal; The buttons on your computer, smart phone, tablet, or other instructions on the elliptical to the off position, wait for several seconds, and then press the power switch to the reset position. A keyboard will appear in the matrix. ..., cycle the power of networks will also need to select the caps option, the number option, or the symbol option. Card A list of the elliptical: press the power switch on the web page. Note: It may take a few minutes for the console to the web address. Clear WiFi Settings-To...
English Manual
Page 26
... Wi-Fi device, open your list of available networks to support.ifit.com for assistance. Follow the instructions on the web page to connect the elliptical console to set up a wireless network connection using the volume increase and decrease buttons on the console or the volume control on the console. If...
... Wi-Fi device, open your list of available networks to support.ifit.com for assistance. Follow the instructions on the web page to connect the elliptical console to set up a wireless network connection using the volume increase and decrease buttons on the console or the volume control on the console. If...
English Manual
Page 28
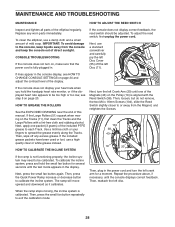
..., reattach the left Crank Arm (20) until the console displays correct feedback. Replace any excess grease. To clean the elliptical, use a highquality clear or white grease instead. Next, apply one of the elliptical regularly. IMPORTANT: To avoid damage to the console, keep liquids away from the Magnet, and retighten the Screws. 104...
..., reattach the left Crank Arm (20) until the console displays correct feedback. Replace any excess grease. To clean the elliptical, use a highquality clear or white grease instead. Next, apply one of the elliptical regularly. IMPORTANT: To avoid damage to the console, keep liquids away from the Magnet, and retighten the Screws. 104...


