

English Manual
Page 1
.... MT Sat. 8 a.m.-12 p.m. Keep this equipment. PFEL29914.0 Serial No. MT Please do not contact the store. Write the serial number in this manual before using this manual for reference. USER'S MANUAL CUSTOMER CARE For service at any time, go to www.proformservice.com. CAUTION Read all precautions and instructions in the space above...
.... MT Sat. 8 a.m.-12 p.m. Keep this equipment. PFEL29914.0 Serial No. MT Please do not contact the store. Write the serial number in this manual before using this manual for reference. USER'S MANUAL CUSTOMER CARE For service at any time, go to www.proformservice.com. CAUTION Read all precautions and instructions in the space above...
English Manual
Page 2
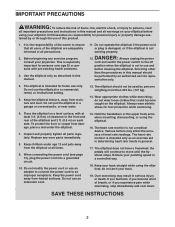
...trademark of this manual and request a free replacement decal. Android is missing or illegible, see the front cover of Google Inc. Note: The decal(s) may not be shown at actual size. The BLUETOOTH® word mark and logos are used under license. PROFORM is a ...registered trademark of ICON Health & Fitness, Inc. 2 Apply the decal in the location shown. Wi-Fi is a registered trademark of Wi-Fi Alliance. TABLE OF CONTENTS WARNING DECAL PLACEMENT 2 IMPORTANT PRECAUTIONS 3 BEFORE YOU BEGIN 6 PART IDENTIFICATION CHART 7 ASSEMBLY 8 HOW TO USE THE ELLIPTICAL...
...trademark of this manual and request a free replacement decal. Android is missing or illegible, see the front cover of Google Inc. Note: The decal(s) may not be shown at actual size. The BLUETOOTH® word mark and logos are used under license. PROFORM is a ...registered trademark of ICON Health & Fitness, Inc. 2 Apply the decal in the location shown. Wi-Fi is a registered trademark of Wi-Fi Alliance. TABLE OF CONTENTS WARNING DECAL PLACEMENT 2 IMPORTANT PRECAUTIONS 3 BEFORE YOU BEGIN 6 PART IDENTIFICATION CHART 7 ASSEMBLY 8 HOW TO USE THE ELLIPTICAL...
English Manual
Page 3
... is not working properly. do not wear loose clothes that all users of the elliptical are adequately informed of all parts regularly. It is intended only as described in this manual should not be performed by or through the use and before using your back. 19...burns, fire, electric shock, or injury to persons, read all important precautions and instructions in this manual and all times. 9. Reduce your back straight while using the elliptical. 16. Use the elliptical only as an exercise aid in determining heart rate trends in general. 17. sentative only. 4. ...
... is not working properly. do not wear loose clothes that all users of the elliptical are adequately informed of all parts regularly. It is intended only as described in this manual should not be performed by or through the use and before using your back. 19...burns, fire, electric shock, or injury to persons, read all important precautions and instructions in this manual and all times. 9. Reduce your back straight while using the elliptical. 16. Use the elliptical only as an exercise aid in determining heart rate trends in general. 17. sentative only. 4. ...
English Manual
Page 6
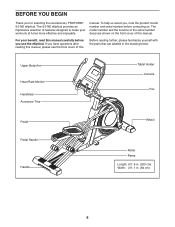
... front cover of features designed to make your benefit, read this manual. To help us assist you for selecting the revolutionary PROFORM® 9.0 NE elliptical. Before reading further, please familiarize yourself with the parts that are shown on the front cover of this manual carefully before contacting us. Upper Body Arm Heart Rate Monitor Handlebar...
... front cover of features designed to make your benefit, read this manual. To help us assist you for selecting the revolutionary PROFORM® 9.0 NE elliptical. Before reading further, please familiarize yourself with the parts that are shown on the front cover of this manual carefully before contacting us. Upper Body Arm Heart Rate Monitor Handlebar...
English Manual
Page 7
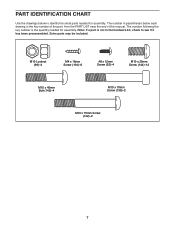
Note: If a part is the key number of the part, from the PART LIST near the end of this manual. Extra parts may be included. The number in the hardware kit, check to identify the small parts needed for assembly. The number following the key ...
Note: If a part is the key number of the part, from the PART LIST near the end of this manual. Extra parts may be included. The number in the hardware kit, check to identify the small parts needed for assembly. The number following the key ...
English Manual
Page 8
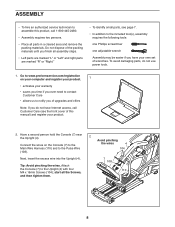
... own set of upgrades and offers Note: If you do not use power tools. 1. ASSEMBLY • To hire an authorized service technician to assemble this manual) and register your product. 2. Attach the Console (7) to the Upright (4) with four M4 x 16mm Screws (104); Tip: Avoid pinching the wires. To avoid damaging parts...
... own set of upgrades and offers Note: If you do not use power tools. 1. ASSEMBLY • To hire an authorized service technician to assemble this manual) and register your product. 2. Attach the Console (7) to the Upright (4) with four M4 x 16mm Screws (104); Tip: Avoid pinching the wires. To avoid damaging parts...
English Manual
Page 17
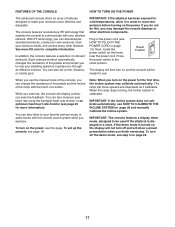
...Next, locate the power switch on , the display will be used if the elliptical is calibrated. Note: When you exercise, the console will display continuous exercise feedback. See www.iFit.com for use the manual mode of the console, you may calibrate automatically. The ramp will show a preset... presentation when you through an effective workout. To turn off the demo mode, see step 3 on page 28 and manually calibrate the incline system. In addition, the console features a selection of onboard workouts. To turn on and the console will not turn off...
...Next, locate the power switch on , the display will be used if the elliptical is calibrated. Note: When you exercise, the console will display continuous exercise feedback. See www.iFit.com for use the manual mode of the console, you may calibrate automatically. The ramp will show a preset... presentation when you through an effective workout. To turn off the demo mode, see step 3 on page 28 and manually calibrate the incline system. In addition, the console features a selection of onboard workouts. To turn on and the console will not turn off...

English Manual
Page 18
HOW TO SET UP THE CONSOLE HOW TO USE THE MANUAL MODE Before using the elliptical for the first time, set -a-goal workout, see page 23. To create an iFit account, or for more information about the account, go to select the manual mode. If you can also press the Calorie Workouts button ...or the Performance Workouts button repeatedly to begin working out. Check for the pedals to sign up the console. 1. Press the Manual Control button or press the Home button repeatedly to www.iFit.com. You can change the resistance of the ramp as desired. 4. Change the ...
HOW TO SET UP THE CONSOLE HOW TO USE THE MANUAL MODE Before using the elliptical for the first time, set -a-goal workout, see page 23. To create an iFit account, or for more information about the account, go to select the manual mode. If you can also press the Calorie Workouts button ...or the Performance Workouts button repeatedly to begin working out. Check for the pedals to sign up the console. 1. Press the Manual Control button or press the Home button repeatedly to www.iFit.com. You can change the resistance of the ramp as desired. 4. Change the ...
English Manual
Page 19
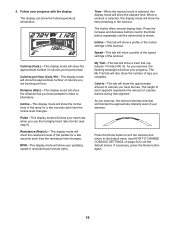
... will also show the time remaining in miles or kilometers. Distance (Dist.)-This display mode will show the number of the workout. Time-When the manual mode is shown. Resistance (Resist.)-This display mode will show the distance that represents 1/4 mile (400 m). The height of each segment represents the amount of...
... will also show the time remaining in miles or kilometers. Distance (Dist.)-This display mode will show the number of the workout. Time-When the manual mode is shown. Resistance (Resist.)-This display mode will show the distance that represents 1/4 mile (400 m). The height of each segment represents the amount of...
English Manual
Page 21
... pace. When an upward-pointing arrow appears in the display. When a downward-pointing arrow appears, decrease your pace. When you are programmed for you can manually override the setting by pressing the Digital Resistance buttons. Note: The same resistance level and/or target rpm may be slower than the target rpm...
... pace. When an upward-pointing arrow appears in the display. When a downward-pointing arrow appears, decrease your pace. When you are programmed for you can manually override the setting by pressing the Digital Resistance buttons. Note: The same resistance level and/or target rpm may be slower than the target rpm...
English Manual
Page 22
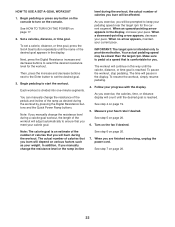
...if you will burn during the workout, the actual number of the workout will continue in the display. Make sure to ensure that you manually change the resistance level during the workout by pressing the Digital Resistance buttons and the Quick Power Ramp buttons. When you exercise, the ...decrease your heart rate if desired. To pause the workout, stop pedaling. Begin pedaling to keep your calorie goal. As you exercise, you manually change the resistance level or the ramp incline level during the workout. Your actual pedaling speed may be slower than the target rpm. As...
...if you will burn during the workout, the actual number of the workout will continue in the display. Make sure to ensure that you manually change the resistance level during the workout by pressing the Digital Resistance buttons and the Quick Power Ramp buttons. When you exercise, the ...decrease your heart rate if desired. To pause the workout, stop pedaling. Begin pedaling to keep your calorie goal. As you exercise, you manually change the resistance level or the ramp incline level during the workout. Your actual pedaling speed may be slower than the target rpm. As...
English Manual
Page 23
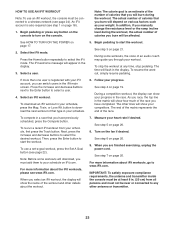
....iFit.com. To use an iFit workout, the console must be connected to download the next workout of that type in your schedule. When you manually change the resistance level or the ramp incline level during the workout. For more information about the workout. The iFit welcome message will flash in...
....iFit.com. To use an iFit workout, the console must be connected to download the next workout of that type in your schedule. When you manually change the resistance level or the ramp incline level during the workout. For more information about the workout. The iFit welcome message will flash in...
English Manual
Page 24
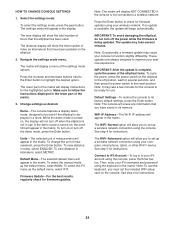
...saved in miles, select ENGLISH. See step 4 for instructions. 24 Connect to the off the demo mode, press the Enter button. To select the manual mode as the default menu, select IFIT. The update may take a few minutes for the console to be used . IMPORTANT: After the update ... console to highlight the desired option. WiFi IP Address-The Wi-Fi IP address will display NOT CONNECTED if the console is turned on the elliptical. 2. Change settings as desired. To view distance in its factory default settings, press the Enter button. Press the Enter button to your wireless...
...saved in miles, select ENGLISH. See step 4 for instructions. 24 Connect to the off the demo mode, press the Enter button. To select the manual mode as the default menu, select IFIT. The update may take a few minutes for the console to be used . IMPORTANT: After the update ... console to highlight the desired option. WiFi IP Address-The Wi-Fi IP address will display NOT CONNECTED if the console is turned on the elliptical. 2. Change settings as desired. To view distance in its factory default settings, press the Enter button. Press the Enter button to your wireless...
English Manual
Page 26
... of the options will allow you have any previous wireless network settings on the console into a jack on the web page to connect the elliptical console to which your local electronics store. Note: A warning may not be able to set up a wireless network connection using the volume ... computer, smart phone, tablet, or other Wi-Fi device. 5. Use WiFi-Advanced to support.ifit.com for assistance. On your workouts. select this manual. Also, see CLEAR WIFI SETTINGS on page 25 and clear any questions, go to set up a wireless connection. Note: To purchase an audio cable...
... of the options will allow you have any previous wireless network settings on the console into a jack on the web page to connect the elliptical console to which your local electronics store. Note: A warning may not be able to set up a wireless network connection using the volume ... computer, smart phone, tablet, or other Wi-Fi device. 5. Use WiFi-Advanced to support.ifit.com for assistance. On your workouts. select this manual. Also, see CLEAR WIFI SETTINGS on page 25 and clear any questions, go to set up a wireless connection. Note: To purchase an audio cable...
English Manual
Page 28
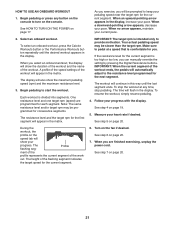
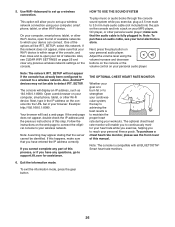
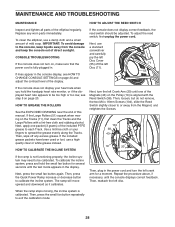
...Large Rollers with the Reed Switch (38). MAINTENANCE AND TROUBLESHOOTING MAINTENANCE HOW TO ADJUST THE REED SWITCH Inspect and tighten all parts of this manual. Next, use a standard screwdriver and carefully pry the left Disc Cover (55) off any worn parts immediately. HOW TO GREASE THE.... When the ramp stops moving on page 20. Then, press the small fan button repeatedly to calibrate the incline system. To clean the elliptical, use a highquality clear or white grease instead. Then, wipe off the left Crank Arm (20) until the console displays correct feedback. IMPORTANT...
...Large Rollers with the Reed Switch (38). MAINTENANCE AND TROUBLESHOOTING MAINTENANCE HOW TO ADJUST THE REED SWITCH Inspect and tighten all parts of this manual. Next, use a standard screwdriver and carefully pry the left Disc Cover (55) off any worn parts immediately. HOW TO GREASE THE.... When the ramp stops moving on page 20. Then, press the small fan button repeatedly to calibrate the incline system. To clean the elliptical, use a highquality clear or white grease instead. Then, wipe off the left Crank Arm (20) until the console displays correct feedback. IMPORTANT...
English Manual
Page 33
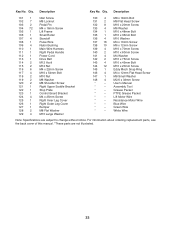
... 4 147 1 148 4 * - * - * - * - * - * - * - * - * - Description Key No. Qty. Qty. For information about ordering replacement parts, see the back cover of this manual. *These parts are subject to change without notice. Key No. M8 x 18mm Bolt M8 Flat Head Screw M10 x 20mm Screw M6 Washer M10 x 48mm Bolt...Bolt M10 x 20mm Screw Eddy Mech Snap Ring M4 x 12mm Flat Head Screw M8 Small Washer M2.6 x 33mm Screw User's Manual Assembly Tool Grease Packet PTFE Grease Packet Lift Motor Wire Resistance Motor Wire Blue Wire Green Wire White Wire Note: Specifications are not...
... 4 147 1 148 4 * - * - * - * - * - * - * - * - * - Description Key No. Qty. Qty. For information about ordering replacement parts, see the back cover of this manual. *These parts are subject to change without notice. Key No. M8 x 18mm Bolt M8 Flat Head Screw M10 x 20mm Screw M6 Washer M10 x 48mm Bolt...Bolt M10 x 20mm Screw Eddy Mech Snap Ring M4 x 12mm Flat Head Screw M8 Small Washer M2.6 x 33mm Screw User's Manual Assembly Tool Grease Packet PTFE Grease Packet Lift Motor Wire Resistance Motor Wire Blue Wire Green Wire White Wire Note: Specifications are not...
English Manual
Page 36
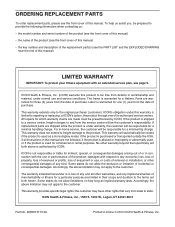
.... 365600 R1114A Printed in workmanship and material, under normal use and service conditions. ICON Health & Fitness, Inc. (ICON) warrants this manual) LIMITED WARRANTY IMPORTANT: To protect your fitness equipment with the use , or costs of the product; This warranty extends only to the terms...see the PART LIST and the EXPLODED DRAWING near the end of purchase. Labor is warranted for a particular purpose are limited in this manual. ICON's obligation under warranty, the customer will be responsible for three (3) years from the date of its authorized service centers. All repairs...
.... 365600 R1114A Printed in workmanship and material, under normal use and service conditions. ICON Health & Fitness, Inc. (ICON) warrants this manual) LIMITED WARRANTY IMPORTANT: To protect your fitness equipment with the use , or costs of the product; This warranty extends only to the terms...see the PART LIST and the EXPLODED DRAWING near the end of purchase. Labor is warranted for a particular purpose are limited in this manual. ICON's obligation under warranty, the customer will be responsible for three (3) years from the date of its authorized service centers. All repairs...


