
English Manual
Page 2
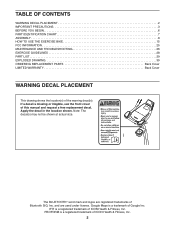
... YOU BEGIN 6 PART IDENTIFICATION CHART 7 ASSEMBLY 8 HOW TO USE THE EXERCISE BIKE 15 FCC INFORMATION 25 MAINTENANCE AND TROUBLESHOOTING 26 EXERCISE GUIDELINES 28 PART LIST 29 EXPLODED DRAWING 30 ORDERING REPLACEMENT PARTS Back Cover LIMITED WARRANTY Back Cover WARNING DECAL PLACEMENT This drawing shows the location(s) of this manual and request a free replacement decal. Note: The decal(s) may not be shown at actual size. and are registered trademarks of ICON Health & Fitness, Inc. 2 PROFORM is missing or...
... YOU BEGIN 6 PART IDENTIFICATION CHART 7 ASSEMBLY 8 HOW TO USE THE EXERCISE BIKE 15 FCC INFORMATION 25 MAINTENANCE AND TROUBLESHOOTING 26 EXERCISE GUIDELINES 28 PART LIST 29 EXPLODED DRAWING 30 ORDERING REPLACEMENT PARTS Back Cover LIMITED WARRANTY Back Cover WARNING DECAL PLACEMENT This drawing shows the location(s) of this manual and request a free replacement decal. Note: The decal(s) may not be shown at actual size. and are registered trademarks of ICON Health & Fitness, Inc. 2 PROFORM is missing or...
English Manual
Page 3
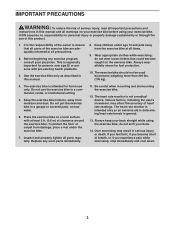
... experience pain while exercising, stop immediately and cool down. 3 This is intended only as described in a commercial, rental, or institutional setting. 5. Do not put the exercise bike in general. 13. Replace any exercise program, consult your exercise bike. The exercise bike should not be used by or through the use only. To protect the floor or carpet from moisture and dust. The heart rate monitor is especially...
... experience pain while exercising, stop immediately and cool down. 3 This is intended only as described in a commercial, rental, or institutional setting. 5. Do not put the exercise bike in general. 13. Replace any exercise program, consult your exercise bike. The exercise bike should not be used by or through the use only. To protect the floor or carpet from moisture and dust. The heart rate monitor is especially...

English Manual
Page 6
... you for increasing cardiovascular fitness, building endurance, and toning the entire body. For your workouts at home more effective and enjoyable. Cycling is one of this manual. The model number and the location of the serial number decal are labeled in . (58 cm) Fan Console Knob Seat Seat Knob Seat Post Seat Post Knob Pedal/Strap Tablet Holder Heart Rate Monitor Console Handlebar Accessory Tray Wheel Handle Leveling Foot 6 The 8.0 EX exercise bike provides an impressive selection...
... you for increasing cardiovascular fitness, building endurance, and toning the entire body. For your workouts at home more effective and enjoyable. Cycling is one of this manual. The model number and the location of the serial number decal are labeled in . (58 cm) Fan Console Knob Seat Seat Knob Seat Post Seat Post Knob Pedal/Strap Tablet Holder Heart Rate Monitor Console Handlebar Accessory Tray Wheel Handle Leveling Foot 6 The 8.0 EX exercise bike provides an impressive selection...
English Manual
Page 8
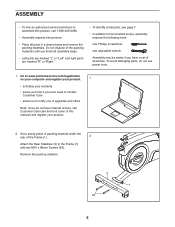
...: one Phillips screwdriver one adjustable wrench Assembly may be easier if you do not use power tools. 1. Remove the packing material. 3 1 53 8 ASSEMBLY • To hire an authorized service technician to assemble this manual) and register your warranty • saves you time if you ever need to contact Customer Care • allows us to notify you of upgrades and offers Note: If...
...: one Phillips screwdriver one adjustable wrench Assembly may be easier if you do not use power tools. 1. Remove the packing material. 3 1 53 8 ASSEMBLY • To hire an authorized service technician to assemble this manual) and register your warranty • saves you time if you ever need to contact Customer Care • allows us to notify you of upgrades and offers Note: If...

English Manual
Page 12
... of the adjustment holes in the Seat Post. Move the Seat Post upward or down- Loosen the Seat Post Knob (27), pull it outward, insert the Seat Post (6) into the Seat Bracket (30) inside the Seat Carriage (24). 9 Next, hold the Seat Carriage (24) on the Seat Post (6). Insert the Seat Knob (26) upward into the Seat Post, and tighten the Seat Knob into the Seat Post 10...
... of the adjustment holes in the Seat Post. Move the Seat Post upward or down- Loosen the Seat Post Knob (27), pull it outward, insert the Seat Post (6) into the Seat Bracket (30) inside the Seat Carriage (24). 9 Next, hold the Seat Carriage (24) on the Seat Post (6). Insert the Seat Knob (26) upward into the Seat Post, and tighten the Seat Knob into the Seat Post 10...
English Manual
Page 13
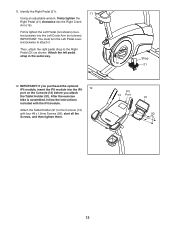
... assembled, follow the instructions included with four #8 x 12mm Screws (92); Attach the Tablet Holder (91) to the Console (13) with the iFit module. Then, attach the right pedal strap to attach it. IMPORTANT: You must turn the Left Pedal counterclockwise to the Right Pedal (21) as shown. 11. Identify the Right Pedal (21). 11 Using an adjustable wrench, firmly tighten the Right Pedal (21) clockwise into the Left Crank Arm...
... assembled, follow the instructions included with four #8 x 12mm Screws (92); Attach the Tablet Holder (91) to the Console (13) with the iFit module. Then, attach the right pedal strap to attach it. IMPORTANT: You must turn the Left Pedal counterclockwise to the Right Pedal (21) as shown. 11. Identify the Right Pedal (21). 11 Using an adjustable wrench, firmly tighten the Right Pedal (21) clockwise into the Left Crank Arm...

English Manual
Page 15
... that the knob is properly installed in the seat post. HOW TO ADJUST THE LATERAL POSITION OF THE SEAT To adjust the lateral position of the exercise bike. HOW TO USE THE EXERCISE BIKE HOW TO PLUG IN THE POWER ADAPTER IMPORTANT: If the exercise bike has been exposed to cold temperatures, allow it to warm to room temperature before you may damage the console displays or other...
... that the knob is properly installed in the seat post. HOW TO ADJUST THE LATERAL POSITION OF THE SEAT To adjust the lateral position of the exercise bike. HOW TO USE THE EXERCISE BIKE HOW TO PLUG IN THE POWER ADAPTER IMPORTANT: If the exercise bike has been exposed to cold temperatures, allow it to warm to room temperature before you may damage the console displays or other...
English Manual
Page 17
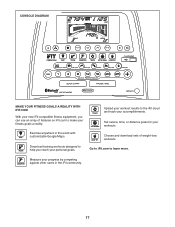
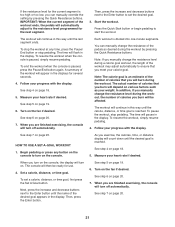
... iFit community. 17 Measure your progress by competing against other users in the world with customizable Google Maps. Go to iFit.com to the iFit cloud and track your accomplishments. CONSOLE DIAGRAM MAKE YOUR FITNESS GOALS A REALITY WITH IFIT.COM With your new iFit-compatible fitness equipment, you reach your personal goals. Download training workouts designed to help you can use an array of weight-loss workouts...
... iFit community. 17 Measure your progress by competing against other users in the world with customizable Google Maps. Go to iFit.com to the iFit cloud and track your accomplishments. CONSOLE DIAGRAM MAKE YOUR FITNESS GOALS A REALITY WITH IFIT.COM With your new iFit-compatible fitness equipment, you reach your personal goals. Download training workouts designed to help you can use an array of weight-loss workouts...
English Manual
Page 18
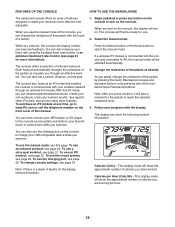
... the approximate number of calories you press a button, it guides you exercise. You can show the following workout information: Calories (Cals.)-This display mode will display continuous exercise feedback. Each workout automatically changes the resistance of the pedals as desired. To purchase an iFit module at any button on the console to turn on the console. HOW TO USE THE MANUAL MODE 1. Change the resistance of the pedals as it will turn on . The display can even connect your...
... the approximate number of calories you press a button, it guides you exercise. You can show the following workout information: Calories (Cals.)-This display mode will display continuous exercise feedback. Each workout automatically changes the resistance of the pedals as desired. To purchase an iFit module at any button on the console to turn on the console. HOW TO USE THE MANUAL MODE 1. Change the resistance of the pedals as it will turn on . The display can even connect your...
English Manual
Page 19
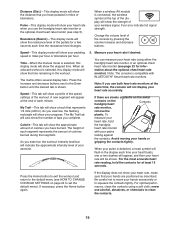
... the display each time the resistance level changes. The height of each segment represents the amount of each minute. Press the Home button to exit the workout and return to the Enter button until the desired tab is selected, this display mode will show your heart rate when you use the handgrip heart rate monitor or the optional chest heart rate monitor (see page 23 for information about the optional chest heart rate monitor). For...
... the display each time the resistance level changes. The height of each segment represents the amount of each minute. Press the Home button to exit the workout and return to the Enter button until the desired tab is selected, this display mode will show your heart rate when you use the handgrip heart rate monitor or the optional chest heart rate monitor (see page 23 for information about the optional chest heart rate monitor). For...
English Manual
Page 20
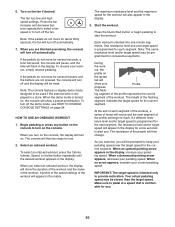
... reset. When you turn on the speed tab will then be prompted to be programmed for the current segment. To resume your current pedaling speed. A profile of the speed settings of the workout. Make sure to turn off the demo mode, see HOW TO CHANGE CONSOLE SETTINGS on the console. The fan has low and high speed settings. Begin pedaling or press any button on the console to pedal at a speed that is programmed for use. 2. Start...
... reset. When you turn on the speed tab will then be prompted to be programmed for the current segment. To resume your current pedaling speed. A profile of the speed settings of the workout. Make sure to turn off the demo mode, see HOW TO CHANGE CONSOLE SETTINGS on the console. The fan has low and high speed settings. Begin pedaling or press any button on the console to pedal at a speed that is programmed for use. 2. Start...
English Manual
Page 21
... programmed for the next segment. Press the Quick Start button or begin pedaling to ensure that you meet your weight. Note: The calorie goal is an estimate of the number of calories that you burn will turn on the console to the Enter button until the calorie, distance, or time goal is reached. In addition, if you manually change the resistance level during the workout...
... programmed for the next segment. Press the Quick Start button or begin pedaling to ensure that you meet your weight. Note: The calorie goal is an estimate of the number of calories that you burn will turn on the console to the Enter button until the calorie, distance, or time goal is reached. In addition, if you manually change the resistance level during the workout...
English Manual
Page 22
... use a set-a-goal workout, press the Set A Goal button (see www.iFit.com. You can switch users in the console. To use a wireless iFit module, you have an iFit module to start the workout. Press the Map button, the Train button, or the Lose Wt. During some workouts will download, you turn on the console, the display will flash in a race that the iFit module is inserted in your schedule on the front cover of the iFit buttons...
... use a set-a-goal workout, press the Set A Goal button (see www.iFit.com. You can switch users in the console. To use a wireless iFit module, you have an iFit module to start the workout. Press the Map button, the Train button, or the Lose Wt. During some workouts will download, you turn on the console, the display will flash in a race that the iFit module is inserted in your schedule on the front cover of the iFit buttons...
English Manual
Page 23
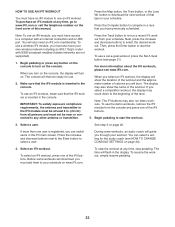
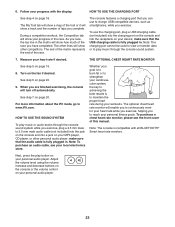
... the end of this manual. When you exercise, plug a 3.5 mm male to play button on your progress in . Note: The console is to achieving the best results is compatible with the display. During a competition workout, the Competition tab will turn off automatically. make sure that the USB charging cable is fully plugged in the race. THE OPTIONAL CHEST HEART RATE MONITOR Whether your goal...
... the end of this manual. When you exercise, plug a 3.5 mm male to play button on your progress in . Note: The console is to achieving the best results is compatible with the display. During a competition workout, the Competition tab will turn off automatically. make sure that the USB charging cable is fully plugged in the race. THE OPTIONAL CHEST HEART RATE MONITOR Whether your goal...
English Manual
Page 24
... to turn the demo mode ON or OFF. Press the Enter button repeatedly to turn the audio coach ON or OFF. Default Menu-The default menu will appear in the display. Press the Enter button. Exit the settings mode. Press the gear button to adjust the contrast level. To select the settings mode, press the gear button. Navigate the settings mode. While the settings mode is connected to the console, the display will show instructions for iFit workouts and firmware downloads...
... to turn the demo mode ON or OFF. Press the Enter button repeatedly to turn the audio coach ON or OFF. Default Menu-The default menu will appear in the display. Press the Enter button. Exit the settings mode. Press the gear button to adjust the contrast level. To select the settings mode, press the gear button. Navigate the settings mode. While the settings mode is connected to the console, the display will show instructions for iFit workouts and firmware downloads...
English Manual
Page 26
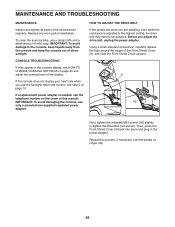
... of direct sunlight. Replace any worn parts immediately. If a replacement power adapter is adjusted to the highest setting, the drive belt may need to tighten the Drive Belt (not shown). CONSOLE TROUBLESHOOTING If lines appear in the power adapter. HOW TO ADJUST THE DRIVE BELT If the pedals slip while you adjust the drive belt, unplug the power adapter. Repeat this manual. IMPORTANT: To avoid damaging the console, use a damp cloth and a small amount of the exercise bike regularly. MAINTENANCE AND TROUBLESHOOTING MAINTENANCE Inspect and tighten all parts...
... of direct sunlight. Replace any worn parts immediately. If a replacement power adapter is adjusted to the highest setting, the drive belt may need to tighten the Drive Belt (not shown). CONSOLE TROUBLESHOOTING If lines appear in the power adapter. HOW TO ADJUST THE DRIVE BELT If the pedals slip while you adjust the drive belt, unplug the power adapter. Repeat this manual. IMPORTANT: To avoid damaging the console, use a damp cloth and a small amount of the exercise bike regularly. MAINTENANCE AND TROUBLESHOOTING MAINTENANCE Inspect and tighten all parts...
English Manual
Page 27
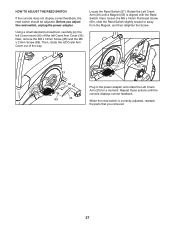
... Plug in the power adapter and rotate the Left Crank Arm (20) for a moment. When the reed switch is aligned with the Reed Switch. Rotate the Left Crank Arm (20) until the console displays correct feedback. Locate the Reed Switch (57). Next, remove the M5 x 12mm Screw (85) and the M5 x 21mm Screw (86). Before you removed. 27 Using a small standard screwdriver, carefully pry the left Cover Insert (35) off the left Crank Arm Cover...
... Plug in the power adapter and rotate the Left Crank Arm (20) for a moment. When the reed switch is aligned with the Reed Switch. Rotate the Left Crank Arm (20) until the console displays correct feedback. Locate the Reed Switch (57). Next, remove the M5 x 12mm Screw (85) and the M5 x 21mm Screw (86). Before you removed. 27 Using a small standard screwdriver, carefully pry the left Cover Insert (35) off the left Crank Arm Cover...
English Manual
Page 28
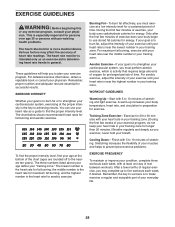
... guide to find your body uses carbohydrate calories for successful results. The chart below shows recommended heart rates for aerobic exercise. The lowest number is the heart rate for fat burning, the middle number is the heart rate for maximum fat burning, and the highest number is...exercise, adjust the intensity of your body temperature, heart rate, and circulation in your body begin to five workouts each week, with pre-existing health problems. The heart rate monitor is near the highest number in your training zone. A warm-up to use your "training zone." Remember, the key...
... guide to find your body uses carbohydrate calories for successful results. The chart below shows recommended heart rates for aerobic exercise. The lowest number is the heart rate for fat burning, the middle number is the heart rate for maximum fat burning, and the highest number is...exercise, adjust the intensity of your body temperature, heart rate, and circulation in your body begin to five workouts each week, with pre-existing health problems. The heart rate monitor is near the highest number in your training zone. A warm-up to use your "training zone." Remember, the key...
English Manual
Page 29
... Pulse Grip 38 1 Pulley 39 1 Crank 40 2 Crank Bearing 41 2 Large Snap Ring 42 1 Eddy Mechanism 43 6 M8 Locknut 44 10 M8 x 12mm Screw 45 1 Idler 46 4 M8 Black Split Washer 47 1 Resistance Motor 48 1 M8 x 18mm Screw 49 5 Knob Nut 50 1 M8 x 76mm Bolt 51 1 J-bolt 52 4 #10 x 12mm Screw 53 4 M10 x 98mm Screw 54 1 Drive Belt 55 2 Magnet 56 1 Clamp 57 1 Reed Switch/Wire 58 1 Lower Wire 59...
... Pulse Grip 38 1 Pulley 39 1 Crank 40 2 Crank Bearing 41 2 Large Snap Ring 42 1 Eddy Mechanism 43 6 M8 Locknut 44 10 M8 x 12mm Screw 45 1 Idler 46 4 M8 Black Split Washer 47 1 Resistance Motor 48 1 M8 x 18mm Screw 49 5 Knob Nut 50 1 M8 x 76mm Bolt 51 1 J-bolt 52 4 #10 x 12mm Screw 53 4 M10 x 98mm Screw 54 1 Drive Belt 55 2 Magnet 56 1 Clamp 57 1 Reed Switch/Wire 58 1 Lower Wire 59...
English Manual
Page 32
... a lifetime. ICON Health & Fitness, Inc., 1500 S. 1000 W., Logan, UT 84321-9813 Part No. 364236 R1114A Printed in -home service, the customer will be free from the date of or in this product to the customer. ORDERING REPLACEMENT PARTS To order replacement parts, please see the front cover of this manual) LIMITED WARRANTY IMPORTANT: To protect your fitness equipment with an extended service plan, see the PART LIST and the...
... a lifetime. ICON Health & Fitness, Inc., 1500 S. 1000 W., Logan, UT 84321-9813 Part No. 364236 R1114A Printed in -home service, the customer will be free from the date of or in this product to the customer. ORDERING REPLACEMENT PARTS To order replacement parts, please see the front cover of this manual) LIMITED WARRANTY IMPORTANT: To protect your fitness equipment with an extended service plan, see the PART LIST and the...


