
English Manual
Page 1
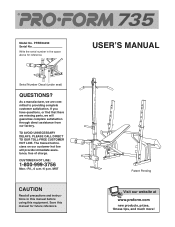
.... Serial Number Decal (under seat) QUESTIONS? If you have questions, or find that there are committed to providing complete customer satisfaction. MST CAUTION Read all precautions and instructions in the space above for future reference. Write the serial number in this manual before using this manual for reference. USERÕS MANUAL Patent Pending Visit our website at www.proform.com new products, prizes, fitness...
.... Serial Number Decal (under seat) QUESTIONS? If you have questions, or find that there are committed to providing complete customer satisfaction. MST CAUTION Read all precautions and instructions in the space above for future reference. Write the serial number in this manual before using this manual for reference. USERÕS MANUAL Patent Pending Visit our website at www.proform.com new products, prizes, fitness...
English Manual
Page 2
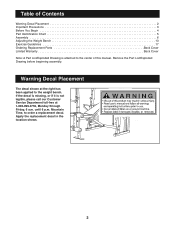
... Placement 2 Important Precautions 3 Before You Begin 4 Part Identification Chart 5 Assembly 6 Adjusting the Weight Bench 13 Exercise Guidelines 17 Ordering Replacement Parts Back Cover Limited Warranty Back Cover Note: A Part List/Exploded Drawing is not legible, please call our Customer Service Department toll-free at the right has been applied to order a replacement decal. Remove the Part List/Exploded Drawing before beginning assembly. Apply the replacement decal in the location shown. 2 Mountain Time, to the...
... Placement 2 Important Precautions 3 Before You Begin 4 Part Identification Chart 5 Assembly 6 Adjusting the Weight Bench 13 Exercise Guidelines 17 Ordering Replacement Parts Back Cover Limited Warranty Back Cover Note: A Part List/Exploded Drawing is not legible, please call our Customer Service Department toll-free at the right has been applied to order a replacement decal. Remove the Part List/Exploded Drawing before beginning assembly. Apply the replacement decal in the location shown. 2 Mountain Time, to the...
English Manual
Page 3
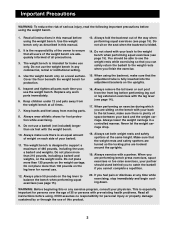
... leg curl or leg extension exercises with pre-existing health problems. Read all precautions. 3. Always remove the lat tower or curl post from moving parts. 8. Always lower the weight carriage in this or any worn parts immediately. 6. WARNING: Before beginning this manual. 13. Use the weight bench only as described in a controlled manner. Do not use the weight bench in this product. 3 Use the weight bench only on the seat when the backrest is folded. 2. adjustment...
... leg curl or leg extension exercises with pre-existing health problems. Read all precautions. 3. Always remove the lat tower or curl post from moving parts. 8. Always lower the weight carriage in this or any worn parts immediately. 6. WARNING: Before beginning this manual. 13. Use the weight bench only as described in a controlled manner. Do not use the weight bench in this product. 3 Use the weight bench only on the seat when the backrest is folded. 2. adjustment...
English Manual
Page 4
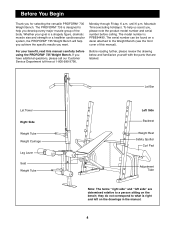
... Customer Service Department toll-free at 1-800-999-3756, Before reading further, please review the drawing below and familiarize yourself with the parts that are determined relative to what is designed to the Weight Bench (see the front cover of the body. Lat Tower Right Side Weight Tube Weight Carriage Leg Lever Seat Weight Tube Lat Bar Left Side Backrest Weight Rest Safety Spotter Curl Pad Adjustment Tube...
... Customer Service Department toll-free at 1-800-999-3756, Before reading further, please review the drawing below and familiarize yourself with the parts that are determined relative to what is designed to the Weight Bench (see the front cover of the body. Lat Tower Right Side Weight Tube Weight Carriage Leg Lever Seat Weight Tube Lat Bar Left Side Backrest Weight Rest Safety Spotter Curl Pad Adjustment Tube...
English Manual
Page 6
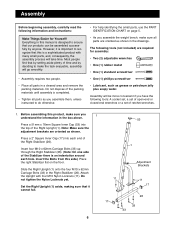
... sure the adjustment brackets are oriented as grease or petroleum jelly plus soapy water. Most people find that our products can be more convenient if you assemble the weight bench, make the task enjoyable, assembly will go smoothly. ¥ Assembly requires two people. ¥ Place all parts are oriented as you assemble them, unless instructed to ensure that by setting aside...
... sure the adjustment brackets are oriented as grease or petroleum jelly plus soapy water. Most people find that our products can be more convenient if you assemble the weight bench, make the task enjoyable, assembly will go smoothly. ¥ Assembly requires two people. ¥ Place all parts are oriented as you assemble them, unless instructed to ensure that by setting aside...
English Manual
Page 7
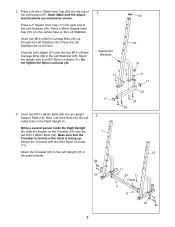
...Upright 3 Support Plate (16). Insert four M10 x 62mm Carriage Bolts (33) up . Slide the Left Upright (37) onto the four M10 x 62mm Carriage Bolts (33) in the same manner. 34 16 25 33 33 37 11 20 11 Decal 11 11 16 34 7 Attach the Crossbar (20) to the Left Upright (37) in the Left Stabilizer (25). Press...the top of the Left Stabilizer (25). Press a 51mm x 76mm Inner Cap (53) into each end of the Left Upright (37). Note: Make sure the adjustment brackets are oriented as shown. Do not tighten the Nylon Locknuts yet. 2 Adjustment Brackets 11 53 37 31 11 11 17...
...Upright 3 Support Plate (16). Insert four M10 x 62mm Carriage Bolts (33) up . Slide the Left Upright (37) onto the four M10 x 62mm Carriage Bolts (33) in the same manner. 34 16 25 33 33 37 11 20 11 Decal 11 11 16 34 7 Attach the Crossbar (20) to the Left Upright (37) in the Left Stabilizer (25). Press...the top of the Left Stabilizer (25). Press a 51mm x 76mm Inner Cap (53) into each end of the Left Upright (37). Note: Make sure the adjustment brackets are oriented as shown. Do not tighten the Nylon Locknuts yet. 2 Adjustment Brackets 11 53 37 31 11 11 17...
English Manual
Page 8
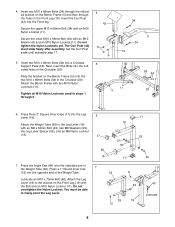
...Weight Tube (39). Tighten all M10 Nylon Locknuts used in the Front Leg (19). Attach the Weight Tube (39) to the Leg Lever (18) with an M10 Washer (6) and an M10 Nylon Locknut (11). Lubricate an M10 x 75mm Bolt (60). Do not overtighten the Nylon Locknut. 4. Set the Curl Post aside until assembly step... of the Weight Tube. Insert two M10 x 68mm Bolts (34) into the Leg 6 Lever (18). Attach the Bench Frame with an M10 Nylon Locknut (11). Press three 2Ó Square Inner Caps (17) into a Crossbar 5 Support Plate (59). You must slide freely after assembly. The Curl...
...Weight Tube (39). Tighten all M10 Nylon Locknuts used in the Front Leg (19). Attach the Weight Tube (39) to the Leg Lever (18) with an M10 Washer (6) and an M10 Nylon Locknut (11). Lubricate an M10 x 75mm Bolt (60). Do not overtighten the Nylon Locknut. 4. Set the Curl Post aside until assembly step... of the Weight Tube. Insert two M10 x 68mm Bolts (34) into the Leg 6 Lever (18). Attach the Bench Frame with an M10 Nylon Locknut (11). Press three 2Ó Square Inner Caps (17) into a Crossbar 5 Support Plate (59). You must slide freely after assembly. The Curl...

English Manual
Page 9
... of the Seat (14) to freely pivot the Backrest. Do not tighten the four Screws yet. 28 30 10. Slide an M10 Washer (6) onto the M10 x 155mm Bolt (22). Lubricate 22 Next, insert the M10 x 155mm Bolt (22) into each end of adjust- Attach the other side. 8. Attach one set of the Adjustment Tube (29). 8 Place the Adjustment Tube (29) in step 9. 27...
... of the Seat (14) to freely pivot the Backrest. Do not tighten the four Screws yet. 28 30 10. Slide an M10 Washer (6) onto the M10 x 155mm Bolt (22). Lubricate 22 Next, insert the M10 x 155mm Bolt (22) into each end of adjust- Attach the other side. 8. Attach one set of the Adjustment Tube (29). 8 Place the Adjustment Tube (29) in step 9. 27...
English Manual
Page 10
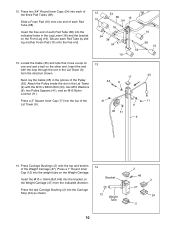
Locate the Cable (45) and note that it has a loop on 13 one end of each Pad Tube (38). Slide a Foam Pad (10) onto one end and a ball on the Front Leg (19). Insert the free end of each Pad Tube (38) into the Carriage Stop (24) as shown. 14 Bracket 12 Weight...the Weight Carriage. Insert the M10 x 19mm Bolt (46) into the weight tube on the Weight Carriage (47) from the direction shown. 45 17 Next, lay the Cable (45) in the Lat Tower 34 6 (9) with the M10 x 68mm Bolt (34), two M10 Washers (6), two Pulley Spacers (41), and an M10 Nylon Locknut (11). 12. Press ...
Locate the Cable (45) and note that it has a loop on 13 one end of each Pad Tube (38). Slide a Foam Pad (10) onto one end and a ball on the Front Leg (19). Insert the free end of each Pad Tube (38) into the Carriage Stop (24) as shown. 14 Bracket 12 Weight...the Weight Carriage. Insert the M10 x 19mm Bolt (46) into the weight tube on the Weight Carriage (47) from the direction shown. 45 17 Next, lay the Cable (45) in the Lat Tower 34 6 (9) with the M10 x 68mm Bolt (34), two M10 Washers (6), two Pulley Spacers (41), and an M10 Nylon Locknut (11). 12. Press ...

English Manual
Page 11
... Locknut (11). Insert the Lat Tower (9) into the Front Leg (19). Slide the Weight Carriage (47) onto the Lat Tower (9). 15 Make sure that the Carriage Stop is turned so the lip of the Carriage Bushing (2) is turned as shown. Attach the Cable with the Adjustment Knob (36). 9 47 13 2 24 9 36 19 11 15. Attach the Carriage Stop to the indicated hole...
... Locknut (11). Insert the Lat Tower (9) into the Front Leg (19). Slide the Weight Carriage (47) onto the Lat Tower (9). 15 Make sure that the Carriage Stop is turned so the lip of the Carriage Bushing (2) is turned as shown. Attach the Cable with the Adjustment Knob (36). 9 47 13 2 24 9 36 19 11 15. Attach the Carriage Stop to the indicated hole...

English Manual
Page 12
... use the weight bench. 17. Turn the Safety Spotters until the locking clips are properly tightened before you use of adjustment holes in the Uprights (1, 37). Press a 1Ó Round Inner Cap (32) into one set of all parts are hooked around the Uprights. Make sure that both Weight Rests are at the same height and that all remaining parts will be explained in ADJUSTING THE WEIGHT BENCH...
... use the weight bench. 17. Turn the Safety Spotters until the locking clips are properly tightened before you use of adjustment holes in the Uprights (1, 37). Press a 1Ó Round Inner Cap (32) into one set of all parts are hooked around the Uprights. Make sure that both Weight Rests are at the same height and that all remaining parts will be explained in ADJUSTING THE WEIGHT BENCH...
English Manual
Page 13
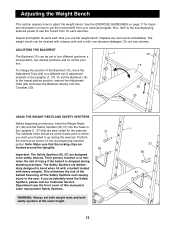
... Backrest directly onto the Crossbar (20). 1 37 15 29 20 USING THE WEIGHT RESTS AND SAFETY SPOTTERS Before beginning an exercise, insert the Weight Rests (21, 58) and the Safety Spotters (56, 57) into the holes in the Uprights (1, 37). The weight bench can be cleaned with heavy weights. If you use solvents. Inspect and tighten all parts each exercise. To set to adjust the weight bench.
... Backrest directly onto the Crossbar (20). 1 37 15 29 20 USING THE WEIGHT RESTS AND SAFETY SPOTTERS Before beginning an exercise, insert the Weight Rests (21, 58) and the Safety Spotters (56, 57) into the holes in the Uprights (1, 37). The weight bench can be cleaned with heavy weights. If you use solvents. Inspect and tighten all parts each exercise. To set to adjust the weight bench.

English Manual
Page 14
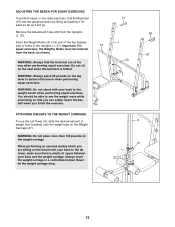
... Pad Tube (38), remove one Foam Pad (10). ATTACHING THE CURL POST OR LAT TOWER For some exercises, you fully tighten the Adjustment Knob. Insert the Lat Tower (9) into the other exercises, the Lat Tower (9) must be stored in the Front Leg (19). Make sure that you should store these parts away from the weight bench so they can be adjusted to either a high position...
... Pad Tube (38), remove one Foam Pad (10). ATTACHING THE CURL POST OR LAT TOWER For some exercises, you fully tighten the Adjustment Knob. Insert the Lat Tower (9) into the other exercises, the Lat Tower (9) must be stored in the Front Leg (19). Make sure that you should store these parts away from the weight bench so they can be adjusted to either a high position...
English Manual
Page 15
... should be inserted from the Uprights (1, 37). ADJUSTING THE BENCH FOR SQUAT EXERCISES To perform squat or toe raise exercises, fold the Backrest (15) into one of the two highest sets of holes in a controlled manner. Remove the Adjustment Tube (29) from the back, as it forward as far as shown. ATTACHING WEIGHTS TO THE WEIGHT CARRIAGE To use the Lat Tower (9), slide the desired...
... should be inserted from the Uprights (1, 37). ADJUSTING THE BENCH FOR SQUAT EXERCISES To perform squat or toe raise exercises, fold the Backrest (15) into one of the two highest sets of holes in a controlled manner. Remove the Adjustment Tube (29) from the back, as it forward as far as shown. ATTACHING WEIGHTS TO THE WEIGHT CARRIAGE To use the Lat Tower (9), slide the desired...

English Manual
Page 16
ATTACHING THE LAT BAR TO THE LAT TOWER To use the Lat Tower (9), attach the Lat Bar (51) to the Cable (45) with a Cable Clip (40). 45 40 9 51 16
ATTACHING THE LAT BAR TO THE LAT TOWER To use the Lat Tower (9), attach the Lat Bar (51) to the Cable (45) with a Cable Clip (40). 45 40 9 51 16
English Manual
Page 17
... proper intensity level in each set should be performed smoothly and without difficulty, increase the amount of weight. Cross Training Many people desire a complete and well-balanced fitness program, and cross training is one full day each workout with it during the return stroke. This requires moving only the appropriate parts of the body. Exercising in any time while exercising, stop immediately and begin cooling...
... proper intensity level in each set should be performed smoothly and without difficulty, increase the amount of weight. Cross Training Many people desire a complete and well-balanced fitness program, and cross training is one full day each workout with it during the return stroke. This requires moving only the appropriate parts of the body. Exercising in any time while exercising, stop immediately and begin cooling...
English Manual
Page 18
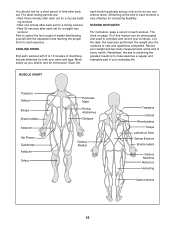
... of time after each set for both your everyday life. List the date, the exercises performed, the weight plus the numbers of every month. Ease into each exercise. Record your weight and key body measurements at the end of your arms and legs. COOLING DOWN End each workout with the equipment and learning the proper form for increasing flexibility. The chart on page 19...
... of time after each set for both your everyday life. List the date, the exercises performed, the weight plus the numbers of every month. Ease into each exercise. Record your weight and key body measurements at the end of your arms and legs. COOLING DOWN End each workout with the equipment and learning the proper form for increasing flexibility. The chart on page 19...
English Manual
Page 19
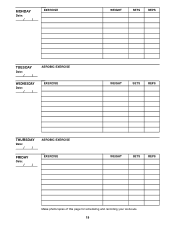
MONDAY Date: / / EXERCISE WEIGHT SETS REPS TUESDAY Date: / / WEDNESDAY Date: / / AEROBIC EXERCISE EXERCISE WEIGHT SETS REPS THURSDAY Date: / / FRIDAY Date: / / AEROBIC EXERCISE EXERCISE WEIGHT SETS REPS Make photocopies of this page for scheduling and recording your workouts. 19
MONDAY Date: / / EXERCISE WEIGHT SETS REPS TUESDAY Date: / / WEDNESDAY Date: / / AEROBIC EXERCISE EXERCISE WEIGHT SETS REPS THURSDAY Date: / / FRIDAY Date: / / AEROBIC EXERCISE EXERCISE WEIGHT SETS REPS Make photocopies of this page for scheduling and recording your workouts. 19
English Manual
Page 20
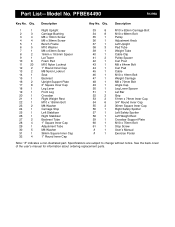
Part ListÑModel No. PFBE64490 R1299A Key No. Qty. See the back cover of the userÕs manual for information about ordering replacement parts. Description Key No. Specifications are subject to change without notice. Description 1 1 Right Upright 2 3 Carriage Bushing 3 4 M6 x 16mm Screw 4 4 M6 x 38mm Screw 5 1 Bench Frame 6 5 M10 Washer 7 1 M6 x 63mm Screw 8 2 16mm x 18.5mm Spacer 9 1 Lat Tower 10 6 Foam Pad 11 20 M10 Nylon Locknut 12 2 1Ó Round...
Part ListÑModel No. PFBE64490 R1299A Key No. Qty. See the back cover of the userÕs manual for information about ordering replacement parts. Description Key No. Specifications are subject to change without notice. Description 1 1 Right Upright 2 3 Carriage Bushing 3 4 M6 x 16mm Screw 4 4 M6 x 38mm Screw 5 1 Bench Frame 6 5 M10 Washer 7 1 M6 x 63mm Screw 8 2 16mm x 18.5mm Spacer 9 1 Lat Tower 10 6 Foam Pad 11 20 M10 Nylon Locknut 12 2 1Ó Round...
English Manual
Page 22
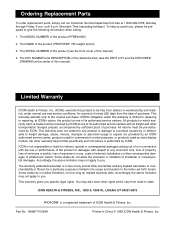
... you . The MODEL NUMBER of the product (PROFORM¨ 735 weight bench) 3. The NAME of the product (PFBE64490) 2. All returns must be pre-authorized by ICON. No other warranty beyond that specifically set forth herein. The KEY NUMBER and DESCRIPTION of the desired part(s) (see the front cover of this manual) 4. Limited Warranty ICON Health & Fitness, Inc. (ICON), warrants this product to be prepared to you , please be free from defects in...
... you . The MODEL NUMBER of the product (PROFORM¨ 735 weight bench) 3. The NAME of the product (PFBE64490) 2. All returns must be pre-authorized by ICON. No other warranty beyond that specifically set forth herein. The KEY NUMBER and DESCRIPTION of the desired part(s) (see the front cover of this manual) 4. Limited Warranty ICON Health & Fitness, Inc. (ICON), warrants this product to be prepared to you , please be free from defects in...

