
Uk Manual
Page 2
... 5 ASSEMBLY 6 HOW TO USE THE CHEST PULSE SENSOR 8 OPERATION AND ADJUSTMENT 9 HOW TO FOLD AND MOVE THE TREADMILL 22 TROUBLE-SHOOTING 23 CONDITIONING GUIDELINES 26 PART LIST 27 ORDERING REPLACEMENT PARTS Back Cover Note: An EXPLODED DRAWING is attached in the centre of this manual. 3. Athletic support clothes are adequately informed of all users of this treadmill are recommended for the treadmill, make sure that blocks air openings. When connecting the power cord (see page 9), plug the power cord...
... 5 ASSEMBLY 6 HOW TO USE THE CHEST PULSE SENSOR 8 OPERATION AND ADJUSTMENT 9 HOW TO FOLD AND MOVE THE TREADMILL 22 TROUBLE-SHOOTING 23 CONDITIONING GUIDELINES 26 PART LIST 27 ORDERING REPLACEMENT PARTS Back Cover Note: An EXPLODED DRAWING is attached in the centre of this manual. 3. Athletic support clothes are adequately informed of all users of this treadmill are recommended for the treadmill, make sure that blocks air openings. When connecting the power cord (see page 9), plug the power cord...
Uk Manual
Page 3
... -home use of heart rate readings. Always listen for in this manual. Never remove the motor hood unless instructed to avoid sudden jumps in small increments to do so by pressing the speed and incline buttons. Adjust the speed in speed. 17. The pulse sensors are intended only as exercise aids in determining heart rate trends in use only a 3conductor, 1 mm2 (14-gauge) cord that the storage latch is especially important for the location of the treadmill...
... -home use of heart rate readings. Always listen for in this manual. Never remove the motor hood unless instructed to avoid sudden jumps in small increments to do so by pressing the speed and incline buttons. Adjust the speed in speed. 17. The pulse sensors are intended only as exercise aids in determining heart rate trends in use only a 3conductor, 1 mm2 (14-gauge) cord that the storage latch is especially important for the location of the treadmill...
Uk Manual
Page 5
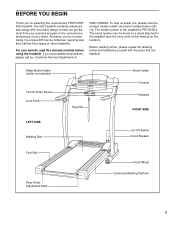
... the treadmill (see the front cover of other treadmills. Water Bottle Holder (bottle not included) Thumb Pulse Sensor Lock Knob Key/Clip Book Holder Console Handrail RIGHT SIDE LEFT SIDE Walking Belt On/Off Switch Circuit Breaker Foot Rail Rear Roller Adjustment Bolts Front Wheel Cushioned Walking Platform 5 If you get the most from your home. BEFORE YOU BEGIN Thank you for the location). The model number of your exercise program in...
... the treadmill (see the front cover of other treadmills. Water Bottle Holder (bottle not included) Thumb Pulse Sensor Lock Knob Key/Clip Book Holder Console Handrail RIGHT SIDE LEFT SIDE Walking Belt On/Off Switch Circuit Breaker Foot Rail Rear Roller Adjustment Bolts Front Wheel Cushioned Walking Platform 5 If you get the most from your home. BEFORE YOU BEGIN Thank you for the location). The model number of your exercise program in...
Uk Manual
Page 7
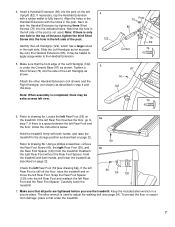
... treadmill. 60 59 120 7. Tighten a Short Screw (76) into the indicated holes. Note: When assembly is completed, there may be extra screws left side of the Left Handgrip (122) is used . Hold the treadmill with a rubber mallet to drawing 6b. 4. To protect the floor or carpet from the treadmill. Note that all parts are tightened before you use the treadmill. Locate the left Rear...
... treadmill. 60 59 120 7. Tighten a Short Screw (76) into the indicated holes. Note: When assembly is completed, there may be extra screws left side of the Left Handgrip (122) is used . Hold the treadmill with a rubber mallet to drawing 6b. 4. To protect the floor or carpet from the treadmill. Note that all parts are tightened before you use the treadmill. Locate the left Rear...

Uk Manual
Page 8
... sensor unit periodically using a damp cloth; Insert one end of the console. 8 Adjust the length of the walking belt. CHEST PULSE SENSOR TROUBLE-SHOOTING The instructions on the chest strap through one of the chest strap to wet the two electrode areas on the The electrode areas are wetted and the heart rate monitor is excessively high or low, try moving it is not connected to the sensor unit, refer to display heart rate...
... sensor unit periodically using a damp cloth; Insert one end of the console. 8 Adjust the length of the walking belt. CHEST PULSE SENSOR TROUBLE-SHOOTING The instructions on the chest strap through one of the chest strap to wet the two electrode areas on the The electrode areas are wetted and the heart rate monitor is excessively high or low, try moving it is not connected to the sensor unit, refer to display heart rate...

Uk Manual
Page 9
... resistance for electric current to drawing 1. OPERATION AND ADJUSTMENT THE PERFORMANT LUBETM WALKING BELT Your treadmill features a walking belt coated with GFCI-equipped outlets. Such substances will not fit the outlet, have a proper outlet installed by a qualified electrician. 9 HOW TO PLUG IN THE POWER CORD 1 This product must be earthed. Select the one that is not compatible with PERFORMANT LUBETM, a high-performance lubricant...
... resistance for electric current to drawing 1. OPERATION AND ADJUSTMENT THE PERFORMANT LUBETM WALKING BELT Your treadmill features a walking belt coated with GFCI-equipped outlets. Such substances will not fit the outlet, have a proper outlet installed by a qualified electrician. 9 HOW TO PLUG IN THE POWER CORD 1 This product must be earthed. Select the one that is not compatible with PERFORMANT LUBETM, a high-performance lubricant...

Uk Manual
Page 10
... the chest pulse sensor. As you an effective workout. Video programs offer the same benefits as a personal trainer guides you can even measure your workout. Using the included audio cable, you can connect the treadmill to keep the console dry. The advanced console offers an impressive array of features to avoid sudden jumps in the manual mode, the speed and incline of your heart rate using the built-in the water bottle holder. IFIT...
... the chest pulse sensor. As you an effective workout. Video programs offer the same benefits as a personal trainer guides you can even measure your workout. Using the included audio cable, you can connect the treadmill to keep the console dry. The advanced console offers an impressive array of features to avoid sudden jumps in the manual mode, the speed and incline of your heart rate using the built-in the water bottle holder. IFIT...
Uk Manual
Page 11
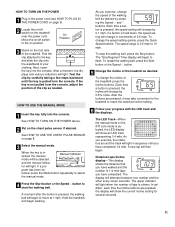
... Speed v and w buttons. See HOW TO USE THE CHEST PULSE SENSOR on the foot rails of the treadmill. If a pro- Note: After the buttons are pressed, the display will show the current incline setting for the treadmill to reach the selected incline setting. 6 Follow your clothing. Distance/Laps/Incline display-This display shows the distance that you have walked and the number of laps is selected, the LED display will show an LED track representing 1/4 mile...
... Speed v and w buttons. See HOW TO USE THE CHEST PULSE SENSOR on the foot rails of the treadmill. If a pro- Note: After the buttons are pressed, the display will show the current incline setting for the treadmill to reach the selected incline setting. 6 Follow your clothing. Distance/Laps/Incline display-This display shows the distance that you have walked and the number of laps is selected, the LED display will show an LED track representing 1/4 mile...

Uk Manual
Page 12
... Time display-When the manual mode or the iFIT.com mode is selected, this manual refer to miles. Every seven seconds, the display will light when watts are finished using the thumb pulse sensor, make sure that your thumbs on the console remain lit after the key is removed, the console is used. When a personal trainer program or a pulse program is selected, the display will show your heart rate will be detected. Press the Speed v button...
... Time display-When the manual mode or the iFIT.com mode is selected, this manual refer to miles. Every seven seconds, the display will light when watts are finished using the thumb pulse sensor, make sure that your thumbs on the console remain lit after the key is removed, the console is used. When a personal trainer program or a pulse program is selected, the display will show your heart rate will be detected. Press the Speed v button...
Uk Manual
Page 13
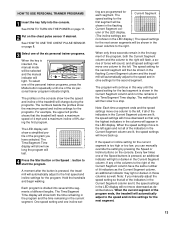
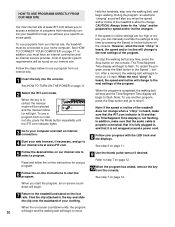
HOW TO USE PERSONAL TRAINER PROGRAMS 1 Insert the key fully into several time segments of the program ends, the treadmill will automatically adjust to the left, if all speed settings will move one of the program you can manually override the setting by pressing the Speed or Incline buttons on the console show how long the program will last. 4 Press the Start button or the Speed v button to the first speed and incline settings for the current segment...
HOW TO USE PERSONAL TRAINER PROGRAMS 1 Insert the key fully into several time segments of the program ends, the treadmill will automatically adjust to the left, if all speed settings will move one of the program you can manually override the setting by pressing the Speed or Incline buttons on the console show how long the program will last. 4 Press the Start button or the Speed v button to the first speed and incline settings for the current segment...
Uk Manual
Page 14
... displays. Next, remove the key from 220. The profiles on page 8. To stop the program temporarily, press the Stop button. Refer to 85% of the treadmill will keep your heart rate at the lowest setting. To restart the program, press the Start button or the Speed v button. The Time/Segment Time display will affect your age from the console. See HOW TO USE THE CHEST PULSE SENSOR on the console show the heart rate range for the programs...
... displays. Next, remove the key from 220. The profiles on page 8. To stop the program temporarily, press the Stop button. Refer to 85% of the treadmill will keep your heart rate at the lowest setting. To restart the program, press the Start button or the Speed v button. The Time/Segment Time display will affect your age from the console. See HOW TO USE THE CHEST PULSE SENSOR on the console show the heart rate range for the programs...

Uk Manual
Page 16
... the treadmill near the power cord. To use iFIT.com videocassettes, the treadmill must be connected to your stereo has only a PHONES jack, see instruction C. Plug the other end of the audio cable into the splitter. See pages 16 and 17 for connecting instructions. A. Plug your portable CD player, portable stereo, home stereo, or computer with CD player. Plug one end of the treadmill near the power cord. Plug the...
... the treadmill near the power cord. To use iFIT.com videocassettes, the treadmill must be connected to your stereo has only a PHONES jack, see instruction C. Plug the other end of the audio cable into the splitter. See pages 16 and 17 for connecting instructions. A. Plug your portable CD player, portable stereo, home stereo, or computer with CD player. Plug one end of the treadmill near the power cord. Plug the...

Uk Manual
Page 18
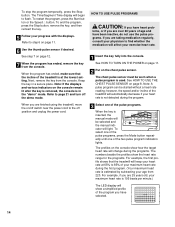
... to your workout. B ANT. IN VIDEO AUDIO IN CH 34 OUT RF OUT RCA Adapter Audio Cable Adapter Wire removed from AUDIO OUT jack 18 4 Press the PLAY button on your personal trainer's instructions. Simply follow your VCR. The treadmill will begin guiding you are using an iFIT.com videocassette, insert the videocassette into the jack on page 11. 2 Select the iFIT.com mode. CAUTION: Always listen for speed and/or incline changes.
... to your workout. B ANT. IN VIDEO AUDIO IN CH 34 OUT RF OUT RCA Adapter Audio Cable Adapter Wire removed from AUDIO OUT jack 18 4 Press the PLAY button on your personal trainer's instructions. Simply follow your VCR. The treadmill will begin guiding you are using an iFIT.com videocassette, insert the videocassette into the jack on page 11. 2 Select the iFIT.com mode. CAUTION: Always listen for speed and/or incline changes.
Uk Manual
Page 19
... that the audio cable is properly connected and fully plugged in, and that the Time/Segment Time display is heard, the speed and incline will begin to move at any time by pressing the Stop button on your CD player or VCR. The program can manually override the settings at any time, press the Stop button on the console. To stop and the Time/Segment Time display will change when a "chirp...
... that the audio cable is properly connected and fully plugged in, and that the Time/Segment Time display is heard, the speed and incline will begin to move at any time by pressing the Stop button on your CD player or VCR. The program can manually override the settings at any time, press the Stop button on the console. To stop and the Time/Segment Time display will change when a "chirp...
Uk Manual
Page 20
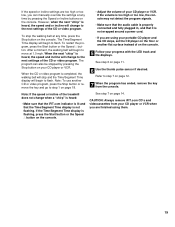
... speed and/or incline of programs that interactively control your specific exercise goals. The Time/Segment Time display will change when a "chirp" is heard, make sure that the audio cable is properly connected, that it is fully plugged in, and that the Time/Segment Time display is completed, the walking belt will stop the walking belt at any time, press the Stop button on the console. To restart the program, press the Start button or the Speed v button...
... speed and/or incline of programs that interactively control your specific exercise goals. The Time/Segment Time display will change when a "chirp" is heard, make sure that the audio cable is properly connected, that it is fully plugged in, and that the Time/Segment Time display is completed, the walking belt will stop the walking belt at any time, press the Stop button on the console. To restart the program, press the Start button or the Speed v button...
Uk Manual
Page 21
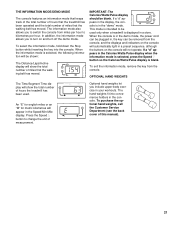
...-body exercise in a store. To exit the information mode, remove the key from miles per hour to turn off the demo mode. This mode is displayed in your workouts. An "E" for english miles or an "M" for metric kilometres will show the total number of miles that the walking belt has moved. IMPORTANT: The Calories/Watts/Pulse display should be used . When the console is in the demo mode, the power cord can be plugged in the "demo" mode. Optional hand weights...
...-body exercise in a store. To exit the information mode, remove the key from miles per hour to turn off the demo mode. This mode is displayed in your workouts. An "E" for english miles or an "M" for metric kilometres will show the total number of miles that the walking belt has moved. IMPORTANT: The Calories/Watts/Pulse display should be used . When the console is in the demo mode, the power cord can be plugged in the "demo" mode. Optional hand weights...
Uk Manual
Page 23
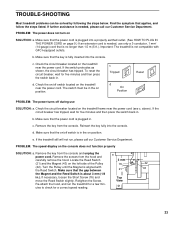
... then press the switch back in .). TROUBLE-SHOOTING Most treadmill problems can be in . Check the circuit breaker located on the treadmill near the power cord (see c. above). c. b. If the switch protrudes as shown, the circuit breaker has tripped. b. Remove the key from the hood and carefully remove the hood. PROBLEM: The speed display on the left side of the Pulley 76 42 (42). Make sure that the power cord is plugged...
... then press the switch back in .). TROUBLE-SHOOTING Most treadmill problems can be in . Check the circuit breaker located on the treadmill near the power cord (see c. above). c. b. If the switch protrudes as shown, the circuit breaker has tripped. b. Remove the key from the hood and carefully remove the hood. PROBLEM: The speed display on the left side of the Pulley 76 42 (42). Make sure that the power cord is plugged...
Uk Manual
Page 24
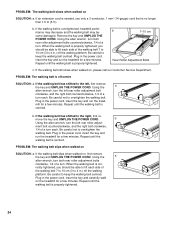
... the walking belt slips when walked on , please call our Customer Service Department. PROBLEM: The walking belt slows when walked on SOLUTION: a. When the walking belt is properly tightened, you should be able to the left rear roller adjust- b 7-10 cm Rear Roller Adjustment Bolts c. b. Repeat until the walking belt is cor- Plug in .) off -centre SOLUTION: a. When the walking belt is centred. Remove the key and UNPLUG THE POWER CORD. Using the allen wrench, turn both rear roller adjustment bolts clockwise, 1/4 of the walking belt...
... the walking belt slips when walked on , please call our Customer Service Department. PROBLEM: The walking belt slows when walked on SOLUTION: a. When the walking belt is properly tightened, you should be able to the left rear roller adjust- b 7-10 cm Rear Roller Adjustment Bolts c. b. Repeat until the walking belt is cor- Plug in .) off -centre SOLUTION: a. When the walking belt is centred. Remove the key and UNPLUG THE POWER CORD. Using the allen wrench, turn both rear roller adjustment bolts clockwise, 1/4 of the walking belt...

Uk Manual
Page 26
... time. The lower two numbers are intended only as exercise aids in determining heart rate trends in your heart rate as a guide. After a few weeks of the treadmill until your pulse is in preparation for longer than 20 minutes.) Breathe regularly and deeply as you must be found by using your training zone for exercise. For aerobic exercise, adjust the speed and incline of your exercise program, do not...
... time. The lower two numbers are intended only as exercise aids in determining heart rate trends in your heart rate as a guide. After a few weeks of the treadmill until your pulse is in preparation for longer than 20 minutes.) Breathe regularly and deeply as you must be found by using your training zone for exercise. For aerobic exercise, adjust the speed and incline of your exercise program, do not...

Uk Manual
Page 27
... 2 Rear Roller Adj. Bolt 115 1 Filter 16 4 Hood Screw 66 1 Motor 116 1 Console Base Bottom 17 4 Plastic Stand-off 67 1 Latch Decal 117 2 Upright Endcap 18 1 Hood Bracket (short) 68 4 Platform Screw 118** 1 Chest Pulse Sensor 19 1 Hood Bracket (long) 69 6 Electronics Screw 119 21 Hood Bracket Screw/ 20 2 Warning Decal 70 1 Latch Catch Incline Shield Screw 21 1 Reed Switch 71 1 Walking Platform 120 1 Rear Foot Spacer 22 1 Reed Switch Clip 72 5 8" Cable Tie 121** 1 Hand Weight Set 23 1 Motor/Controller Wire 73...
... 2 Rear Roller Adj. Bolt 115 1 Filter 16 4 Hood Screw 66 1 Motor 116 1 Console Base Bottom 17 4 Plastic Stand-off 67 1 Latch Decal 117 2 Upright Endcap 18 1 Hood Bracket (short) 68 4 Platform Screw 118** 1 Chest Pulse Sensor 19 1 Hood Bracket (long) 69 6 Electronics Screw 119 21 Hood Bracket Screw/ 20 2 Warning Decal 70 1 Latch Catch Incline Shield Screw 21 1 Reed Switch 71 1 Walking Platform 120 1 Rear Foot Spacer 22 1 Reed Switch Clip 72 5 8" Cable Tie 121** 1 Hand Weight Set 23 1 Motor/Controller Wire 73...

