
Uk Manual
Page 2
.... 6. IMPORTANT PRECAUTIONS WARNING: To reduce the risk of burns, fire, electric shock, or injury to an electrical plug. 7. Place the treadmill on ASTA approved BS1362 type should not be fitted to ensure that blocks air openings. Always wear athletic shoes. Use the...PRECAUTIONS 2 BEFORE YOU BEGIN 5 ASSEMBLY 6 HOW TO USE THE CHEST PULSE SENSOR 8 OPERATION AND ADJUSTMENT 9 HOW TO FOLD AND MOVE THE TREADMILL 22 TROUBLE-SHOOTING 23 CONDITIONING GUIDELINES 26 PART LIST 27 ORDERING REPLACEMENT PARTS Back Cover Note: An EXPLODED DRAWING is attached in the centre of...
.... 6. IMPORTANT PRECAUTIONS WARNING: To reduce the risk of burns, fire, electric shock, or injury to an electrical plug. 7. Place the treadmill on ASTA approved BS1362 type should not be fitted to ensure that blocks air openings. Always wear athletic shoes. Use the...PRECAUTIONS 2 BEFORE YOU BEGIN 5 ASSEMBLY 6 HOW TO USE THE CHEST PULSE SENSOR 8 OPERATION AND ADJUSTMENT 9 HOW TO FOLD AND MOVE THE TREADMILL 22 TROUBLE-SHOOTING 23 CONDITIONING GUIDELINES 26 PART LIST 27 ORDERING REPLACEMENT PARTS Back Cover Note: An EXPLODED DRAWING is attached in the centre of...

Uk Manual
Page 3
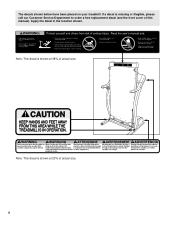
...the on /off switch.) 19. Various factors, including the user's movement, may change before the personal trainer describes the change . Never leave the treadmill unattended whilst it is heard, the speed and/or incline will alert you are not medical devices. However, when the next "chirp" is properly... exercise aids in determining heart rate trends in this manual. Never remove the motor hood unless instructed to raise, lower, or move the treadmill until it is not working properly.) 15. Always remove iFIT.com CD's and videos from heated surfaces. 14. Never insert or drop...
...the on /off switch.) 19. Various factors, including the user's movement, may change before the personal trainer describes the change . Never leave the treadmill unattended whilst it is heard, the speed and/or incline will alert you are not medical devices. However, when the next "chirp" is properly... exercise aids in determining heart rate trends in this manual. Never remove the motor hood unless instructed to raise, lower, or move the treadmill until it is not working properly.) 15. Always remove iFIT.com CD's and videos from heated surfaces. 14. Never insert or drop...
Uk Manual
Page 4
Note: This decal is shown at 20% of actual size. 4 Note: This decal is missing or illegible, please call our Customer Service Department to order a free replacement decal (see the front cover of actual size. Apply the decal in the location shown. The decals shown below have been placed on your treadmill. If a decal is shown at 38% of this manual).
Note: This decal is shown at 20% of actual size. 4 Note: This decal is missing or illegible, please call our Customer Service Department to order a free replacement decal (see the front cover of actual size. Apply the decal in the location shown. The decals shown below have been placed on your treadmill. If a decal is shown at 38% of this manual).
Uk Manual
Page 5
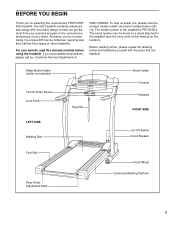
..., please review the drawing below and familiarise yourself with innovative design to the treadmill (see the front cover of your benefit, read this manual for selecting the revolutionary PROFORM® 635 treadmill. Water Bottle Holder (bottle not included) Thumb Pulse Sensor Lock Knob Key/Clip...Cushioned Walking Platform 5 And when you , please note the product model number and serial number before using the treadmill. For your home. The 635 treadmill combines advanced technology with the parts that are labelled. To help you have additional questions, please call our ...
..., please review the drawing below and familiarise yourself with innovative design to the treadmill (see the front cover of your benefit, read this manual for selecting the revolutionary PROFORM® 635 treadmill. Water Bottle Holder (bottle not included) Thumb Pulse Sensor Lock Knob Key/Clip...Cushioned Walking Platform 5 And when you , please note the product model number and serial number before using the treadmill. For your home. The 635 treadmill combines advanced technology with the parts that are labelled. To help you have additional questions, please call our ...

Uk Manual
Page 6
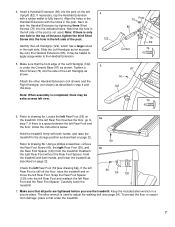
... the bottom. Make sure that the Extension Leg is turned so the Thick Base Pad (11) is on the floor. 1 103 11 2. Next, tip the treadmill to be transferred to the position shown at the right. Attach each Extension Leg (103) with two Screws (101) and a Base Pad (97) as 2 shown... worn and needs to the other side and insert the other Extension Leg (not shown) in the same way. During shipping, a small amount of the treadmill so that the Extension Legs (103) re- With the help of the walking belt, simply wipe off the lubricant with high-performance lubricant. Note: One...
... the bottom. Make sure that the Extension Leg is turned so the Thick Base Pad (11) is on the floor. 1 103 11 2. Next, tip the treadmill to be transferred to the position shown at the right. Attach each Extension Leg (103) with two Screws (101) and a Base Pad (97) as 2 shown... worn and needs to the other side and insert the other Extension Leg (not shown) in the same way. During shipping, a small amount of the treadmill so that the Extension Legs (103) re- With the help of the walking belt, simply wipe off the lubricant with high-performance lubricant. Note: One...
Uk Manual
Page 7
...the side of the post. If necessary, tap the Handrail Extension with both hands, and lower the treadmill as shown. Make sure that all parts are tightened before you use the treadmill. Hold the treadmill with the holes in the top of the post is completed, there may be extra screws left Rear... the Rear Foot Spacer (120) onto the left Rear Foot and reattach the left Rear Foot (59 [see page 24). If there is under the treadmill. 7 Insert a Handrail Extension (85) into the hole in step 4 and this step. Slide the Left Handgrip as far as described in the left Rear Foot...
...the side of the post. If necessary, tap the Handrail Extension with both hands, and lower the treadmill as shown. Make sure that all parts are tightened before you use the treadmill. Hold the treadmill with the holes in the top of the post is completed, there may be extra screws left Rear... the Rear Foot Spacer (120) onto the left Rear Foot and reattach the left Rear Foot (59 [see page 24). If there is under the treadmill. 7 Insert a Handrail Extension (85) into the hole in step 4 and this step. Slide the Left Handgrip as far as described in the left Rear Foot...

Uk Manual
Page 8
... SENSOR HOW TO PUT ON THE CHEST PULSE SENSOR CHEST PULSE SENSOR CARE AND MAINTENANCE Before you use . Insert one of the tabs on the treadmill, position your chest.
... SENSOR HOW TO PUT ON THE CHEST PULSE SENSOR CHEST PULSE SENSOR CARE AND MAINTENANCE Before you use . Insert one of the tabs on the treadmill, position your chest.

Uk Manual
Page 9
Such substances will not fit the outlet, have a proper outlet installed by a qualified electrician. 9 Socket on the treadmill. Important: The tread- Outlet Use only a power cord type H05VV-F with GFCI-equipped outlets. Plug the indicated end of the ... to the walking belt or the walking platform. DANGER: Improper connection of electric shock. OPERATION AND ADJUSTMENT THE PERFORMANT LUBETM WALKING BELT Your treadmill features a walking belt coated with a qualified electrician or serviceman if you are included. IMPORTANT: Never apply silicone spray or other substances to...
Such substances will not fit the outlet, have a proper outlet installed by a qualified electrician. 9 Socket on the treadmill. Important: The tread- Outlet Use only a power cord type H05VV-F with GFCI-equipped outlets. Plug the indicated end of the ... to the walking belt or the walking platform. DANGER: Improper connection of electric shock. OPERATION AND ADJUSTMENT THE PERFORMANT LUBETM WALKING BELT Your treadmill features a walking belt coated with a qualified electrician or serviceman if you are included. IMPORTANT: Never apply silicone spray or other substances to...

Uk Manual
Page 10
...console, follow the steps beginning on page 11. The advanced console offers an impressive array of features to give you can connect the treadmill to your home stereo, portable stereo, or computer and play iFIT.com video programs (videocassettes are available separately). As you can also..., you an effective workout. Avoid spilling liquids on the face of your workout. Each program automatically controls the speed and incline of the treadmill to help you through every step of the console, remove it. To use a pulse program, see page 14. Manual/Program Indicators Displays...
...console, follow the steps beginning on page 11. The advanced console offers an impressive array of features to give you can connect the treadmill to your home stereo, portable stereo, or computer and play iFIT.com video programs (videocassettes are available separately). As you can also..., you an effective workout. Avoid spilling liquids on the face of your workout. Each program automatically controls the speed and incline of the treadmill to help you through every step of the console, remove it. To use a pulse program, see page 14. Manual/Program Indicators Displays...
Uk Manual
Page 11
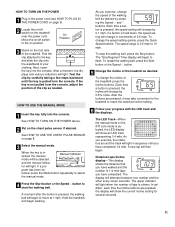
... 8. 3 Select the manual mode. To restart the walking belt, press the Start button or the Speed v button. 5 Change the incline of the treadmill, press the Incline buttons. The display will light. The upper indicator will change by pressing the Speed v and w buttons. On Position 3 Stand on.... if a button is selected, the LED display will begin walking. The Time/Segment Time display will show the current incline setting for the treadmill to reach the selected incline setting. 6 Follow your clothing. To change the speed of your progress with the LED track and the displays. ...
... 8. 3 Select the manual mode. To restart the walking belt, press the Start button or the Speed v button. 5 Change the incline of the treadmill, press the Incline buttons. The display will light. The upper indicator will change by pressing the Speed v and w buttons. On Position 3 Stand on.... if a button is selected, the LED display will begin walking. The Time/Segment Time display will show the current incline setting for the treadmill to reach the selected incline setting. 6 Follow your clothing. To change the speed of your progress with the LED track and the displays. ...

Uk Manual
Page 12
... sure that your hands are finished, remove the key. Step onto the foot rails, press the stop button, and adjust the incline of the treadmill to change the unit of the walking belt and your current pace (pace is in the display. When a personal trainer program or a pulse program... off position and unplug the power cord. 12 Note: For simplicity, all instructions in a secure place. Remember to stand still whilst using the treadmill, move the on the sensor for another 15 seconds for metric kilometres will alternate between one number and the other every seven seconds. Time/Segment...
... sure that your hands are finished, remove the key. Step onto the foot rails, press the stop button, and adjust the incline of the treadmill to change the unit of the walking belt and your current pace (pace is in the display. When a personal trainer program or a pulse program... off position and unplug the power cord. 12 Note: For simplicity, all instructions in a secure place. Remember to stand still whilst using the treadmill, move the on the sensor for another 15 seconds for metric kilometres will alternate between one number and the other every seven seconds. Time/Segment...
Uk Manual
Page 13
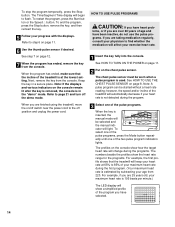
...The incline settings are programmed for the current segment is inserted, the manual mode will be shown in the flashing Current Segment column and the treadmill will automatically adjust to the right of the Speed buttons is shown in the Current Segment column and no time remains in the LED display... will move one column to the left. The walking belt will then slow to the left profile shows that all of the treadmill will change during the programs. The numbers beside the profiles show how long the program will light. If any of 8% during the first program...
...The incline settings are programmed for the current segment is inserted, the manual mode will be shown in the flashing Current Segment column and the treadmill will automatically adjust to the right of the Speed buttons is shown in the Current Segment column and no time remains in the LED display... will move one column to the left. The walking belt will then slow to the left profile shows that all of the treadmill will change during the programs. The numbers beside the profiles show how long the program will light. If any of 8% during the first program...
Uk Manual
Page 14
...keep your exercise heart rate. 1 Insert the key fully into the console. HOW TO USE PULSE PROGRAMS CAUTION: If you are finished using the treadmill, move the on the console remain lit after the key is removed, the console is used. See step 7 on the chest pulse sensor. ... reinsert the key. 5 Follow your physician to 85% of the two pulse program indicators lights. however, the speed and/or incline of the treadmill will automatically decrease if your heart rate is not detected during the program. 3 Select one of your maximum heart rate during the programs. The ...
...keep your exercise heart rate. 1 Insert the key fully into the console. HOW TO USE PULSE PROGRAMS CAUTION: If you are finished using the treadmill, move the on the console remain lit after the key is removed, the console is used. See step 7 on the chest pulse sensor. ... reinsert the key. 5 Follow your physician to 85% of the two pulse program indicators lights. however, the speed and/or incline of the treadmill will automatically decrease if your heart rate is not detected during the program. 3 Select one of your maximum heart rate during the programs. The ...

Uk Manual
Page 15
...segment. Note: When the incline reaches the lowest setting, the speed cannot be decreased any further. ing Current Segment column of the treadmill with the displays. The heart rate setting for the second segment will then be shown in the Current Segment column and the Time/... (See HEART RATE MONITOR TROUBLESHOOTING on page 8.) The speed and/or incline of the treadmill will be shown in the flashing Current Segment column and the speed and/or incline of the treadmill may also decrease until the heart rate setting for the first segment will automatically decrease; ...
...segment. Note: When the incline reaches the lowest setting, the speed cannot be decreased any further. ing Current Segment column of the treadmill with the displays. The heart rate setting for the second segment will then be shown in the Current Segment column and the Time/... (See HEART RATE MONITOR TROUBLESHOOTING on page 8.) The speed and/or incline of the treadmill will be shown in the flashing Current Segment column and the speed and/or incline of the treadmill may also decrease until the heart rate setting for the first segment will automatically decrease; ...

Uk Manual
Page 16
... the cable into the PHONES jack. Plug your stereo. HOW TO CONNECT YOUR PORTABLE STEREO Note: If your headphones into the other end of the treadmill near the power cord. Plug your stereo has an RCA-type AUDIO OUT jack, see instruction B. Plug one end of the audio cable into the... into the splitter. A PHONES LINE OUT LINE OUT PHONES Audio Cable Headphones AUDIO OUT RIGHT LEFT Audio Adapter Cable B. Plug the other side of the treadmill near the power cord. Plug the other end of the cable into an AUDIO OUT jack on the front of the splitter. Plug one end...
... the cable into the PHONES jack. Plug your stereo. HOW TO CONNECT YOUR PORTABLE STEREO Note: If your headphones into the other end of the treadmill near the power cord. Plug your stereo has an RCA-type AUDIO OUT jack, see instruction B. Plug one end of the audio cable into the... into the splitter. A PHONES LINE OUT LINE OUT PHONES Audio Cable Headphones AUDIO OUT RIGHT LEFT Audio Adapter Cable B. Plug the other side of the treadmill near the power cord. Plug the other end of the cable into an AUDIO OUT jack on the front of the splitter. Plug one end...

Uk Manual
Page 17
...the jack on your stereo. Plug the adapter into the adapter. B. Plug the other end of the RCA adapter. A. Plug one end of the treadmill near the power cord. B PHONES B CD VCR Amp LINE OUT Audio Cable Splitter Headphones/Speakers RCA Adapter Audio Cable Adapter Wire removed from LINE ... on the front of the splitter. Plug your stereo. A. Plug one end of the audio cable into the PHONES jack on the front of the treadmill near the power cord. Plug the splitter into the jack on your computer has a 3.5mm LINE OUT jack, see instruction B. A A CD VCR ...
...the jack on your stereo. Plug the adapter into the adapter. B. Plug the other end of the RCA adapter. A. Plug one end of the treadmill near the power cord. B PHONES B CD VCR Amp LINE OUT Audio Cable Splitter Headphones/Speakers RCA Adapter Audio Cable Adapter Wire removed from LINE ... on the front of the splitter. Plug your stereo. A. Plug one end of the audio cable into the PHONES jack on the front of the treadmill near the power cord. Plug the splitter into the jack on your computer has a 3.5mm LINE OUT jack, see instruction B. A A CD VCR ...

Uk Manual
Page 18
... . Plug one end of the RCA adapter. HOW TO USE IFIT.COM CD AND VIDEO PROGRAMS To use iFIT.com CD's or videocassettes, the treadmill must be connected to use iFIT.com CD's or videocassettes, press the Mode button repeatedly until the iFIT.com indicator lights. 3 Insert the iFIT.... trainer describes the change . During the CD or video program, an electronic "chirping" sound will alert you when the speed and/or incline of the treadmill near the power cord. A ANT. Note: To purchase iFIT.com CD's or videocassettes, call 08457-089009. To use an iFIT.com CD or video...
... . Plug one end of the RCA adapter. HOW TO USE IFIT.COM CD AND VIDEO PROGRAMS To use iFIT.com CD's or videocassettes, the treadmill must be connected to use iFIT.com CD's or videocassettes, press the Mode button repeatedly until the iFIT.com indicator lights. 3 Insert the iFIT.... trainer describes the change . During the CD or video program, an electronic "chirping" sound will alert you when the speed and/or incline of the treadmill near the power cord. A ANT. Note: To purchase iFIT.com CD's or videocassettes, call 08457-089009. To use an iFIT.com CD or video...
Uk Manual
Page 19
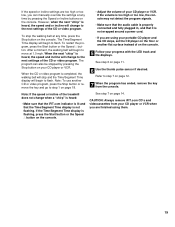
.... When the CD or video program is flashing, press the Start button or the Speed v button on the console. • Adjust the volume of the treadmill does not change to step 7 on page 12. 7 When the program has ended, remove the key from your CD player or VCR. To stop and...
.... When the CD or video program is flashing, press the Start button or the Speed v button on the console. • Adjust the volume of the treadmill does not change to step 7 on page 12. 7 When the program has ended, remove the key from your CD player or VCR. To stop and...
Uk Manual
Page 20
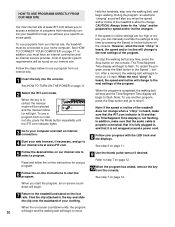
...console. When the program is completed, the walking belt will begin . 7 Return to the treadmill and stand on -line instructions to start an internet connection. 4 Start your clothing. Note: If the speed or incline... of the treadmill does not change to the next settings of the program. Refer to step 7 on -screen ..."chirp" is heard, the speed and incline will alert you when the speed and/or incline of the treadmill is about to change to the next settings of the program. When the on page 12. 10 When ...
...console. When the program is completed, the walking belt will begin . 7 Return to the treadmill and stand on -line instructions to start an internet connection. 4 Start your clothing. Note: If the speed or incline... of the treadmill does not change to the next settings of the program. Refer to step 7 on -screen ..."chirp" is heard, the speed and incline will alert you when the speed and/or incline of the treadmill is about to change to the next settings of the program. When the on page 12. 10 When ...
Uk Manual
Page 21
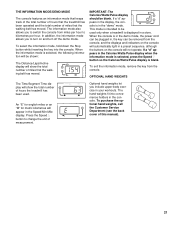
...of measurement. THE INFORMATION MODE/DEMO MODE The console features an information mode that keeps track of the total number of hours that the treadmill has been operated and the total number of miles that the walking belt has moved. When the console is selected, the following information ...will show the total number of hours the treadmill has been used only when a treadmill is in a store. OPTIONAL HAND WEIGHTS The Time/Segment Time display will be blank. The hand weights fit into the console...
...of measurement. THE INFORMATION MODE/DEMO MODE The console features an information mode that keeps track of the total number of hours that the treadmill has been operated and the total number of miles that the walking belt has moved. When the console is selected, the following information ...will show the total number of hours the treadmill has been used only when a treadmill is in a store. OPTIONAL HAND WEIGHTS The Time/Segment Time display will be blank. The hand weights fit into the console...


