
Uk Manual
Page 1
..., fitness tips, and much more! Save this equipment. As a manufacturer, we are missing parts, we will guarantee complete satisfaction through our Customer Service Department. Write the serial number in the location shown below. Greenwich House 223 North Street Sheepscar Leeds LS7 2AA West Yorkshire CAUTION Read all precautions and instructions in this manual before using this manual for reference. Serial Number Decal...
..., fitness tips, and much more! Save this equipment. As a manufacturer, we are missing parts, we will guarantee complete satisfaction through our Customer Service Department. Write the serial number in the location shown below. Greenwich House 223 North Street Sheepscar Leeds LS7 2AA West Yorkshire CAUTION Read all precautions and instructions in this manual before using this manual for reference. Serial Number Decal...
Uk Manual
Page 2
... treadmill. When choosing a location for future reference. Athletic support clothes are attached in a garage or covered patio, or near water. 5. When connecting the power cord (see page 7), plug the power cord into an earthed circuit. A 13 amp fuse should be fitted to persons, read the following important precautions and information before operating the treadmill. 1. No other appliance should be used . Never move the walking belt while the power is turned...
... treadmill. When choosing a location for future reference. Athletic support clothes are attached in a garage or covered patio, or near water. 5. When connecting the power cord (see page 7), plug the power cord into an earthed circuit. A 13 amp fuse should be fitted to persons, read the following important precautions and information before operating the treadmill. 1. No other appliance should be used . Never move the walking belt while the power is turned...
Uk Manual
Page 3
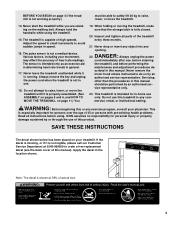
... adjustment procedures de- scribed in -home use this manual). This is properly assembled. (See ASSEMBLY on pages 5 and 6, and HOW TO MOVE THE TREADMILL on your physician. BEFORE YOU BEGIN on the walking belt. Adjust the speed in general. 17. When folding or moving the treadmill, make sure that the storage latch is capable of 35 or persons with pre-existing health problems. Read all parts of heart rate readings. SAVE THESE INSTRUCTIONS...
... adjustment procedures de- scribed in -home use this manual). This is properly assembled. (See ASSEMBLY on pages 5 and 6, and HOW TO MOVE THE TREADMILL on your physician. BEFORE YOU BEGIN on the walking belt. Adjust the speed in general. 17. When folding or moving the treadmill, make sure that the storage latch is capable of 35 or persons with pre-existing health problems. Read all parts of heart rate readings. SAVE THESE INSTRUCTIONS...
Uk Manual
Page 4
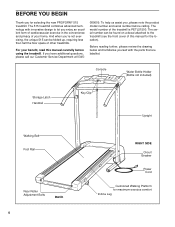
... home. Console Water Bottle Holder (Bottle not included) Storage Latch Handrail Key/Clip Upright Walking Belt Foot Rail Rear Roller Adjustment Bolts BACK 4 RIGHT SIDE Circuit Breaker Power Cord Cushioned Walking Platform for selecting the new PROFORM® 515 treadmill. If you 're not exercising, the unique 515 can be folded up, requiring less than half the floor space of this manual carefully before calling. The model number of your benefit, read this manual for the location...
... home. Console Water Bottle Holder (Bottle not included) Storage Latch Handrail Key/Clip Upright Walking Belt Foot Rail Rear Roller Adjustment Bolts BACK 4 RIGHT SIDE Circuit Breaker Power Cord Cushioned Walking Platform for selecting the new PROFORM® 515 treadmill. If you 're not exercising, the unique 515 can be folded up, requiring less than half the floor space of this manual carefully before calling. The model number of your benefit, read this manual for the location...
Uk Manual
Page 5
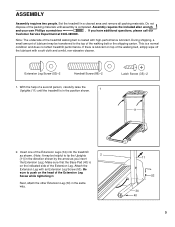
... is coated with high-performance lubricant. Set the treadmill in the same way. 11 53 34 40 5 Note: The underside of the treadmill walking belt is lubricant on top of the walking belt, simply wipe off the lubricant with an Extension Leg Screw (53). With the help of a second person, carefully raise the Uprights (11) until assembly is in the direction shown by the arrow...
... is coated with high-performance lubricant. Set the treadmill in the same way. 11 53 34 40 5 Note: The underside of the treadmill walking belt is lubricant on top of the walking belt, simply wipe off the lubricant with an Extension Leg Screw (53). With the help of a second person, carefully raise the Uprights (11) until assembly is in the direction shown by the arrow...
Uk Manual
Page 6
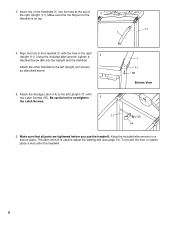
... top of the right Upright (11). Make sure that all parts are tightened before you use the treadmill. The allen wrench is on top. 11 1 4. Align the hole in the Handrail (1) with two Latch Screws (35). Be careful not to the left Upright (11) with the ...used to the left Upright (not shown) as described above. 5. Attach the other Handrail to overtighten 5 the Latch Screws. 1 11 86 Bottom View 11 35 14 6. Keep the included allen wrench in the right 4 Upright (11). Attach the Storage Latch (14) to adjust the walking belt (see page 13). Make sure that the flat part...
... top of the right Upright (11). Make sure that all parts are tightened before you use the treadmill. The allen wrench is on top. 11 1 4. Align the hole in the Handrail (1) with two Latch Screws (35). Be careful not to the left Upright (11) with the ...used to the left Upright (not shown) as described above. 5. Attach the other Handrail to overtighten 5 the Latch Screws. 1 11 86 Bottom View 11 35 14 6. Keep the included allen wrench in the right 4 Upright (11). Attach the Storage Latch (14) to adjust the walking belt (see page 13). Make sure that the flat part...
Uk Manual
Page 7
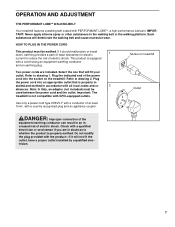
... on treadmill Two power cords are in accordance with PERFORMANT LUBETM, a high-performance lubricant. Check with a cord having an equipment-earthing conductor and an earthing plug. Socket on the treadmill. Such substances will fit your outlet. stalled and earthed in doubt as to the walking belt or the walking platform. OPERATION AND ADJUSTMENT THE PERFORMANT LUBETM WALKING BELT Your treadmill features a walking belt coated with all local codes...
... on treadmill Two power cords are in accordance with PERFORMANT LUBETM, a high-performance lubricant. Check with a cord having an equipment-earthing conductor and an earthing plug. Socket on the treadmill. Such substances will fit your outlet. stalled and earthed in doubt as to the walking belt or the walking platform. OPERATION AND ADJUSTMENT THE PERFORMANT LUBETM WALKING BELT Your treadmill features a walking belt coated with all local codes...
Uk Manual
Page 8
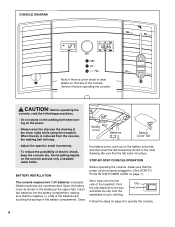
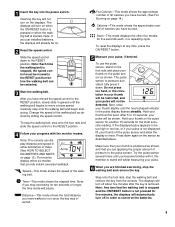
... waistband of the console, remove it before operating the console. When the key is removed from the console, the walking belt will stop. • Adjust the speed in the drawing at the lower right) while using the treadmill. Avoid spilling liquids on the power. • Always wear the clip (see the drawing at the upper right. Close Battery Cover Batteries Battery Cover Tab the battery cover, push up on the battery cover tab, and...
... waistband of the console, remove it before operating the console. When the key is removed from the console, the walking belt will stop. • Adjust the speed in the drawing at the lower right) while using the treadmill. Avoid spilling liquids on the power. • Always wear the clip (see the drawing at the upper right. Close Battery Cover Batteries Battery Cover Tab the battery cover, push up on the battery cover tab, and...
Uk Manual
Page 9
... the foot rails, stop the walking belt, step onto the foot rails and slide the speed control to the RESET position before the walking belt can dis- The pulse sensor is positioned as desired by sliding the speed control. Change the speed of the walking belt. To reset the displays at any time, press the ON/RESET button. 5 Measure your pulse will turn off about five minutes after the key is started. Inserting the key will pause.
... the foot rails, stop the walking belt, step onto the foot rails and slide the speed control to the RESET position before the walking belt can dis- The pulse sensor is positioned as desired by sliding the speed control. Change the speed of the walking belt. To reset the displays at any time, press the ON/RESET button. 5 Measure your pulse will turn off about five minutes after the key is started. Inserting the key will pause.
Uk Manual
Page 10
...- Move the switch upward or down- Locate the small Switch switch on the wires, and turn the console over. There are fully inserted at the right. Make sure that both incline pins are three different in ei- Important: Before using the treadmill, make sure to lift with your exercise, the incline of the treadmill can display distance and speed in - Caution: You must be changed. cline levels. Next, fold the treadmill...
...- Move the switch upward or down- Locate the small Switch switch on the wires, and turn the console over. There are fully inserted at the right. Make sure that both incline pins are three different in ei- Important: Before using the treadmill, make sure to lift with your exercise, the incline of the treadmill can display distance and speed in - Caution: You must be changed. cline levels. Next, fold the treadmill...
Uk Manual
Page 11
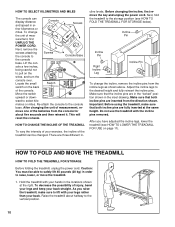
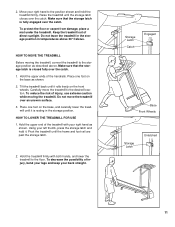
... treadmill with both hands, and lower the treadmill to the desired location. Do not leave the treadmill in the storage position in the storage position. Carefully move the treadmill over the catch. HOW TO LOWER THE TREADMILL FOR USE 1. Using your right hand as shown. Make sure that the storage latch is closed fully over the catch. To reduce the risk of injury, bend your legs...
... treadmill with both hands, and lower the treadmill to the desired location. Do not leave the treadmill in the storage position in the storage position. Carefully move the treadmill over the catch. HOW TO LOWER THE TREADMILL FOR USE 1. Using your right hand as shown. Make sure that the storage latch is closed fully over the catch. To reduce the risk of injury, bend your legs...
Uk Manual
Page 12
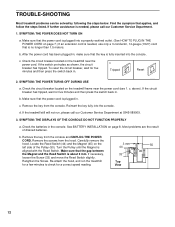
... the circuit breaker located on the treadmill near the power cord (see 1. c. Remove the key from the console and UNPLUG THE POWER CORD. Carefully remove the hood. If necessary, loosen the Screw (33) and move the Reed Switch slightly. TROUBLE-SHOOTING Most treadmill problems can be solved by following the steps below. Find the symptom that is needed , use only a 3-conductor, 14-gauge (1mm2) cord that applies, and follow the steps listed. If further...
... the circuit breaker located on the treadmill near the power cord (see 1. c. Remove the key from the console and UNPLUG THE POWER CORD. Carefully remove the hood. If necessary, loosen the Screw (33) and move the Reed Switch slightly. TROUBLE-SHOOTING Most treadmill problems can be solved by following the steps below. Find the symptom that is needed , use only a 3-conductor, 14-gauge (1mm2) cord that applies, and follow the steps listed. If further...
Uk Manual
Page 13
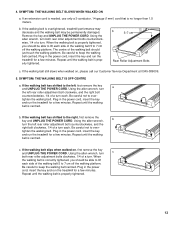
... walking belt slips when walked on , please call our Customer Service Department at 0345-089009. 5. Plug in the power cord, insert the key and run the treadmill for a few minutes. Repeat until the walking belt is overtightened, treadmill performance may decrease and the walking belt may be able to 7 cm off the walking platform. tighten the walking belt. Using the allen wrench, b turn the left rear roller adjustment bolt counterclockwise, and the right bolt clockwise, 1/4 of a turn...
... walking belt slips when walked on , please call our Customer Service Department at 0345-089009. 5. Plug in the power cord, insert the key and run the treadmill for a few minutes. Repeat until the walking belt is overtightened, treadmill performance may decrease and the walking belt may be able to 7 cm off the walking platform. tighten the walking belt. Using the allen wrench, b turn the left rear roller adjustment bolt counterclockwise, and the right bolt clockwise, 1/4 of a turn...
Uk Manual
Page 14
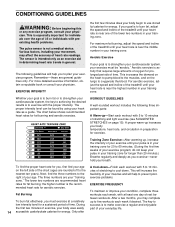
... the three numbers to 10 minutes of the treadmill until your heart rate is intended only as an exercise aid in determining heart rate trends in preparation for individuals over the age of stretching to cool down -Finish each workout with preexisting health problems. The pulse sensor is the recom- For maximum fat burning, adjust the speed and incline of stretching and light exercise (see SUGGESTED...
... the three numbers to 10 minutes of the treadmill until your heart rate is intended only as an exercise aid in determining heart rate trends in preparation for individuals over the age of stretching to cool down -Finish each workout with preexisting health problems. The pulse sensor is the recom- For maximum fat burning, adjust the speed and incline of stretching and light exercise (see SUGGESTED...
Uk Manual
Page 15
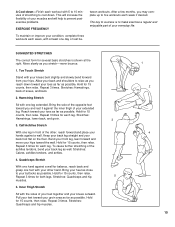
.... Move slowly as possible. Calf/Achilles Stretch With one leg extended. Repeat 3 times for each leg. Quadriceps Stretch With one hand against a wall for several basic stretches is to prevent postexercise problems. EXERCISE FREQUENCY To maintain or improve your condition, complete three workouts each...Hamstrings, lower back, and groin. 3 3. After a few months, you stretch-never bounce. 1. Reach toward your toes as far as you may complete up to your back foot flat on the floor. tween workouts. Hold for both legs. SUGGESTED STRETCHES The correct form for...
.... Move slowly as possible. Calf/Achilles Stretch With one leg extended. Repeat 3 times for each leg. Quadriceps Stretch With one hand against a wall for several basic stretches is to prevent postexercise problems. EXERCISE FREQUENCY To maintain or improve your condition, complete three workouts each...Hamstrings, lower back, and groin. 3 3. After a few months, you stretch-never bounce. 1. Reach toward your toes as far as you may complete up to your back foot flat on the floor. tween workouts. Hold for both legs. SUGGESTED STRETCHES The correct form for...
Uk Manual
Page 16
... (PROFORM® 515 treadmill) • The SERIAL NUMBER OF THE PRODUCT (see the front cover of this manual) • The DESCRIPTION OF THE PART(S) (see the PART LIST and the EXPLODED DRAWING attached in the cen- Part No. 162721 R0800A Printed in the cen- tre of this manual). tre of ICON Health & Fitness, Inc. PROFORM® is a registered trademark of this manual) • The KEY NUMBER OF THE PART(S) (see the PART LIST...
... (PROFORM® 515 treadmill) • The SERIAL NUMBER OF THE PRODUCT (see the front cover of this manual) • The DESCRIPTION OF THE PART(S) (see the PART LIST and the EXPLODED DRAWING attached in the cen- Part No. 162721 R0800A Printed in the cen- tre of this manual). tre of ICON Health & Fitness, Inc. PROFORM® is a registered trademark of this manual) • The KEY NUMBER OF THE PART(S) (see the PART LIST...

Uk Manual
Page 17
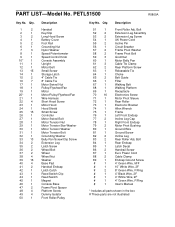
For information about ordering replacement parts, see the back cover of the User's Manual. 34 REMOVE THIS EXPLODED DRAWING AND PART LIST FROM THE MANUAL Save this EXPLODED DRAWING and PART LIST for future reference. Note: Specifications are subject to change without notice.
For information about ordering replacement parts, see the back cover of the User's Manual. 34 REMOVE THIS EXPLODED DRAWING AND PART LIST FROM THE MANUAL Save this EXPLODED DRAWING and PART LIST for future reference. Note: Specifications are subject to change without notice.
Uk Manual
Page 18
...Roller/Pulley Key No. Bolt Extension Leg Assembly Extension Leg Screw UK Power Cord Incline Pin Circuit Breaker Frame Pivot Washer Frame Pivot Bolt Grommet Motor Belly Pan Cable Tie Clamp Rear Platform Screw Releasable Tie Choke Belt Guide Filter Walking Belt Walking Platform Receptacle Electronics Screw Motor Pivot Sleeve Rear Roller Electronic Bracket Allen Wrench Frame Left Front Endcap Incline Leg Cap Right Front Endcap Motor Pivot Bushing Ground Wire Ground Screw Incline Leg Rear Roller Adj. Bolt Rear Endcap Latch Decal Handrail Screw Euro Power Cord Cable Clamp Endcap Ground Screw...
...Roller/Pulley Key No. Bolt Extension Leg Assembly Extension Leg Screw UK Power Cord Incline Pin Circuit Breaker Frame Pivot Washer Frame Pivot Bolt Grommet Motor Belly Pan Cable Tie Clamp Rear Platform Screw Releasable Tie Choke Belt Guide Filter Walking Belt Walking Platform Receptacle Electronics Screw Motor Pivot Sleeve Rear Roller Electronic Bracket Allen Wrench Frame Left Front Endcap Incline Leg Cap Right Front Endcap Motor Pivot Bushing Ground Wire Ground Screw Incline Leg Rear Roller Adj. Bolt Rear Endcap Latch Decal Handrail Screw Euro Power Cord Cable Clamp Endcap Ground Screw...


