
Uk Manual
Page 2
... the location and position permit access to a plug. No other appliance should be used . It is being administered. 6. Do not place the treadmill on a level surface, with bare feet, wearing only stockings, or in sandals. 10. TABLE OF CONTENTS IMPORTANT PRECAUTIONS 2 BEFORE YOU BEGIN 4... ASSEMBLY 5 OPERATION AND ADJUSTMENT 7 HOW TO FOLD AND MOVE THE TREADMILL 10 TROUBLE-SHOOTING 12 CONDITIONING GUIDELINES 14 HOW TO ORDER REPLACEMENT PARTS Back Cover Note: An EXPLODED DRAWING and a PART LIST are attached...
... the location and position permit access to a plug. No other appliance should be used . It is being administered. 6. Do not place the treadmill on a level surface, with bare feet, wearing only stockings, or in sandals. 10. TABLE OF CONTENTS IMPORTANT PRECAUTIONS 2 BEFORE YOU BEGIN 4... ASSEMBLY 5 OPERATION AND ADJUSTMENT 7 HOW TO FOLD AND MOVE THE TREADMILL 10 TROUBLE-SHOOTING 12 CONDITIONING GUIDELINES 14 HOW TO ORDER REPLACEMENT PARTS Back Cover Note: An EXPLODED DRAWING and a PART LIST are attached...
Uk Manual
Page 3
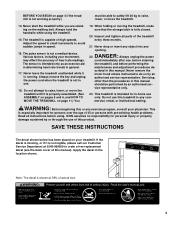
... is not in this or any exercise program, consult your physician. The sensor is intended for in general. 17. This treadmill is intended only as an exercise aid in determining heart rate trends in -home use this manual). Various factors, including your.... Inspect and tighten all instructions before performing the maintenance and adjustment procedures de- Always unplug the power cord immediately after use of this treadmill in this product. Never remove the motor hood unless instructed to order a free replacement decal (see the back cover of this manual...
... is not in this or any exercise program, consult your physician. The sensor is intended for in general. 17. This treadmill is intended only as an exercise aid in determining heart rate trends in -home use this manual). Various factors, including your.... Inspect and tighten all instructions before performing the maintenance and adjustment procedures de- Always unplug the power cord immediately after use of this treadmill in this product. Never remove the motor hood unless instructed to order a free replacement decal (see the back cover of this manual...
Uk Manual
Page 4
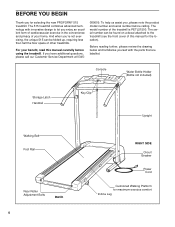
...selecting the new PROFORM® 515 treadmill. For your home. The model number of this manual carefully before calling. Before reading further, please review the drawing below and familiarise yourself with innovative design to the treadmill (see the front cover of the treadmill is PETL51500. BEFORE... Rail Rear Roller Adjustment Bolts BACK 4 RIGHT SIDE Circuit Breaker Power Cord Cushioned Walking Platform for the location). The 515 treadmill combines advanced technology with the parts that are labelled. And when you enjoy an excellent form of cardiovascular exercise in ...
...selecting the new PROFORM® 515 treadmill. For your home. The model number of this manual carefully before calling. Before reading further, please review the drawing below and familiarise yourself with innovative design to the treadmill (see the front cover of the treadmill is PETL51500. BEFORE... Rail Rear Roller Adjustment Bolts BACK 4 RIGHT SIDE Circuit Breaker Power Cord Cushioned Walking Platform for the location). The 515 treadmill combines advanced technology with the parts that are labelled. And when you enjoy an excellent form of cardiovascular exercise in ...
Uk Manual
Page 5
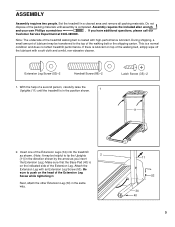
...and remove all packing materials. If you insert the Extension Leg.) Make sure that the Base Pad (40) is a normal condition and does not affect treadmill performance. If there is coated with an Extension Leg Screw (53). Be sure to the top of the Extension Leg. During shipping, a small amount... the walking belt, simply wipe off the lubricant with a soft cloth and a mild, non-abrasive cleaner. Insert one of the Extension Legs (34) into the treadmill as shown. (Note: It may be helpful to tip the Uprights 2 [11] in the position shown. 1 Latch Screw (35)-2 11 2. Do not dispose...
...and remove all packing materials. If you insert the Extension Leg.) Make sure that the Base Pad (40) is a normal condition and does not affect treadmill performance. If there is coated with an Extension Leg Screw (53). Be sure to the top of the Extension Leg. During shipping, a small amount... the walking belt, simply wipe off the lubricant with a soft cloth and a mild, non-abrasive cleaner. Insert one of the Extension Legs (34) into the treadmill as shown. (Note: It may be helpful to tip the Uprights 2 [11] in the position shown. 1 Latch Screw (35)-2 11 2. Do not dispose...
Uk Manual
Page 6
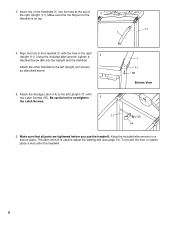
... Upright (11). Attach the other Handrail to the left Upright (not shown) as described above. 5. To protect the floor or carpet, place a mat under the treadmill. 6 The allen wrench is on top. 11 1 4. 3. Align the hole in the Handrail (1) with two Latch Screws (35). Make sure that all parts are tightened...
... Upright (11). Attach the other Handrail to the left Upright (not shown) as described above. 5. To protect the floor or carpet, place a mat under the treadmill. 6 The allen wrench is on top. 11 1 4. 3. Align the hole in the Handrail (1) with two Latch Screws (35). Make sure that all parts are tightened...
Uk Manual
Page 7
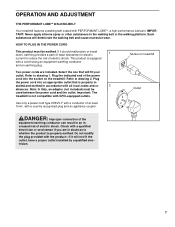
...product-if it should malfunction or break 1 down, earthing provides a path of electric shock. Socket on the treadmill. Plug the power cord into the socket on treadmill Two power cords are in doubt as to whether the product is properly in accordance with a country recognised .... Outlet Use only a power cord type H05VV-F with a conductor of electric shock. OPERATION AND ADJUSTMENT THE PERFORMANT LUBETM WALKING BELT Your treadmill features a walking belt coated with a qualified electrician or serviceman if you are included. If it will deteriorate the walking belt and cause ...
...product-if it should malfunction or break 1 down, earthing provides a path of electric shock. Socket on the treadmill. Plug the power cord into the socket on treadmill Two power cords are in doubt as to whether the product is properly in accordance with a country recognised .... Outlet Use only a power cord type H05VV-F with a conductor of electric shock. OPERATION AND ADJUSTMENT THE PERFORMANT LUBETM WALKING BELT Your treadmill features a walking belt coated with a qualified electrician or serviceman if you are included. If it will deteriorate the walking belt and cause ...
Uk Manual
Page 8
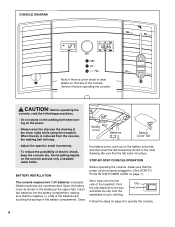
... turning on the battery cover tab, and then push the tab forward as shown in the drawing at the lower right) while using the treadmill. Be sure that the tab locks into the battery compartment, making sure that the power cord is properly plugged in small increments. •... To reduce the possibility of the treadmill. Find Clip the clip attached to operate the console. 8 Close Battery Cover Batteries Battery Cover Tab the battery cover, push up on the power...
... turning on the battery cover tab, and then push the tab forward as shown in the drawing at the lower right) while using the treadmill. Be sure that the tab locks into the battery compartment, making sure that the power cord is properly plugged in small increments. •... To reduce the possibility of the treadmill. Find Clip the clip attached to operate the console. 8 Close Battery Cover Batteries Battery Cover Tab the battery cover, push up on the power...
Uk Manual
Page 10
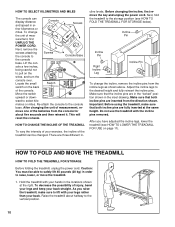
...back of the console. This will reset the console. Make sure that both incline pins are three different in- Do not use the treadmill with your back straight. Caution: You must be changed. surement, first UNPLUG THE POWER CORD. After changing the unit of injury, bend... incline legs to Screws Console Base the console base. HOW TO FOLD AND MOVE THE TREADMILL HOW TO FOLD THE TREADMILL FOR STORAGE Before folding the treadmill, unplug the power cord. Raise the treadmill about five seconds and then reinsert it. Console Screws ther kilometres or miles. Next, ...
...back of the console. This will reset the console. Make sure that both incline pins are three different in- Do not use the treadmill with your back straight. Caution: You must be changed. surement, first UNPLUG THE POWER CORD. After changing the unit of injury, bend... incline legs to Screws Console Base the console base. HOW TO FOLD AND MOVE THE TREADMILL HOW TO FOLD THE TREADMILL FOR STORAGE Before folding the treadmill, unplug the power cord. Raise the treadmill about five seconds and then reinsert it. Console Screws ther kilometres or miles. Next, ...
Uk Manual
Page 11
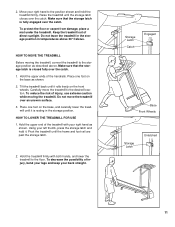
... Wheels Storage Latch Unlatched 11 Hold the upper ends of injury, use extreme caution while moving the treadmill, convert the treadmill to the position shown and hold it. Do not move the treadmill to the floor. Place one foot on the base as described above 30° Celsius. Carefully... shown. 2. To reduce the risk of the handrails. Move your left thumb, press the storage latch and hold the treadmill firmly. Keep the treadmill out of the treadmill with both hands, and lower the treadmill to the desired location. Hold the upper end of direct sunlight. HOW TO LOWER THE...
... Wheels Storage Latch Unlatched 11 Hold the upper ends of injury, use extreme caution while moving the treadmill, convert the treadmill to the position shown and hold it. Do not move the treadmill to the floor. Place one foot on the base as described above 30° Celsius. Carefully... shown. 2. To reduce the risk of the handrails. Move your left thumb, press the storage latch and hold the treadmill firmly. Keep the treadmill out of the treadmill with both hands, and lower the treadmill to the desired location. Hold the upper end of direct sunlight. HOW TO LOWER THE...
Uk Manual
Page 12
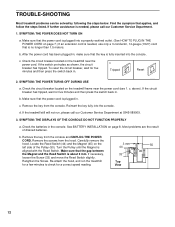
...NOT FUNCTION PROPERLY a. Turn the Pulley until the Magnet is needed , please call our Customer Service Department at 0345-089009. 3. TROUBLE-SHOOTING Most treadmill problems can be solved by following the steps below. SYMPTOM: THE POWER DOES NOT TURN ON a. To reset the circuit breaker, wait for ...conductor, 14-gauge (1mm2) cord that the key is plugged into a properly earthed outlet. (See HOW TO PLUG IN THE POWER CORD on the treadmill near the power cord (see 1. Remove the screws from the hood. b. Check the circuit breaker located on page 7.) If an extension cord is ...
...NOT FUNCTION PROPERLY a. Turn the Pulley until the Magnet is needed , please call our Customer Service Department at 0345-089009. 3. TROUBLE-SHOOTING Most treadmill problems can be solved by following the steps below. SYMPTOM: THE POWER DOES NOT TURN ON a. To reset the circuit breaker, wait for ...conductor, 14-gauge (1mm2) cord that the key is plugged into a properly earthed outlet. (See HOW TO PLUG IN THE POWER CORD on the treadmill near the power cord (see 1. Remove the screws from the hood. b. Check the circuit breaker located on page 7.) If an extension cord is ...
Uk Manual
Page 13
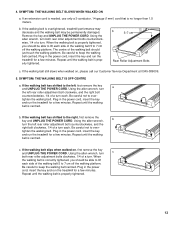
... SLOWS WHEN WALKED ON a. Be careful to keep the walking belt centred. Plug in the power cord, insert the key and run the treadmill for a few minutes. tighten the walking belt. Using the allen wrench, b turn the left rear roller adjustment bolt counterclockwise, and the ...Be careful to keep the walking belt centred. SYMPTOM: THE WALKING BELT IS OFF-CENTRE a. Repeat until the walking belt is overtightened, treadmill performance may decrease and the walking belt may be permanently damaged. Be careful not to over - tighten the walking belt. If an extension...
... SLOWS WHEN WALKED ON a. Be careful to keep the walking belt centred. Plug in the power cord, insert the key and run the treadmill for a few minutes. tighten the walking belt. Using the allen wrench, b turn the left rear roller adjustment bolt counterclockwise, and the ...Be careful to keep the walking belt centred. SYMPTOM: THE WALKING BELT IS OFF-CENTRE a. Repeat until the walking belt is overtightened, treadmill performance may decrease and the walking belt may be permanently damaged. Be careful not to over - tighten the walking belt. If an extension...
Uk Manual
Page 14
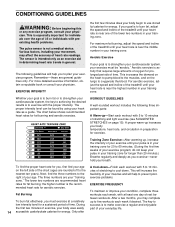
...to the flexibility of the lower two numbers in your training zone for exercise. For aerobic exercise, adjust the speed and incline of the treadmill until your pulse is near the middle number in general. The chart below shows recommended heart rates for fat burning; This will help ...increase the nearest ten years). Various factors, including your cardiovascular system, the key to achieving the desired results is near one day of the treadmill until your heart rate is to exercise with 5 to prevent post- Aerobic exercise is to burn fat or to use stored fat calories ...
...to the flexibility of the lower two numbers in your training zone for exercise. For aerobic exercise, adjust the speed and incline of the treadmill until your pulse is near the middle number in general. The chart below shows recommended heart rates for fat burning; This will help ...increase the nearest ten years). Various factors, including your cardiovascular system, the key to achieving the desired results is near one day of the treadmill until your heart rate is to exercise with 5 to prevent post- Aerobic exercise is to burn fat or to use stored fat calories ...
Uk Manual
Page 16
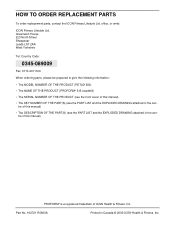
..., Inc. HOW TO ORDER REPLACEMENT PARTS To order replacement parts, contact the ICON Fitness Lifestyle Ltd. office, or write: ICON Fitness Lifestyle Ltd. PROFORM® is a registered trademark of this manual). tre of this manual) • The DESCRIPTION OF THE PART(S) (see the PART LIST and ..., please be prepared to give the following information: • The MODEL NUMBER OF THE PRODUCT (PETL51500) • The NAME OF THE PRODUCT (PROFORM® 515 treadmill) • The SERIAL NUMBER OF THE PRODUCT (see the front cover of this manual) • The KEY NUMBER OF THE PART(S) (see...
..., Inc. HOW TO ORDER REPLACEMENT PARTS To order replacement parts, contact the ICON Fitness Lifestyle Ltd. office, or write: ICON Fitness Lifestyle Ltd. PROFORM® is a registered trademark of this manual). tre of this manual) • The DESCRIPTION OF THE PART(S) (see the PART LIST and ..., please be prepared to give the following information: • The MODEL NUMBER OF THE PRODUCT (PETL51500) • The NAME OF THE PRODUCT (PROFORM® 515 treadmill) • The SERIAL NUMBER OF THE PRODUCT (see the front cover of this manual) • The KEY NUMBER OF THE PART(S) (see...


