
Uk Manual
Page 1
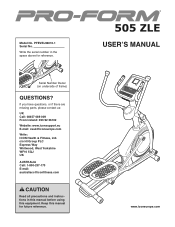
....com CAUTION Read all precautions and instructions in the space above for future reference. If you have questions, or if there are missing parts, please contact us: UK Call: 08457 089 009 From Ireland: 053 92 36102 Website: www.iconsupport.eu E-mail: [email protected] Write: ICON Health & Fitness, Ltd. USERʼS MANUAL www.iconeurope.com PFEVEL96010.1 Serial No.
....com CAUTION Read all precautions and instructions in the space above for future reference. If you have questions, or if there are missing parts, please contact us: UK Call: 08457 089 009 From Ireland: 053 92 36102 Website: www.iconsupport.eu E-mail: [email protected] Write: ICON Health & Fitness, Ltd. USERʼS MANUAL www.iconeurope.com PFEVEL96010.1 Serial No.
Uk Manual
Page 2
... PRECAUTIONS 3 BEFORE YOU BEGIN 4 ASSEMBLY 5 HOW TO USE THE CHEST PULSE SENSOR 12 HOW TO USE THE ELLIPTICAL 13 MAINTENANCE AND TROUBLESHOOTING 20 EXERCISE GUIDELINES 22 PART LIST 23 EXPLODED DRAWING 25 ORDERING REPLACEMENT PARTS Back Cover RECYCLING INFORMATION Back Cover WARNING DECAL PLACEMENT This drawing shows the location(s) of ICON IP, Inc. 2 PROFORM is missing or illegible, see the front cover of this manual and request a free replacement decal. Note: The decal(s) may...
... PRECAUTIONS 3 BEFORE YOU BEGIN 4 ASSEMBLY 5 HOW TO USE THE CHEST PULSE SENSOR 12 HOW TO USE THE ELLIPTICAL 13 MAINTENANCE AND TROUBLESHOOTING 20 EXERCISE GUIDELINES 22 PART LIST 23 EXPLODED DRAWING 25 ORDERING REPLACEMENT PARTS Back Cover RECYCLING INFORMATION Back Cover WARNING DECAL PLACEMENT This drawing shows the location(s) of ICON IP, Inc. 2 PROFORM is missing or illegible, see the front cover of this manual and request a free replacement decal. Note: The decal(s) may...
Uk Manual
Page 3
... the owner to move until the flywheel stops. The pulse sensor is intended for personal injury or property damage sustained by persons weighing more than 300 lbs. (136 kg). 10. the pedals will continue to ensure that could become caught on the elliptical. Over exercising may affect the accuracy of heart rate readings. ICON assumes no responsibility for home use of this manual. 9. Wear...
... the owner to move until the flywheel stops. The pulse sensor is intended for personal injury or property damage sustained by persons weighing more than 300 lbs. (136 kg). 10. the pedals will continue to ensure that could become caught on the elliptical. Over exercising may affect the accuracy of heart rate readings. ICON assumes no responsibility for home use of this manual. 9. Wear...
Uk Manual
Page 4
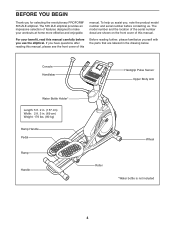
... the product model number and serial number before you use the elliptical. Console Handlebar Handgrip Pulse Sensor Upper Body Arm Water Bottle Holder* Length: 5 ft. 2 in. (157 cm) Width: 2 ft. 3 in the drawing below. If you for selecting the revolutionary PROFORM® 505 ZLE elliptical. BEFORE YOU BEGIN Thank you have questions after reading this manual, please see the front cover of this manual. For your workouts at home more...
... the product model number and serial number before you use the elliptical. Console Handlebar Handgrip Pulse Sensor Upper Body Arm Water Bottle Holder* Length: 5 ft. 2 in. (157 cm) Width: 2 ft. 3 in the drawing below. If you for selecting the revolutionary PROFORM® 505 ZLE elliptical. BEFORE YOU BEGIN Thank you have questions after reading this manual, please see the front cover of this manual. For your workouts at home more...
Uk Manual
Page 5
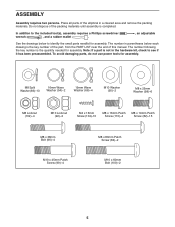
The number following the key number is the quantity needed for assembly. Place all parts of the elliptical in parentheses below to see if it has been preassembled. Note: If a part is completed. The number in a cleared area and remove the packing materials. Do not dispose of this manual. To avoid damaging parts, do not use power tools for assembly. M8 Split Washer (83)-13 16mm...
The number following the key number is the quantity needed for assembly. Place all parts of the elliptical in parentheses below to see if it has been preassembled. Note: If a part is completed. The number in a cleared area and remove the packing materials. Do not dispose of this manual. To avoid damaging parts, do not use power tools for assembly. M8 Split Washer (83)-13 16mm...

Uk Manual
Page 11
... all parts are properly tightened before you use the elliptical. If necessary, plug the Power Adapter (112) into an outlet, see HOW TO PLUG IN THE POWER ADAPTER on the Console to the Wire Harness (111) and to the 12 Upright (4) with four M4 x 16mm Screws (104). 12. Attach the Water Bottle Holder (37) to the Pulse Wires (63). Attach the Console (7) to protect the floor. 11 Note: After assembly...
... all parts are properly tightened before you use the elliptical. If necessary, plug the Power Adapter (112) into an outlet, see HOW TO PLUG IN THE POWER ADAPTER on the Console to the Wire Harness (111) and to the 12 Upright (4) with four M4 x 16mm Screws (104). 12. Attach the Water Bottle Holder (37) to the Pulse Wires (63). Attach the Console (7) to protect the floor. 11 Note: After assembly...
Uk Manual
Page 12
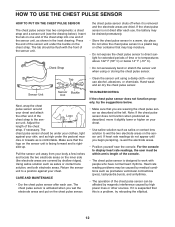
...- Press the end of the Logo chest strap to wet the two electrode areas on your body a few inches and locate the two electrode areas on the inner side (the electrode areas are covered by high power lines or other sources. the chest pulse sensor shuts off when it is suspected that this is removed and the electrode areas are dried. TROUBLESHOOTING...
...- Press the end of the Logo chest strap to wet the two electrode areas on your body a few inches and locate the two electrode areas on the inner side (the electrode areas are covered by high power lines or other sources. the chest pulse sensor shuts off when it is suspected that this is removed and the electrode areas are dried. TROUBLESHOOTING...

Uk Manual
Page 13
... of the elliptical, hold the upright, and place one foot against one of the front wheels. Carefully move the elliptical to the desired location, and then lower it to room temperature before plugging in the power adapter. cal. HOW TO MOVE THE ELLIPTICAL Due to the size and weight of the ellipti- If you do not do this, you may damage the console displays or...
... of the elliptical, hold the upright, and place one foot against one of the front wheels. Carefully move the elliptical to the desired location, and then lower it to room temperature before plugging in the power adapter. cal. HOW TO MOVE THE ELLIPTICAL Due to the size and weight of the ellipti- If you do not do this, you may damage the console displays or...

Uk Manual
Page 14
... crank arms in the opposite direction. Then, release the latch button and engage the latch pin into one of the adjustment holes in the frame. Note: The elliptical does not have a free wheel; When the pedals are stationary, step off the lower pedal. 14 To change the incline of the ramp. Latch Button Ramp Handle Crank Arm Upper Body Arms Pedals Ramp To dismount the elliptical, wait until the flywheel stops. HOW TO EXERCISE ON THE ELLIPTICAL...
... crank arms in the opposite direction. Then, release the latch button and engage the latch pin into one of the adjustment holes in the frame. Note: The elliptical does not have a free wheel; When the pedals are stationary, step off the lower pedal. 14 To change the incline of the ramp. Latch Button Ramp Handle Crank Arm Upper Body Arms Pedals Ramp To dismount the elliptical, wait until the flywheel stops. HOW TO EXERCISE ON THE ELLIPTICAL...
Uk Manual
Page 15
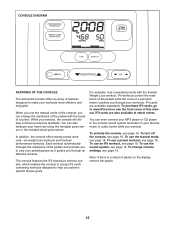
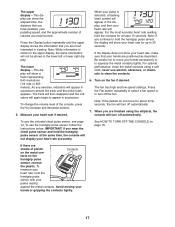
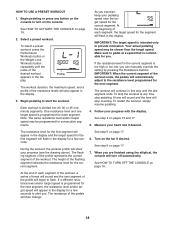
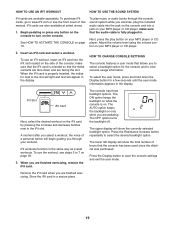
... heart rate using the handgrip pulse sensor or the included chest pulse sensor. In addition, the console offers twenty preset workouts-six weight loss workouts and fourteen performance workouts. iFit workouts control the resistance of the pedals while the voice of the console, you achieve specific fitness goals. When you use the sound system, see page 19. To purchase iFit cards, go to help you can change console settings, see page 16. iFit cards are available separately. To use the manual mode...
... heart rate using the handgrip pulse sensor or the included chest pulse sensor. In addition, the console offers twenty preset workouts-six weight loss workouts and fourteen performance workouts. iFit workouts control the resistance of the pedals while the voice of the console, you achieve specific fitness goals. When you use the sound system, see page 19. To purchase iFit cards, go to help you can change console settings, see page 16. iFit cards are available separately. To use the manual mode...
Uk Manual
Page 16
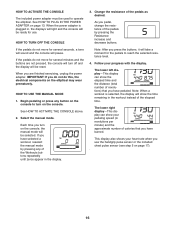
... display also shows your heart rate when you pedal, change the resistance of the elapsed time. When you have burned. Note: After you have selected a workout, reselect the manual mode by pressing the Resistance increase and decrease buttons. Follow your pedaling speed (in the display. 3. If the pedals do not move for several minutes and the buttons are finished exercising, unplug the power adapter. HOW TO USE THE MANUAL MODE 1. HOW TO TURN OFF THE CONSOLE...
... display also shows your heart rate when you pedal, change the resistance of the elapsed time. When you have burned. Note: After you have selected a workout, reselect the manual mode by pressing the Resistance increase and decrease buttons. Follow your pedaling speed (in the display. 3. If the pedals do not move for several minutes and the buttons are finished exercising, unplug the power adapter. HOW TO USE THE MANUAL MODE 1. HOW TO TURN OFF THE CONSOLE...
Uk Manual
Page 17
... not show a track representing 640 revolutions (1/4 mile or 400 meters). To use the handgrip pulse sensor, follow the instructions below. Measure your heart rate for up to hold the handgrip pulse sensor, the display will not display your heart rate accurately. Note: If you have pedaled, your hands excessively or to turn off the fan. Note: If the pedals do not move your pedaling speed, and the approximate number of calories...
... not show a track representing 640 revolutions (1/4 mile or 400 meters). To use the handgrip pulse sensor, follow the instructions below. Measure your heart rate for up to hold the handgrip pulse sensor, the display will not display your heart rate accurately. Note: If you have pedaled, your hands excessively or to turn off the fan. Note: If the pedals do not move your pedaling speed, and the approximate number of calories...
Uk Manual
Page 18
..., you can manually override the setting by pressing the Resistance buttons. IMPORTANT: The target speed is comfortable for the current segment is divided into 20, 30 or 45 oneminute segments. If the resistance level for you are finished using the elliptical, the console will flash in the display for consecutive segments. To stop the workout at a speed that is intended only to start the workout. The...
..., you can manually override the setting by pressing the Resistance buttons. IMPORTANT: The target speed is comfortable for the current segment is divided into 20, 30 or 45 oneminute segments. If the resistance level for you are finished using the elliptical, the console will flash in the display for consecutive segments. To stop the workout at a speed that is intended only to start the workout. The...
Uk Manual
Page 19
... information. The OFF option turns the backlight off. To use the workout, see the front cover of a personal trainer will show the currently selected backlight option. When you are face down the Display button for the console and to select a backlight option for a few seconds until the user mode information appears in . Press the Resistance increase button repeatedly to save the console settings and exit the user mode. Remove the iFit card...
... information. The OFF option turns the backlight off. To use the workout, see the front cover of a personal trainer will show the currently selected backlight option. When you are face down the Display button for the console and to select a backlight option for a few seconds until the user mode information appears in . Press the Resistance increase button repeatedly to save the console settings and exit the user mode. Remove the iFit card...

Uk Manual
Page 20
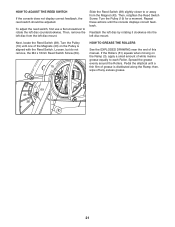
... of the elliptical regularly. Next, tighten the Belt Adjustment Screw (88) until the Drive Belt (not shown) is adjusted to the highest level, the drive belt may need to be adjusted. HOW TO ADJUST THE DRIVE BELT 120 88 If the pedals slip while you use the chest pulse sensor, see step 5 on page 12. Then, retighten the Idler Bolt. terclockwise. Locate and loosen the Idler Bolt (120). If the console does not display your heart rate when you...
... of the elliptical regularly. Next, tighten the Belt Adjustment Screw (88) until the Drive Belt (not shown) is adjusted to the highest level, the drive belt may need to be adjusted. HOW TO ADJUST THE DRIVE BELT 120 88 If the pedals slip while you use the chest pulse sensor, see step 5 on page 12. Then, retighten the Idler Bolt. terclockwise. Locate and loosen the Idler Bolt (120). If the console does not display your heart rate when you...
Uk Manual
Page 21
... moving on the Pulley is distributed along the Ramp; Next, locate the Reed Switch (38). Spread the grease evenly around the Rollers. Loosen, but do not remove, the M4 x 16mm Reed Switch Screw (69). 19 HOW TO GREASE THE ROLLERS See the EXPLODED DRAWING near the end of grease is aligned with the Reed Switch. Turn the Pulley (19) for a moment. Pedal the elliptical until the console displays correct feedback. HOW TO ADJUST...
... moving on the Pulley is distributed along the Ramp; Next, locate the Reed Switch (38). Spread the grease evenly around the Rollers. Loosen, but do not remove, the M4 x 16mm Reed Switch Screw (69). 19 HOW TO GREASE THE ROLLERS See the EXPLODED DRAWING near the end of grease is aligned with the Reed Switch. Turn the Pulley (19) for a moment. Pedal the elliptical until the console displays correct feedback. HOW TO ADJUST...

Uk Manual
Page 22
... system, exercising at the bottom of your training zone. For detailed exercise information, obtain a reputable book or consult your body temperature, heart rate, and circulation in general. A warm-up to five workouts each week, with pre-existing health problems. The pulse sensor is to strengthen your cardiovascular system, you to plan your breath. The three numbers listed above your age define your heart rate as a guide to...
... system, exercising at the bottom of your training zone. For detailed exercise information, obtain a reputable book or consult your body temperature, heart rate, and circulation in general. A warm-up to five workouts each week, with pre-existing health problems. The pulse sensor is to strengthen your cardiovascular system, you to plan your breath. The three numbers listed above your age define your heart rate as a guide to...
Uk Manual
Page 23
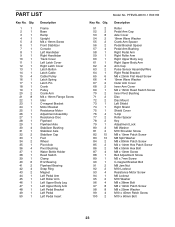
... Handlebar Track Cover Left Latch Cover Right Latch Cover Latch Button Latch Cable Cable Pulley Latch Spring Latch Pin Crank Pulley Crank Arm M4 x 16mm Flange Screw Idler C-magnet Bracket Motor Bracket Resistance Motor Adjustment Assembly Resistance Disc Flywheel Flywheel Axle Stabilizer Bushing Stabilizer Axle Stabilizer Cap Foot Wheel Pivot Axle Pivot Bushing Water Bottle Holder Reed Switch Clamp R12 Bearing Flywheel Bearing Snap Ring Magnet Left Pedal Arm Left Roller Arm Left Upper Body Leg Left Upper Body Arm Left Pedal Bracket Left Pedal Left Pedal Insert Model No...
... Handlebar Track Cover Left Latch Cover Right Latch Cover Latch Button Latch Cable Cable Pulley Latch Spring Latch Pin Crank Pulley Crank Arm M4 x 16mm Flange Screw Idler C-magnet Bracket Motor Bracket Resistance Motor Adjustment Assembly Resistance Disc Flywheel Flywheel Axle Stabilizer Bushing Stabilizer Axle Stabilizer Cap Foot Wheel Pivot Axle Pivot Bushing Water Bottle Holder Reed Switch Clamp R12 Bearing Flywheel Bearing Snap Ring Magnet Left Pedal Arm Left Roller Arm Left Upper Body Leg Left Upper Body Arm Left Pedal Bracket Left Pedal Left Pedal Insert Model No...
Uk Manual
Page 24
... Pivot Screw M4 x 16mm Screw Pedal Pad Motor Bracket Screw Roller Arm Bushing M6 x 13mm Screw Power Receptacle/Wire M8 x 16mm Patch Screw Wire Harness Power Adapter Drive Belt Foam Grip 115 1 116 1 117 2 118 2 119 1 120 1 121 1 122 1 123 1 124 1 * - * - * - Qty. Right Pedal Right Pedal Insert Pulse Wire Upper Bushing M3.5 x 12mm Screw Idler Bolt Audio Cable Plug Adapter Small Snap Ring M5 Washer Assembly Tool Grease Packet Userʼs Manual Note: Specifications are not illustrated. 24 For information about ordering replacement parts...
... Pivot Screw M4 x 16mm Screw Pedal Pad Motor Bracket Screw Roller Arm Bushing M6 x 13mm Screw Power Receptacle/Wire M8 x 16mm Patch Screw Wire Harness Power Adapter Drive Belt Foam Grip 115 1 116 1 117 2 118 2 119 1 120 1 121 1 122 1 123 1 124 1 * - * - * - Qty. Right Pedal Right Pedal Insert Pulse Wire Upper Bushing M3.5 x 12mm Screw Idler Bolt Audio Cable Plug Adapter Small Snap Ring M5 Washer Assembly Tool Grease Packet Userʼs Manual Note: Specifications are not illustrated. 24 For information about ordering replacement parts...
Uk Manual
Page 28
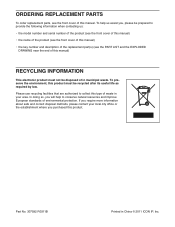
... this manual. ORDERING REPLACEMENT PARTS To order replacement parts, see the PART LIST and the EXPLODED DRAWING near the end of this product. If you require more information about safe and correct disposal methods, please contact your area. To help to provide the following information when contacting us: • the model number and serial number of the product (see the front cover of this manual...
... this manual. ORDERING REPLACEMENT PARTS To order replacement parts, see the PART LIST and the EXPLODED DRAWING near the end of this product. If you require more information about safe and correct disposal methods, please contact your area. To help to provide the following information when contacting us: • the model number and serial number of the product (see the front cover of this manual...


