
Uk Manual
Page 3
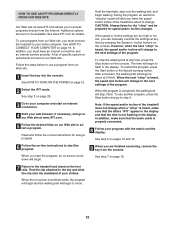
...), plug the power cord into an earthed circuit. In some instances, the speed and/or incline may affect the accuracy of high speeds. IMPORTANT PRECAUTIONS WARNING: To reduce the risk of the treadmill is about to change. It is the responsibility of the owner to raise, lower, or move the walking belt while the power is turned off. Use the treadmill only as an exercise aid in determining heart rate...
...), plug the power cord into an earthed circuit. In some instances, the speed and/or incline may affect the accuracy of high speeds. IMPORTANT PRECAUTIONS WARNING: To reduce the risk of the treadmill is about to change. It is the responsibility of the owner to raise, lower, or move the walking belt while the power is turned off. Use the treadmill only as an exercise aid in determining heart rate...

Uk Manual
Page 4
... by an authorized service representative. Apply the decal in this manual should be performed by pressing the speed and incline buttons. Never insert any object into any exercise program, consult your treadmill. Always unplug the power cord immediately after use of this or any opening. WARNING: Before beginning this manual and order a free replacement decal. scribed in a commercial, rental, or institutional setting. SAVE THESE INSTRUCTIONS The decals shown...
... by an authorized service representative. Apply the decal in this manual should be performed by pressing the speed and incline buttons. Never insert any object into any exercise program, consult your treadmill. Always unplug the power cord immediately after use of this or any opening. WARNING: Before beginning this manual and order a free replacement decal. scribed in a commercial, rental, or institutional setting. SAVE THESE INSTRUCTIONS The decals shown...
Uk Manual
Page 5
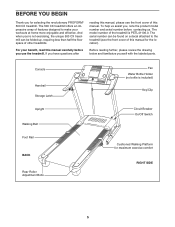
... us . Console Handrail Storage Latch Upright Walking Belt Foot Rail BACK Rear Roller Adjustment Bolts Fan Water Bottle Holder (no bottle is PETL41106.0. For your workouts at home more enjoyable and effective. If you use the treadmill. And when you're not exercising, the unique 500 CX treadmill can be folded up, requiring less than half the floor space of this manual, please see the front cover of other treadmills. The serial number can be...
... us . Console Handrail Storage Latch Upright Walking Belt Foot Rail BACK Rear Roller Adjustment Bolts Fan Water Bottle Holder (no bottle is PETL41106.0. For your workouts at home more enjoyable and effective. If you use the treadmill. And when you're not exercising, the unique 500 CX treadmill can be folded up, requiring less than half the floor space of this manual, please see the front cover of other treadmills. The serial number can be...

Uk Manual
Page 6
... has been pre-assembled. Set the treadmill in the parts bag, check to the base of the walking belt, simply wipe off the lubricant with four 1" Tek Screws (22). The number following the parentheses is unplugged. Hold two Extension Leg Nuts (67) in parentheses below . Handrail Bolt (64)-4 ASSEMBLY Assembly requires two persons. Make sure that the power cord is the quantity needed for assembly. To avoid...
... has been pre-assembled. Set the treadmill in the parts bag, check to the base of the walking belt, simply wipe off the lubricant with four 1" Tek Screws (22). The number following the parentheses is unplugged. Hold two Extension Leg Nuts (67) in parentheses below . Handrail Bolt (64)-4 ASSEMBLY Assembly requires two persons. Make sure that the power cord is the quantity needed for assembly. To avoid...
Uk Manual
Page 7
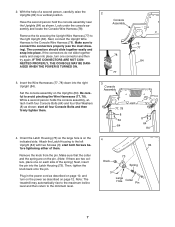
... side of a second person, carefully raise the Uprights (84) to the Console Wire Harness (78). start both Screws before tightening either of them . 3 Console Assembly 77, 78 8 64 84 8 64 84 4. Plug in the power cord as described on page 10, and turn one on page 12. Note: The treadmill may automatically rise to the maximum incline level and then return to the right...
... side of a second person, carefully raise the Uprights (84) to the Console Wire Harness (78). start both Screws before tightening either of them . 3 Console Assembly 77, 78 8 64 84 8 64 84 4. Plug in the power cord as described on page 10, and turn one on page 12. Note: The treadmill may automatically rise to the maximum incline level and then return to the right...

Uk Manual
Page 8
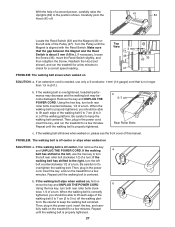
...storage position (see page 27). 8 Next, press the Incline increase and decrease buttons until it out of the Gas Spring (92) to a vertical 6 position. Keep the included hex key in the end of clear plastic on page 24). Place the treadmill in the power cord as described on page 10. Be careful to adjust the walking belt (see HOW TO FOLD AND MOVE... in step 5. Note: Extra hardware may be included. See drawing 5a. Then, pivot the Spring Pin until the ball on the bracket is used to avoid losing the Spring Pin. See drawing 6a. Make sure that all parts are ...
...storage position (see page 27). 8 Next, press the Incline increase and decrease buttons until it out of the Gas Spring (92) to a vertical 6 position. Keep the included hex key in the end of clear plastic on page 24). Place the treadmill in the power cord as described on page 10. Be careful to adjust the walking belt (see HOW TO FOLD AND MOVE... in step 5. Note: Extra hardware may be included. See drawing 5a. Then, pivot the Spring Pin until the ball on the bracket is used to avoid losing the Spring Pin. See drawing 6a. Make sure that all parts are ...
Uk Manual
Page 9
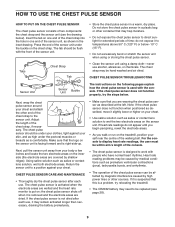
... air dried. Note: If the chest pulse sensor does not function when positioned as described, move it slightly lower or higher on your chest. For the console to a position against your body a few inches and locate the two electrode areas on the sensor unit. Return the sensor unit to display heart rate readings, the user must be within arm's length of the chest strap, if necessary. Next, pull...
... air dried. Note: If the chest pulse sensor does not function when positioned as described, move it slightly lower or higher on your chest. For the console to a position against your body a few inches and locate the two electrode areas on the sensor unit. Return the sensor unit to display heart rate readings, the user must be within arm's length of the chest strap, if necessary. Next, pull...
Uk Manual
Page 10
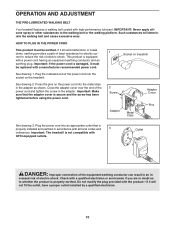
... of least resistance for electric cur- 1 rent to the walking belt or the walking platform. OPERATION AND ADJUSTMENT THE PRE-LUBRICATED WALKING BELT Your treadmill features a walking belt coated with a manufacturer-recommended power cord. Do not modify the plug provided with a power cord having an equipment-earthing conductor and an earthing plug. If it will deteriorate the walking belt and cause excessive wear. Press the pins on the power cord into the metal...
... of least resistance for electric cur- 1 rent to the walking belt or the walking platform. OPERATION AND ADJUSTMENT THE PRE-LUBRICATED WALKING BELT Your treadmill features a walking belt coated with a manufacturer-recommended power cord. Do not modify the plug provided with a power cord having an equipment-earthing conductor and an earthing plug. If it will deteriorate the walking belt and cause excessive wear. Press the pins on the power cord into the metal...

Uk Manual
Page 11
... heart rate near target heart rate settings during your workouts. The console also features iFIT interactive technology. Using a stereo audio cable, you can connect the treadmill to your heart rate using the treadmill. 11 iFIT programs automatically control the speed and incline of the treadmill as it guides you through every step of your home. To prevent damage to the walking platform, always wear clean athletic shoes while using the handgrip pulse sensor or the chest pulse sensor. As you can change the speed and incline...
... heart rate near target heart rate settings during your workouts. The console also features iFIT interactive technology. Using a stereo audio cable, you can connect the treadmill to your heart rate using the treadmill. 11 iFIT programs automatically control the speed and incline of the treadmill as it guides you through every step of your home. To prevent damage to the walking platform, always wear clean athletic shoes while using the handgrip pulse sensor or the chest pulse sensor. As you can change the speed and incline...

Uk Manual
Page 12
... for the treadmill to reach the selected speed setting. If you press one of the numbered speed buttons, the walking belt will be selected. As you exercise, change in increments of 0.5 Km/h. The lower left corner of the display will light. HOW TO USE THE MANUAL MODE 1 Insert the key into the console. a track will change by 0.1 Km/h; As you walk or run on /off switch near the power cord. Each time a button is selected...
... for the treadmill to reach the selected speed setting. If you press one of the numbered speed buttons, the walking belt will be selected. As you exercise, change in increments of 0.5 Km/h. The lower left corner of the display will light. HOW TO USE THE MANUAL MODE 1 Insert the key into the console. a track will change by 0.1 Km/h; As you walk or run on /off switch near the power cord. Each time a button is selected...
Uk Manual
Page 13
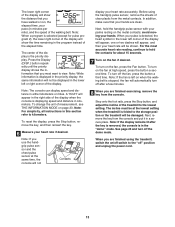
... "demo" mode. In addition, make sure that you use the handgrip pulse sensor and the chest pulse sensor at the lowest setting when the treadmill is stopped, the fan will automatically turn off " position and unplug the power cord. 13 Step onto the foot rails, press the Stop button, and adjust the incline of the treadmill to the storage position or the treadmill will be at the same time, the console will not Contacts display...
... "demo" mode. In addition, make sure that you use the handgrip pulse sensor and the chest pulse sensor at the lowest setting when the treadmill is stopped, the fan will automatically turn off " position and unplug the power cord. 13 Step onto the foot rails, press the Stop button, and adjust the incline of the treadmill to the storage position or the treadmill will be at the same time, the console will not Contacts display...

Uk Manual
Page 16
... THE CHEST PULSE SENSOR on page 29). A moment after the button is divided into the console. If pulse program 1, 3, or 4 is programmed for the entire program will affect your physician to the right. When only three seconds remain in the display. If desired, press the Incline increase and decrease buttons to start the program. Pulse program 2 is pressed, the treadmill will change. 5 Press the Start button or the Speed increase button to change the target heart rate setting (see EXERCISE...
... THE CHEST PULSE SENSOR on page 29). A moment after the button is divided into the console. If pulse program 1, 3, or 4 is programmed for the entire program will affect your physician to the right. When only three seconds remain in the display. If desired, press the Incline increase and decrease buttons to start the program. Pulse program 2 is pressed, the treadmill will change. 5 Press the Start button or the Speed increase button to change the target heart rate setting (see EXERCISE...
Uk Manual
Page 17
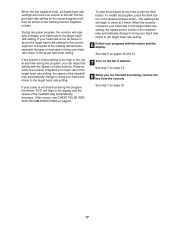
... target heart rate settings will move at 2 Km/h. If your pulse is not detected during the program, you are finished exercising, remove the key from the console. If this occurs, see CHEST PULSE SENSOR TROUBLESHOOTING on the fan if desired. See step 5 on pages 12 and 13. 7 Turn on page 9. See step 7 on page 13. 8 When you can adjust the setting with the matrix and the display. If the speed or incline setting...
... target heart rate settings will move at 2 Km/h. If your pulse is not detected during the program, you are finished exercising, remove the key from the console. If this occurs, see CHEST PULSE SENSOR TROUBLESHOOTING on the fan if desired. See step 5 on pages 12 and 13. 7 Turn on page 9. See step 7 on page 13. 8 When you can adjust the setting with the matrix and the display. If the speed or incline setting...
Uk Manual
Page 20
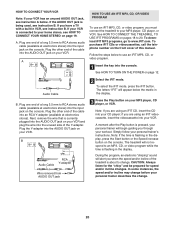
.... A Plug the Y-adapter into the console. See HOW TO TURN ON THE POWER on pages 18 to an MP3, CD, or video program while the time is pressed, your personal trainer will not respond to 20. In some instances, the speed and/or incline may change . HOW TO CONNECT YOUR VCR Note: If your personal trainer's instructions. IN VIDEO AUDIO IN CH 34 OUT RF OUT B Audio Cable RCA Y-adapter Wire removed...
.... A Plug the Y-adapter into the console. See HOW TO TURN ON THE POWER on pages 18 to an MP3, CD, or video program while the time is pressed, your personal trainer will not respond to 20. In some instances, the speed and/or incline may change . HOW TO CONNECT YOUR VCR Note: If your personal trainer's instructions. IN VIDEO AUDIO IN CH 34 OUT RF OUT B Audio Cable RCA Y-adapter Wire removed...

Uk Manual
Page 21
... the speed and/or incline of the treadmill does not change when a "chirp" is heard: • Make sure that the letters "iFIT" appear in the display and that the audio cable is completed, the walking belt will stop the walking belt at 2 Km/h. See step 7 on the fan if desired. When the next "chirp" is flashing, press the Start button or the Speed increase button on the console. • Adjust the...
... the speed and/or incline of the treadmill does not change when a "chirp" is heard: • Make sure that the letters "iFIT" appear in the display and that the audio cable is completed, the walking belt will stop the walking belt at 2 Km/h. See step 7 on the fan if desired. When the next "chirp" is flashing, press the Start button or the Speed increase button on the console. • Adjust the...
Uk Manual
Page 22
..., step onto the walking belt, and begin to flash in the display and that the audio cable is found on -line instructions to start the program, an on page 12. 2 Select the iFIT mode. In addition, make sure that the letters "iFIT" appear in the display. Find the clip attached to the key and slide the clip onto the waistband of specific system requirements is properly connected...
..., step onto the walking belt, and begin to flash in the display and that the audio cable is found on -line instructions to start the program, an on page 12. 2 Select the iFIT mode. In addition, make sure that the letters "iFIT" appear in the display. Find the clip attached to the key and slide the clip onto the waistband of specific system requirements is properly connected...
Uk Manual
Page 27
... a turn . If the walking a belt has shifted to keep the walking belt centered. move the Reed Switch slightly, and then retighten the Screw. Reattach the Hood (not shown), and run the treadmill for a few minutes. Repeat until the walking belt is off the walking plat- PROBLEM: The walking belt is properly tightened. 27 b. form. When the walking belt is off the walking platform. Then, plug in .) off -center, first remove the key and UNPLUG THE POWER CORD...
... a turn . If the walking a belt has shifted to keep the walking belt centered. move the Reed Switch slightly, and then retighten the Screw. Reattach the Hood (not shown), and run the treadmill for a few minutes. Repeat until the walking belt is off the walking plat- PROBLEM: The walking belt is properly tightened. 27 b. form. When the walking belt is off the walking platform. Then, plug in .) off -center, first remove the key and UNPLUG THE POWER CORD...
Uk Manual
Page 29
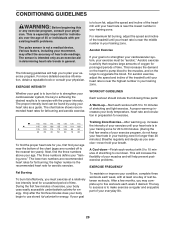
..., heart rate and circulation in your heart rate in general. is to burn fat, adjust the speed and incline of the treadmill until your heart rate is to make exercise a regular and enjoyable part of time. Fat Burning To burn fat effectively, you must be found by using your heart rate as you to plan your age near the lowest number in your condition, complete three workouts...
..., heart rate and circulation in your heart rate in general. is to burn fat, adjust the speed and incline of the treadmill until your heart rate is to make exercise a regular and enjoyable part of time. Fat Burning To burn fat effectively, you must be found by using your heart rate as you to plan your age near the lowest number in your condition, complete three workouts...

Uk Manual
Page 31
... 1 Front Roller Nut 101 1 Idler Arm Pulley 63 1 Reed Switch 102 1 Pulley Bolt 64 4 Console Bolt 103 5 Hood Cover Screw 65 4 Extension Leg Bolt 104 1 Pulse Receiver 66 4 Star Washer 105 1 Chest Pulse Strap 67 4 Extension Leg Nut 106 1 Transformer 68 2 Caution Decal 107 1 Filter 69 1 Warning Decal 108 1 Outlet Assembly 70 2 Platform Nut 109 1 Power Cord 71 10 Cable Tie Adapter 72 1 Cotter Pin, Bottom 110 2 Motor Isolator 73 1 Latch Housing 111 1 Chest Pulse 74 2 Tie Clamp Sensor 75...
... 1 Front Roller Nut 101 1 Idler Arm Pulley 63 1 Reed Switch 102 1 Pulley Bolt 64 4 Console Bolt 103 5 Hood Cover Screw 65 4 Extension Leg Bolt 104 1 Pulse Receiver 66 4 Star Washer 105 1 Chest Pulse Strap 67 4 Extension Leg Nut 106 1 Transformer 68 2 Caution Decal 107 1 Filter 69 1 Warning Decal 108 1 Outlet Assembly 70 2 Platform Nut 109 1 Power Cord 71 10 Cable Tie Adapter 72 1 Cotter Pin, Bottom 110 2 Motor Isolator 73 1 Latch Housing 111 1 Chest Pulse 74 2 Tie Clamp Sensor 75...
Uk Manual
Page 36
... the following information: • the MODEL NUMBER of the product (PETL41106.0) • the NAME of the product (PROFORM 500 CX treadmill) • the SERIAL NUMBER of the product (see the front cover of this manual) • the KEY NUMBER and DESCRIPTION of the part(s) (see the PART LIST and EXPLODED DRAWING on pages 31 to 35) Part No. 237466 R0806A Printed in China © 2006 ICON IP, Inc...
... the following information: • the MODEL NUMBER of the product (PETL41106.0) • the NAME of the product (PROFORM 500 CX treadmill) • the SERIAL NUMBER of the product (see the front cover of this manual) • the KEY NUMBER and DESCRIPTION of the part(s) (see the PART LIST and EXPLODED DRAWING on pages 31 to 35) Part No. 237466 R0806A Printed in China © 2006 ICON IP, Inc...


