
English Manual
Page 1
... Serial No. Serial Number Decal QUESTIONS? TO AVOID UNNECESSARY DELAYS, PLEASE CALL DIRECT TO OUR TOLL-FREE CUSTOMER HOT LINE. MST CAUTION Read all precautions and instructions in this manual before using this manual for future reference. USER'S MANUAL Visit our website at www.proform.com new products, prizes, fitness tips, and much more! If you have questions, or if there are missing parts...
... Serial No. Serial Number Decal QUESTIONS? TO AVOID UNNECESSARY DELAYS, PLEASE CALL DIRECT TO OUR TOLL-FREE CUSTOMER HOT LINE. MST CAUTION Read all precautions and instructions in this manual before using this manual for future reference. USER'S MANUAL Visit our website at www.proform.com new products, prizes, fitness tips, and much more! If you have questions, or if there are missing parts...

English Manual
Page 2
... power cord or plug is damaged, or if the treadmill is not working properly.) 15. TABLE OF CONTENTS IMPORTANT PRECAUTIONS 2 BEFORE YOU BEGIN 4 ASSEMBLY 5 OPERATION AND ADJUSTMENT 7 HOW TO FOLD AND MOVE THE TREADMILL 10 TROUBLE-SHOOTING 12 CONDITIONING GUIDELINES 14 ORDERING REPLACEMENT PARTS Back Cover LIMITED WARRANTY Back Cover Note: An EXPLODED DRAWING is attached in the center of this treadmill are recommended for both men and women. Use...
... power cord or plug is damaged, or if the treadmill is not working properly.) 15. TABLE OF CONTENTS IMPORTANT PRECAUTIONS 2 BEFORE YOU BEGIN 4 ASSEMBLY 5 OPERATION AND ADJUSTMENT 7 HOW TO FOLD AND MOVE THE TREADMILL 10 TROUBLE-SHOOTING 12 CONDITIONING GUIDELINES 14 ORDERING REPLACEMENT PARTS Back Cover LIMITED WARRANTY Back Cover Note: An EXPLODED DRAWING is attached in the center of this treadmill are recommended for both men and women. Use...

English Manual
Page 3
...-existing health problems. Read all parts of the decals is properly assembled. (See ASSEMBLY on page 5, and HOW TO FOLD AND MOVE THE TREADMILL on page 10.) You must be performed by or through the use , before cleaning the treadmill, and before using. Inspect and tighten all instructions before performing the maintenance and adjustment procedures described in any opening. Always unplug the power cord immediately after use of high speeds...
...-existing health problems. Read all parts of the decals is properly assembled. (See ASSEMBLY on page 5, and HOW TO FOLD AND MOVE THE TREADMILL on page 10.) You must be performed by or through the use , before cleaning the treadmill, and before using. Inspect and tighten all instructions before performing the maintenance and adjustment procedures described in any opening. Always unplug the power cord immediately after use of high speeds...
English Manual
Page 4
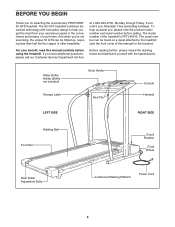
... home. Water Bottle Holder (Bottle not included) Storage Latch Book Holder Key/Clip Console Handrail LEFT SIDE RIGHT SIDE Walking Belt Foot Rail Circuit Breaker Front Wheel Rear Roller Adjustment Bolts Cushioned Walking Platform Power Cord 4 To help you , please note the product model number and serial number before using the treadmill. And when you're not exercising, the unique 50 GTS can be folded up, requiring less than half the floor space of this manual...
... home. Water Bottle Holder (Bottle not included) Storage Latch Book Holder Key/Clip Console Handrail LEFT SIDE RIGHT SIDE Walking Belt Foot Rail Circuit Breaker Front Wheel Rear Roller Adjustment Bolts Cushioned Walking Platform Power Cord 4 To help you , please note the product model number and serial number before using the treadmill. And when you're not exercising, the unique 50 GTS can be folded up, requiring less than half the floor space of this manual...
English Manual
Page 5
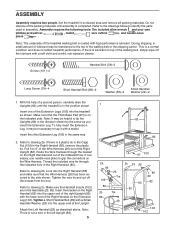
... side. If there is in the direction shown by the arrow as you insert the Extension Leg. If there is on the Wire Harness. If necessary, use needle-nose pliers to identify the parts used in the Right Handrail (85), remove the plastic tie. ASSEMBLY Assembly requires two people. Do not dispose of the walking belt, simply wipe off the excess...
... side. If there is in the direction shown by the arrow as you insert the Extension Leg. If there is on the Wire Harness. If necessary, use needle-nose pliers to identify the parts used in the Right Handrail (85), remove the plastic tie. ASSEMBLY Assembly requires two people. Do not dispose of the walking belt, simply wipe off the excess...
English Manual
Page 6
... four Long Screws have been started, tighten the Screws until they are fully inserted into the Latch Bracket (77). WARNING: Do not disconnect or connect the Wires while the treadmill power cord is used to the upright position. 4. Remove the Lock Knob (105) from the Lock Pin (11). Refer to connect them . Thread four Long Screws (79) into each Extension Leg with the holes in the Console Base. Make...
... four Long Screws have been started, tighten the Screws until they are fully inserted into the Latch Bracket (77). WARNING: Do not disconnect or connect the Wires while the treadmill power cord is used to the upright position. 4. Remove the Lock Knob (105) from the Lock Pin (11). Refer to connect them . Thread four Long Screws (79) into each Extension Leg with the holes in the Console Base. Make...

English Manual
Page 7
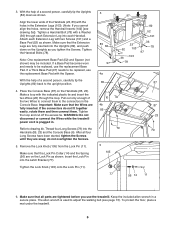
... Suppressor sor, see your treadmill (see draw- The surge suppressor must be seriously damaged by a metal screw. If the control system is grounded before using an adapter. 7 Voltage surges, spikes, and noise interference can be connected to determine if the outlet box cover is damaged, the walking belt may change speed or stop unexpectedly, which may be installed by a qualified electrician. To decrease...
... Suppressor sor, see your treadmill (see draw- The surge suppressor must be seriously damaged by a metal screw. If the control system is grounded before using an adapter. 7 Voltage surges, spikes, and noise interference can be connected to determine if the outlet box cover is damaged, the walking belt may change speed or stop unexpectedly, which may be installed by a qualified electrician. To decrease...
English Manual
Page 8
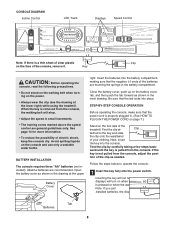
... the console, adjust the posi- Inserting the key will turn on . Note: If you just installed batteries, the displays will stop. • Adjust the speed in the drawing at the upper Battery Cover right. Insert the batteries into place. Next, insert the key into the power switch. Follow the steps below to the key and slide the clip onto the waistband of electric shock, keep the console dry. CONSOLE DIAGRAM Incline Control LED Track Displays Speed Control...
... the console, adjust the posi- Inserting the key will turn on . Note: If you just installed batteries, the displays will stop. • Adjust the speed in the drawing at the upper Battery Cover right. Insert the batteries into place. Next, insert the key into the power switch. Follow the steps below to the key and slide the clip onto the waistband of electric shock, keep the console dry. CONSOLE DIAGRAM Incline Control LED Track Displays Speed Control...

English Manual
Page 9
... change the incline of the treadmill, press the top or bottom of the walking belt, in the heart rate display flashes steadily. SPEED display-This display shows the speed of the incline control until the desired incline level is removed. Do not press too hard, or the circulation in the display will then begin exercising. pear in miles. The LED Track-The LED track represents a distance of the treadmill to the RESET position. CALS/FAT CALS display...
... change the incline of the treadmill, press the top or bottom of the walking belt, in the heart rate display flashes steadily. SPEED display-This display shows the speed of the incline control until the desired incline level is removed. Do not press too hard, or the circulation in the display will then begin exercising. pear in miles. The LED Track-The LED track represents a distance of the treadmill to the RESET position. CALS/FAT CALS display...

English Manual
Page 10
... STORAGE 1 Before folding the treadmill, adjust the incline to the desired location. Slowly release the knob. Slot To protect the floor or carpet from damage, place a mat under the treadmill. Carefully move the treadmill without tipping it rolls freely on the lock knob is al2igned with your back straight. Next, unplug the power cord. Make sure that the pin on the base, and carefully lower...
... STORAGE 1 Before folding the treadmill, adjust the incline to the desired location. Slowly release the knob. Slot To protect the floor or carpet from damage, place a mat under the treadmill. Carefully move the treadmill without tipping it rolls freely on the lock knob is al2igned with your back straight. Next, unplug the power cord. Make sure that the pin on the base, and carefully lower...

English Manual
Page 11
Pivot the treadmill until the frame and foot rail are past the storage latch. Slot Knob 11 Do not drop the treadmill frame to the left hand, pull the storage latch and 1 hold it. HOW TO LOWER THE TREADMILL FOR USE 1. Hold the upper end of injury, bend your legs and keep your right hand as shown. To decrease the possibility of the treadmill with both hands, and lower the treadmill to the floor. If necessary, press the handrail to 2 the floor. Hold the treadmill firmly with your back straight. Using your left . 2.
Pivot the treadmill until the frame and foot rail are past the storage latch. Slot Knob 11 Do not drop the treadmill frame to the left hand, pull the storage latch and 1 hold it. HOW TO LOWER THE TREADMILL FOR USE 1. Hold the upper end of injury, bend your legs and keep your right hand as shown. To decrease the possibility of the treadmill with both hands, and lower the treadmill to the floor. If necessary, press the handrail to 2 the floor. Hold the treadmill firmly with your back straight. Using your left . 2.
English Manual
Page 12
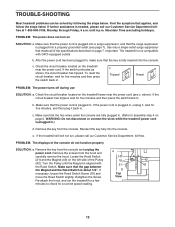
... steps listed. Mountain Time (excluding holidays). b. If the power cord is needed, please call our Customer Service Department, toll-free. e. If further assistance is plugged in, unplug it back in . until the Magnet is fully inserted into a surge suppressor, and that the power cord is plugged into the console. Important: The treadmill is not compatible with 21 43 the Reed Switch. above). Remove the key from the console. PROBLEM...
... steps listed. Mountain Time (excluding holidays). b. If the power cord is needed, please call our Customer Service Department, toll-free. e. If further assistance is plugged in, unplug it back in . until the Magnet is fully inserted into a surge suppressor, and that the power cord is plugged into the console. Important: The treadmill is not compatible with 21 43 the Reed Switch. above). Remove the key from the console. PROBLEM...

English Manual
Page 13
...: a. b. Using the allen wrench, turn both rear roller bolts clockwise, 1/4 of a turn. Repeat until the walking belt is centered. Be careful not to using the pulse sensor. Plug in the power cord, insert the key and run the treadmill for a few minutes. Repeat until the walking belt is correctly tight- Repeat until the walking belt is properly tightened. If the walking belt has shifted to keep the walking belt centered. If the walking belt slips when walked on the console...
...: a. b. Using the allen wrench, turn both rear roller bolts clockwise, 1/4 of a turn. Repeat until the walking belt is centered. Be careful not to using the pulse sensor. Plug in the power cord, insert the key and run the treadmill for a few minutes. Repeat until the walking belt is correctly tight- Repeat until the walking belt is properly tightened. If the walking belt has shifted to keep the walking belt centered. If the walking belt slips when walked on the console...
English Manual
Page 14
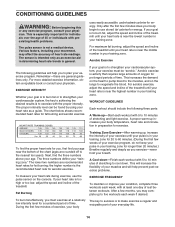
... the flexibility of your exercise until your heart rate as a guide. This is near the bottom of rest between workouts. If your goal is to burn fat, adjust the speed and incline of the treadmill until your pulse is to use the pulse sensor on the lungs to make exercise a regular and enjoyable part of the treadmill until your training zone for exercise. the higher number is not a medical...
... the flexibility of your exercise until your heart rate as a guide. This is near the bottom of rest between workouts. If your goal is to burn fat, adjust the speed and incline of the treadmill until your pulse is to use the pulse sensor on the lungs to make exercise a regular and enjoyable part of the treadmill until your training zone for exercise. the higher number is not a medical...
English Manual
Page 15
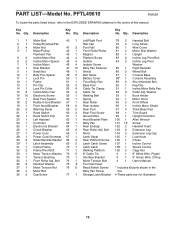
... 1 Power Cord Grommet 67 1 Latch Decal 105 1 Lock Knob 29 2 Small Handrail Washer 68 4 Rear Platform Screw 106 1 Choke 30* 1 Latch Assembly 69 2 Latch Catch Screw 107 1 Incline Control 31 1 Incline Frame 70 1 Latch Catch 108 1 Speed Control 32 2 Frame Pivot Bolt 71 1 Walking Platform 109 2 Cage Nut 33 1 Motor Tension Washer 72 5 8" Cable Tie # 1 8" White Wire, Pigtail 34 1 Tension Bushing 73 1 Interface Bracket # 1 8" Green Wire, 2 Ring 35 1 Front Roller Adj. Description 1 1 Motor Belt 40...
... 1 Power Cord Grommet 67 1 Latch Decal 105 1 Lock Knob 29 2 Small Handrail Washer 68 4 Rear Platform Screw 106 1 Choke 30* 1 Latch Assembly 69 2 Latch Catch Screw 107 1 Incline Control 31 1 Incline Frame 70 1 Latch Catch 108 1 Speed Control 32 2 Frame Pivot Bolt 71 1 Walking Platform 109 2 Cage Nut 33 1 Motor Tension Washer 72 5 8" Cable Tie # 1 8" White Wire, Pigtail 34 1 Tension Bushing 73 1 Interface Bracket # 1 8" Green Wire, 2 Ring 35 1 Front Roller Adj. Description 1 1 Motor Belt 40...

English Manual
Page 16
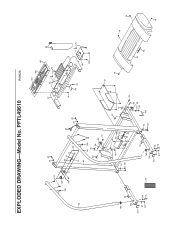
PFTL49610 R0902A To identify the parts shown on this exploded drawing, refer to the PART LIST on page 15 of the USER'S MANUAL. 4* 37 8 5 7 75 49 45 44 9 1 2 3 39 40 41 32 45 44 46 71 66 3 6 16 18 76 62 21 22 15 33 39 40 38 43 41 75 16 42 106 44 15 13 19 16 74 34 16 24 16 33 48 5 81 15 35 15 31 16 33 18 15 32 51 76 27 16 28 26 25 76 69 70 46 68 58 44 55 45 46 10 73 73 92 65 12 92 65 68 57 58 47 59 60 47 67 63 17 64 62 59 61 60 47 46 54 47 76 45 49 9 16 53 76 76 EXPLODED DRAWING-Model No.
PFTL49610 R0902A To identify the parts shown on this exploded drawing, refer to the PART LIST on page 15 of the USER'S MANUAL. 4* 37 8 5 7 75 49 45 44 9 1 2 3 39 40 41 32 45 44 46 71 66 3 6 16 18 76 62 21 22 15 33 39 40 38 43 41 75 16 42 106 44 15 13 19 16 74 34 16 24 16 33 48 5 81 15 35 15 31 16 33 18 15 32 51 76 27 16 28 26 25 76 69 70 46 68 58 44 55 45 46 10 73 73 92 65 12 92 65 68 57 58 47 59 60 47 67 63 17 64 62 59 61 60 47 46 54 47 76 45 49 9 16 53 76 76 EXPLODED DRAWING-Model No.
English Manual
Page 17
PFTL49610 R0902A 89 29 79 107 108 88* 90 87 93 76 105 109 76 77 56 13 11 30* 26 89 29 23 14 82 83 85 109 79 84 86 95 15 76 50 76 76 80 76 91 102 20 103 104 97 36 101 78 97 101 52 101 16 62 96 26 99 84 101 15 83 86 97 95 20 101 72 102 103 52 100 101 104 36 97 78 101 16 94 98 16 16 16 EXPLODED DRAWING-Model No.
PFTL49610 R0902A 89 29 79 107 108 88* 90 87 93 76 105 109 76 77 56 13 11 30* 26 89 29 23 14 82 83 85 109 79 84 86 95 15 76 50 76 76 80 76 91 102 20 103 104 97 36 101 78 97 101 52 101 16 62 96 26 99 84 101 15 83 86 97 95 20 101 72 102 103 52 100 101 104 36 97 78 101 16 94 98 16 16 16 EXPLODED DRAWING-Model No.

English Manual
Page 18
... give the following information: • The MODEL NUMBER OF THE PRODUCT (PFTL49610) • The NAME OF THE PRODUCT (PROFORM® 50 GTS treadmill) • The SERIAL NUMBER OF THE PRODUCT (see the EXPLODED DRAWING and PART LIST attached in USA © 2002 ICON Health & Fitness, Inc. until 6 p.m. LIMITED WARRANTY ICON Health & Fitness, Inc. (ICON), warrants this product to be prepared to you . The warranty extended hereunder is limited to replacing or repairing, at 1-800-999...
... give the following information: • The MODEL NUMBER OF THE PRODUCT (PFTL49610) • The NAME OF THE PRODUCT (PROFORM® 50 GTS treadmill) • The SERIAL NUMBER OF THE PRODUCT (see the EXPLODED DRAWING and PART LIST attached in USA © 2002 ICON Health & Fitness, Inc. until 6 p.m. LIMITED WARRANTY ICON Health & Fitness, Inc. (ICON), warrants this product to be prepared to you . The warranty extended hereunder is limited to replacing or repairing, at 1-800-999...

