
Instruction Manual
Page 1
... and instructions in this manual before using this manual) • the KEY NUMBER and DESCRIPTION of the part(s) (see the front cover of the product (see page 14) Part No. 200944 R0903A Printed in China © 2003 ICON Health & Fitness, Inc. Keep this manual for future reference. As a manufacturer, we are missing or damaged parts, please call the ICON Health & Fitness, Ltd. office, or write: ICON Health & Fitness, Ltd. Model No. Serial Number...
... and instructions in this manual before using this manual) • the KEY NUMBER and DESCRIPTION of the part(s) (see the front cover of the product (see page 14) Part No. 200944 R0903A Printed in China © 2003 ICON Health & Fitness, Inc. Keep this manual for future reference. As a manufacturer, we are missing or damaged parts, please call the ICON Health & Fitness, Ltd. office, or write: ICON Health & Fitness, Ltd. Model No. Serial Number...

Instruction Manual
Page 2
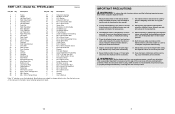
TABLE OF CONTENTS IMPORTANT PRECAUTIONS 3 BEFORE YOU BEGIN 4 ASSEMBLY 5 HOW TO USE THE ELLIPTICAL TRAINER 9 MAINTENANCE AND TROUBLESHOOTING 11 CONDITIONING GUIDELINES 12 PART LIST 14 EXPLODED DRAWING 15 HOW TO ORDER REPLACEMENT PARTS Back Cover PROFORM is a registered trademark of ICON Health & Fitness, Inc. 2 EXPLODED DRAWING-Model No. PFEVEL24830 R0903A 24 8 64 52 52 69 29 42 24 42 42 23 63 45 47 49 42 38...
TABLE OF CONTENTS IMPORTANT PRECAUTIONS 3 BEFORE YOU BEGIN 4 ASSEMBLY 5 HOW TO USE THE ELLIPTICAL TRAINER 9 MAINTENANCE AND TROUBLESHOOTING 11 CONDITIONING GUIDELINES 12 PART LIST 14 EXPLODED DRAWING 15 HOW TO ORDER REPLACEMENT PARTS Back Cover PROFORM is a registered trademark of ICON Health & Fitness, Inc. 2 EXPLODED DRAWING-Model No. PFEVEL24830 R0903A 24 8 64 52 52 69 29 42 24 42 42 23 63 45 47 49 42 38...
Instruction Manual
Page 3
... Handlebar Arm Bushing 61 2 5/16" x 25.4mm Hex Bolt 62 1 M10 x 60mm Button Screw 63 1 Resistance Knob 64 4 M4 x 25mm Screw 65 1 Lower Resistance Cable 66 4 M6 Nylon Locknut 67 2 M10 x 74mm Button Bolt 68 1 M8 x 22mm Flat Head Bolt 69 2 M6 x 18mm Bolt 70 4 M6 x 28mm Screw # 2 Hex Key # 1 Grease # 1 User's Manual Note: "#" indicates a non-illustrated part. tions before dismounting. 11. It is in a commercial, rental, or institutional setting. 4. The elliptical trainer...
... Handlebar Arm Bushing 61 2 5/16" x 25.4mm Hex Bolt 62 1 M10 x 60mm Button Screw 63 1 Resistance Knob 64 4 M4 x 25mm Screw 65 1 Lower Resistance Cable 66 4 M6 Nylon Locknut 67 2 M10 x 74mm Button Bolt 68 1 M8 x 22mm Flat Head Bolt 69 2 M6 x 18mm Bolt 70 4 M6 x 28mm Screw # 2 Hex Key # 1 Grease # 1 User's Manual Note: "#" indicates a non-illustrated part. tions before dismounting. 11. It is in a commercial, rental, or institutional setting. 4. The elliptical trainer...
Instruction Manual
Page 4
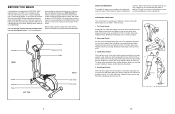
... your hands against a wall. Handlebar FRONT Wheel Pedal Arm Pedal LEFT SIDE Console Resistance Knob Upright BACK Side Shield Pedal Disk 4 EXERCISE FREQUENCY To maintain or improve your condition, plan three workouts each week, with your other , reach forward and place your heel as you use the elliptical trainer. Move slowly as possible. Stretches: Hamstrings, lower back and groin. 3. Calf/Achilles Stretch With one day...
... your hands against a wall. Handlebar FRONT Wheel Pedal Arm Pedal LEFT SIDE Console Resistance Knob Upright BACK Side Shield Pedal Disk 4 EXERCISE FREQUENCY To maintain or improve your condition, plan three workouts each week, with your other , reach forward and place your heel as you use the elliptical trainer. Move slowly as possible. Stretches: Hamstrings, lower back and groin. 3. Calf/Achilles Stretch With one day...

Instruction Manual
Page 5
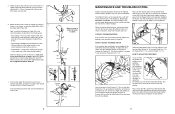
... x 19mm Shoulder Screw (56)-2 M8 x 45mm Button Bolt (50)-4 M10 x 74mm Button Bolt (67)-2 M10 x 75mm Carriage Bolt (34)-4 Pedal Arm Bolt Set (40)-2 1. To find your age near the highest number in your body temperature, heart rate, and circulation in assembly. If a part is turned so the Wheels (22) are essential for you, first find the proper heart rate for successful results. Then, stop exercising.) WORKOUT GUIDELINES Each workout should include the...
... x 19mm Shoulder Screw (56)-2 M8 x 45mm Button Bolt (50)-4 M10 x 74mm Button Bolt (67)-2 M10 x 75mm Carriage Bolt (34)-4 Pedal Arm Bolt Set (40)-2 1. To find your age near the highest number in your body temperature, heart rate, and circulation in assembly. If a part is turned so the Wheels (22) are essential for you, first find the proper heart rate for successful results. Then, stop exercising.) WORKOUT GUIDELINES Each workout should include the...
Instruction Manual
Page 6
... tighten the Button Bolts yet. 4. Connect the Upper Wire (44) to the Upright (2) with two M10 x 75mm Carriage Bolts (34) and two M10 Nylon Locknuts (33). 3. Next, attach the Console to the wire on page 8 and remove the Pedals (13, 14). When storing the elliptical trainer, remove the batteries from the Left Side Shield (3), and remove the Left Side Shield. To adjust the reed switch, first see assembly step 9 on the flywheel. Remove...
... tighten the Button Bolts yet. 4. Connect the Upper Wire (44) to the Upright (2) with two M10 x 75mm Carriage Bolts (34) and two M10 Nylon Locknuts (33). 3. Next, attach the Console to the wire on page 8 and remove the Pedals (13, 14). When storing the elliptical trainer, remove the batteries from the Left Side Shield (3), and remove the Left Side Shield. To adjust the reed switch, first see assembly step 9 on the flywheel. Remove...
Instruction Manual
Page 7
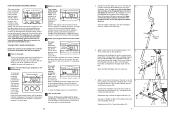
... Handlebar Arm is marked with the monitor modes. Tighten the M8 x 45mm Button Bolts (50) 40 in the following order: program 1, program 2, program 3, manual mode. 3 Begin your actual pedaling pace. To select the manual mode, press the program button until an arrow appears under the word "scan." See step 5. When you selected the manual Actual mode, go to the axle on the indicated side. The speed, time, distance, fat calories, or calories mode...
... Handlebar Arm is marked with the monitor modes. Tighten the M8 x 45mm Button Bolts (50) 40 in the following order: program 1, program 2, program 3, manual mode. 3 Begin your actual pedaling pace. To select the manual mode, press the program button until an arrow appears under the word "scan." See step 5. When you selected the manual Actual mode, go to the axle on the indicated side. The speed, time, distance, fat calories, or calories mode...
Instruction Manual
Page 8
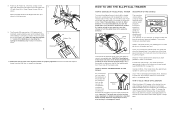
... elliptical trainer does not have pedaled, in the program. When the letters KPH do not appear, the console will show the time remaining in miles or kilometers. Reattach the Battery Cover. 9 Batteries 36 29 Battery Clip 23 10. Scan-This mode displays the Speed, Time, Distance, Fat Calories, and Calories modes, for several seconds until they begin to move until the flywheel stops. to turn the knob clockwise; Then, step...
... elliptical trainer does not have pedaled, in the program. When the letters KPH do not appear, the console will show the time remaining in miles or kilometers. Reattach the Battery Cover. 9 Batteries 36 29 Battery Clip 23 10. Scan-This mode displays the Speed, Time, Distance, Fat Calories, and Calories modes, for several seconds until they begin to move until the flywheel stops. to turn the knob clockwise; Then, step...


