
English Manual
Page 1
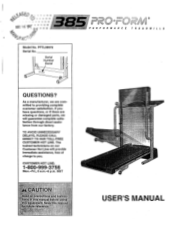
... or if there are missing or damaged parts, we are : is manual ure.:fe eteti •i* USER'S MANUAL PFTL38572 Serial No. Serial Number Decal TREADMI LLS QUESTIONS? If you . TO AVOID UNNECESSARY DELAYS, PLEASE CALL DIRECT TO OUR TOLL-FREE CUSTOMER HOT LINE. CUSTOMER HOT LINE: ...The trained technicians on our Customer Hot Line will guarantee complete satisfaction through direct assistance from our factory. 0 ED b., CJ DEC 1 6s -47A, 've/PAG-C\ tO 0 in PROARawilnk:Mannian.P7 6 3' 6 k* degoofiRet' PERFORMANCE Model No. As a manufacturer, we will provide immediate assistance, free ...
... or if there are missing or damaged parts, we are : is manual ure.:fe eteti •i* USER'S MANUAL PFTL38572 Serial No. Serial Number Decal TREADMI LLS QUESTIONS? If you . TO AVOID UNNECESSARY DELAYS, PLEASE CALL DIRECT TO OUR TOLL-FREE CUSTOMER HOT LINE. CUSTOMER HOT LINE: ...The trained technicians on our Customer Hot Line will guarantee complete satisfaction through direct assistance from our factory. 0 ED b., CJ DEC 1 6s -47A, 've/PAG-C\ tO 0 in PROARawilnk:Mannian.P7 6 3' 6 k* degoofiRet' PERFORMANCE Model No. As a manufacturer, we will provide immediate assistance, free ...
English Manual
Page 2
... BEGIN ASSEMBLY OPERATION AND ADJUSTMENT HOW TO FOLD AND MOVE THE TREADMILL MAINTENANCE AND TROUBLE-SHOOTING CONDITIONING GUIDELINES ORDERING REPLACEMENT PARTS LIMITED WARRANTY 2 4 5 7 10 12 14 Back Cover Back Cover Note: An EXPLODED DRAWING and a PART LIST are attached to ensure..:::'::: 9 Wear appropriate exercise clothing when etl'alyUseta,of all times 12. Please save them for se the treadmill only as described both men and women. Athletic support clothes...
... BEGIN ASSEMBLY OPERATION AND ADJUSTMENT HOW TO FOLD AND MOVE THE TREADMILL MAINTENANCE AND TROUBLE-SHOOTING CONDITIONING GUIDELINES ORDERING REPLACEMENT PARTS LIMITED WARRANTY 2 4 5 7 10 12 14 Back Cover Back Cover Note: An EXPLODED DRAWING and a PART LIST are attached to ensure..:::'::: 9 Wear appropriate exercise clothing when etl'alyUseta,of all times 12. Please save them for se the treadmill only as described both men and women. Athletic support clothes...

English Manual
Page 3
... sustained by an authorized service representative. 4. Always remove the key when the treadmill is fully closed. 20. Always unplug the power cord before using the treadmill. 5.The treadmill is properly assembled. (See ASSEMBLY on the walking belt. Always hold the handrails while using . Inspect and tighten all parts of 35 or persons with pre-existing health problems ead all instructions before performing the maintenance and adjustment procedures described in the location shown.
... sustained by an authorized service representative. 4. Always remove the key when the treadmill is fully closed. 20. Always unplug the power cord before using the treadmill. 5.The treadmill is properly assembled. (See ASSEMBLY on the walking belt. Always hold the handrails while using . Inspect and tighten all parts of 35 or persons with pre-existing health problems ead all instructions before performing the maintenance and adjustment procedures described in the location shown.
English Manual
Page 4
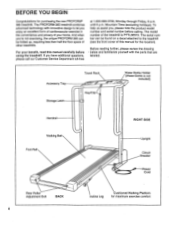
The PROFORM 385 treadmill combines advanced technology with the parts that are labeled. until 6 p.m. The serial number can be found on a decal attached to let you enjoy an excellent form of cardiovascular exercise in the convenience and privacy of the treadmill is not included) Handrail Walking Belt Foot Rail RIGHT SIDE Upright Circuit Breaker Power Cord Rear Roller Adjustment Bolt BACK 4 Incline Leg Cushioned Walking Platform for purchasing the new PROFORM® 385 treadmill. BEFORE YOU...
The PROFORM 385 treadmill combines advanced technology with the parts that are labeled. until 6 p.m. The serial number can be found on a decal attached to let you enjoy an excellent form of cardiovascular exercise in the convenience and privacy of the treadmill is not included) Handrail Walking Belt Foot Rail RIGHT SIDE Upright Circuit Breaker Power Cord Rear Roller Adjustment Bolt BACK 4 Incline Leg Cushioned Walking Platform for purchasing the new PROFORM® 385 treadmill. BEFORE YOU...
English Manual
Page 5
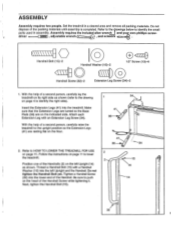
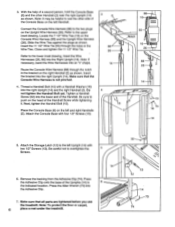
... 11. Attach each Extension Leg with a Handrail Washer (16) into the treadmill. Follow the instructions on page 11 to the upright position so the Extension Legs (41) are on the left Upright and the Handrail. ASSEMBLY Assembly requires two people. With the help of the Handrail Screw while tightening it. Thread a Handrail Bolt (15) with an Extension Leg Screw (34). Next, tighten the Handrail Bolt (15...
... 11. Attach each Extension Leg with a Handrail Washer (16) into the treadmill. Follow the instructions on page 11 to the upright position so the Extension Legs (41) are on the left Upright and the Handrail. ASSEMBLY Assembly requires two people. With the help of the Handrail Screw while tightening it. Thread a Handrail Bolt (15) with an Extension Leg Screw (34). Next, tighten the Handrail Bolt (15...
English Manual
Page 6
... Handrails (2). Make sure that the Console Wire Harness is not pinched. 4. Locate the 7 1/2" Wire Ties (10) on the left Handrail. Slide the Wire Ties against the plugs as shown. Route the Console Wire Harness (88) through the holes in the Wire Ties. Make sure that all parts are tightened before you use the treadmill. Do not tighten the Handrail Bolt yet. Be careful not to the...
... Handrails (2). Make sure that the Console Wire Harness is not pinched. 4. Locate the 7 1/2" Wire Ties (10) on the left Handrail. Slide the Wire Ties against the plugs as shown. Route the Console Wire Harness (88) through the holes in the Wire Ties. Make sure that all parts are tightened before you use the treadmill. Do not tighten the Handrail Bolt yet. Be careful not to the...
English Manual
Page 7
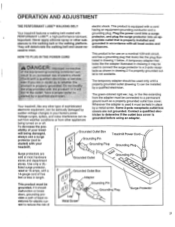
... used to connect the surge protector to the walking belt or the walking platform. ordinances. OPERATION AND ADJUSTMENT THE PERFORMANT LUBEim WALKING BELT electric shock. Plug the power cord into an ap- grounded in your treadmill being turned on a nominal 120-volt circuit, HOW TO PLUG IN THE POWER CORD and has a grounding plug that is properly installed and stances to a 2-pole receptacle as shown in length. A temporary adapter...
... used to connect the surge protector to the walking belt or the walking platform. ordinances. OPERATION AND ADJUSTMENT THE PERFORMANT LUBEim WALKING BELT electric shock. Plug the power cord into an ap- grounded in your treadmill being turned on a nominal 120-volt circuit, HOW TO PLUG IN THE POWER CORD and has a grounding plug that is properly installed and stances to a 2-pole receptacle as shown in length. A temporary adapter...
English Manual
Page 8
.... Speed Control Clip Key Before operating t e;rea e folloWing Precaution o not stan onthe walking belt when urro tf*ObWe fiOyS wet c (see the drawing above re roved from the console, the walking belt wil just the speed in small increment . . 0;4 0. Make sure that the power cord is a thin sheet of clear film on o reduce the possibility of your clothing. Close the Batteries battery cover. 8 STEP BY STEP CONSOLE...
.... Speed Control Clip Key Before operating t e;rea e folloWing Precaution o not stan onthe walking belt when urro tf*ObWe fiOyS wet c (see the drawing above re roved from the console, the walking belt wil just the speed in small increment . . 0;4 0. Make sure that the power cord is a thin sheet of clear film on o reduce the possibility of your clothing. Close the Batteries battery cover. 8 STEP BY STEP CONSOLE...
English Manual
Page 9
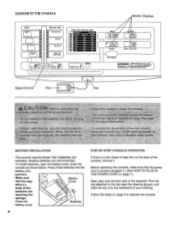
... automatically turn off in - CAUTION: Before exercis- cline; Note: If you are finished exercising, stop the walking belt, and remove the key from one number to make sure that you have moved the speed control to the RESET position, slowly slide it upward until it . FAT BURNING on the treadmill. Store the key in these locations Incline Leg est posi- This display shows the total distance that the incline legs are pressed...
... automatically turn off in - CAUTION: Before exercis- cline; Note: If you are finished exercising, stop the walking belt, and remove the key from one number to make sure that you have moved the speed control to the RESET position, slowly slide it upward until it . FAT BURNING on the treadmill. Store the key in these locations Incline Leg est posi- This display shows the total distance that the incline legs are pressed...
English Manual
Page 10
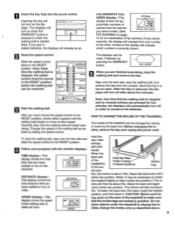
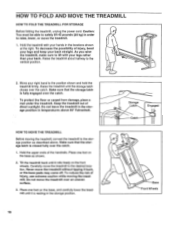
.... Keep the treadmill out of injury, use extreme caution while moving the treadmill, convert the treadmill to the position shown and hold the treadmill firmly. Carefully move the treadmill. 1. As you raise the treadmill, make sure to lift with your right hand to the storage position as shown. 2. HOW TO FOLD AND MOVE THE TREADMILL HOW TO FOLD THE TREADMILL FOR STORAGE Before folding the treadmill, unplug the power cord.
.... Keep the treadmill out of injury, use extreme caution while moving the treadmill, convert the treadmill to the position shown and hold the treadmill firmly. Carefully move the treadmill. 1. As you raise the treadmill, make sure to lift with your right hand to the storage position as shown. 2. HOW TO FOLD AND MOVE THE TREADMILL HOW TO FOLD THE TREADMILL FOR STORAGE Before folding the treadmill, unplug the power cord.
English Manual
Page 11
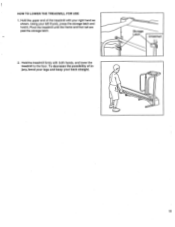
Using your back straight. 11 Hold the treadmill firmly with your right hand as shown. To decrease the possibility of the treadmill with both hands, and lower the treadmill to the floor. HOW TO LOWER THE TREADMILL FOR USE 1. Storage Latch • Unlatched 2. Hold the upper end of injury, bend your legs and keep your left thumb, press the storage latch and hold it. Pivot the treadmill until the frame and foot rail are past the storage latch.
Using your back straight. 11 Hold the treadmill firmly with your right hand as shown. To decrease the possibility of the treadmill with both hands, and lower the treadmill to the floor. HOW TO LOWER THE TREADMILL FOR USE 1. Storage Latch • Unlatched 2. Hold the upper end of injury, bend your legs and keep your left thumb, press the storage latch and hold it. Pivot the treadmill until the frame and foot rail are past the storage latch.
English Manual
Page 12
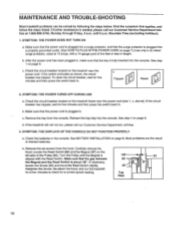
... batteries in . See BATTERY INSTALLATION on the left side of the Pulley (85). Remove the six screws from the console. Locate the Reed Switch (86) and the Magnet (87) on page 8. Find the symptom that the key is aligned with a 14-gauge cord of drained batteries. c Tripped Reset 2. See step 1 on page 9. SYMPTOM: THE DISPLAYS OF THE CONSOLE DO NOT FUNCTION PROPERLY a. Carefully remove the hood. MAINTENANCE AND TROUBLE-SHOOTING Most treadmill problems...
... batteries in . See BATTERY INSTALLATION on the left side of the Pulley (85). Remove the six screws from the console. Locate the Reed Switch (86) and the Magnet (87) on page 8. Find the symptom that the key is aligned with a 14-gauge cord of drained batteries. c Tripped Reset 2. See step 1 on page 9. SYMPTOM: THE DISPLAYS OF THE CONSOLE DO NOT FUNCTION PROPERLY a. Carefully remove the hood. MAINTENANCE AND TROUBLE-SHOOTING Most treadmill problems...
English Manual
Page 13
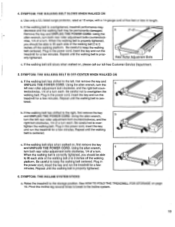
... toll-free Customer Service Department. 5. Plug in the power cord, insert the key and run the treadmill for a few minutes. Be careful not to the right, first remove the key and UNPLUG THE POWER CORD. Using the allen wrench, c turn both rear roller adjustment bolts counterclockwise, 1/4 of a turn . If the walking belt has shifted to overtighten the walking belt. Repeat until the walking belt is properly tightened. 6. Plug in length. See HOW TO FOLD THE TREADMILL FOR STORAGE on...
... toll-free Customer Service Department. 5. Plug in the power cord, insert the key and run the treadmill for a few minutes. Be careful not to the right, first remove the key and UNPLUG THE POWER CORD. Using the allen wrench, c turn both rear roller adjustment bolts counterclockwise, 1/4 of a turn . If the walking belt has shifted to overtighten the walking belt. Repeat until the walking belt is properly tightened. 6. Plug in length. See HOW TO FOLD THE TREADMILL FOR STORAGE on...
English Manual
Page 14
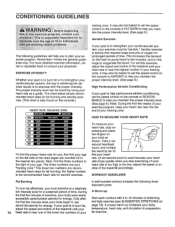
Next, find your age on the left side of the chart (ages are your "training zone." training zone. For aerobic exercise, adjust the speed and incline of the treadmill until your 14 heart rate is near one of stretching and light exercise (see SUGGESTED STRETCHES on the console.) HEART RATE TRAINING ZONE CM:=1111===1 cal Fat Bum Max Bum Aerobic 20 T125 145 165 30 120. 138...
Next, find your age on the left side of the chart (ages are your "training zone." training zone. For aerobic exercise, adjust the speed and incline of the treadmill until your 14 heart rate is near one of stretching and light exercise (see SUGGESTED STRETCHES on the console.) HEART RATE TRAINING ZONE CM:=1111===1 cal Fat Bum Max Bum Aerobic 20 T125 145 165 30 120. 138...
English Manual
Page 15
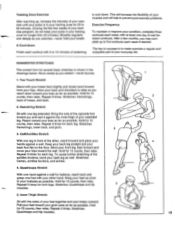
..., complete three workouts each week, with the soles of your feet together and your knees outward. Hold for each leg. Stretches: Hamstrings, lower back, and groin. 3 3. Repeat 3 times for 15 counts, then relax. Hold for 15 counts, then relax. After a few weeks of your exercise program, do not keep your pulse in your training zone for 20...
..., complete three workouts each week, with the soles of your feet together and your knees outward. Hold for each leg. Stretches: Hamstrings, lower back, and groin. 3 3. Repeat 3 times for 15 counts, then relax. Hold for 15 counts, then relax. After a few weeks of your exercise program, do not keep your pulse in your training zone for 20...
English Manual
Page 16
... an ICON authorized service center, to products used for easy reference when calling. until 6 p.m. LIMITED WARRANTY ICON Health & Fitness, Inc. (ICON), warrants this manual). The warranty extended hereunder is in connection with the use , costs of removal, installation or other rights which warranty claim is limited to you. Mountain Time (excluding holidays). PROFORM is limited in Canada © 1997 ICON Health & Fitness, Inc. ORDERING REPLACEMENT PARTS To order replacement parts, call our Customer Service Department toll-free at...
... an ICON authorized service center, to products used for easy reference when calling. until 6 p.m. LIMITED WARRANTY ICON Health & Fitness, Inc. (ICON), warrants this manual). The warranty extended hereunder is in connection with the use , costs of removal, installation or other rights which warranty claim is limited to you. Mountain Time (excluding holidays). PROFORM is limited in Canada © 1997 ICON Health & Fitness, Inc. ORDERING REPLACEMENT PARTS To order replacement parts, call our Customer Service Department toll-free at...

English Manual
Page 17
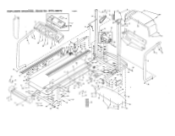
REMOVE THIS EXPLODED DRAWING AND PART LIST FROM THE MANUAL Save this EXPLODED DRAWING and PART LIST for future reference. N Note: Specifications are subject to change without notice. For information about ordering replacement parts, see the back cover of the User's Manual.
REMOVE THIS EXPLODED DRAWING AND PART LIST FROM THE MANUAL Save this EXPLODED DRAWING and PART LIST for future reference. N Note: Specifications are subject to change without notice. For information about ordering replacement parts, see the back cover of the User's Manual.
English Manual
Page 18
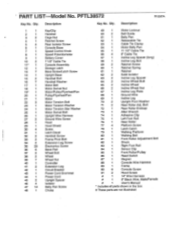
... Rear Isolator Screw Console Base Speed Control Knob Speed Potentiometer Battery Cover 7 1/2" Cable Tie Console Assembly Storage Latch Base Screw/Latch Screw Upright Base Handrail Bolt Handrail Washer Motor Belt Motor Swivel Nut Motor/Pulley/Flywheel/Fan Pulley/Flywheel/Fan Motor Motor Tension Bolt Motor Tension Washer Motor Tension Star Washer Motor Swivel Bolt Upright Wire Harness Ground Wire Screw Hood Hood Shield Screw Latch Decal Handrail Screw Frame Pivot Bolt Extension Leg Screw Electronics Screw Base Pad Wheel Bolt Wheel Wheel Nut Controller Extension Leg Circuit Breaker Power Cord...
... Rear Isolator Screw Console Base Speed Control Knob Speed Potentiometer Battery Cover 7 1/2" Cable Tie Console Assembly Storage Latch Base Screw/Latch Screw Upright Base Handrail Bolt Handrail Washer Motor Belt Motor Swivel Nut Motor/Pulley/Flywheel/Fan Pulley/Flywheel/Fan Motor Motor Tension Bolt Motor Tension Washer Motor Tension Star Washer Motor Swivel Bolt Upright Wire Harness Ground Wire Screw Hood Hood Shield Screw Latch Decal Handrail Screw Frame Pivot Bolt Extension Leg Screw Electronics Screw Base Pad Wheel Bolt Wheel Wheel Nut Controller Extension Leg Circuit Breaker Power Cord...
English Manual
Page 19
... 16 :r" 68 66 65 41 I . 25 7 45 3:7:7886 16 36 30 82 35 83 II 1491 I 35 36 35 70 35 36 35 EXPLODED DRAWING-Model No. op, 58 59 I -I 35 6 4 61 00 60 57 631, 22 39 34 45 46 4 -1 43 35 • r' 4 35 42 41 51 50• 48...
... 16 :r" 68 66 65 41 I . 25 7 45 3:7:7886 16 36 30 82 35 83 II 1491 I 35 36 35 70 35 36 35 EXPLODED DRAWING-Model No. op, 58 59 I -I 35 6 4 61 00 60 57 631, 22 39 34 45 46 4 -1 43 35 • r' 4 35 42 41 51 50• 48...


