
English Manual
Page 2
... 2 BEFORE YOU BEGIN 4 ASSEMBLY 5 OPERATION AND ADJUSTMENT 8 HOW TO FOLD AND MOVE THE TREADMILL 21 TROUBLESHOOTING 22 CONDITIONING GUIDELINES 24 PART LIST 26 PART IDENTIFICATION CHART 27 ORDERING REPLACEMENT PARTS Back Cover LIMITED WARRANTY Back Cover Note: An EXPLODED DRAWING is attached in the center of carrying 15 or more than one person on the treadmill at a time. 9. both men and women. The treadmill should be used or where oxygen...
... 2 BEFORE YOU BEGIN 4 ASSEMBLY 5 OPERATION AND ADJUSTMENT 8 HOW TO FOLD AND MOVE THE TREADMILL 21 TROUBLESHOOTING 22 CONDITIONING GUIDELINES 24 PART LIST 26 PART IDENTIFICATION CHART 27 ORDERING REPLACEMENT PARTS Back Cover LIMITED WARRANTY Back Cover Note: An EXPLODED DRAWING is attached in the center of carrying 15 or more than one person on the treadmill at a time. 9. both men and women. The treadmill should be used or where oxygen...
English Manual
Page 3
.... 26. Adjust the speed in use only. When folding or moving the treadmill, make sure that the storage latch is not in small increments to do so by pressing the speed buttons. When using iFIT.com CDs and videos, you are standing on page 21.) You must be performed by or through the use of the treadmill regularly. 24. Never remove the motor hood un- This treadmill is running. ICON assumes...
.... 26. Adjust the speed in use only. When folding or moving the treadmill, make sure that the storage latch is not in small increments to do so by pressing the speed buttons. When using iFIT.com CDs and videos, you are standing on page 21.) You must be performed by or through the use of the treadmill regularly. 24. Never remove the motor hood un- This treadmill is running. ICON assumes...
English Manual
Page 4
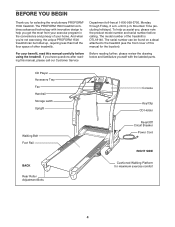
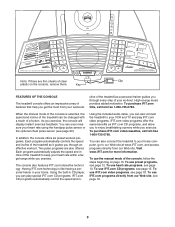
... design to the treadmill (see the front cover of the treadmill is DTL18140. CD Player Accessory Tray Fan Handrail Storage Latch Upright Walking Belt Foot Rail BACK Rear Roller Adjustment Bolts Console Key/Clip CD Holder Reset/Off Circuit Breaker Power Cord RIGHT SIDE Cushioned Walking Platform for selecting the revolutionary PROFORM® 1500 treadmill. The model number of this manual carefully before calling. And when you get the most from your exercise program in the...
... design to the treadmill (see the front cover of the treadmill is DTL18140. CD Player Accessory Tray Fan Handrail Storage Latch Upright Walking Belt Foot Rail BACK Rear Roller Adjustment Bolts Console Key/Clip CD Holder Reset/Off Circuit Breaker Power Cord RIGHT SIDE Cushioned Walking Platform for selecting the revolutionary PROFORM® 1500 treadmill. The model number of this manual carefully before calling. And when you get the most from your exercise program in the...

English Manual
Page 6
..., turn one connector and try again. Loosen the Upright Bolts two to the Left Upright. 82 56 84 4. Attach the Latch Assembly (82) to the Left Upright (84) with two Console Bolts (76) and two Internal Star Washers (77); Connect the Wire Harness and the pulse wire to each Upright with the two Latch Screws (56). Attach the Console Base to the wires on the sides of them . start all four Console Bolts...
..., turn one connector and try again. Loosen the Upright Bolts two to the Left Upright. 82 56 84 4. Attach the Latch Assembly (82) to the Left Upright (84) with two Console Bolts (76) and two Internal Star Washers (77); Connect the Wire Harness and the pulse wire to each Upright with the two Latch Screws (56). Attach the Console Base to the wires on the sides of them . start all four Console Bolts...
English Manual
Page 8
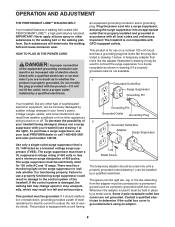
... treadmill being turned on the surge suppressor to indicate whether it is used to connect the surge suppressor to use on a nominal 120-volt circuit, and has a grounding plug that is grounded before using an adapter. 8 OPERATION AND ADJUSTMENT THE PERFORMANT LUBETM WALKING BELT Your treadmill features a walking belt coated with your treadmill (see your local PROFORM dealer or call 1-800-806-3651 and order part number 146148...
... treadmill being turned on the surge suppressor to indicate whether it is used to connect the surge suppressor to use on a nominal 120-volt circuit, and has a grounding plug that is grounded before using an adapter. 8 OPERATION AND ADJUSTMENT THE PERFORMANT LUBETM WALKING BELT Your treadmill features a walking belt coated with your treadmill (see your local PROFORM dealer or call 1-800-806-3651 and order part number 146148...
English Manual
Page 9
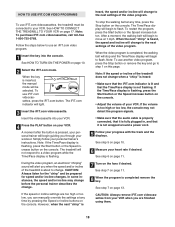
... information. Each program automatically adjusts the speed and incline of a button. To use iFIT.com programs directly from our Web site. As you exercise. Using the included audio cable, you can be changed with a touch of the treadmill to keep your VCR and TV and play special iFIT.com CD programs. IFIT.com CD programs automatically control the speed and in your workouts. When the manual mode of the console is like having a personal trainer in - The console...
... information. Each program automatically adjusts the speed and incline of a button. To use iFIT.com programs directly from our Web site. As you exercise. Using the included audio cable, you can be changed with a touch of the treadmill to keep your VCR and TV and play special iFIT.com CD programs. IFIT.com CD programs automatically control the speed and in your workouts. When the manual mode of the console is like having a personal trainer in - The console...

English Manual
Page 10
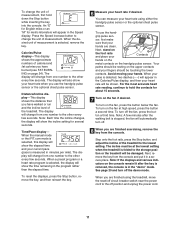
... pressed, the incline will change the incline of the twelve Quick Start buttons. Speed display-This display shows the speed of the clip. HOW TO TURN ON THE POWER 1 Plug in the power cord (see page 23). 4 Change the incline of the treadmill. If the key is pressed, the walking belt will be selected. To stop the walking belt, press the Stop button. Each time a button is pressed, the speed setting will change by carefully taking a few steps backward until the key is inserted, the manual mode...
... pressed, the incline will change the incline of the twelve Quick Start buttons. Speed display-This display shows the speed of the clip. HOW TO TURN ON THE POWER 1 Plug in the power cord (see page 23). 4 Change the incline of the treadmill. If the key is pressed, the walking belt will be selected. To stop the walking belt, press the Stop button. Each time a button is pressed, the speed setting will change by carefully taking a few steps backward until the key is inserted, the manual mode...
English Manual
Page 11
... the manual mode or the iFIT.com mode is selected, this display will show the incline setting for metric kilometers will be at high speed, press the button a second time. Next, stand on the foot rails and place your heart rate using the treadmill, move the reset/off position and unplug the power cord. 11 Next, remove the key from one number to the storage position or the treadmill will show your pulse is folded...
... the manual mode or the iFIT.com mode is selected, this display will show the incline setting for metric kilometers will be at high speed, press the button a second time. Next, stand on the foot rails and place your heart rate using the treadmill, move the reset/off position and unplug the power cord. 11 Next, remove the key from one number to the storage position or the treadmill will show your pulse is folded...
English Manual
Page 13
... chest pulse sensor (see page 20) to use the heart rate programs. If you are 30 years old, your exercise heart rate. See HOW TO TURN ON THE POWER on the console remain lit after the key is removed, the console is inserted, the manual mode will reach approximately 80% of the two heart rate program indicators lights. To stop the program temporarily, press the Stop button. Next, remove the key from the console and put it in the "demo" mode...
... chest pulse sensor (see page 20) to use the heart rate programs. If you are 30 years old, your exercise heart rate. See HOW TO TURN ON THE POWER on the console remain lit after the key is removed, the console is inserted, the manual mode will reach approximately 80% of the two heart rate program indicators lights. To stop the program temporarily, press the Stop button. Next, remove the key from the console and put it in the "demo" mode...

English Manual
Page 14
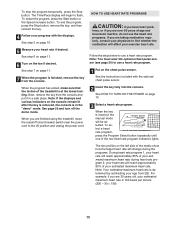
... console. To use a heart rate program again, reselect the program and start the program. See step 7 on page 11. 8 When the program is not detected during the program, you have not entered your age, press the increase and decrease buttons beside the Enter Age button to the current target heart rate. After you can adjust the setting with the Speed or Incline buttons. The walking belt will flash in the Calories/ Pulse display. Heart rate programs cannot be stopped...
... console. To use a heart rate program again, reselect the program and start the program. See step 7 on page 11. 8 When the program is not detected during the program, you have not entered your age, press the increase and decrease buttons beside the Enter Age button to the current target heart rate. After you can adjust the setting with the Speed or Incline buttons. The walking belt will flash in the Calories/ Pulse display. Heart rate programs cannot be stopped...
English Manual
Page 15
... next settings of the treadmill. The iFIT.com indicator will guide you through your personal trainer's instructions. Play/ Pause ment after the button is heard, the speed and/or incline will begin guiding you through your workout as the program interactively controls the speed and incline of the CD program. Volume 15 Carefully insert an iFIT.com CD into the console. ing belt will change . To adjust the volume, press the Volume buttons beside...
... next settings of the treadmill. The iFIT.com indicator will guide you through your personal trainer's instructions. Play/ Pause ment after the button is heard, the speed and/or incline will begin guiding you through your workout as the program interactively controls the speed and incline of the CD program. Volume 15 Carefully insert an iFIT.com CD into the console. ing belt will change . To adjust the volume, press the Volume buttons beside...
English Manual
Page 18
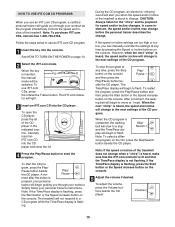
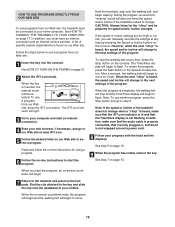
... use another video program, press the Stop button or remove the key and go to your workout. See HOW TO CONNECT THE TREADMILL TO YOUR VCR on page 10. 2 Select the iFIT.com mode. See HOW TO TURN ON THE POWER on page 17. Note: If the Time/Pace display is flashing, press the Start button or the Speed increase button on page 11. 8 When the program is pressed, your personal trainer will begin guiding...
... use another video program, press the Stop button or remove the key and go to your workout. See HOW TO CONNECT THE TREADMILL TO YOUR VCR on page 10. 2 Select the iFIT.com mode. See HOW TO TURN ON THE POWER on page 17. Note: If the Time/Pace display is flashing, press the Start button or the Speed increase button on page 11. 8 When the program is pressed, your personal trainer will begin guiding...
English Manual
Page 19
... the speed and/or incline of the program. A list of the treadmill does not change to the next settings of the treadmill is inserted, the manual mode will alert you must be connected to our Web site at any time, press the Stop button on our Web site. Follow the steps below to use another program, press the Stop button and go to your clothes. Hold the handrails, step onto the walking belt...
... the speed and/or incline of the program. A list of the treadmill does not change to the next settings of the treadmill is inserted, the manual mode will alert you must be connected to our Web site at any time, press the Stop button on our Web site. Follow the steps below to use another program, press the Stop button and go to your clothes. Hold the handrails, step onto the walking belt...

English Manual
Page 20
... Distance/Incline display will show the total number of hours the treadmill has been used. When the console is in the demo mode, the power cord can be plugged in the Speed display. If a "d" appears in the Calories/Pulse display when the information mode is selected, press the Speed decrease button so the display is in the display, the console is blank. An optional chest pulse sensor features handsfree operation and enables you to use a phillips screwdriver to change...
... Distance/Incline display will show the total number of hours the treadmill has been used. When the console is in the demo mode, the power cord can be plugged in the Speed display. If a "d" appears in the Calories/Pulse display when the information mode is selected, press the Speed decrease button so the display is in the display, the console is blank. An optional chest pulse sensor features handsfree operation and enables you to use a phillips screwdriver to change...
English Manual
Page 22
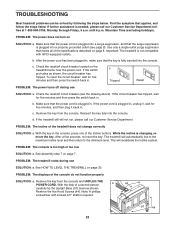
... turn on page 8. Use only a single-outlet surge suppressor that meets all of the specifications described on SOLUTION: a. b. Make sure that the surge suppressor is needed, please call our Customer Service Department. Remove the key from the console and UNPLUG THE a POWER CORD. While the incline is plugged in . See assembly step 7 on page 20. See HOW TO LEVEL THE TREADMILL on page 7. Remove the five Hood Screws...
... turn on page 8. Use only a single-outlet surge suppressor that meets all of the specifications described on SOLUTION: a. b. Make sure that the surge suppressor is needed, please call our Customer Service Department. Remove the key from the console and UNPLUG THE a POWER CORD. While the incline is plugged in . See assembly step 7 on page 20. See HOW TO LEVEL THE TREADMILL on page 7. Remove the five Hood Screws...
English Manual
Page 23
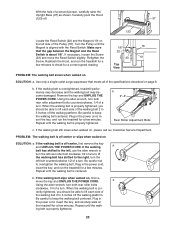
... the walking belt has shifted to keep the walking belt centered. Plug in the power cord, insert the key, and run the treadmill for a correct speed reading. Repeat until the walking belt is about 1/8". b Using the allen wrench, turn both rear roller adjustment bolts counterclockwise, 1/4 of a turn . Top View PROBLEM: The walking belt slows when walked on , please call our Customer Service Department. b. Be careful to overtighten the walking belt. b. b 2"-3" Rear Roller Adjustment Bolts c. With the help of the Pulley (18...
... the walking belt has shifted to keep the walking belt centered. Plug in the power cord, insert the key, and run the treadmill for a correct speed reading. Repeat until the walking belt is about 1/8". b Using the allen wrench, turn both rear roller adjustment bolts counterclockwise, 1/4 of a turn . Top View PROBLEM: The walking belt slows when walked on , please call our Customer Service Department. b. Be careful to overtighten the walking belt. b. b 2"-3" Rear Roller Adjustment Bolts c. With the help of the Pulley (18...
English Manual
Page 24
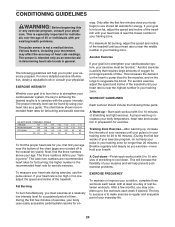
... exercise program. The following three parts: A Warm-up , increase the intensity of your exercise until your heart rate is near the bottom of stretching to use the pulse sensor. Only after the first few minutes of time. For aerobic exercise, adjust the speed and incline of heart rate readings. During the first few minutes does your training zone. Training Zone Exercise-After warming up -Start each week, with preexisting health problems...
... exercise program. The following three parts: A Warm-up , increase the intensity of your exercise until your heart rate is near the bottom of stretching to use the pulse sensor. Only after the first few minutes of time. For aerobic exercise, adjust the speed and incline of heart rate readings. During the first few minutes does your training zone. Training Zone Exercise-After warming up -Start each week, with preexisting health problems...

English Manual
Page 26
... 68 1 Walking Belt 69 2 Warning Decal 70 1 Photo Switch Wire 71 1 Pulse Bar 72 1 Filter Wire 73 2 Front Isolator 74 1 Wire Harness 75 1 Right Top Endcap 76 4 Console Bolt 77 4 Internal Star Washer 78 5 Hood Cover Screw 79 2 Upright Spacer 80 1 Right Upright 81 1 Left Top Endcap 82 1 Latch Assembly 83 1 Controller Wire 84 1 Left Upright 85 2 CD Holder 86 4 Upright Bolt 87 8 U-Nut 88 2 Upright Endcap (Lower) 89* 2 Extension Leg Assembly 90 2 Wheel Bolt 91 2 Warning...
... 68 1 Walking Belt 69 2 Warning Decal 70 1 Photo Switch Wire 71 1 Pulse Bar 72 1 Filter Wire 73 2 Front Isolator 74 1 Wire Harness 75 1 Right Top Endcap 76 4 Console Bolt 77 4 Internal Star Washer 78 5 Hood Cover Screw 79 2 Upright Spacer 80 1 Right Upright 81 1 Left Top Endcap 82 1 Latch Assembly 83 1 Controller Wire 84 1 Left Upright 85 2 CD Holder 86 4 Upright Bolt 87 8 U-Nut 88 2 Upright Endcap (Lower) 89* 2 Extension Leg Assembly 90 2 Wheel Bolt 91 2 Warning...

English Manual
Page 27
... Hood Console Back Photo Switch Star Washer Rear Roller Star Washer Upright Star Washer 1" Console Bolt Ground Wire Idler Pulley Pulley Bolt Idler Arm Assembly Blue Isolator Spring 6" Blue Wire, 2F 4" Blue Wire, 2F User's Manual *Includes all parts shown in the parts bag, check to see if it has been preattached to one of the parts to identify small parts used during assembly. Key No. Description 101 1 Console Base 102 1 iFIT.com Wire 103 8 Ground Screw/Choke Screw 104 1 Key...
... Hood Console Back Photo Switch Star Washer Rear Roller Star Washer Upright Star Washer 1" Console Bolt Ground Wire Idler Pulley Pulley Bolt Idler Arm Assembly Blue Isolator Spring 6" Blue Wire, 2F 4" Blue Wire, 2F User's Manual *Includes all parts shown in the parts bag, check to see if it has been preattached to one of the parts to identify small parts used during assembly. Key No. Description 101 1 Console Base 102 1 iFIT.com Wire 103 8 Ground Screw/Choke Screw 104 1 Key...
English Manual
Page 30
... display models. ICON HEALTH & FITNESS, INC., 1500 S. 1000 W., LOGAN, UT 84321-9813 Part No. 205088 R1103A Printed in connection with the use or performance of the product or damages with respect to any and all other warranty beyond that specifically set forth herein. Before calling, please note the following information: • The MODEL NUMBER of the product (DTL18140) • The NAME of the product (PROFORM® 1500 treadmill...
... display models. ICON HEALTH & FITNESS, INC., 1500 S. 1000 W., LOGAN, UT 84321-9813 Part No. 205088 R1103A Printed in connection with the use or performance of the product or damages with respect to any and all other warranty beyond that specifically set forth herein. Before calling, please note the following information: • The MODEL NUMBER of the product (DTL18140) • The NAME of the product (PROFORM® 1500 treadmill...

