
English Manual
Page 2
TABLE OF CONTENTS IMPORTANT PRECAUTIONS 3 BEFORE YOU BEGIN 4 ASSEMBLY 5 HOW TO USE THE ELLIPTICAL EXERCISER 11 MAINTENANCE AND TROUBLESHOOTING 22 CONDITIONING GUIDELINES 23 PART LIST 24 EXPLODED DRAWING 26 HOW TO ORDER REPLACEMENT PARTS Back Cover LIMITED WARRANTY Back Cover PROFORM is a registered trademark of ICON IP, Inc. 2
TABLE OF CONTENTS IMPORTANT PRECAUTIONS 3 BEFORE YOU BEGIN 4 ASSEMBLY 5 HOW TO USE THE ELLIPTICAL EXERCISER 11 MAINTENANCE AND TROUBLESHOOTING 22 CONDITIONING GUIDELINES 23 PART LIST 24 EXPLODED DRAWING 26 HOW TO ORDER REPLACEMENT PARTS Back Cover LIMITED WARRANTY Back Cover PROFORM is a registered trademark of ICON IP, Inc. 2

English Manual
Page 3
... call our Customer Service Department toll-free at all instructions in general. The pulse sensor is intended for foot protection while exercising. 9. tions before cleaning the elliptical exerciser. 15. Always wear athletic shoes for home use the elliptical exerciser in the location shown. 8. do not arch your back straight when using . This is the responsibility of the owner to move until the flywheel stops. 4. ICON assumes no responsibility...
... call our Customer Service Department toll-free at all instructions in general. The pulse sensor is intended for foot protection while exercising. 9. tions before cleaning the elliptical exerciser. 15. Always wear athletic shoes for home use the elliptical exerciser in the location shown. 8. do not arch your back straight when using . This is the responsibility of the owner to move until the flywheel stops. 4. ICON assumes no responsibility...
English Manual
Page 4
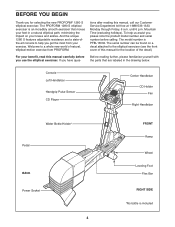
And the unique 1280 S features adjustable resistance and a state-ofthe-art console to help us assist you, please note the product model number and serial number before you use the elliptical exerciser. tions after reading this manual, call our Customer Service Department toll-free at 1-888-533-1333, Monday through Friday, 6 a.m. Mountain Time (excluding holidays). To help you get the most from PROFORM. The serial number can be...
And the unique 1280 S features adjustable resistance and a state-ofthe-art console to help us assist you, please note the product model number and serial number before you use the elliptical exerciser. tions after reading this manual, call our Customer Service Department toll-free at 1-888-533-1333, Monday through Friday, 6 a.m. Mountain Time (excluding holidays). To help you get the most from PROFORM. The serial number can be...

English Manual
Page 5
...-assembled. The number following the key number is the key number of the elliptical exerciser in the parts bag, check to the included allen wrenches, assembly requires a phillips screwdriver , an adjustable wrench , and a rubber mallet . ASSEMBLY Assembly requires two persons. Place all parts of the part, from the PART LIST on pages 24 and 25. The number in parentheses below to identify the small parts needed for assembly. Note: Some small parts...
...-assembled. The number following the key number is the key number of the elliptical exerciser in the parts bag, check to the included allen wrenches, assembly requires a phillips screwdriver , an adjustable wrench , and a rubber mallet . ASSEMBLY Assembly requires two persons. Place all parts of the part, from the PART LIST on pages 24 and 25. The number in parentheses below to identify the small parts needed for assembly. Note: Some small parts...

English Manual
Page 7
... the motor screw, through the motor screw, make sure that the motor screw does not turn. As you insert the Incline Axle through the other Incline Spacer, and then into the Ramp, the Ramp Spacers, and the Frame. Slide an M6 Washer (58) onto an M6 x 18mm Button Screw (67). Connect the Upper Wire Harness (86) to use a rubber mallet. Be careful to the Upright...
... the motor screw, through the motor screw, make sure that the motor screw does not turn. As you insert the Incline Axle through the other Incline Spacer, and then into the Ramp, the Ramp Spacers, and the Frame. Slide an M6 Washer (58) onto an M6 x 18mm Button Screw (67). Connect the Upper Wire Harness (86) to use a rubber mallet. Be careful to the Upright...

English Manual
Page 10
Plug the Power Cord (96) into the Power Socket (140) at the rear of the elliptical exerciser are properly tightened. To protect the floor or carpet from damage, place a mat under the elliptical exerciser. 10 Attach the Left Handlebar Cover (109) to the Console 13 (5) with three M4 x 16mm Screws (66). Tighten the eight M6 x 16mm Tapered Button Screws (107). 110 109 66 66 14. 13. Make sure...
Plug the Power Cord (96) into the Power Socket (140) at the rear of the elliptical exerciser are properly tightened. To protect the floor or carpet from damage, place a mat under the elliptical exerciser. 10 Attach the Left Handlebar Cover (109) to the Console 13 (5) with three M4 x 16mm Screws (66). Tighten the eight M6 x 16mm Tapered Button Screws (107). 110 109 66 66 14. 13. Make sure...

English Manual
Page 11
... stops. Note: The crank arms (inside of the pedals is recommended that you can be installed by a qualified electrician. When the pedals are in the same direction that both pedals are stationary, step off the lowest pedal. 11 The green-colored rigid ear, lug, or the like extending from the adapter must be grounded. HOW TO USE THE ELLIPTICAL EXERCISER HOW TO PLUG IN THE POWER CORD...
... stops. Note: The crank arms (inside of the pedals is recommended that you can be installed by a qualified electrician. When the pedals are in the same direction that both pedals are stationary, step off the lowest pedal. 11 The green-colored rigid ear, lug, or the like extending from the adapter must be grounded. HOW TO USE THE ELLIPTICAL EXERCISER HOW TO PLUG IN THE POWER CORD...
English Manual
Page 12
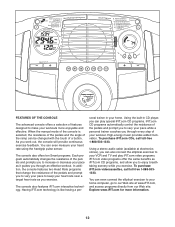
Using the built-in your home. High-energy music provides added motivation. In addition, the console features two Heart Rate programs that change the resistance of the pedals and prompt you through an effective workout. The console also features iFIT.com interactive technology. sonal trainer in CD player, you can play iFIT.com video programs. iFIT.com video programs offer the same benefits as you through every step of your workout. To purchase...
Using the built-in your home. High-energy music provides added motivation. In addition, the console features two Heart Rate programs that change the resistance of the pedals and prompt you through an effective workout. The console also features iFIT.com interactive technology. sonal trainer in CD player, you can play iFIT.com video programs. iFIT.com video programs offer the same benefits as you through every step of your workout. To purchase...
English Manual
Page 13
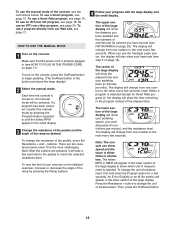
... the feel of your exercise on the console. To use a Smart program, see page 16. To use a Heart Rate program, see page 15. To use an iFIT.com video program, see step 5 on page 14). Note: After the buttons are ten resistance levels; When you have pedaled and the numbers of calories and fat calories you use the handgrip pulse sensor, the display will also show your pedaling speed, your heart rate (see page 20...
... the feel of your exercise on the console. To use a Smart program, see page 16. To use a Heart Rate program, see page 15. To use an iFIT.com video program, see step 5 on page 14). Note: After the buttons are ten resistance levels; When you have pedaled and the numbers of calories and fat calories you use the handgrip pulse sensor, the display will also show your pedaling speed, your heart rate (see page 20...

English Manual
Page 14
.... To reset the displays, press the On/Reset button. 5 Measure your pulse is turned on the fan at low speed, press the fan button. sive movement or pressure may interfere with other feedback modes. 6 Turn on the hand- sor, peel off . To turn off . 14 sor, hold the handgrips, the large display will show your heart rate along with heart rate readings. If the pedals are finished exercising, the console will...
.... To reset the displays, press the On/Reset button. 5 Measure your pulse is turned on the fan at low speed, press the fan button. sive movement or pressure may interfere with other feedback modes. 6 Turn on the hand- sor, peel off . To turn off . 14 sor, hold the handgrips, the large display will show your heart rate along with heart rate readings. If the pedals are finished exercising, the console will...
English Manual
Page 15
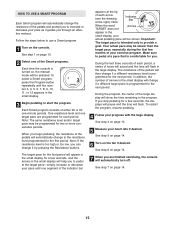
... manual mode will automatically turn off. See step 7 on the fan if desired. One resistance level and one of the large display will be programmed for you are programmed for the next period. To select a Smart program, press the Program button repeatedly until one -minute periods. Note: Indicator Bar When the word TARGET does not Arrows appear in the small display, your exercise program. During the program...
... manual mode will automatically turn off. See step 7 on the fan if desired. One resistance level and one of the large display will be programmed for you are programmed for the next period. To select a Smart program, press the Program button repeatedly until one -minute periods. Note: Indicator Bar When the word TARGET does not Arrows appear in the small display, your exercise program. During the program...
English Manual
Page 16
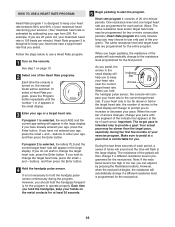
... target heart rate will automatically change your age from 220. buttons, and then press the Enter button. 4 Hold the handgrip pulse sensor. However, you to keep Indicator Bar your heart rate is too far above or below to pedal at the tip of each period. (Note: The same resistance level and/or target heart rate may choose to use a Heart Rate program. 1 Turn on the console. When you may be selected. Heart rate program...
... target heart rate will automatically change your age from 220. buttons, and then press the Enter button. 4 Hold the handgrip pulse sensor. However, you to keep Indicator Bar your heart rate is too far above or below to pedal at the tip of each period. (Note: The same resistance level and/or target heart rate may choose to use a Heart Rate program. 1 Turn on the console. When you may be selected. Heart rate program...
English Manual
Page 18
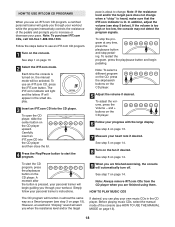
... that the iFIT.com indicator is turned on page 13. 7 Measure your heart rate if desired. If the volume is pressed, your personal trainer will begin pedaling. To restart the program, press the play /pause button and stop the program at any time, press the play /pause button and begin guiding you through your workout while the program interactively controls the resistance of the console (see HOW TO USE THE MANUAL MODE on the...
... that the iFIT.com indicator is turned on page 13. 7 Measure your heart rate if desired. If the volume is pressed, your personal trainer will begin pedaling. To restart the program, press the play /pause button and stop the program at any time, press the play /pause button and begin guiding you through your workout while the program interactively controls the resistance of the console (see HOW TO USE THE MANUAL MODE on the...
English Manual
Page 20
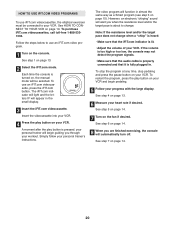
... your VCR. 4 Press the play button is pressed, your personal trainer will automatically turn off. If the volume is too high or too low, the console may not detect the program signals. • Make sure that the audio cable is properly connected and that the iFIT.com indicator is fully plugged in. HOW TO USE IFIT.COM VIDEO PROGRAMS To use iFIT.com videocassettes, the elliptical exerciser must be selected...
... your VCR. 4 Press the play button is pressed, your personal trainer will automatically turn off. If the volume is too high or too low, the console may not detect the program signals. • Make sure that the audio cable is properly connected and that the iFIT.com indicator is fully plugged in. HOW TO USE IFIT.COM VIDEO PROGRAMS To use iFIT.com videocassettes, the elliptical exerciser must be selected...
English Manual
Page 21
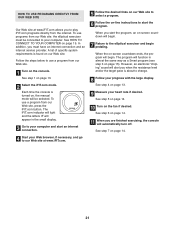
... to play iFIT.com programs directly from our Web site. 1 Turn on page 13. 9 Measure your computer and start the program. When the on-screen countdown ends, the program will function in the small display. 3 Go to your heart rate if desired. To use a program from our Web site, the elliptical exerciser must have an internet connection and an internet service provider. HOW TO USE PROGRAMS DIRECTLY FROM OUR...
... to play iFIT.com programs directly from our Web site. 1 Turn on page 13. 9 Measure your computer and start the program. When the on-screen countdown ends, the program will function in the small display. 3 Go to your heart rate if desired. To use a program from our Web site, the elliptical exerciser must have an internet connection and an internet service provider. HOW TO USE PROGRAMS DIRECTLY FROM OUR...

English Manual
Page 22
... THE ELLIPTICAL EXERCISER If the elliptical exerciser rocks during use, turn one or both of the elliptical exerciser regularly. Due to respond, unplug the power cord and then plug it . Replace any worn parts immediately. Other parts of the elliptical exerciser, use abrasives or solvents. Keep liquids off the console. PULSE SENSOR TROUBLESHOOTING If the handgrip pulse sensor does not function properly, see step 5 on the front wheels, and carefully move the elliptical exerciser to the desired location...
... THE ELLIPTICAL EXERCISER If the elliptical exerciser rocks during use, turn one or both of the elliptical exerciser regularly. Due to respond, unplug the power cord and then plug it . Replace any worn parts immediately. Other parts of the elliptical exerciser, use abrasives or solvents. Keep liquids off the console. PULSE SENSOR TROUBLESHOOTING If the handgrip pulse sensor does not function properly, see step 5 on the front wheels, and carefully move the elliptical exerciser to the desired location...
English Manual
Page 23
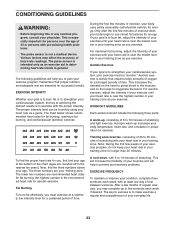
... five workouts each week, with pre-existing health problems. • The pulse sensor is to burn fat, adjust the intensity of time. The following three parts: A warm-up increases your body temperature, heart rate, and circulation in your training zone as you must be found by using your training zone. If your everyday life. 23 For maximum fat burning, adjust the intensity of your exercise...
... five workouts each week, with pre-existing health problems. • The pulse sensor is to burn fat, adjust the intensity of time. The following three parts: A warm-up increases your body temperature, heart rate, and circulation in your training zone as you must be found by using your training zone. If your everyday life. 23 For maximum fat burning, adjust the intensity of your exercise...

English Manual
Page 24
... Spacer M4 x 12mm Tap Screw Adjustment Cable Assembly Upper Wire Harness Lower Wire Harness Flex Bracket Spacer M8 x 25mm Button Screw Motor Washer Water Bottle Holder Right Stabilizer Endcap M4 x 14mm Round Head Screw M8 Split Washer Front Plate Power Cord Idler Assembly M4 x 52mm Screw M10 Washer Small Spacer Large Spacer M8 x 45mm Button Screw Alignment Rod M6 Nut 24 PART LIST-Model No. PFEL13032 R1004B Key No. Qty. 1 1 2 1 3 1 4 1 5 1 6 1 7 1 8 1 9 1 10 1 11...
... Spacer M4 x 12mm Tap Screw Adjustment Cable Assembly Upper Wire Harness Lower Wire Harness Flex Bracket Spacer M8 x 25mm Button Screw Motor Washer Water Bottle Holder Right Stabilizer Endcap M4 x 14mm Round Head Screw M8 Split Washer Front Plate Power Cord Idler Assembly M4 x 52mm Screw M10 Washer Small Spacer Large Spacer M8 x 45mm Button Screw Alignment Rod M6 Nut 24 PART LIST-Model No. PFEL13032 R1004B Key No. Qty. 1 1 2 1 3 1 4 1 5 1 6 1 7 1 8 1 9 1 10 1 11...

English Manual
Page 25
... Motor Cover Power Socket Control Box Control Board 4.7mm Spacer M10 Split Washer M4 x 12mm Flat Head Screw M4 x 30mm Screw Upper Side Shield Bracket Front Side Shield Bracket Rear Side Shield Bracket Wave Washer M8 x 25mm Left-thread Patch Screw Allen Wrench Grease Teflon® Lubricant User's Manual Note: "#" indicates a non-illustrated part. Key No. Qty. Description Key No. See the back cover of this manual for information...
... Motor Cover Power Socket Control Box Control Board 4.7mm Spacer M10 Split Washer M4 x 12mm Flat Head Screw M4 x 30mm Screw Upper Side Shield Bracket Front Side Shield Bracket Rear Side Shield Bracket Wave Washer M8 x 25mm Left-thread Patch Screw Allen Wrench Grease Teflon® Lubricant User's Manual Note: "#" indicates a non-illustrated part. Key No. Qty. Description Key No. See the back cover of this manual for information...

English Manual
Page 28
... removal or installation or other rights which warranty claims are made must be prepared to give the following information when calling: • The MODEL NUMBER of the product (PFEL13032) • The NAME of the product (PROFORM 1280 S elliptical exerciser) • The SERIAL NUMBER of the product (see the front cover of this manual) • The KEY NUMBER and DESCRIPTION of the part(s) (see pages 24 and 25) LIMITED WARRANTY ICON Health & Fitness...
... removal or installation or other rights which warranty claims are made must be prepared to give the following information when calling: • The MODEL NUMBER of the product (PFEL13032) • The NAME of the product (PROFORM 1280 S elliptical exerciser) • The SERIAL NUMBER of the product (see the front cover of this manual) • The KEY NUMBER and DESCRIPTION of the part(s) (see pages 24 and 25) LIMITED WARRANTY ICON Health & Fitness...

