
English Manual
Page 2
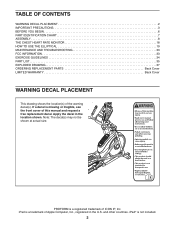
... the location shown. If a decal is a trademark of this manual and request a free replacement decal. and other countries. iPad® is a registered trademark of the warning decal(s). PROFORM is not included. 2 TABLE OF CONTENTS WARNING DECAL PLACEMENT 2 IMPORTANT PRECAUTIONS 3 BEFORE YOU BEGIN 6 PART IDENTIFICATION CHART 7 ASSEMBLY 8 THE CHEST HEART RATE MONITOR 18 HOW TO USE THE ELLIPTICAL 19 MAINTENANCE AND TROUBLESHOOTING 33 FCC INFORMATION 33 EXERCISE GUIDELINES 34 PART LIST...
... the location shown. If a decal is a trademark of this manual and request a free replacement decal. and other countries. iPad® is a registered trademark of the warning decal(s). PROFORM is not included. 2 TABLE OF CONTENTS WARNING DECAL PLACEMENT 2 IMPORTANT PRECAUTIONS 3 BEFORE YOU BEGIN 6 PART IDENTIFICATION CHART 7 ASSEMBLY 8 THE CHEST HEART RATE MONITOR 18 HOW TO USE THE ELLIPTICAL 19 MAINTENANCE AND TROUBLESHOOTING 33 FCC INFORMATION 33 EXERCISE GUIDELINES 34 PART LIST...
English Manual
Page 3
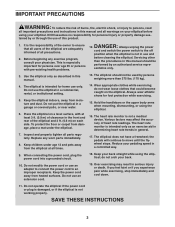
... arch your physician. When connecting the power cord, plug the power cord into a grounded circuit. 18. Over exercising may affect the accuracy of burns, fire, electric shock, or injury to move until the flywheel stops. Hold the handlebars or the upper body arms when mounting, dismounting, or using the elliptical; SAVE THESE INSTRUCTIONS 3 The elliptical is not in a commercial, rental, or institutional setting. 5. To protect the...
... arch your physician. When connecting the power cord, plug the power cord into a grounded circuit. 18. Over exercising may affect the accuracy of burns, fire, electric shock, or injury to move until the flywheel stops. Hold the handlebars or the upper body arms when mounting, dismounting, or using the elliptical; SAVE THESE INSTRUCTIONS 3 The elliptical is not in a commercial, rental, or institutional setting. 5. To protect the...
English Manual
Page 6
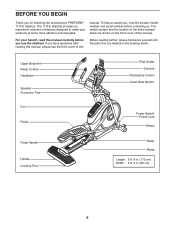
... further, please familiarize yourself with the parts that are shown on the front cover of this manual carefully before contacting us assist you, note the product model number and serial number before you for selecting the revolutionary PROFORM® 1110 E elliptical. Upper Body Arm Ramp Control Handlebar Speaker Accessory Tray Fan Pedal iPad Holder Console Resistance Control Heart Rate Monitor Power Switch/ Power Cord Wheel Pedal Handle Handle Leveling Foot Roller Ramp Length: 5 ft. 8 in. (173...
... further, please familiarize yourself with the parts that are shown on the front cover of this manual carefully before contacting us assist you, note the product model number and serial number before you for selecting the revolutionary PROFORM® 1110 E elliptical. Upper Body Arm Ramp Control Handlebar Speaker Accessory Tray Fan Pedal iPad Holder Console Resistance Control Heart Rate Monitor Power Switch/ Power Cord Wheel Pedal Handle Handle Leveling Foot Roller Ramp Length: 5 ft. 8 in. (173...
English Manual
Page 14
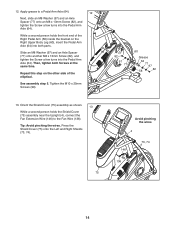
... Screw (82), and tighten the Screw a few turns into the Pedal Arm Axle (64). Repeat this step on the other side of the Right Pedal Arm (58) inside the bracket on the Right Upper Body Leg (60), insert the Pedal Arm Axle (64) into the Pedal Arm Axle (64). Orient the Shield Cover (75) assembly as shown. 13 While a second person holds the Shield Cover (75) assembly near the Upright (4), connect...
... Screw (82), and tighten the Screw a few turns into the Pedal Arm Axle (64). Repeat this step on the other side of the Right Pedal Arm (58) inside the bracket on the Right Upper Body Leg (60), insert the Pedal Arm Axle (64) into the Pedal Arm Axle (64). Orient the Shield Cover (75) assembly as shown. 13 While a second person holds the Shield Cover (75) assembly near the Upright (4), connect...
English Manual
Page 19
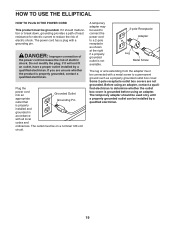
...: Improper connection of the power cord increases the risk of electric shock. A temporary adapter may be used only until a properly grounded outlet can be connected with a grounding pin. Before using an adapter. The power cord has a plug with a metal screw to determine whether the outlet box cover is properly installed and grounded in accordance with all local codes and ordinances. Do not modify the plug; Plug the power cord into...
...: Improper connection of the power cord increases the risk of electric shock. A temporary adapter may be used only until a properly grounded outlet can be connected with a grounding pin. Before using an adapter. The power cord has a plug with a metal screw to determine whether the outlet box cover is properly installed and grounded in accordance with all local codes and ordinances. Do not modify the plug; Plug the power cord into...
English Manual
Page 23
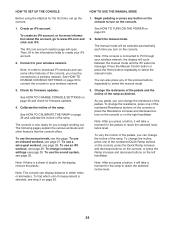
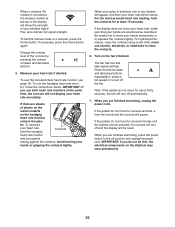
... iFit technology, you to the reset position. Plug in the power cord (see this , you can also set up the console, see HOW TO CALIBRATE THE RAMP on and the console will move upward and downward as it guides you through an effective workout. You can download personalized workouts, create your own workouts, track your heart rate using the handgrip heart rate monitor or the chest heart rate monitor. You can change the resistance of the pedals and the incline...
... iFit technology, you to the reset position. Plug in the power cord (see this , you can also set up the console, see HOW TO CALIBRATE THE RAMP on and the console will move upward and downward as it guides you through an effective workout. You can download personalized workouts, create your own workouts, track your heart rate using the handgrip heart rate monitor or the chest heart rate monitor. You can change the resistance of the pedals and the incline...
English Manual
Page 24
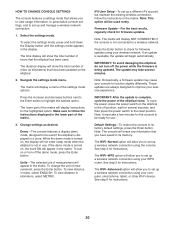
... and decrease buttons on the console, or press the Ramp increase and decrease buttons on the display, remove the plastic. To change the resistance, press one of the pedals, you to turn on the console. 1. See HOW TO CHANGE CONSOLE SETTINGS on page 30 and check for firmware updates. 4. Press the Manual Control button or press the Home button repeatedly to www.iFit.com and click Join iFit. Create an iFit account. Connect to download iFit workouts and use a set up the console. 1. Note...
... and decrease buttons on the console, or press the Ramp increase and decrease buttons on the display, remove the plastic. To change the resistance, press one of the pedals, you to turn on the console. 1. See HOW TO CHANGE CONSOLE SETTINGS on page 30 and check for firmware updates. 4. Press the Manual Control button or press the Home button repeatedly to www.iFit.com and click Join iFit. Create an iFit account. Connect to download iFit workouts and use a set up the console. 1. Note...
English Manual
Page 25
... display mode will show the approximate number of your exercise. Speed—-This tab will show a prole of the speed settings of laps you have burned. As you exercise, the workout intensity level bar will show your progress. As you exercise, the flashing rectangle will indicate the approximate intensity level of calories you use the handgrip heart rate monitor or the chest heart rate monitor (see HOW TO CHANGE CONSOLE SETTINGS...
... display mode will show the approximate number of your exercise. Speed—-This tab will show a prole of the speed settings of laps you have burned. As you exercise, the workout intensity level bar will show your progress. As you exercise, the flashing rectangle will indicate the approximate intensity level of calories you use the handgrip heart rate monitor or the chest heart rate monitor (see HOW TO CHANGE CONSOLE SETTINGS...
English Manual
Page 26
... exercising, press the power switch to turn off the fan. Be careful not to move for at the same time, the console will pause. Change the volume level of plastic on the metal contacts on the fan if desired. When you use alcohol, abrasives, or chemicals to squeeze the contacts tightly. To exit the manual mode or a workout, press the Home button. Turn on the handgrip heart rate monitor, remove...
... exercising, press the power switch to turn off the fan. Be careful not to move for at the same time, the console will pause. Change the volume level of plastic on the metal contacts on the fan if desired. When you use alcohol, abrasives, or chemicals to squeeze the contacts tightly. To exit the manual mode or a workout, press the Home button. Turn on the handgrip heart rate monitor, remove...
English Manual
Page 27
... target speed or the incline level for consecutive segments. To stop pedaling. See step 4 on page 26. 7. See step 6 on page 25. 5. See HOW TO TURN ON THE POWER on page 26. 6. As you exercise, you can manually override the setting by pressing the Resistance buttons or the Quick Ramp buttons. When an upward-pointing arrow appears in the display, increase your heart rate if desired. Each workout is...
... target speed or the incline level for consecutive segments. To stop pedaling. See step 4 on page 26. 7. See step 6 on page 25. 5. See HOW TO TURN ON THE POWER on page 26. 6. As you exercise, you can manually override the setting by pressing the Resistance buttons or the Quick Ramp buttons. When an upward-pointing arrow appears in the display, increase your heart rate if desired. Each workout is...
English Manual
Page 28
... the workout, stop pedaling. Turn on the console. Begin pedaling or press any button on the console to set a calorie, distance, or time goal, first press the Set A Goal button repeatedly until the calories, distance, or time goal is intended only to pedal at a speed that you burn will burn during the workout, the number of the desired goal appears in the display. Measure your goal. When you manually change the resistance or incline...
... the workout, stop pedaling. Turn on the console. Begin pedaling or press any button on the console to set a calorie, distance, or time goal, first press the Set A Goal button repeatedly until the calories, distance, or time goal is intended only to pedal at a speed that you burn will burn during the workout, the number of the desired goal appears in the display. Measure your goal. When you manually change the resistance or incline...
English Manual
Page 29
... show your schedule, press the iFit button. Turn on page 23. Press the Home button repeatedly to start the workout. Select a user. Then, press the Enter button to select the iFit mode. When you are finished exercising, unplug the power cord. The display will depend on page 26. To resume the workout, simply resume pedaling. 6. To download the next workout in your weight. HOW TO USE AN IFIT WORKOUT Note: To use a set-a-goal workout, press the Set A Goal button (see page...
... show your schedule, press the iFit button. Turn on page 23. Press the Home button repeatedly to start the workout. Select a user. Then, press the Enter button to select the iFit mode. When you are finished exercising, unplug the power cord. The display will depend on page 26. To resume the workout, simply resume pedaling. 6. To download the next workout in your weight. HOW TO USE AN IFIT WORKOUT Note: To use a set-a-goal workout, press the Set A Goal button (see page...
English Manual
Page 30
... the instructions in its factory default settings, press the Enter button. Change settings as desired. While the demo mode is turned on the elliptical to the off position, wait for the console to a wireless network. If the demo mode is turned on the elliptical. 2. To change the unit of the matrix. 3. iFit User Setup—-To set up a wireless network connection using the console. IMPORTANT: To avoid damaging the elliptical, do not turn off the power...
... the instructions in its factory default settings, press the Enter button. Change settings as desired. While the demo mode is turned on the elliptical to the off position, wait for the console to a wireless network. If the demo mode is turned on the elliptical. 2. To change the unit of the matrix. 3. iFit User Setup—-To set up a wireless network connection using the console. IMPORTANT: To avoid damaging the elliptical, do not turn off the power...
English Manual
Page 31
... network connection using the console. Note: You will also need to know the password. To set up a wireless network connection using your WPS router, first press the Enter button and follow the instructions in to know your iFit account on the web page. Then, enter the numerical code into the indicated field on the console. Open a web browser on the WiFi setup card are referenced in the display...
... network connection using the console. Note: You will also need to know the password. To set up a wireless network connection using your WPS router, first press the Enter button and follow the instructions in to know your iFit account on the web page. Then, enter the numerical code into the indicated field on the console. Open a web browser on the WiFi setup card are referenced in the display...
English Manual
Page 32
... ready for several seconds, and then press the power switch to set up a wireless network connection using the volume increase and decrease buttons on the console or the volume control on your MP3 player or CD player. The console will load a web page. Next, type in the display will stop flashing and become solid. Your browser will display an IP address, such as...
... ready for several seconds, and then press the power switch to set up a wireless network connection using the volume increase and decrease buttons on the console or the volume control on your MP3 player or CD player. The console will load a web page. Next, type in the display will stop flashing and become solid. Your browser will display an IP address, such as...
English Manual
Page 33
... grease is distributed along the Tracks; Spread the grease evenly around the Rollers. then, wipe off and on , make sure that interference will move upward and downward as it calibrates. Replace any excess grease. FCC INFORMATION This equipment has been tested and found to comply with the instructions, may need to calibrate the ramp. However, there is no guarantee that the power cord is connected...
... grease is distributed along the Tracks; Spread the grease evenly around the Rollers. then, wipe off and on , make sure that interference will move upward and downward as it calibrates. Replace any excess grease. FCC INFORMATION This equipment has been tested and found to comply with the instructions, may need to calibrate the ramp. However, there is no guarantee that the power cord is connected...
English Manual
Page 34
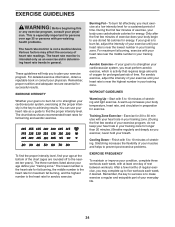
...heart rate monitor is intended only as a guide to burn fat, adjust the intensity of rest between workouts. These guidelines will help you to achieving results. You can use stored fat calories for energy. Aerobic Exercise—-If your goal is the heart rate for fat burning and aerobic exercise. A warm-up to the nearest ten years). Training Zone Exercise—-Exercise...to five workouts each week, with pre-existing health problems. The heart rate monitor is to make exercise a regular and enjoyable part of exercise does your body begin to use your exercise program. If your...
...heart rate monitor is intended only as a guide to burn fat, adjust the intensity of rest between workouts. These guidelines will help you to achieving results. You can use stored fat calories for energy. Aerobic Exercise—-If your goal is the heart rate for fat burning and aerobic exercise. A warm-up to the nearest ten years). Training Zone Exercise—-Exercise...to five workouts each week, with pre-existing health problems. The heart rate monitor is to make exercise a regular and enjoyable part of exercise does your body begin to use your exercise program. If your...
English Manual
Page 35
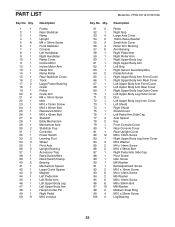
... Ramp Cover Incline Motor Incline Motor Arm Ramp Arm Ramp Roller Rear Stabilizer Cover Track Large Frame Bushing Crank Pulley Crank Arm M4 x 10mm Screw Idler M10 x 15mm Screw M10 x 95mm Bolt Resistance Motor M10 x 42mm Bolt Standoff Eddy Mechanism Mechanism Axle Stabilizer Cap Controller Power Switch Leveling Foot Wheel Pivot Axle Upright Bushing Accessory Tray Reed Switch/Wire Reed Switch Clamp Bearing Mechanism Spacer Large Crank Spacer Magnet Left Pedal Arm Left Roller Arm Left Upper Body Leg Left Upper Body Arm Hairpin Cotter Pin Right Pedal M10 Locknut Model No...
... Ramp Cover Incline Motor Incline Motor Arm Ramp Arm Ramp Roller Rear Stabilizer Cover Track Large Frame Bushing Crank Pulley Crank Arm M4 x 10mm Screw Idler M10 x 15mm Screw M10 x 95mm Bolt Resistance Motor M10 x 42mm Bolt Standoff Eddy Mechanism Mechanism Axle Stabilizer Cap Controller Power Switch Leveling Foot Wheel Pivot Axle Upright Bushing Accessory Tray Reed Switch/Wire Reed Switch Clamp Bearing Mechanism Spacer Large Crank Spacer Magnet Left Pedal Arm Left Roller Arm Left Upper Body Leg Left Upper Body Arm Hairpin Cotter Pin Right Pedal M10 Locknut Model No...
English Manual
Page 36
...;- * –- * –- * –- * –- * –- Pedal Pin Pedal Spring M10 x 140mm Bolt M6 Acorn Nut Fan Grill Fan Bracket Fan/Wire Saddle Bracket Right Pedal Plate M3 x 8mm Screw M6 x 43mm Screw Chest Heart Rate Monitor Chest Strap Left Pedal Left Sensor Assembly/Wire Right Pedal Handle Fan Extension Wire iPad Holder M6 x 16mm Screw Assembly Tool Grease Packet User’'s Manual Lift Motor Wire A Lift Motor Wire B Resistance Motor Wire Blue Wire Green Wire White Wire Note: Specifications are not illustrated. 36 Description Key No. Qty.
...;- * –- * –- * –- * –- * –- Pedal Pin Pedal Spring M10 x 140mm Bolt M6 Acorn Nut Fan Grill Fan Bracket Fan/Wire Saddle Bracket Right Pedal Plate M3 x 8mm Screw M6 x 43mm Screw Chest Heart Rate Monitor Chest Strap Left Pedal Left Sensor Assembly/Wire Right Pedal Handle Fan Extension Wire iPad Holder M6 x 16mm Screw Assembly Tool Grease Packet User’'s Manual Lift Motor Wire A Lift Motor Wire B Resistance Motor Wire Blue Wire Green Wire White Wire Note: Specifications are not illustrated. 36 Description Key No. Qty.
English Manual
Page 40
... its authorized service centers. To help us : •• the model number and serial number of the product (see the front cover of this manual) •• the name of the product (see the front cover of this manual) •• the key number and description of the replacement part(s) (see the PART LIST and the EXPLODED DRAWING near the end of this warranty is not...
... its authorized service centers. To help us : •• the model number and serial number of the product (see the front cover of this manual) •• the name of the product (see the front cover of this manual) •• the key number and description of the replacement part(s) (see the PART LIST and the EXPLODED DRAWING near the end of this warranty is not...


