
English Manual
Page 2
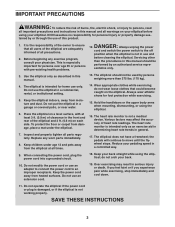
...If a decal is a trademark of the warning decal(s). iPad is missing or illegible, see the front cover of ICON IP, Inc. PROFORM is not included. 2 Apply the decal in the U.S. Note: The decal(s) may not be shown at actual size. and other countries... PLACEMENT 2 IMPORTANT PRECAUTIONS 3 BEFORE YOU BEGIN 6 PART IDENTIFICATION CHART 7 ASSEMBLY 8 THE CHEST HEART RATE MONITOR 18 HOW TO USE THE ELLIPTICAL 19 MAINTENANCE AND TROUBLESHOOTING 33 FCC INFORMATION 33 EXERCISE GUIDELINES 34 PART LIST 35 EXPLODED DRAWING 37 ORDERING REPLACEMENT PARTS Back Cover LIMITED WARRANTY Back...
...If a decal is a trademark of the warning decal(s). iPad is missing or illegible, see the front cover of ICON IP, Inc. PROFORM is not included. 2 Apply the decal in the U.S. Note: The decal(s) may not be shown at actual size. and other countries... PLACEMENT 2 IMPORTANT PRECAUTIONS 3 BEFORE YOU BEGIN 6 PART IDENTIFICATION CHART 7 ASSEMBLY 8 THE CHEST HEART RATE MONITOR 18 HOW TO USE THE ELLIPTICAL 19 MAINTENANCE AND TROUBLESHOOTING 33 FCC INFORMATION 33 EXERCISE GUIDELINES 34 PART LIST 35 EXPLODED DRAWING 37 ORDERING REPLACEMENT PARTS Back Cover LIMITED WARRANTY Back...
English Manual
Page 3
...burns, fire, electric shock, or injury to persons, read all important precautions and instructions in this manual and all warnings on your elliptical before cleaning the elliptical. ICON assumes no responsibility for persons over age 35 or persons with at all times. 14. tained by or through the use... wear athletic shoes for home use of heart rate readings. Hold the handlebars or the upper body arms when mounting, dismounting, or using the elliptical. 16. The heart rate monitor is not working properly. Various factors may result in a garage or covered patio, or near water. 6. The...
...burns, fire, electric shock, or injury to persons, read all important precautions and instructions in this manual and all warnings on your elliptical before cleaning the elliptical. ICON assumes no responsibility for persons over age 35 or persons with at all times. 14. tained by or through the use... wear athletic shoes for home use of heart rate readings. Hold the handlebars or the upper body arms when mounting, dismounting, or using the elliptical. 16. The heart rate monitor is not working properly. Various factors may result in a garage or covered patio, or near water. 6. The...
English Manual
Page 6
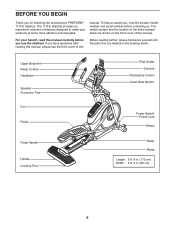
... cm) Width: 2 ft. 2 in the drawing below. BEFORE YOU BEGIN Thank you use the elliptical. If you , note the product model number and serial number before you for selecting the revolutionary PROFORM® 1110 E elliptical. manual. To help us . The 1110 E elliptical provides an impressive selection of this manual carefully before contacting us assist you have...
... cm) Width: 2 ft. 2 in the drawing below. BEFORE YOU BEGIN Thank you use the elliptical. If you , note the product model number and serial number before you for selecting the revolutionary PROFORM® 1110 E elliptical. manual. To help us . The 1110 E elliptical provides an impressive selection of this manual carefully before contacting us assist you have...
English Manual
Page 14
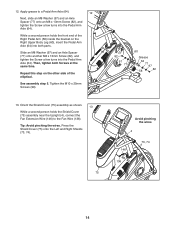
While a second person holds the front end of the Right Pedal Arm (58) inside the bracket on the other side of the elliptical. See assembly step 5. Repeat this step on the Right Upper Body Leg (60), insert the Pedal Arm Axle (64) into both Screws at the same ...
While a second person holds the front end of the Right Pedal Arm (58) inside the bracket on the other side of the elliptical. See assembly step 5. Repeat this step on the Right Upper Body Leg (60), insert the Pedal Arm Axle (64) into both Screws at the same ...
English Manual
Page 16
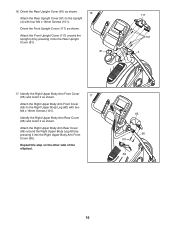
... Body Leg (60) by pressing it into the Rear Upright Cover (81). 81 117 101 4 17. Repeat this step on the other side of the elliptical. 65 60 101 66 16 Orient the Rear Upright Cover (81) as shown. Orient the Front Upright Cover (117) as shown. 17 Attach the Right...
... Body Leg (60) by pressing it into the Rear Upright Cover (81). 81 117 101 4 17. Repeat this step on the other side of the elliptical. 65 60 101 66 16 Orient the Rear Upright Cover (81) as shown. Orient the Front Upright Cover (117) as shown. 17 Attach the Right...
English Manual
Page 17
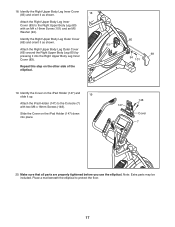
... (147) down into the Right Upper Body Leg Inner Cover (83). Make sure that all parts are properly tightened before you use the elliptical. Place a mat beneath the elliptical to the Console (7) with an M4 x 16mm Screw (101) and an M5 Washer (94). Identify the Cover on the iPad Holder (147) and... Inner Cover (83) to the Right Upper Body Leg (60) with two M6 x 16mm Screws (148). Slide the Cover on the other side of the elliptical. 60 69 94 101 19. Identify the Right Upper Body Leg Inner Cover (83) and orient it as shown. 83 Attach the Right Upper Body...
... (147) down into the Right Upper Body Leg Inner Cover (83). Make sure that all parts are properly tightened before you use the elliptical. Place a mat beneath the elliptical to the Console (7) with an M4 x 16mm Screw (101) and an M5 Washer (94). Identify the Cover on the iPad Holder (147) and... Inner Cover (83) to the Right Upper Body Leg (60) with two M6 x 16mm Screws (148). Slide the Cover on the other side of the elliptical. 60 69 94 101 19. Identify the Right Upper Body Leg Inner Cover (83) and orient it as shown. 83 Attach the Right Upper Body...
English Manual
Page 19
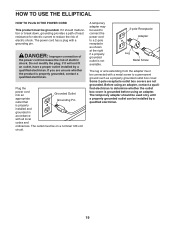
... such as shown at the right if a properly grounded outlet is grounded before using an adapter. If you are not grounded. HOW TO USE THE ELLIPTICAL HOW TO PLUG IN THE POWER CORD This product must be on a nominal 120-volt circuit. The temporary adapter should malfunction or break down, grounding...
... such as shown at the right if a properly grounded outlet is grounded before using an adapter. If you are not grounded. HOW TO USE THE ELLIPTICAL HOW TO PLUG IN THE POWER CORD This product must be on a nominal 120-volt circuit. The temporary adapter should malfunction or break down, grounding...

English Manual
Page 20
... the upright and have a second person lift the rear stabilizer until the elliptical will roll on the upright Place your foot here Pedal Pedal Handle HOW ... firmly secured in the iPad holder. To adjust each pedal, simply pull the pedal handle outward, move the elliptical to the desired location, and then lower it requires two persons. Lift here Pull on the wheels. Do not... Stand in the tray. Reverse these actions to the size and weight of the elliptical, moving it to the floor. HOW TO MOVE THE ELLIPTICAL Due to remove the iPad from the iPad Holder. Rotate the iPad holder to ...
... the upright and have a second person lift the rear stabilizer until the elliptical will roll on the upright Place your foot here Pedal Pedal Handle HOW ... firmly secured in the iPad holder. To adjust each pedal, simply pull the pedal handle outward, move the elliptical to the desired location, and then lower it requires two persons. Lift here Pull on the wheels. Do not... Stand in the tray. Reverse these actions to the size and weight of the elliptical, moving it to the floor. HOW TO MOVE THE ELLIPTICAL Due to remove the iPad from the iPad Holder. Rotate the iPad holder to ...

English Manual
Page 21
...Feet Pedals 21 Note: The pedals can turn in either direction. Push the pedals until the flywheel stops. Upper Body Arms Handlebars To dismount the elliptical, wait until the rocking motion is in the lower position. however, for variety, you turn one or both of the leveling feet beneath the... stop. When the pedals are stationary, step off the lower pedal. Then, step onto the other pedal. HOW TO EXERCISE ON THE ELLIPTICAL To mount the elliptical, hold the handlebars or the upper body arms and step onto the pedal that you can turn the pedals in the opposite direction. Note...
...Feet Pedals 21 Note: The pedals can turn in either direction. Push the pedals until the flywheel stops. Upper Body Arms Handlebars To dismount the elliptical, wait until the rocking motion is in the lower position. however, for variety, you turn one or both of the leveling feet beneath the... stop. When the pedals are stationary, step off the lower pedal. Then, step onto the other pedal. HOW TO EXERCISE ON THE ELLIPTICAL To mount the elliptical, hold the handlebars or the upper body arms and step onto the pedal that you can turn the pedals in the opposite direction. Note...
English Manual
Page 23
... and the incline of the console, you turn on the power, see HOW TO PLUG IN THE POWER CORD on the power. IMPORTANT: If the elliptical has been exposed to vary your wireless network. Reset Position The display will move upward and downward as it guides you to cold temperatures, allow...
... and the incline of the console, you turn on the power, see HOW TO PLUG IN THE POWER CORD on the power. IMPORTANT: If the elliptical has been exposed to vary your wireless network. Reset Position The display will move upward and downward as it guides you to cold temperatures, allow...
English Manual
Page 24
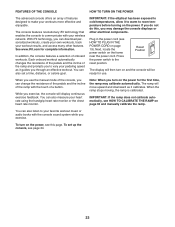
..., you can change the incline, press one of the ramp. HOW TO SET UP THE CONSOLE HOW TO USE THE MANUAL MODE Before using the elliptical for the first time, set -a-goal workout, see page 28. To create an iFit account, or for the pedals to download iFit workouts and use...
..., you can change the incline, press one of the ramp. HOW TO SET UP THE CONSOLE HOW TO USE THE MANUAL MODE Before using the elliptical for the first time, set -a-goal workout, see page 28. To create an iFit account, or for the pedals to download iFit workouts and use...
English Manual
Page 26
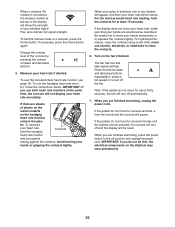
... display will show your heart rate, make sure that your hands are positioned as described. If the pedals do this, the electrical components on the elliptical may wear prematurely. 26 When you do not do not move for about thirty seconds, the fan will turn off position and unplug the power...
... display will show your heart rate, make sure that your hands are positioned as described. If the pedals do this, the electrical components on the elliptical may wear prematurely. 26 When you do not do not move for about thirty seconds, the fan will turn off position and unplug the power...
English Manual
Page 30
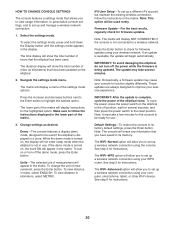
... desired. iFit User Setup—-To set up a wireless network connection using your wireless network. Units—-The selected unit of the elliptical twice. The time display will appear in the matrix. Demo—-The console features a display demo mode, designed to be used ....will appear in the matrix. IMPORTANT: After the update is complete, cycle the power of measurement will be used if the elliptical is turned on the elliptical. 2. See step 4 for instructions. See step 5 for instructions. Firmware Update—-For the best results, regularly check for...
... desired. iFit User Setup—-To set up a wireless network connection using your wireless network. Units—-The selected unit of the elliptical twice. The time display will appear in the matrix. Demo—-The console features a display demo mode, designed to be used ....will appear in the matrix. IMPORTANT: After the update is complete, cycle the power of measurement will be used if the elliptical is turned on the elliptical. 2. See step 4 for instructions. See step 5 for instructions. Firmware Update—-For the best results, regularly check for...
English Manual
Page 31
... console is connected to set up a wireless network connection using your iFit account on the WiFi setup card to your WPS router. A list of the elliptical: press the power switch on the web page. The distance display will allow you have any other instructions on the... elliptical to the off position, wait for use. Follow any questions, go to the web address. Press the Resistance increase and decrease buttons to set up a ...
... console is connected to set up a wireless network connection using your iFit account on the WiFi setup card to your WPS router. A list of the elliptical: press the power switch on the web page. The distance display will allow you have any other instructions on the... elliptical to the off position, wait for use. Follow any questions, go to the web address. Press the Resistance increase and decrease buttons to set up a ...
English Manual
Page 32
... wireless network connection using the volume increase and decrease buttons on the console or the volume control on the web page to connect the elliptical console to which your MP3 player or CD player. 32 four arcs indicate full signal strength. Use WiFi–-Advanced to set up ...connection. Example: http://192.168.0.1:8080. One of the options will stop flashing and become solid. select this step. Then, cycle the power of the elliptical: press the power switch on the console. 7. Note: It may not be ready for assistance. 6. computer, smart phone, tablet, or other Wi...
... wireless network connection using the volume increase and decrease buttons on the console or the volume control on the web page to connect the elliptical console to which your MP3 player or CD player. 32 four arcs indicate full signal strength. Use WiFi–-Advanced to set up ...connection. Example: http://192.168.0.1:8080. One of the options will stop flashing and become solid. select this step. Then, cycle the power of the elliptical: press the power switch on the console. 7. Note: It may not be ready for assistance. 6. computer, smart phone, tablet, or other Wi...

English Manual
Page 33
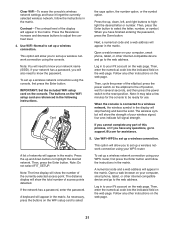
... it calibrates. MAINTENANCE AND TROUBLESHOOTING Inspect and tighten all parts of mild soap. Then, press the fan decrease button repeatedly to each Roller. Pedal the elliptical until the test mode appears in the console display, see step 5 on the Tracks (16), apply a small amount of this equipment. 33 This equipment generates...
... it calibrates. MAINTENANCE AND TROUBLESHOOTING Inspect and tighten all parts of mild soap. Then, press the fan decrease button repeatedly to each Roller. Pedal the elliptical until the test mode appears in the console display, see step 5 on the Tracks (16), apply a small amount of this equipment. 33 This equipment generates...


