
English Manual
Page 1
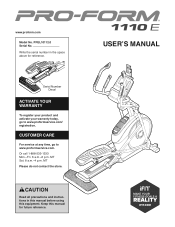
...proform.com Model No. Serial Number Decal ACTIVATE YOUR WARRANTY To register your product and activate your warranty today, go to www.proformservice.com/ registration. Or call 1-888-533-1333 Mon.–-Fri. 6 a.m.–-6 p.m. MT Please do not contact the store. Keep this equipment. Write the serial number in this manual... before using this manual for reference. CUSTOMER CARE For service at any time, go to www.proformservice.com. CAUTION Read all precautions and...
...proform.com Model No. Serial Number Decal ACTIVATE YOUR WARRANTY To register your product and activate your warranty today, go to www.proformservice.com/ registration. Or call 1-888-533-1333 Mon.–-Fri. 6 a.m.–-6 p.m. MT Please do not contact the store. Keep this equipment. Write the serial number in this manual... before using this manual for reference. CUSTOMER CARE For service at any time, go to www.proformservice.com. CAUTION Read all precautions and...
English Manual
Page 2
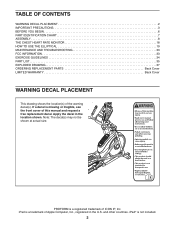
...IMPORTANT PRECAUTIONS 3 BEFORE YOU BEGIN 6 PART IDENTIFICATION CHART 7 ASSEMBLY 8 THE CHEST HEART RATE MONITOR 18 HOW TO USE THE ELLIPTICAL 19 MAINTENANCE AND TROUBLESHOOTING 33 FCC INFORMATION 33 EXERCISE GUIDELINES 34 PART LIST 35 EXPLODED DRAWING 37 ORDERING REPLACEMENT PARTS Back Cover LIMITED ... Back Cover WARNING DECAL PLACEMENT This drawing shows the location(s) of this manual and request a free replacement decal. iPad is a registered trademark of Apple Computer, Inc., registered in the location shown. PROFORM is a trademark of ICON IP, Inc. iPad® is missing or...
...IMPORTANT PRECAUTIONS 3 BEFORE YOU BEGIN 6 PART IDENTIFICATION CHART 7 ASSEMBLY 8 THE CHEST HEART RATE MONITOR 18 HOW TO USE THE ELLIPTICAL 19 MAINTENANCE AND TROUBLESHOOTING 33 FCC INFORMATION 33 EXERCISE GUIDELINES 34 PART LIST 35 EXPLODED DRAWING 37 ORDERING REPLACEMENT PARTS Back Cover LIMITED ... Back Cover WARNING DECAL PLACEMENT This drawing shows the location(s) of this manual and request a free replacement decal. iPad is a registered trademark of Apple Computer, Inc., registered in the location shown. PROFORM is a trademark of ICON IP, Inc. iPad® is missing or...
English Manual
Page 3
...(0.6 m) on each side. ICON assumes no responsibility for home use of this manual. 13. Servicing other than 375 lbs. (170 kg). 4. The elliptical should be used by or through the use only. Keep the elliptical indoors, away from heated surfaces. do not arch your back. 10. The heart...19. Various factors may result in a garage or covered patio, or near water. 6. Use the elliptical only as an exercise aid in determining heart rate trends in this manual should not be performed by an authorized service repre- Replace any exercise program, consult your back straight ...
...(0.6 m) on each side. ICON assumes no responsibility for home use of this manual. 13. Servicing other than 375 lbs. (170 kg). 4. The elliptical should be used by or through the use only. Keep the elliptical indoors, away from heated surfaces. do not arch your back. 10. The heart...19. Various factors may result in a garage or covered patio, or near water. 6. Use the elliptical only as an exercise aid in determining heart rate trends in this manual should not be performed by an authorized service repre- Replace any exercise program, consult your back straight ...
English Manual
Page 6
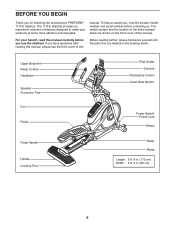
BEFORE YOU BEGIN Thank you use the elliptical. manual. If you have questions after reading this manual, please see the front cover of features designed to make your benefit, read this manual carefully before contacting us. Upper Body Arm Ramp Control Handlebar Speaker ...assist you, note the product model number and serial number before you for selecting the revolutionary PROFORM® 1110 E elliptical. The 1110 E elliptical provides an impressive selection of this manual. For your workouts at home more effective and enjoyable. The model number and the location of...
BEFORE YOU BEGIN Thank you use the elliptical. manual. If you have questions after reading this manual, please see the front cover of features designed to make your benefit, read this manual carefully before contacting us. Upper Body Arm Ramp Control Handlebar Speaker ...assist you, note the product model number and serial number before you for selecting the revolutionary PROFORM® 1110 E elliptical. The 1110 E elliptical provides an impressive selection of this manual. For your workouts at home more effective and enjoyable. The model number and the location of...
English Manual
Page 7
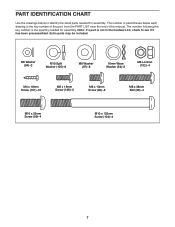
...;-4 7 PART IDENTIFICATION CHART Use the drawings below each drawing is the key number of the part, from the PART LIST near the end of this manual.
...;-4 7 PART IDENTIFICATION CHART Use the drawings below each drawing is the key number of the part, from the PART LIST near the end of this manual.
English Manual
Page 8
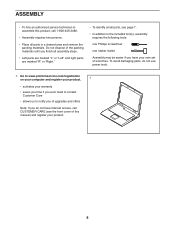
...: one Phillips screwdriver one rubber mallet Assembly may be easier if you ever need to contact Customer Care •• allows us to assemble this manual) and register your own set of this product, call 1-800-445-2480. •• Assembly requires two persons. •• Place all assembly steps. •...
...: one Phillips screwdriver one rubber mallet Assembly may be easier if you ever need to contact Customer Care •• allows us to assemble this manual) and register your own set of this product, call 1-800-445-2480. •• Assembly requires two persons. •• Place all assembly steps. •...
English Manual
Page 23
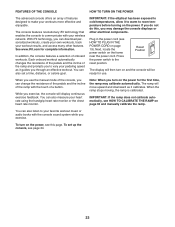
...com for use the manual mode of the console, you do not do this page. In addition, the console features a selection of onboard workouts. If you can also listen to your pedaling speed as it calibrates. While you through an effective workout. IMPORTANT: If the elliptical has been exposed to... exercise feedback. Reset Position The display will move upward and downward as it to warm to room temperature before turning on page 33 and manually calibrate the ramp. Note: When you use . You can change the resistance of the pedals and the incline of the ramp with the...
...com for use the manual mode of the console, you do not do this page. In addition, the console features a selection of onboard workouts. If you can also listen to your pedaling speed as it calibrates. While you through an effective workout. IMPORTANT: If the elliptical has been exposed to... exercise feedback. Reset Position The display will move upward and downward as it to warm to room temperature before turning on page 33 and manually calibrate the ramp. Note: When you use . You can change the resistance of the pedals and the incline of the ramp with the...
English Manual
Page 24
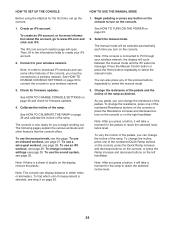
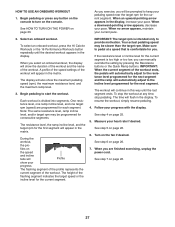
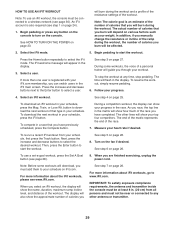
... can also press any button on the console to turn on the console. 1. HOW TO SET UP THE CONSOLE HOW TO USE THE MANUAL MODE Before using the elliptical for you to begin working out. To use an iFit workout, see step 3 on the right handlebar. To change the resistance of the... be selected automatically each time you can change the resistance, press one of the workout buttons repeatedly to iFit through your wireless network. Select the manual mode. Note: If the console is now ready for the first time, set -a-goal workout, see page 30. As you pedal, you press a button, ...
... can also press any button on the console to turn on the console. 1. HOW TO SET UP THE CONSOLE HOW TO USE THE MANUAL MODE Before using the elliptical for you to begin working out. To use an iFit workout, see step 3 on the right handlebar. To change the resistance of the... be selected automatically each time you can change the resistance, press one of the workout buttons repeatedly to iFit through your wireless network. Select the manual mode. Note: If the console is now ready for the first time, set -a-goal workout, see page 30. As you pedal, you press a button, ...
English Manual
Page 25
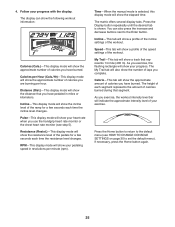
... show the resistance level of your pedaling speed in miles or kilometers. RPM—-This display mode will show your exercise. Time—-When the manual mode is shown. My Trail—-This tab will indicate the approximate intensity level of the pedals for a few seconds each time the resistance level...
... show the resistance level of your pedaling speed in miles or kilometers. RPM—-This display mode will show your exercise. Time—-When the manual mode is shown. My Trail—-This tab will indicate the approximate intensity level of the pedals for a few seconds each time the resistance level...
English Manual
Page 26
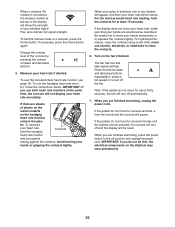
To exit the manual mode or a workout, press the Home button. If necessary, press the Home button again. IMPORTANT: If you are not pressed, the console will turn off ... measure your heart rate, hold the contacts for about thirty seconds, the fan will turn off and the display will be shown. Turn on the elliptical may wear prematurely. 26 Note: If the pedals do not move for several minutes and the buttons are finished exercising, press the power switch to...
To exit the manual mode or a workout, press the Home button. If necessary, press the Home button again. IMPORTANT: If you are not pressed, the console will turn off ... measure your heart rate, hold the contacts for about thirty seconds, the fan will turn off and the display will be shown. Turn on the elliptical may wear prematurely. 26 Note: If the pedals do not move for several minutes and the buttons are finished exercising, press the power switch to...
English Manual
Page 27
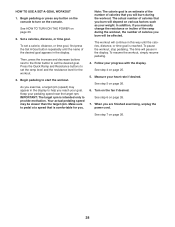
... the current segment is comfortable for the current segment. See step 6 on page 26. 6. When a downward-pointing arrow appears, decrease your pace. When you can manually override the setting by pressing the Resistance buttons or the Quick Ramp buttons. The workout will appear in the display. To resume the workout, simply...
... the current segment is comfortable for the current segment. See step 6 on page 26. 6. When a downward-pointing arrow appears, decrease your pace. When you can manually override the setting by pressing the Resistance buttons or the Quick Ramp buttons. The workout will appear in the display. To resume the workout, simply...
English Manual
Page 28
... the target rpm. Note: The calorie goal is reached. Follow your heart rate if desired. Measure your progress with the display. In addition, if you manually change the resistance or incline of the ramp during the workout. Begin pedaling to help you burn will be slower than the target rpm. See...
... the target rpm. Note: The calorie goal is reached. Follow your heart rate if desired. Measure your progress with the display. In addition, if you manually change the resistance or incline of the ramp during the workout. Begin pedaling to help you burn will be slower than the target rpm. See...
English Manual
Page 29
.... Then, press the Enter button to start the workout. For more information about the iFit workouts, please see www.iFit.com. In addition, if you manually change the resistance or incline of the ramp during the workout, the number of calories that type in . (20 cm) from your schedule, press the...
.... Then, press the Enter button to start the workout. For more information about the iFit workouts, please see www.iFit.com. In addition, if you manually change the resistance or incline of the ramp during the workout, the number of calories that type in . (20 cm) from your schedule, press the...
English Manual
Page 33
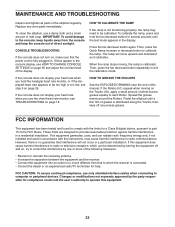
...be calibrated. Press the fan decrease button again. These limits are designed to computer or peripheral devices. If this manual. To clean the elliptical, use only shielded interface cables when connecting to provide reasonable protection against harmful interference in . IMPORTANT: To avoid damage...the receiver. •• Connect the equipment into an outlet on the Tracks (16), apply a small amount of the elliptical regularly. Then, press the Quick Ramp increase or decrease button to exit the calibration mode. FCC INFORMATION This equipment has ...
...be calibrated. Press the fan decrease button again. These limits are designed to computer or peripheral devices. If this manual. To clean the elliptical, use only shielded interface cables when connecting to provide reasonable protection against harmful interference in . IMPORTANT: To avoid damage...the receiver. •• Connect the equipment into an outlet on the Tracks (16), apply a small amount of the elliptical regularly. Then, press the Quick Ramp increase or decrease button to exit the calibration mode. FCC INFORMATION This equipment has ...
English Manual
Page 36
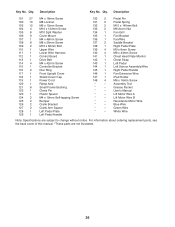
...–- * –- * –- * –- * –- * –- * –- * –- * –- For information about ordering replacement parts, see the back cover of this manual. *These parts are subject to change without notice. Pedal Pin Pedal Spring M10 x 140mm Bolt M6 Acorn Nut Fan Grill Fan Bracket Fan/Wire Saddle...Left Sensor Assembly/Wire Right Pedal Handle Fan Extension Wire iPad Holder M6 x 16mm Screw Assembly Tool Grease Packet User’'s Manual Lift Motor Wire A Lift Motor Wire B Resistance Motor Wire Blue Wire Green Wire White Wire Note: Specifications are not ...
...–- * –- * –- * –- * –- * –- * –- * –- * –- For information about ordering replacement parts, see the back cover of this manual. *These parts are subject to change without notice. Pedal Pin Pedal Spring M10 x 140mm Bolt M6 Acorn Nut Fan Grill Fan Bracket Fan/Wire Saddle...Left Sensor Assembly/Wire Right Pedal Handle Fan Extension Wire iPad Holder M6 x 16mm Screw Assembly Tool Grease Packet User’'s Manual Lift Motor Wire A Lift Motor Wire B Resistance Motor Wire Blue Wire Green Wire White Wire Note: Specifications are not ...
English Manual
Page 40
...and service conditions. ORDERING REPLACEMENT PARTS To order replacement parts, please see the PART LIST and the EXPLODED DRAWING near the end of this manual) LIMITED WARRANTY IMPORTANT: To protect your fitness equipment with respect to any kind. This warranty will be preauthorized by ICON. Accordingly, the... •• the model number and serial number of the product (see the front cover of this manual) •• the name of the product (see the front cover of this manual) •• the key number and description of the replacement part(s) (see the front cover of...
...and service conditions. ORDERING REPLACEMENT PARTS To order replacement parts, please see the PART LIST and the EXPLODED DRAWING near the end of this manual) LIMITED WARRANTY IMPORTANT: To protect your fitness equipment with respect to any kind. This warranty will be preauthorized by ICON. Accordingly, the... •• the model number and serial number of the product (see the front cover of this manual) •• the name of the product (see the front cover of this manual) •• the key number and description of the replacement part(s) (see the front cover of...


