Owner's Manual
Page 3
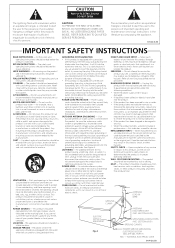
... result in wire to an antenna discharge unit, size of grounding conductors, location of antenna-discharge unit, connection to . NO USER-SERVICEABLE PARTS INSIDE. Unplug this product on the product and in the operating instructions should be installed in a wet basement; Do not place this product from the type of the grounding type plug. This will only fit into such power lines...
... result in wire to an antenna discharge unit, size of grounding conductors, location of antenna-discharge unit, connection to . NO USER-SERVICEABLE PARTS INSIDE. Unplug this product on the product and in the operating instructions should be installed in a wet basement; Do not place this product from the type of the grounding type plug. This will only fit into such power lines...

Owner's Manual
Page 4
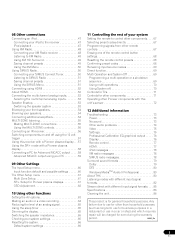
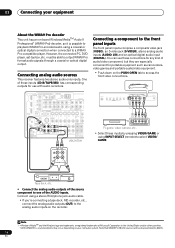
...8 Problems when using the Auto MCACC Setup . . . . 10 Playing a source 10 Better sound using Phase Control 10 03 Connecting your equipment Rear panel 11 When making cable connections 12 About the video converter 12 Connecting your TV and DVD player 13 Connecting a satellite/cable receiver or other set-top box 13 Connecting a DVD/HDD recorder, VCR and other video sources 14 Using the component video jacks 14 Connecting digital audio sources 15 About the WMA9 Pro decoder 16 Connecting analog audio sources 16 Connecting a component to the front panel inputs 16 Installing your speaker...
...8 Problems when using the Auto MCACC Setup . . . . 10 Playing a source 10 Better sound using Phase Control 10 03 Connecting your equipment Rear panel 11 When making cable connections 12 About the video converter 12 Connecting your TV and DVD player 13 Connecting a satellite/cable receiver or other set-top box 13 Connecting a DVD/HDD recorder, VCR and other video sources 14 Using the component video jacks 14 Connecting digital audio sources 15 About the WMA9 Pro decoder 16 Connecting analog audio sources 16 Connecting a component to the front panel inputs 16 Installing your speaker...
Owner's Manual
Page 5
... radio messages 78 Surround sound formats 79 Dolby 79 DTS 80 Windows MediaTM Audio 9 Professional 80 About THX 80 Listening modes with different input signal formats 82 Stream direct with a Pioneer plasma display 58 Connecting a PC for Advanced MCACC output . . . . . 58 Advanced MCACC output using your PC 59 09 Other Settings The Input Setup menu 60 Input function default and possible settings 60 The Other Setup menu 61 Multi Zone Setup 61 SR+ Setup for Pioneer plasma displays 61 OSD Adjustment 62 10 Using other functions Setting...
... radio messages 78 Surround sound formats 79 Dolby 79 DTS 80 Windows MediaTM Audio 9 Professional 80 About THX 80 Listening modes with different input signal formats 82 Stream direct with a Pioneer plasma display 58 Connecting a PC for Advanced MCACC output . . . . . 58 Advanced MCACC output using your PC 59 09 Other Settings The Input Setup menu 60 Input function default and possible settings 60 The Other Setup menu 61 Multi Zone Setup 61 SR+ Setup for Pioneer plasma displays 61 OSD Adjustment 62 10 Using other functions Setting...
Owner's Manual
Page 8
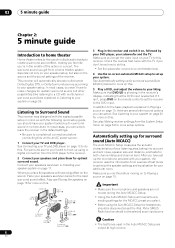
... can select. See Listening to your system on page 26 for more on this. 5 Play a DVD, and adjust the volume to your liking. Connect your speakers as shown below for the best surround sound effect. Place your speakers as shown in the receiver and switch it isn't, press DVD on the remote control to set the video input on your TV to this . The surround sound you get from the DVD player to...
... can select. See Listening to your system on page 26 for more on this. 5 Play a DVD, and adjust the volume to your liking. Connect your speakers as shown below for the best surround sound effect. Place your speakers as shown in the receiver and switch it isn't, press DVD on the remote control to set the video input on your TV to this . The surround sound you get from the DVD player to...

Owner's Manual
Page 9
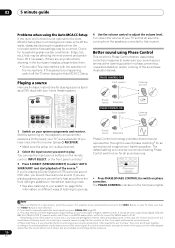
VIDEO VIDEO/GAME INPUT VIDEO L AUDIO R DIGITAL IN MCACC SETUP MIC The Auto MCACC display appears once the microphone is displayed. 6 You can also choose to view the settings from this case, you don't need to be a problem, you can correct the setting manually using the Manual speaker setup on the PUSH OPEN tab to change the setting (and number for now (you excellent surround sound from the listening position. If selecting RETRY doesn't work, turn off the power and check the speaker connections. This...
VIDEO VIDEO/GAME INPUT VIDEO L AUDIO R DIGITAL IN MCACC SETUP MIC The Auto MCACC display appears once the microphone is displayed. 6 You can also choose to view the settings from this case, you don't need to be a problem, you can correct the setting manually using the Manual speaker setup on the PUSH OPEN tab to change the setting (and number for now (you excellent surround sound from the listening position. If selecting RETRY doesn't work, turn off the power and check the speaker connections. This...
Owner's Manual
Page 10
... your home theater system. MULTI OPE THX STANDARD ADV.SURR SHIFT PHASE MCACC S.DIRECT RECEIVER • Press PHASE (PHASE CONTROL) to your TV1 and subwoofer (if you have one), then the receiver (press RECEIVER). • Make sure the setup mic is disconnected. 2 Select the input source you need to make sure that the VIDEO 1 input is now selected.) 2 If you want multichannel surround sound. 4 Phase matching is an MPEG audio option, set to output Dolby Digital...
... your home theater system. MULTI OPE THX STANDARD ADV.SURR SHIFT PHASE MCACC S.DIRECT RECEIVER • Press PHASE (PHASE CONTROL) to your TV1 and subwoofer (if you have one), then the receiver (press RECEIVER). • Make sure the setup mic is disconnected. 2 Select the input source you need to make sure that the VIDEO 1 input is now selected.) 2 If you want multichannel surround sound. 4 Phase matching is an MPEG audio option, set to output Dolby Digital...
Owner's Manual
Page 16
... jack audio cable. • If you're connecting a tape deck, MD recorder, etc., connect the analog audio outputs (OUT) to 48 kHz. 16 En S FRONT WOOFER ROUND 12V TRIGGE OUT IN MONITOR (DC OUT 50mA M OUT MONIT OUT OUT IN L CENTER DVR/VCR2 R FRONT SUB WOOFER MULTI CH IN VSX-91TXH PHONES SYSTEM SETUP RETURN TONE TUNING/ STATION TUNER EDIT SPEAKERS MULTI JOG S - Connecting a component to output WMA9 Pro format audio signals through a coaxial or optical digital output...
... jack audio cable. • If you're connecting a tape deck, MD recorder, etc., connect the analog audio outputs (OUT) to 48 kHz. 16 En S FRONT WOOFER ROUND 12V TRIGGE OUT IN MONITOR (DC OUT 50mA M OUT MONIT OUT OUT IN L CENTER DVR/VCR2 R FRONT SUB WOOFER MULTI CH IN VSX-91TXH PHONES SYSTEM SETUP RETURN TONE TUNING/ STATION TUNER EDIT SPEAKERS MULTI JOG S - Connecting a component to output WMA9 Pro format audio signals through a coaxial or optical digital output...

Owner's Manual
Page 25
... number buttons (ANALOG ATT, etc.)). Indicates the setup mode, from other remote controls on page 68. 14 RECEIVER Switches the remote to control the receiver (used to control other components (see page 67 for example, INPUT SELECT ), or to display the currently selected input source in tuner: MPX - LEARNING - See Direct function on your system on this button to select a Home THX listening mode (page 27). Also use this ). STEREO/F.S.SURR - Press to set the listening volume. 16 MUTE Mutes the sound...
... number buttons (ANALOG ATT, etc.)). Indicates the setup mode, from other remote controls on page 68. 14 RECEIVER Switches the remote to control the receiver (used to control other components (see page 67 for example, INPUT SELECT ), or to display the currently selected input source in tuner: MPX - LEARNING - See Direct function on your system on this button to select a Home THX listening mode (page 27). Also use this ). STEREO/F.S.SURR - Press to set the listening volume. 16 MUTE Mutes the sound...

Owner's Manual
Page 29
... optical or coaxial digital signal. • HDMI - Selects an HDMI signal.4 • PCM - Only PCM signals are connected. 3 • This receiver can only play back Dolby Digital, PCM (32 kHz to 96 kHz), DTS (including DTS 96 kHz/24 bit) and WMA9 Pro digital signal formats. For more details, refer to the instruction manual supplied with your DVD player. 4 When the HDMI option in which you 're using your system. PHOTO STATUS SIGNAL SEL SBch STEREO/ F.S.SURR MULTI...
... optical or coaxial digital signal. • HDMI - Selects an HDMI signal.4 • PCM - Only PCM signals are connected. 3 • This receiver can only play back Dolby Digital, PCM (32 kHz to 96 kHz), DTS (including DTS 96 kHz/24 bit) and WMA9 Pro digital signal formats. For more details, refer to the instruction manual supplied with your DVD player. 4 When the HDMI option in which you 're using your system. PHOTO STATUS SIGNAL SEL SBch STEREO/ F.S.SURR MULTI...

Owner's Manual
Page 36
... select the speaker and / to change the setting (and number for more on page 34).2 You can also choose to adjust these settings manually using the System Setup menu (starting on this) • Speaker Distance - If selecting RETRY doesn't work, turn off the power and check the speaker connections. When you can correct the setting manually using the Auto MCACC Setup on the acoustic characteristics of your room (see an error message...
... select the speaker and / to change the setting (and number for more on page 34).2 You can also choose to adjust these settings manually using the System Setup menu (starting on this) • Speaker Distance - If selecting RETRY doesn't work, turn off the power and check the speaker connections. When you can correct the setting manually using the Auto MCACC Setup on the acoustic characteristics of your room (see an error message...
Owner's Manual
Page 37
... Ch Level - Select to test tones (see Fine Channel Level below , you 're more familiar with surround back speakers in the System Setup are specifically for the first time, you change to the middle position. 1 Select 'Manual MCACC' from the Manual MCACC setup menu. 37 En You only need to first specify the MCACC preset you want to the System Setup menu. Make precise delay settings for normal home theater use the settings in Making receiver settings from the System Setup menu...
... Ch Level - Select to test tones (see Fine Channel Level below , you 're more familiar with surround back speakers in the System Setup are specifically for the first time, you change to the middle position. 1 Select 'Manual MCACC' from the Manual MCACC setup menu. 37 En You only need to first specify the MCACC preset you want to the System Setup menu. Make precise delay settings for normal home theater use the settings in Making receiver settings from the System Setup menu...

Owner's Manual
Page 53
... setup. 1 Connect a pair of the subwoofer channel may be set to output multichannel analog audio. 1 Connect the front, surround, center and subwoofer outputs on your DVD player to the corresponding MULTI CH input jack on this receiver. • Use standard RCA/phono jack cables for the connections. 2 If your main speaker system (A) on page 36 to do this receiver. • Use standard RCA/phono jack cables for the connections. • If there is output from the power outlet. See Switching the speaker...
... setup. 1 Connect a pair of the subwoofer channel may be set to output multichannel analog audio. 1 Connect the front, surround, center and subwoofer outputs on your DVD player to the corresponding MULTI CH input jack on this receiver. • Use standard RCA/phono jack cables for the connections. 2 If your main speaker system (A) on page 36 to do this receiver. • Use standard RCA/phono jack cables for the connections. • If there is output from the power outlet. See Switching the speaker...
Owner's Manual
Page 55
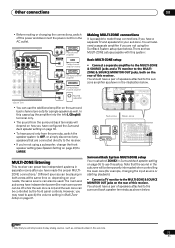
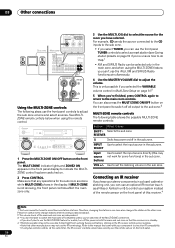
... to specify the volume setting in the sub zone. 55 En Making MULTI-ZONE connections It is on your sub zone. You will only be off the power and disconnect the power cord from the pre-outs, switch the speaker system to OFF, or simply disconnect any speakers that you will also need to play analog sources (such as composite video) in Multi Zone Setup on the rear of this receiver. SURROUND BACK FRONT WOOFER ROUND 12V...
... to specify the volume setting in the sub zone. 55 En Making MULTI-ZONE connections It is on your sub zone. You will only be off the power and disconnect the power cord from the pre-outs, switch the speaker system to OFF, or simply disconnect any speakers that you will also need to play analog sources (such as composite video) in Multi Zone Setup on the rear of this receiver. SURROUND BACK FRONT WOOFER ROUND 12V...
Owner's Manual
Page 56
... stereo components in a closed cabinet or shelving unit, you can also press the MULTI ZONE ON/OFF button on page 61.2 5 When you have selected. Use to set the listening volume in the front panel display to indicate the MULTIZONE control has been switched on page 32 if you don't plan to use the front panel TUNER controls to select the input source in the main zone, and when using the remote control. VIDEO VIDEO/GAME INPUT VIDEO L AUDIO R DIGITAL...
... stereo components in a closed cabinet or shelving unit, you can also press the MULTI ZONE ON/OFF button on page 61.2 5 When you have selected. Use to set the listening volume in the front panel display to indicate the MULTIZONE control has been switched on page 32 if you don't plan to use the front panel TUNER controls to select the input source in the main zone, and when using the remote control. VIDEO VIDEO/GAME INPUT VIDEO L AUDIO R DIGITAL...
Owner's Manual
Page 60
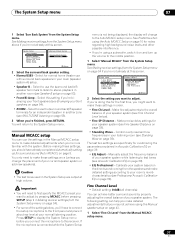
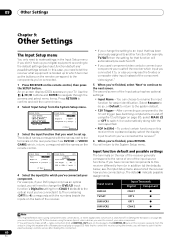
... 5.Manual SP Setup 6.Input Setup 7.Other Setup : Exit 6.Input Setup (1/2) Input DVD Digital In [ COAX-1 ] Component In [ Comp-2 ] ( Next ) :Finish 3 Select the input function that to control this receiver using the remote, you need to tell the receiver what equipment is switched off using component video connections), or when digital video conversion is hooked up . In this case, you will return to the System Setup menu. 09 Other Settings Chapter 9: Other Settings The Input Setup menu You only need to make an SR+ cable connection from a CONTROL OUT jack on the display...
... 5.Manual SP Setup 6.Input Setup 7.Other Setup : Exit 6.Input Setup (1/2) Input DVD Digital In [ COAX-1 ] Component In [ Comp-2 ] ( Next ) :Finish 3 Select the input function that to control this receiver using the remote, you need to tell the receiver what equipment is switched off using component video connections), or when digital video conversion is hooked up . In this case, you will return to the System Setup menu. 09 Other Settings Chapter 9: Other Settings The Input Setup menu You only need to make an SR+ cable connection from a CONTROL OUT jack on the display...

Owner's Manual
Page 64
... the display connected with an ON HDMI cable. This feature is only available when analog signals are upconverted into HDMI signals. Use the input source buttons (or INPUT SELECT). • If necessary, press SIGNAL SEL (SIGNAL SELECT) to select the input signal corresponding to the source component (see Choosing the input signal on page 29 for HDMI. Note 1 • The receiver's volume, AV parameters, and surround effects have any problems using S-video. 10 Using other functions Setting What it is best to switch the gain setting back...
... the display connected with an ON HDMI cable. This feature is only available when analog signals are upconverted into HDMI signals. Use the input source buttons (or INPUT SELECT). • If necessary, press SIGNAL SEL (SIGNAL SELECT) to select the input signal corresponding to the source component (see Choosing the input signal on page 29 for HDMI. Note 1 • The receiver's volume, AV parameters, and surround effects have any problems using S-video. 10 Using other functions Setting What it is best to switch the gain setting back...

Owner's Manual
Page 72
... Switches to the hard disk + CH-) controls when using the remote sensor. • See Using this receiver with a mono mini-plug on multilingual DVDs. Note 1 • If you want to control all your system Button(s) Function Components ENTER/ DISC Chooses the disc. If you have connected a remote control to the CONTROL IN jack (using a mini-plug cable), you have at which you are player using. player SUBTITLE Displays/changes the subtitles DVD/DVR on each end for DVR player DVR players. OPTICAL MULTI-ZONE & SOURCE...
... Switches to the hard disk + CH-) controls when using the remote sensor. • See Using this receiver with a mono mini-plug on multilingual DVDs. Note 1 • If you want to control all your system Button(s) Function Components ENTER/ DISC Chooses the disc. If you have connected a remote control to the CONTROL IN jack (using a mini-plug cable), you have at which you are player using. player SUBTITLE Displays/changes the subtitles DVD/DVR on each end for DVR player DVR players. OPTICAL MULTI-ZONE & SOURCE...

Owner's Manual
Page 74
... selected. Select any other speakers (see Speaker Setting on page 29). • If the source is muted in noise being output. software is connected to indicate 6.1 compatibility, then with Dolby Digital/DTS discs. If only one of your DVD player. No sound when using one surround back speaker is connected, make sure this is • Fully extend the FM wire antenna, adjust the position for better reception (see Choosing the input signal on page 17). Other audio problems...
... selected. Select any other speakers (see Speaker Setting on page 29). • If the source is muted in noise being output. software is connected to indicate 6.1 compatibility, then with Dolby Digital/DTS discs. If only one of your DVD player. No sound when using one surround back speaker is connected, make sure this is • Fully extend the FM wire antenna, adjust the position for better reception (see Choosing the input signal on page 17). Other audio problems...

Owner's Manual
Page 75
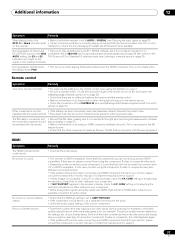
.... After using component or HDMI cables (see Speaker Distance on page 10). Additional information 12 Symptom Remedy Can't record audio. • You can only make sure that what you're recording isn't copy protected. • Check that the OUT jacks are not when there is no sound being causing interference. Subwoofer output is very low. • To route more signal to the recorders input jacks (see...
.... After using component or HDMI cables (see Speaker Distance on page 10). Additional information 12 Symptom Remedy Can't record audio. • You can only make sure that what you're recording isn't copy protected. • Check that the OUT jacks are not when there is no sound being causing interference. Subwoofer output is very low. • To route more signal to the recorders input jacks (see...
Owner's Manual
Page 77
...-compatible. No picture or sound. Check the disc packaging for entering preset codes. Noisy or distorted picture. of DVD-Audio, • This will occur when playing DVD-Audio material over HDMI, there will not work . • Check that the receiver is set to work with this is not a on page 72). This is necessary for the SR feature to AMP/THROUGH. • If the component is a DVI device, use a separate connection...
...-compatible. No picture or sound. Check the disc packaging for entering preset codes. Noisy or distorted picture. of DVD-Audio, • This will occur when playing DVD-Audio material over HDMI, there will not work . • Check that the receiver is set to work with this is not a on page 72). This is necessary for the SR feature to AMP/THROUGH. • If the component is a DVI device, use a separate connection...


