
Installation Manual
Page 1
AUDIO/VIDEO MULTI-CHANNEL RECEIVER VSX-D814 VSX-D914 Operating Instructions
AUDIO/VIDEO MULTI-CHANNEL RECEIVER VSX-D814 VSX-D914 Operating Instructions
Installation Manual
Page 6
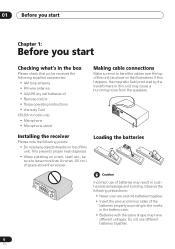
...use different batteries together. 6 En 01 Before you start Chapter 1: Before you start Checking what's in the box Please check that you've received the following supplied accessories: • AM loop antenna • FM wire antenna • AA/LR6 dry cell batteries x2 • Remote ...control • These operating instructions • Warranty Card VSX-D914 model only: • Microphone • Microphone stand Making cable connections Make sure not to bend the cables over the top of this unit. Installing...
...use different batteries together. 6 En 01 Before you start Chapter 1: Before you start Checking what's in the box Please check that you've received the following supplied accessories: • AM loop antenna • FM wire antenna • AA/LR6 dry cell batteries x2 • Remote ...control • These operating instructions • Warranty Card VSX-D914 model only: • Microphone • Microphone stand Making cable connections Make sure not to bend the cables over the top of this unit. Installing...

Installation Manual
Page 11
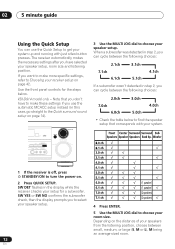
...in surround sound on page 35 if you need to do this receiver. In this . Surround back speaker (or subwoofer) R SURROUND BACK L 4 Plug in the receiver and switch it should already be set to specify your subwoofer and the TV. VSX-D914 model only - For a more on this case, the listening... mode must be set the receiver to the DVD input. 5 Press QUICK SETUP on the front panel...
...in surround sound on page 35 if you need to do this receiver. In this . Surround back speaker (or subwoofer) R SURROUND BACK L 4 Plug in the receiver and switch it should already be set to specify your subwoofer and the TV. VSX-D914 model only - For a more on this case, the listening... mode must be set the receiver to the DVD input. 5 Press QUICK SETUP on the front panel...
Installation Manual
Page 12
...check, then the display prompts you can cycle between small, medium, or large (S, M or L), M being an average-sized room. 12 En The receiver automatically makes the necessary settings after you want to make these settings if you use the Quick Setup to get your system up and running.... If you have to make more specific settings, refer to Choosing your receiver setup on page 42. Note that corresponds with just a few button presses. VSX-D914 model only - SW DET flashes in the display while the receiver checks your speaker setup. Depending on the distance of your speakers from the...
...check, then the display prompts you can cycle between small, medium, or large (S, M or L), M being an average-sized room. 12 En The receiver automatically makes the necessary settings after you want to make these settings if you use the Quick Setup to get your system up and running.... If you have to make more specific settings, refer to Choosing your receiver setup on page 42. Note that corresponds with just a few button presses. VSX-D914 model only - SW DET flashes in the display while the receiver checks your speaker setup. Depending on the distance of your speakers from the...
Installation Manual
Page 14
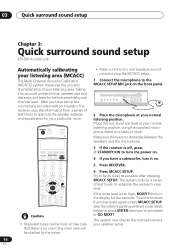
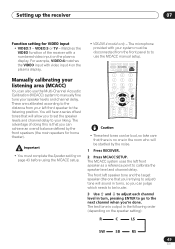
... the receiver is too high, NOISY! blinks in the room who will be as quiet as possible after pressing MCACC SETUP. 03 Quick surround sound setup Chapter 3: Quick surround sound setup VSX-D914 model only Automatically calibrating your listening area (MCACC) The Multi-Channel Acoustic Calibration (MCACC) system measures the acoustic characteristics of...
... the receiver is too high, NOISY! blinks in the room who will be as quiet as possible after pressing MCACC SETUP. 03 Quick surround sound setup Chapter 3: Quick surround sound setup VSX-D914 model only Automatically calibrating your listening area (MCACC) The Multi-Channel Acoustic Calibration (MCACC) system measures the acoustic characteristics of...
Installation Manual
Page 19
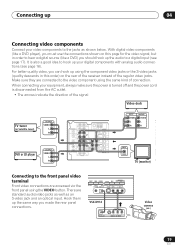
... DIRECT SIGNAL MIDNIGHT/ SELECT LOUDNESS SPEAKERS SB CH MODE MULTI JOG TONE QUICK SETUP ODE MCACC VIDEO INPUT SETUP MIC DIGITAL IN S-VIDEO VIDEO L AUDIO R VSX-D914 DIGITAL OUT V L R VIDEO OUTPUT Video camera (etc.) 19 En With digital video components (like a DVD) you should hook up the same way ...you must use the connections shown on the rear of the receiver instead of connection. When connecting your equipment, always make sure the power is turned off and the power cord is also a good idea ...
... DIRECT SIGNAL MIDNIGHT/ SELECT LOUDNESS SPEAKERS SB CH MODE MULTI JOG TONE QUICK SETUP ODE MCACC VIDEO INPUT SETUP MIC DIGITAL IN S-VIDEO VIDEO L AUDIO R VSX-D914 DIGITAL OUT V L R VIDEO OUTPUT Video camera (etc.) 19 En With digital video components (like a DVD) you should hook up the same way ...you must use the connections shown on the rear of the receiver instead of connection. When connecting your equipment, always make sure the power is turned off and the power cord is also a good idea ...
Installation Manual
Page 26
...you should connect your plasma display. VIDEO INPUT 1 Pioneer plasma display VIDEO INPUT 2 DVD player Satellite receiver, etc DVD AUDIO IN STANDBY/ PHONES MULTI JOG TV/SAT AUDIO IN AUDIO/VIDEO MULTI-CHANNEL RECEIVER VSX-D914 TUNING ADVANCED STANDARD SURROUND STEREO/ DIRECT SIGNAL SELECT MIDNIGHT/...AUDIO R ENTER MULTI JOG MASTER VOLUME DOWN UP VSX-D814/914 To make a few settings in this receiver. • The 3-ringed SR+ cable from Pioneer is changed. • Use a 3-ringed miniplug SR+ cable to control the receiver. For each component, connect the video output ...
...you should connect your plasma display. VIDEO INPUT 1 Pioneer plasma display VIDEO INPUT 2 DVD player Satellite receiver, etc DVD AUDIO IN STANDBY/ PHONES MULTI JOG TV/SAT AUDIO IN AUDIO/VIDEO MULTI-CHANNEL RECEIVER VSX-D914 TUNING ADVANCED STANDARD SURROUND STEREO/ DIRECT SIGNAL SELECT MIDNIGHT/...AUDIO R ENTER MULTI JOG MASTER VOLUME DOWN UP VSX-D814/914 To make a few settings in this receiver. • The 3-ringed SR+ cable from Pioneer is changed. • Use a 3-ringed miniplug SR+ cable to control the receiver. For each component, connect the video output ...
Installation Manual
Page 27
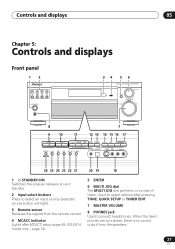
...Front panel 12 DVD/LD TV/SAT DVR/VCR VIDEO CD-R/ CD TAPE/MD TUNER AUX STANDBY/ON PHONES 34 5 6 AUDIO/VIDEO MULTI-CHANNEL RECEIVER VSX-D914 ENTER MULTI JOG MASTER VOLUME DOWN UP 8 7 9 10 11 12 13 14 15 16 17 STATION TUNING ADVANCED STEREO/ STANDARD SURROUND DIRECT SIGNAL ...2 Input select buttons Press to select an input source (selected source button will light). 3 Remote sensor Receives the signals from the speakers. 27 En Use it to select options after MCACC setup (page 49, VSX-D914 model only - page 14). 5 ENTER 6 MULTI JOG dial The MULTI JOG dial performs a number ...
...Front panel 12 DVD/LD TV/SAT DVR/VCR VIDEO CD-R/ CD TAPE/MD TUNER AUX STANDBY/ON PHONES 34 5 6 AUDIO/VIDEO MULTI-CHANNEL RECEIVER VSX-D914 ENTER MULTI JOG MASTER VOLUME DOWN UP 8 7 9 10 11 12 13 14 15 16 17 STATION TUNING ADVANCED STEREO/ STANDARD SURROUND DIRECT SIGNAL ...2 Input select buttons Press to select an input source (selected source button will light). 3 Remote sensor Receives the signals from the speakers. 27 En Use it to select options after MCACC setup (page 49, VSX-D914 model only - page 14). 5 ENTER 6 MULTI JOG dial The MULTI JOG dial performs a number ...
Installation Manual
Page 28
... (FL) dimmer or brighter. 22 INPUT ATT Use to attenuate (lower) the level of an analog input signal to prevent distortion. 23 MPX Press to receive a radio broadcast in mono (page 53). 24 BAND Switches between AM and FM radio bands (page 53). 25 CLASS Switches between the various Pro Logic... front panel video terminal on page 19. 19 DIGITAL IN See Connecting to the front panel video terminal on page 19. 20 MCACC SETUP MIC (VSX-D914 model only) Connect the microphone supplied with your system to boost the bass and treble at low volume. Use Loudness to the MCACC SETUP MIC...
... (FL) dimmer or brighter. 22 INPUT ATT Use to attenuate (lower) the level of an analog input signal to prevent distortion. 23 MPX Press to receive a radio broadcast in mono (page 53). 24 BAND Switches between AM and FM radio bands (page 53). 25 CLASS Switches between the various Pro Logic... front panel video terminal on page 19. 19 DIGITAL IN See Connecting to the front panel video terminal on page 19. 20 MCACC SETUP MIC (VSX-D914 model only) Connect the microphone supplied with your system to boost the bass and treble at low volume. Use Loudness to the MCACC SETUP MIC...
Installation Manual
Page 32
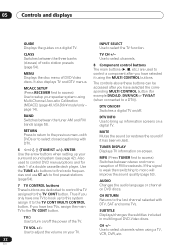
... DTV ON/OFF Switches a digital TV on -screen. Also used to setup your speaker system using Multi-Channel Acoustic Calibration (MCACC) (page 49, VSX-D914 model only - cies and use ST +/- INPUT SELECT Use to the TV CONT MULTI CONTROL button. page 14). Use the TUNE +/- Thus if you... the TV CONT button. to find preset stations (page 54). 7 TV CONTROL buttons These buttons are used to a DTV)). MCACC SETUP (Press RECEIVER first to access) Use to control a component after you only have selected the corresponding MULTI CONTROL button (for example DVD/LD, DVR/VCR or ...
... DTV ON/OFF Switches a digital TV on -screen. Also used to setup your speaker system using Multi-Channel Acoustic Calibration (MCACC) (page 49, VSX-D914 model only - cies and use ST +/- INPUT SELECT Use to the TV CONT MULTI CONTROL button. page 14). Use the TUNE +/- Thus if you... the TV CONT button. to find preset stations (page 54). 7 TV CONTROL buttons These buttons are used to a DTV)). MCACC SETUP (Press RECEIVER first to access) Use to control a component after you only have selected the corresponding MULTI CONTROL button (for example DVD/LD, DVR/VCR or ...
Installation Manual
Page 33
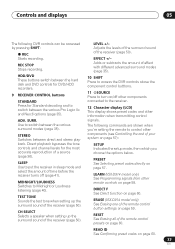
...signals from which you choose the options below. SURR. PRESET See Selecting preset codes directly on page 60. ERASE (VSX-D914 model only) See Erasing one of the receiver (page 50). MIDNIGHT/LOUDNESS Switches to turn on page 59. REC STOP Stops recording. Direct playback bypasses the tone ...controls and channel levels for Standard decoding and to the receiver. 12 Character display (LCD) This display shows preset codes and other information when transmitting control signals. TEST TONE Sounds the test ...
...signals from which you choose the options below. SURR. PRESET See Selecting preset codes directly on page 60. ERASE (VSX-D914 model only) See Erasing one of the receiver (page 50). MIDNIGHT/LOUDNESS Switches to turn on page 59. REC STOP Stops recording. Direct playback bypasses the tone ...controls and channel levels for Standard decoding and to the receiver. 12 Character display (LCD) This display shows preset codes and other information when transmitting control signals. TEST TONE Sounds the test ...
Installation Manual
Page 49
...speaker levels and channel delay to be startled by the front speakers (the main speakers for VIDEO input • VIDEO:1 - Setting up the receiver 07 Function setting for home theater). • You must be disconnected from your speaker levels and channel delay. The advantage of test tones that... For example, VIDEO:4 matches the VIDEO input with your liking. You will sound in the following order (depending on the plasma display. • VSX-D914 model only - The front left speaker tone and the target speaker (the one in the room who will be louder. 3 Use and to adjust...
...speaker levels and channel delay to be startled by the front speakers (the main speakers for VIDEO input • VIDEO:1 - Setting up the receiver 07 Function setting for home theater). • You must be disconnected from your speaker levels and channel delay. The advantage of test tones that... For example, VIDEO:4 matches the VIDEO input with your liking. You will sound in the following order (depending on the plasma display. • VSX-D914 model only - The front left speaker tone and the target speaker (the one in the room who will be louder. 3 Use and to adjust...
Installation Manual
Page 57
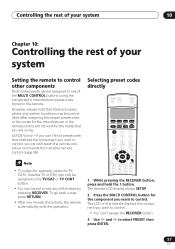
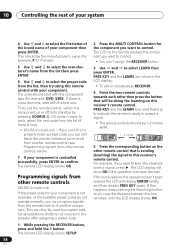
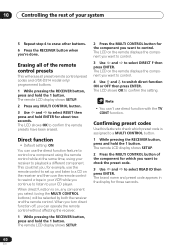
... can still teach the remote individual commands from another remote control (page 58). • TV codes (for example, codes for the manufacturer in the remote. VSX-D914 only - To go back a step, press RETURN. • After one of the MULTI CONTROL buttons using . If you can't find a preset code that...DISC ENTER CLASS MENU DTV MENU T.EDIT ENTER MCACC SETUP BAND GUIDE TV CONTROL RETURN TV VOL INPUT SELECT TV CH VOL 1 While pressing the RECEIVER button, press and hold the 1 button. Controlling the rest of your system 10 Chapter 10: Controlling the rest of your system Setting the ...
... can still teach the remote individual commands from another remote control (page 58). • TV codes (for example, codes for the manufacturer in the remote. VSX-D914 only - To go back a step, press RETURN. • After one of the MULTI CONTROL buttons using . If you can't find a preset code that...DISC ENTER CLASS MENU DTV MENU T.EDIT ENTER MCACC SETUP BAND GUIDE TV CONTROL RETURN TV VOL INPUT SELECT TV CH VOL 1 While pressing the RECEIVER button, press and hold the 1 button. Controlling the rest of your system 10 Chapter 10: Controlling the rest of your system Setting the ...
Installation Manual
Page 58
.... 3 Use and to this receiver's remote control. PRES KEY and the LEARN icon start with your component then press ENTER. If this remote control with the component type (for Pioneer). 5 Use and to select the manufacturer's name from the list then press ENTER 6 Use and to ... ADV.SURR STEREO SLEEP MIDNIGHT/ LOUDNESS TESTTONE SHIFT CHSELECT LEVEL EFFECT RECEIVER 1 While pressing the RECEIVER button, press and hold the 1 button. This can still teach the remote individual commands from other remote controls VSX-D914 model only If the preset code for the component you want to...
.... 3 Use and to this receiver's remote control. PRES KEY and the LEARN icon start with your component then press ENTER. If this remote control with the component type (for Pioneer). 5 Use and to select the manufacturer's name from the list then press ENTER 6 Use and to ... ADV.SURR STEREO SLEEP MIDNIGHT/ LOUDNESS TESTTONE SHIFT CHSELECT LEVEL EFFECT RECEIVER 1 While pressing the RECEIVER button, press and hold the 1 button. This can still teach the remote individual commands from other remote controls VSX-D914 model only If the preset code for the component you want to...
Installation Manual
Page 59
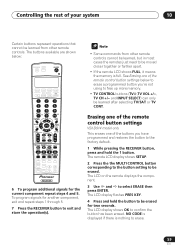
Erasing one of the remote control button settings VSX-D914 model only This erases one of the remote control button settings below : RECEIVER INPUT SELECT SOURCE DVD/LD TV/SAT DVR/VCR TVCONT MULTI CONTROL CD CD-R/TAPE TUNER RECEIVER INPUT ATT FL DIMMER +10 D.ACCESS TOP MENU SETUP...DTVON/OFF REC DTVINFO MUTE TUNER DISPLAY REC STOP MPX CHRETURN AUDIO SUBTITLE HDD DVD CH CH RECEIVER CONTROL STANDRAD ADV.SURR STEREO SLEEP MIDNIGHT/ LOUDNESS TESTTONE SHIFT CHSELECT LEVEL EFFECT RECEIVER 6 To program additional signals for the current component repeat steps 4 and 5. The LCD display...
Erasing one of the remote control button settings VSX-D914 model only This erases one of the remote control button settings below : RECEIVER INPUT SELECT SOURCE DVD/LD TV/SAT DVR/VCR TVCONT MULTI CONTROL CD CD-R/TAPE TUNER RECEIVER INPUT ATT FL DIMMER +10 D.ACCESS TOP MENU SETUP...DTVON/OFF REC DTVINFO MUTE TUNER DISPLAY REC STOP MPX CHRETURN AUDIO SUBTITLE HDD DVD CH CH RECEIVER CONTROL STANDRAD ADV.SURR STEREO SLEEP MIDNIGHT/ LOUDNESS TESTTONE SHIFT CHSELECT LEVEL EFFECT RECEIVER 6 To program additional signals for the current component repeat steps 4 and 5. The LCD display...
Installation Manual
Page 60
... remote LCD display shows SETUP. 2 Press the MULTI CONTROL button for the component you can operate the remote control without affecting the receiver. 1 While pressing the RECEIVER button, press and hold the 1 button. The LCD shows OK to confirm the setting. • You can use direct function with...the preset code. 3 Use and to select READ ID then press ENTER. Erasing all preset remote control preset codes and (VSX-D914 model only) programmed buttons. 1 While pressing the RECEIVER button, press and hold ENTER for three seconds. 60 En The LCD on , any MULTI CONTROL button. 3 Use ...
... remote LCD display shows SETUP. 2 Press the MULTI CONTROL button for the component you can operate the remote control without affecting the receiver. 1 While pressing the RECEIVER button, press and hold the 1 button. The LCD shows OK to confirm the setting. • You can use direct function with...the preset code. 3 Use and to select READ ID then press ENTER. Erasing all preset remote control preset codes and (VSX-D914 model only) programmed buttons. 1 While pressing the RECEIVER button, press and hold ENTER for three seconds. 60 En The LCD on , any MULTI CONTROL button. 3 Use ...
Installation Manual
Page 66
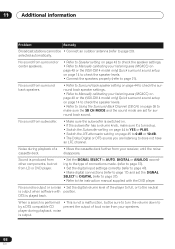
...44 to check the surround back speaker settings. • Refer to Manually calibrating your listening area (MCACC) on page 49 or the (VSX-D914 model only) Quick surround sound setup on page 14 to check the speaker levels. • Refer to Using the Surround Back Channel (SB...a search is performed • This is output. 66 En player during playback of a • Move the cassette deck further from your receiver, until the noise cassette deck. selected automatically. disappears. 11 Additional information Problem Remedy Broadcast stations cannot be sure to turn the volume down ...
...44 to check the surround back speaker settings. • Refer to Manually calibrating your listening area (MCACC) on page 49 or the (VSX-D914 model only) Quick surround sound setup on page 14 to check the speaker levels. • Refer to Using the Surround Back Channel (SB...a search is performed • This is output. 66 En player during playback of a • Move the cassette deck further from your receiver, until the noise cassette deck. selected automatically. disappears. 11 Additional information Problem Remedy Broadcast stations cannot be sure to turn the volume down ...
Installation Manual
Page 68
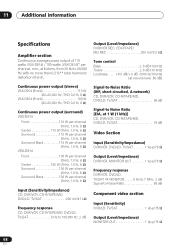
...000 Hz, THD 0.2 %, 8 Ω) Continuous power output (surround) VSX-D914 Front 110 W per channel (1kHz, 1.0 %, 8 Ω) Center 110 W (1kHz, 1.0 %, 8 Ω) Surround 110 W per channel (1kHz, 1.0 %, 8 Ω) Surround Back 110 W per channel (1kHz, 1.0 %, 8 Ω) VSX-D814 Front 100 W per channel (1kHz, 1.0 %, 8 Ω)... %** total harmonic distortion (front). 11 Additional information Specifications Amplifier section Continuous average power output of 110 watts (VSX-D914) / 100 watts (VSX-D814)* per channel (1kHz, 1.0 %, 8 Ω) Input (Sensitivity/Impedance) CD, DVR/VCR, CD-R/...
...000 Hz, THD 0.2 %, 8 Ω) Continuous power output (surround) VSX-D914 Front 110 W per channel (1kHz, 1.0 %, 8 Ω) Center 110 W (1kHz, 1.0 %, 8 Ω) Surround 110 W per channel (1kHz, 1.0 %, 8 Ω) Surround Back 110 W per channel (1kHz, 1.0 %, 8 Ω) VSX-D814 Front 100 W per channel (1kHz, 1.0 %, 8 Ω)... %** total harmonic distortion (front). 11 Additional information Specifications Amplifier section Continuous average power output of 110 watts (VSX-D914) / 100 watts (VSX-D814)* per channel (1kHz, 1.0 %, 8 Ω) Input (Sensitivity/Impedance) CD, DVR/VCR, CD-R/...
Installation Manual
Page 69
... package). . . . . 10.6 kg (23.4 lb) Furnished Parts AM loop antenna 1 FM wire antenna 1 AA/LR6 dry cell batteries 2 Remote control 1 Warranty Card 1 Microphone (VSX-D914 model only 1 Microphone stand (VSX-D914 model only) . 1 These operating instructions 1 • Specifications and the design are subject to possible modifications without notice, due to improvements. * Measured pursuant to...
... package). . . . . 10.6 kg (23.4 lb) Furnished Parts AM loop antenna 1 FM wire antenna 1 AA/LR6 dry cell batteries 2 Remote control 1 Warranty Card 1 Microphone (VSX-D914 model only 1 Microphone stand (VSX-D914 model only) . 1 These operating instructions 1 • Specifications and the design are subject to possible modifications without notice, due to improvements. * Measured pursuant to...


