Installation Manual
Page 3
.... If the plug should be sure the service technician has used for ventilation and to ensure reliable operation of the product and to a wall or ceiling. POWER-CORD PROTECTION - If an outside antenna system should be located in a risk of fire or electric shock. LIGHTNING - An outside antenna or cable system is connected to the product, be sure the antenna or cable system is...
.... If the plug should be sure the service technician has used for ventilation and to ensure reliable operation of the product and to a wall or ceiling. POWER-CORD PROTECTION - If an outside antenna system should be located in a risk of fire or electric shock. LIGHTNING - An outside antenna or cable system is connected to the product, be sure the antenna or cable system is...
Installation Manual
Page 4
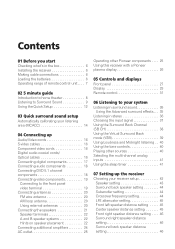
...the box 6 Installing the receiver 6 Making cable connections 6 Loading the batteries 6 Operating range of remote control unit. . . . 7 02 5 minute guide Introduction to home theater 8 Listening to Surround Sound 9 Using the Quick Setup 12 03 Quick surround sound setup Automatically calibrating your listening area (MCACC 14 04 Connecting up Audio/Video cords 16 S-video cables 16 Component video cords 16 Digital audio coaxial cords/ Optical cables 16 Connecting digital components 17 Connecting audio components 18 Connecting DVD 5.1 channel components 18 Connecting video components...
...the box 6 Installing the receiver 6 Making cable connections 6 Loading the batteries 6 Operating range of remote control unit. . . . 7 02 5 minute guide Introduction to home theater 8 Listening to Surround Sound 9 Using the Quick Setup 12 03 Quick surround sound setup Automatically calibrating your listening area (MCACC 14 04 Connecting up Audio/Video cords 16 S-video cables 16 Component video cords 16 Digital audio coaxial cords/ Optical cables 16 Connecting digital components 17 Connecting audio components 18 Connecting DVD 5.1 channel components 18 Connecting video components...

Installation Manual
Page 5
... video input settings 47 Digital input settings 47 SR+ control for Pioneer plasma displays 48 Manually calibrating your listening area (MCACC 49 Setting separate channel levels for listening modes 50 Using the SR+ mode with a Pioneer plasma display 51 08 Using the tuner Listening to the radio 53 Improving FM stereo sound 53 Tuning directly to a station 53 Saving station presets 54 Naming station presets 54 Listening to station presets 55 10 Controlling the rest of your system Setting the remote to control other components 57 Selecting preset codes directly 57 Programming signals...
... video input settings 47 Digital input settings 47 SR+ control for Pioneer plasma displays 48 Manually calibrating your listening area (MCACC 49 Setting separate channel levels for listening modes 50 Using the SR+ mode with a Pioneer plasma display 51 08 Using the tuner Listening to the radio 53 Improving FM stereo sound 53 Tuning directly to a station 53 Saving station presets 54 Naming station presets 54 Listening to station presets 55 10 Controlling the rest of your system Setting the remote to control other components 57 Selecting preset codes directly 57 Programming signals...
Installation Manual
Page 10
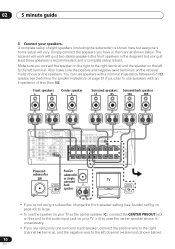
... / SA T IN DVD /LD FRONT D V D 5.1CH REC INPUT CD-R IN / TAPE / MD VIDEO CONTROL DVD 5.1CH INPUT IN OUT DVR/ VCR OUT IN MONITOR TV/ OUT SAT IN SUB WOOFER DVD PREOUT /LD IN S-VIDEO Y PB PR Y PB PR R R CENTER (T V / SAT)IN ø FRONT SURROUND PREOUT S R FRONT L P E A K A E R CENTER R SURROUND BACK L R SURROUND L SINGLE SEE INSTRUCTION MANUAL R FRONT L B IN PLAY S R AUDIO L AC OUTLET Powered Passive subwoofer subwoofer SW or single surround INPUT back speaker TV AUDIO IN •...
... / SA T IN DVD /LD FRONT D V D 5.1CH REC INPUT CD-R IN / TAPE / MD VIDEO CONTROL DVD 5.1CH INPUT IN OUT DVR/ VCR OUT IN MONITOR TV/ OUT SAT IN SUB WOOFER DVD PREOUT /LD IN S-VIDEO Y PB PR Y PB PR R R CENTER (T V / SAT)IN ø FRONT SURROUND PREOUT S R FRONT L P E A K A E R CENTER R SURROUND BACK L R SURROUND L SINGLE SEE INSTRUCTION MANUAL R FRONT L B IN PLAY S R AUDIO L AC OUTLET Powered Passive subwoofer subwoofer SW or single surround INPUT back speaker TV AUDIO IN •...

Installation Manual
Page 11
... channel (+) terminal, and the negative wire to your subwoofer and the TV. Make sure you want multi-channel surround sound. 11 En In this receiver. Also make sure that DVD/LD is showing in the receiver and switch it isn't, press DVD on the remote control to set the video input on page 14. 6 Play a DVD, and adjust the volume to confirm your speaker setup, room size and listening position. Surround back speaker (or subwoofer) R SURROUND BACK L 4 Plug in the receiver's display...
... channel (+) terminal, and the negative wire to your subwoofer and the TV. Make sure you want multi-channel surround sound. 11 En In this receiver. Also make sure that DVD/LD is showing in the receiver and switch it isn't, press DVD on the remote control to set the video input on page 14. 6 Play a DVD, and adjust the volume to confirm your speaker setup, room size and listening position. Surround back speaker (or subwoofer) R SURROUND BACK L 4 Plug in the receiver's display...
Installation Manual
Page 14
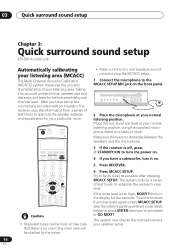
... have set up the microphone provided with your system, the receiver uses the information from a series of your listening area, taking into account ambient noise, speaker size and distance, and tests for five seconds. STATION TUNING ADVANCED STEREO/ STANDARD SURROUND DIRECT SIGNAL MIDNIGHT/ SELECT LOUDNESS SPEAKERS SB CH MODE MULTI JOG TONE QUICK SETUP TUNER EDIT CLASS BAND LISTENING MODE MPX INPUT ATT FL DIMMER MCACC SETUP MIC DIGITAL IN VIDEO INPUT S-VIDEO VIDEO L AUDIO R MULTI JOG 2 Place the microphone at your speaker setup...
... have set up the microphone provided with your system, the receiver uses the information from a series of your listening area, taking into account ambient noise, speaker size and distance, and tests for five seconds. STATION TUNING ADVANCED STEREO/ STANDARD SURROUND DIRECT SIGNAL MIDNIGHT/ SELECT LOUDNESS SPEAKERS SB CH MODE MULTI JOG TONE QUICK SETUP TUNER EDIT CLASS BAND LISTENING MODE MPX INPUT ATT FL DIMMER MCACC SETUP MIC DIGITAL IN VIDEO INPUT S-VIDEO VIDEO L AUDIO R MULTI JOG 2 Place the microphone at your speaker setup...
Installation Manual
Page 19
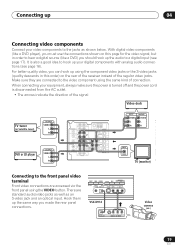
When connecting your equipment, always make sure the power is turned off and the power cord is also a good idea to hook up the audio to a digital input (see page 18). There are standard audio/video jacks as well as shown below. STEREO/ DIRECT SIGNAL MIDNIGHT/ SELECT LOUDNESS SPEAKERS SB CH MODE MULTI JOG TONE QUICK SETUP ODE MCACC VIDEO INPUT SETUP MIC DIGITAL IN S-VIDEO VIDEO L AUDIO R VSX-D914 DIGITAL OUT V L R VIDEO OUTPUT Video camera (etc.) 19 En Connecting up the same way you must use the connections shown on...
When connecting your equipment, always make sure the power is turned off and the power cord is also a good idea to hook up the audio to a digital input (see page 18). There are standard audio/video jacks as well as shown below. STEREO/ DIRECT SIGNAL MIDNIGHT/ SELECT LOUDNESS SPEAKERS SB CH MODE MULTI JOG TONE QUICK SETUP ODE MCACC VIDEO INPUT SETUP MIC DIGITAL IN S-VIDEO VIDEO L AUDIO R VSX-D914 DIGITAL OUT V L R VIDEO OUTPUT Video camera (etc.) 19 En Connecting up the same way you must use the connections shown on...
Installation Manual
Page 21
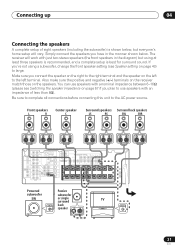
... two stereo speakers (the front speakers in the manner shown below , but using a subwoofer, change the front speaker setting (see Switching the speaker impedance on the speakers. Also make sure the positive and negative (+/-) terminals on the receiver match those on page 67 if you have in the diagram) but everyone's home setup will vary. Front speakers L R Center speaker C Surround speakers Surround back speakers LS RS SBL SBR CENTER IN DIGITAL OUT OPT IN AUX COMPONENT VIDEO ASSIGNABLE...
... two stereo speakers (the front speakers in the manner shown below , but using a subwoofer, change the front speaker setting (see Switching the speaker impedance on the speakers. Also make sure the positive and negative (+/-) terminals on the receiver match those on page 67 if you have in the diagram) but everyone's home setup will vary. Front speakers L R Center speaker C Surround speakers Surround back speakers LS RS SBL SBR CENTER IN DIGITAL OUT OPT IN AUX COMPONENT VIDEO ASSIGNABLE...
Installation Manual
Page 22
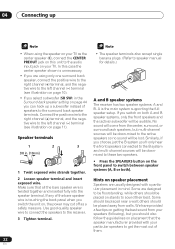
... the best sound from the center, surround, or surround back speakers, but you 'll only hear the front speakers connected to the B system and multi channel sources will be placed near a wall; Use good quality speaker wire to connect the speakers to the receiver. 3 Tighten terminal. • The speaker terminals also accept single banana plugs. (Refer to speaker manual for details.) A and B speaker systems The receiver has two speaker systems: A and B. 04 Connecting up a subwoofer instead of speakers...
... the best sound from the center, surround, or surround back speakers, but you 'll only hear the front speakers connected to the B system and multi channel sources will be placed near a wall; Use good quality speaker wire to connect the speakers to the receiver. 3 Tighten terminal. • The speaker terminals also accept single banana plugs. (Refer to speaker manual for details.) A and B speaker systems The receiver has two speaker systems: A and B. 04 Connecting up a subwoofer instead of speakers...
Installation Manual
Page 26
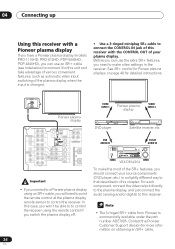
...under the part number ADE7095. VIDEO INPUT 1 Pioneer plasma display VIDEO INPUT 2 DVD player Satellite receiver, etc DVD AUDIO IN STANDBY/ PHONES MULTI JOG TV/SAT AUDIO IN AUDIO/VIDEO MULTI-CHANNEL RECEIVER VSX-D914 TUNING ADVANCED STANDARD SURROUND STEREO/ DIRECT SIGNAL SELECT MIDNIGHT/ LOUDNESS SPEAKERS SB CH MODE MULTI JOG TONE QUICK SETUP BAND LISTENING MODE MPX INPUT ATT FL DIMMER MCACC SETUP MIC DIGITAL IN VIDEO INPUT S-VIDEO VIDEO L AUDIO R ENTER MULTI JOG MASTER VOLUME DOWN UP VSX-D814/914 To make a few settings in this receiver with the CONTROL OUT...
...under the part number ADE7095. VIDEO INPUT 1 Pioneer plasma display VIDEO INPUT 2 DVD player Satellite receiver, etc DVD AUDIO IN STANDBY/ PHONES MULTI JOG TV/SAT AUDIO IN AUDIO/VIDEO MULTI-CHANNEL RECEIVER VSX-D914 TUNING ADVANCED STANDARD SURROUND STEREO/ DIRECT SIGNAL SELECT MIDNIGHT/ LOUDNESS SPEAKERS SB CH MODE MULTI JOG TONE QUICK SETUP BAND LISTENING MODE MPX INPUT ATT FL DIMMER MCACC SETUP MIC DIGITAL IN VIDEO INPUT S-VIDEO VIDEO L AUDIO R ENTER MULTI JOG MASTER VOLUME DOWN UP VSX-D814/914 To make a few settings in this receiver with the CONTROL OUT...
Installation Manual
Page 27
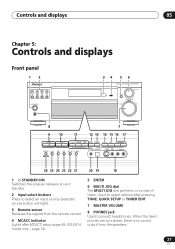
...AUDIO/VIDEO MULTI-CHANNEL RECEIVER VSX-D914 ENTER MULTI JOG MASTER VOLUME DOWN UP 8 7 9 10 11 12 13 14 15 16 17 STATION TUNING ADVANCED STEREO/ STANDARD SURROUND DIRECT SIGNAL MIDNIGHT/ SELECT LOUDNESS SPEAKERS SB CH MODE MULTI JOG TONE QUICK SETUP TUNER EDIT CLASS BAND LISTENING MODE MPX INPUT ATT FL DIMMER MCACC SETUP MIC DIGITAL IN VIDEO INPUT S-VIDEO VIDEO L AUDIO R MULTI JOG 26 25 24 23 22 21 20 19 18 1 STANDBY/ON Switches the receiver between on and standby. 2 Input select buttons Press to select an input source (selected source button will light). 3 Remote...
...AUDIO/VIDEO MULTI-CHANNEL RECEIVER VSX-D914 ENTER MULTI JOG MASTER VOLUME DOWN UP 8 7 9 10 11 12 13 14 15 16 17 STATION TUNING ADVANCED STEREO/ STANDARD SURROUND DIRECT SIGNAL MIDNIGHT/ SELECT LOUDNESS SPEAKERS SB CH MODE MULTI JOG TONE QUICK SETUP TUNER EDIT CLASS BAND LISTENING MODE MPX INPUT ATT FL DIMMER MCACC SETUP MIC DIGITAL IN VIDEO INPUT S-VIDEO VIDEO L AUDIO R MULTI JOG 26 25 24 23 22 21 20 19 18 1 STANDBY/ON Switches the receiver between on and standby. 2 Input select buttons Press to select an input source (selected source button will light). 3 Remote...
Installation Manual
Page 28
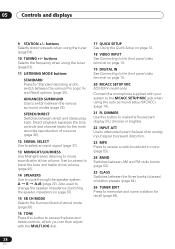
... low volume. Also used to change the speaker impedence (Switching the speaker impedance on page 67). 15 SB CH MODE Selects the Surround back channel mode (page 38). 16 TONE Press this button to access the bass and treble controls, which you can then adjust with the MULTI JOG dial. 17 QUICK SETUP See Using the Quick Setup on page 12. 18 VIDEO INPUT See Connecting to the front panel video terminal on page 19. 19 DIGITAL IN See Connecting...
... low volume. Also used to change the speaker impedence (Switching the speaker impedance on page 67). 15 SB CH MODE Selects the Surround back channel mode (page 38). 16 TONE Press this button to access the bass and treble controls, which you can then adjust with the MULTI JOG dial. 17 QUICK SETUP See Using the Quick Setup on page 12. 18 VIDEO INPUT See Connecting to the front panel video terminal on page 19. 19 DIGITAL IN See Connecting...
Installation Manual
Page 31
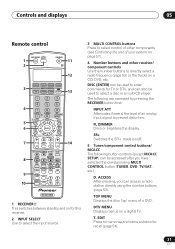
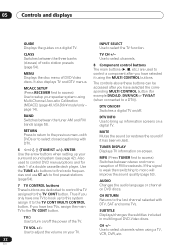
SR+ Switches the SR+ mode on a digital TV. The following button controls (except MCACC SETUP) can access a radio station directly using the number buttons (page 53). TOP MENU Displays the disc 'top' menu of your system on a CD, DVD, etc. EDIT Press to prevent distortion. FL DIMMER Dims or brightens the display. ACCESS After pressing, you have selected the corresponding MULTI CONTROL button (TUNER, DVD, TV/SAT, etc.) D. Controls and displays 05 Remote control RECEIVER INPUT SELECT 1 2 SOURCE 11 12 DVD/LD TV/SAT...
SR+ Switches the SR+ mode on a digital TV. The following button controls (except MCACC SETUP) can access a radio station directly using the number buttons (page 53). TOP MENU Displays the disc 'top' menu of your system on a CD, DVD, etc. EDIT Press to prevent distortion. FL DIMMER Dims or brightens the display. ACCESS After pressing, you have selected the corresponding MULTI CONTROL button (TUNER, DVD, TV/SAT, etc.) D. Controls and displays 05 Remote control RECEIVER INPUT SELECT 1 2 SOURCE 11 12 DVD/LD TV/SAT...
Installation Manual
Page 32
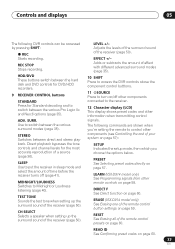
... TV Use to adjust the volume on /off . MPX (Press TUNER first to a DTV)). Use to turn on your surround sound system (see page 42). If the signal is weak then switching to the TV CONT MULTI CONTROL button. 05 Controls and displays GUIDE Displays the guides on -screen. CLASS Switches between the three banks (classes) of DVD-Video discs. MENU Displays the disc menu of radio station presets (page 54). It also displays TV and DTV menus. Use to select channels. 8 Component control buttons The main buttons...
... TV Use to adjust the volume on /off . MPX (Press TUNER first to a DTV)). Use to turn on your surround sound system (see page 42). If the signal is weak then switching to the TV CONT MULTI CONTROL button. 05 Controls and displays GUIDE Displays the guides on -screen. CLASS Switches between the three banks (classes) of DVD-Video discs. MENU Displays the disc menu of radio station presets (page 54). It also displays TV and DTV menus. Use to select channels. 8 Component control buttons The main buttons...
Installation Manual
Page 33
... 59. DIRECT F See Direct function on page 57. Controls and displays 05 The following commands are shown when you're setting the remote to Midnight or Loudness listening (page 40). STEREO Switches between the various Pro Logic IIx and Neo:6 options (page 35). TEST TONE Sounds the test tone when setting up the surround sound of a source (page 36). Adjusts the levels of the surround sound of the receiver (page 50). PRESET See Selecting preset codes directly on...
... 59. DIRECT F See Direct function on page 57. Controls and displays 05 The following commands are shown when you're setting the remote to Midnight or Loudness listening (page 40). STEREO Switches between the various Pro Logic IIx and Neo:6 options (page 35). TEST TONE Sounds the test tone when setting up the surround sound of a source (page 36). Adjusts the levels of the surround sound of the receiver (page 50). PRESET See Selecting preset codes directly on...

Installation Manual
Page 37
...play back Dolby Digital, PCM (32kHz-96 kHz) and DTS digital signal formats (including DTS 96kHz/24 bit). Selects the analog inputs. • DIGITAL - Selects the multichannel inputs (only appears when DVD/LD is selected, the receiver automatically switches to STEREO. When set the signal input to the source component. Listening to your DVD player. STATION TUNING ADVANCED STEREO/ STANDARD SURROUND DIRECT SIGNAL MIDNIGHT/ SELECT LOUDNESS SPEAKERS SB CH MODE MULTI JOG TONE QUICK SETUP TUNER EDIT CLASS BAND LISTENING MODE MPX INPUT ATT FL DIMMER MCACC SETUP MIC DIGITAL IN VIDEO...
...play back Dolby Digital, PCM (32kHz-96 kHz) and DTS digital signal formats (including DTS 96kHz/24 bit). Selects the analog inputs. • DIGITAL - Selects the multichannel inputs (only appears when DVD/LD is selected, the receiver automatically switches to STEREO. When set the signal input to the source component. Listening to your DVD player. STATION TUNING ADVANCED STEREO/ STANDARD SURROUND DIRECT SIGNAL MIDNIGHT/ SELECT LOUDNESS SPEAKERS SB CH MODE MULTI JOG TONE QUICK SETUP TUNER EDIT CLASS BAND LISTENING MODE MPX INPUT ATT FL DIMMER MCACC SETUP MIC DIGITAL IN VIDEO...
Installation Manual
Page 40
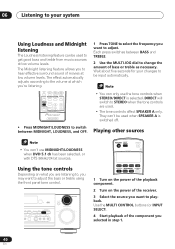
.../LOUDNESS to switch between BASS and TREBLE. 2 Use the MULTI JOG dial to hear effective surround sound of movies at which you may want to adjust. GNAL MIDNIGHT/ ELECT LOUDNESS SPEAKERS SB CH MODE MULTI JOG TONE QUICK SETUP CACC UP MIC DIGITAL IN VIDEO INPUT S-VIDEO VIDEO L AUDIO R ENTER MULTI JOG MASTER VOLUME DOWN UP RECEIVER INPUT SELECT SOURCE DVD/LD TV/SAT DVR/VCR TVCONT MULTI CONTROL CD CD-R/TAPE TUNER RECEIVER 1 Turn on the power of the receiver. 3 Select the source you selected in step...
.../LOUDNESS to switch between BASS and TREBLE. 2 Use the MULTI JOG dial to hear effective surround sound of movies at which you may want to adjust. GNAL MIDNIGHT/ ELECT LOUDNESS SPEAKERS SB CH MODE MULTI JOG TONE QUICK SETUP CACC UP MIC DIGITAL IN VIDEO INPUT S-VIDEO VIDEO L AUDIO R ENTER MULTI JOG MASTER VOLUME DOWN UP RECEIVER INPUT SELECT SOURCE DVD/LD TV/SAT DVR/VCR TVCONT MULTI CONTROL CD CD-R/TAPE TUNER RECEIVER 1 Turn on the power of the receiver. 3 Select the source you selected in step...
Installation Manual
Page 41
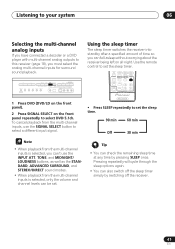
...a DVD player with multi-channel analog outputs to set . • You can 't use the INPUT ATT, TONE, and MIDNIGHT/ LOUDNESS buttons, as well as the STANDARD, ADVANCED SURROUND, and STEREO/DIRECT sound modes. • When playback from the multi-channel inputs, use the SIGNAL SELECT button to select a different input signal. STATION TUNING ADVANCED STEREO/ STANDARD SURROUND DIRECT SIGNAL MIDNIGHT/ SELECT LOUDNESS SPEAKERS SB CH MODE MULTI JOG TONE QUICK SETUP TUNER EDIT CLASS BAND LISTENING MODE MPX INPUT ATT FL DIMMER MCACC SETUP MIC DIGITAL IN VIDEO INPUT S-VIDEO VIDEO L AUDIO...
...a DVD player with multi-channel analog outputs to set . • You can 't use the INPUT ATT, TONE, and MIDNIGHT/ LOUDNESS buttons, as well as the STANDARD, ADVANCED SURROUND, and STEREO/DIRECT sound modes. • When playback from the multi-channel inputs, use the SIGNAL SELECT button to select a different input signal. STATION TUNING ADVANCED STEREO/ STANDARD SURROUND DIRECT SIGNAL MIDNIGHT/ SELECT LOUDNESS SPEAKERS SB CH MODE MULTI JOG TONE QUICK SETUP TUNER EDIT CLASS BAND LISTENING MODE MPX INPUT ATT FL DIMMER MCACC SETUP MIC DIGITAL IN VIDEO INPUT S-VIDEO VIDEO L AUDIO...
Installation Manual
Page 59
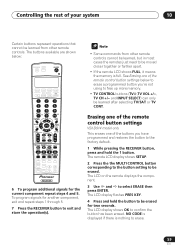
... remote control button settings VSX-D914 model only This erases one of the remote control button settings below : RECEIVER INPUT SELECT SOURCE DVD/LD TV/SAT DVR/VCR TVCONT MULTI CONTROL CD CD-R/TAPE TUNER RECEIVER INPUT ATT FL DIMMER +10 D.ACCESS TOP MENU SETUP TUNE SR DISC ENTER CLASS MENU DTVMENU ST T.EDIT ENTER ST MCACC SETUP BAND GUIDE TUNE TV CONTROL RETURN TV VOL INPUT SELECT TV CH VOL DTVON/OFF REC DTVINFO MUTE TUNER DISPLAY REC STOP MPX CHRETURN AUDIO SUBTITLE HDD DVD...
... remote control button settings VSX-D914 model only This erases one of the remote control button settings below : RECEIVER INPUT SELECT SOURCE DVD/LD TV/SAT DVR/VCR TVCONT MULTI CONTROL CD CD-R/TAPE TUNER RECEIVER INPUT ATT FL DIMMER +10 D.ACCESS TOP MENU SETUP TUNE SR DISC ENTER CLASS MENU DTVMENU ST T.EDIT ENTER ST MCACC SETUP BAND GUIDE TUNE TV CONTROL RETURN TV VOL INPUT SELECT TV CH VOL DTVON/OFF REC DTVINFO MUTE TUNER DISPLAY REC STOP MPX CHRETURN AUDIO SUBTITLE HDD DVD...
Installation Manual
Page 66
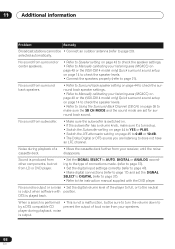
... or the (VSX-D914 model only) Quick surround sound setup on page 38 to make sure it's turned up. • Switch the Subwoofer setting on page 44 to YES or PLUS. • Switch the LFE attenuator setting on page 44 to check the surround back speaker settings. • Refer to Manually calibrating your speakers. Sound is output. 66 En No sound from other components, but be • Connect an outdoor antenna (refer to the instruction manual supplied with...
... or the (VSX-D914 model only) Quick surround sound setup on page 38 to make sure it's turned up. • Switch the Subwoofer setting on page 44 to YES or PLUS. • Switch the LFE attenuator setting on page 44 to check the surround back speaker settings. • Refer to Manually calibrating your speakers. Sound is output. 66 En No sound from other components, but be • Connect an outdoor antenna (refer to the instruction manual supplied with...


