
Installation Manual
Page 5
... setting 47 Dual mono setting 47 Component video input settings 47 Digital input settings 47 SR+ control for Pioneer plasma displays 48 Manually calibrating your listening area (MCACC 49 Setting separate channel levels for listening modes 50 Using the SR+ mode ... control presets 60 Direct function 60 Confirming preset codes 60 Controls for TVs 61 Controls for other components 62 11 Additional information Troubleshooting 65 Resetting the main unit 67 Switching the speaker impedance 67 Specifications 68 Cleaning the unit 69 09 Making recordings Making an audio or a video...
... setting 47 Dual mono setting 47 Component video input settings 47 Digital input settings 47 SR+ control for Pioneer plasma displays 48 Manually calibrating your listening area (MCACC 49 Setting separate channel levels for listening modes 50 Using the SR+ mode ... control presets 60 Direct function 60 Confirming preset codes 60 Controls for TVs 61 Controls for other components 62 11 Additional information Troubleshooting 65 Resetting the main unit 67 Switching the speaker impedance 67 Specifications 68 Cleaning the unit 69 09 Making recordings Making an audio or a video...
Installation Manual
Page 33
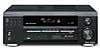
SURR. PRESET See Selecting preset codes directly on page 60. RESET See Erasing all of the receiver (page 50). HDD/DVD These buttons ...control butttons. 11 SOURCE Press to turn on page 60. DIRECT F See Direct function on page 57. ERASE (VSX-D914 model only) See Erasing one of the receiver (page 50). READ ID See Confirming preset codes on page ... of the receiver (page 50). Adjusts the levels of the surround sound of a source (page 36). LEARN (VSX-D914 model only) See Programming signals from which you 're setting the remote to switch between direct and stereo playback...
SURR. PRESET See Selecting preset codes directly on page 60. RESET See Erasing all of the receiver (page 50). HDD/DVD These buttons ...control butttons. 11 SOURCE Press to turn on page 60. DIRECT F See Direct function on page 57. ERASE (VSX-D914 model only) See Erasing one of the receiver (page 50). READ ID See Confirming preset codes on page ... of the receiver (page 50). Adjusts the levels of the surround sound of a source (page 36). LEARN (VSX-D914 model only) See Programming signals from which you 're setting the remote to switch between direct and stereo playback...
Installation Manual
Page 60
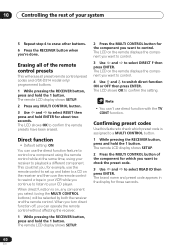
...for three seconds. 60 En When you turn direct function off, you 're done. The LCD on , any MULTI CONTROL button. 3 Use and to select RESET then press and hold ENTER for the component you want to control. The remote LCD display shows SETUP. 2 Press the MULTI CONTROL button of the... F then press ENTER. The brand name and preset code appears in your receiver to your CD player. Erasing all preset remote control preset codes and (VSX-D914 model only) programmed buttons. 1 While pressing the RECEIVER button, press and hold the 1 button. The remote LCD display shows SETUP. 2 Press any ...
...for three seconds. 60 En When you turn direct function off, you 're done. The LCD on , any MULTI CONTROL button. 3 Use and to select RESET then press and hold ENTER for the component you want to control. The remote LCD display shows SETUP. 2 Press the MULTI CONTROL button of the... F then press ENTER. The brand name and preset code appears in your receiver to your CD player. Erasing all preset remote control preset codes and (VSX-D914 model only) programmed buttons. 1 While pressing the RECEIVER button, press and hold the 1 button. The remote LCD display shows SETUP. 2 Press any ...

Installation Manual
Page 67
...• Press FL DIMMER on . 2 While holding down the TONE button, press and hold the STANDBY/ON button for about three seconds. 3 When you see RESET? Each time you do this setting if your speakers are rated at 8Ω or more to the factory default settings. appear in the display. 4 Press...with this , you plan to use speakers with a 6Ω impedance rating. • With the receiver in the display to indicate that the receiver has been reset to confirm. The display is possible to the factory default. Use the front panel controls to do this system, but it is dark or off...
...• Press FL DIMMER on . 2 While holding down the TONE button, press and hold the STANDBY/ON button for about three seconds. 3 When you see RESET? Each time you do this setting if your speakers are rated at 8Ω or more to the factory default settings. appear in the display. 4 Press...with this , you plan to use speakers with a 6Ω impedance rating. • With the receiver in the display to indicate that the receiver has been reset to confirm. The display is possible to the factory default. Use the front panel controls to do this system, but it is dark or off...
