
Owner's Manual
Page 4
... sound quality . . . . 17 Connecting the speakers 19 Switching the speaker terminal 20 Making cable connections 21 HDMI cables 21 About HDMI 21 Analog audio cables 22 Digital audio cables 22 Video cables 22 About the video converter 23 Connecting a TV and playback components . . . 24 Connecting using HDMI 24 Connecting your DVD player with no HDMI input. . . 26 Connecting a satellite receiver or other digital set-top box 27 Connecting an HDD/DVD recorder, VCR and other video sources 27 Using the component video jacks 28 Connecting other audio components 28 Connecting antennas...
... sound quality . . . . 17 Connecting the speakers 19 Switching the speaker terminal 20 Making cable connections 21 HDMI cables 21 About HDMI 21 Analog audio cables 22 Digital audio cables 22 Video cables 22 About the video converter 23 Connecting a TV and playback components . . . 24 Connecting using HDMI 24 Connecting your DVD player with no HDMI input. . . 26 Connecting a satellite receiver or other digital set-top box 27 Connecting an HDD/DVD recorder, VCR and other video sources 27 Using the component video jacks 28 Connecting other audio components 28 Connecting antennas...
Owner's Manual
Page 6
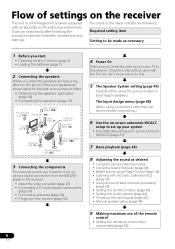
...; 3 Connecting the components For surround sound, you'll want to hook up using Phase Control (page 38) • Listening with Acoustic Calibration EQ (page 39) • Using surround back channel processing (page 39) • Setting the Up Mix function (page 40) • Setting the Audio options (page 40) • Choosing the input signal (page 43) • Manual speaker setup (page 45) 9 Making maximum use of the remote control • Setting the remote to control...
...; 3 Connecting the components For surround sound, you'll want to hook up using Phase Control (page 38) • Listening with Acoustic Calibration EQ (page 39) • Using surround back channel processing (page 39) • Setting the Up Mix function (page 40) • Setting the Audio options (page 40) • Choosing the input signal (page 43) • Manual speaker setup (page 45) 9 Making maximum use of the remote control • Setting the remote to control...
Owner's Manual
Page 9
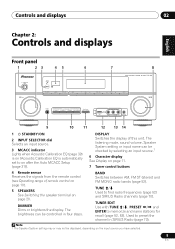
... panel 1 23 45 STANDBY/ON INPUT SELECTOR PHASE CONTROL SPEAKERS DIMMER DISPLAY BAND 6 7 8 AUDIO/ VIDEO MULTI- DISPLAY Switches the display of remote control on page 10). 5 SPEAKERS See Switching the speaker terminal on page 20. CHANNEL RECEIVER VSX-920 TUNE TUNER EDIT PRESET ENTER MASTER VOLUME PHONES AUTO/DIRECT LISTENING MODE STEREO/ALC STANDARD ADV SURROUND iPod iPhone DIRECT CONTROL VIDEO INPUT USB iPod iPhone VIDEO L AUDIO R MCACC SETUP MIC 9 10 11 12 13 14 1 STANDBY/ON 2 INPUT SELECTOR dial Selects an input source. 3 MCACC indicator Lights...
... panel 1 23 45 STANDBY/ON INPUT SELECTOR PHASE CONTROL SPEAKERS DIMMER DISPLAY BAND 6 7 8 AUDIO/ VIDEO MULTI- DISPLAY Switches the display of remote control on page 10). 5 SPEAKERS See Switching the speaker terminal on page 20. CHANNEL RECEIVER VSX-920 TUNE TUNER EDIT PRESET ENTER MASTER VOLUME PHONES AUTO/DIRECT LISTENING MODE STEREO/ALC STANDARD ADV SURROUND iPod iPhone DIRECT CONTROL VIDEO INPUT USB iPod iPhone VIDEO L AUDIO R MCACC SETUP MIC 9 10 11 12 13 14 1 STANDBY/ON 2 INPUT SELECTOR dial Selects an input source. 3 MCACC indicator Lights...
Owner's Manual
Page 10
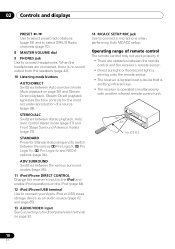
... Use to connect your Apple iPod or USB mass storage device as an audio source (page 62 and page 65). 13 AUDIO/VIDEO input See Connecting to the front panel video terminal on page 30. 14 MCACC SETUP MIC jack Use to switch between Auto surround mode (Auto playback on page 35) and Stream Direct playback. 02 Controls and displays PRESET / Use to select preset radio stations (page 53) and to select SIRIUS Radio channels (page 70). 8 MASTER VOLUME dial 9 PHONES jack Use to connect...
... Use to connect your Apple iPod or USB mass storage device as an audio source (page 62 and page 65). 13 AUDIO/VIDEO input See Connecting to the front panel video terminal on page 30. 14 MCACC SETUP MIC jack Use to switch between Auto surround mode (Auto playback on page 35) and Stream Direct playback. 02 Controls and displays PRESET / Use to select preset radio stations (page 53) and to select SIRIUS Radio channels (page 70). 8 MASTER VOLUME dial 9 PHONES jack Use to connect...
Owner's Manual
Page 13
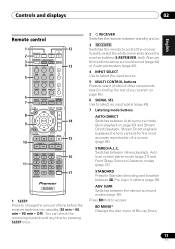
... Also use this button to set up surround sound (page 44) or Audio parameters (page 40). 4 INPUT SELECT Use to select the input source. 5 MULTI CONTROL buttons Press to access: BD MENU* Displays the disc menu of a source (page 38). STEREO/A.L.C. Off). ADV SURR Switches between 2 Pro Logic II options (page 35). Press BD first to select control of other components (see Controlling the rest of time before the receiver switches into standby (30 min - 60 min - 90 min - Controls and displays 02...
... Also use this button to set up surround sound (page 44) or Audio parameters (page 40). 4 INPUT SELECT Use to select the input source. 5 MULTI CONTROL buttons Press to access: BD MENU* Displays the disc menu of a source (page 38). STEREO/A.L.C. Off). ADV SURR Switches between 2 Pro Logic II options (page 35). Press BD first to select control of other components (see Controlling the rest of time before the receiver switches into standby (30 min - 60 min - 90 min - Controls and displays 02...
Owner's Manual
Page 17
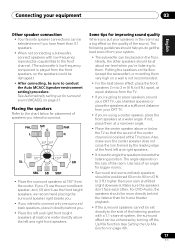
... the side of the listening position with low frequency reproduction capabilities to the front channel. (The subwoofer's low frequency component is not recommended. • For the best stereo effect, place the front speakers 2 m to connect. If you, (1) use the surround back speaker, and, (2) don't use shielded speakers or place the speakers at the TV screen. Some tips for placement of the center channel is best to 90 cm (2 ft. The following...
... the side of the listening position with low frequency reproduction capabilities to the front channel. (The subwoofer's low frequency component is not recommended. • For the best stereo effect, place the front speakers 2 m to connect. If you, (1) use the surround back speaker, and, (2) don't use shielded speakers or place the speakers at the TV screen. Some tips for placement of the center channel is best to 90 cm (2 ft. The following...

Owner's Manual
Page 19
...) OPTICAL IN 2 OUT IN 1 (CD-R/TAPE) HDMI ASSIGNABLE 12 IN R TV/SAT DVD L IN R AUDIO IN MONITOR OUT DVD IN BD IN ANTENNA PR PB Y MONITOR OUT BD FM UNBAL 75 SIRIUS IN IN IN 2 (DVD) AM LOOP COMPONENT VIDEO IN 1 (BD) ASSIGNABLE 12 FRONT HEIGHT / SPEAKERS B R L SURROUND R L SURROUND BACK R L(Single) When using at least three speakers is recommended, and a complete setup is best for the listening options with a normal impedance between...
...) OPTICAL IN 2 OUT IN 1 (CD-R/TAPE) HDMI ASSIGNABLE 12 IN R TV/SAT DVD L IN R AUDIO IN MONITOR OUT DVD IN BD IN ANTENNA PR PB Y MONITOR OUT BD FM UNBAL 75 SIRIUS IN IN IN 2 (DVD) AM LOOP COMPONENT VIDEO IN 1 (BD) ASSIGNABLE 12 FRONT HEIGHT / SPEAKERS B R L SURROUND R L SURROUND BACK R L(Single) When using at least three speakers is recommended, and a complete setup is best for the listening options with a normal impedance between...
Owner's Manual
Page 21
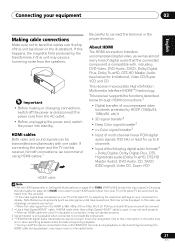
... digital audio that the connected component is used, it may not operate properly. 3 Signal transfer is 480i, 480p, 576i or 576p, Multi Ch PCM sound and HD sound cannot be displayed. This receiver supports the functions described below for up to hear HDMI audio output from the speakers. If HDMI cable other than a High Speed HDMI™ cable is compatible with, including DVD-Video, DVD-Audio, SACD, Dolby Digital Plus, Dolby TrueHD, DTS-HD Master Audio (see below through HDMI connections.2 • Digital transfer of multi-channel linear PCM digital audio signals...
... digital audio that the connected component is used, it may not operate properly. 3 Signal transfer is 480i, 480p, 576i or 576p, Multi Ch PCM sound and HD sound cannot be displayed. This receiver supports the functions described below for up to hear HDMI audio output from the speakers. If HDMI cable other than a High Speed HDMI™ cable is compatible with, including DVD-Video, DVD-Audio, SACD, Dolby Digital Plus, Dolby TrueHD, DTS-HD Master Audio (see below through HDMI connections.2 • Digital transfer of multi-channel linear PCM digital audio signals...
Owner's Manual
Page 33
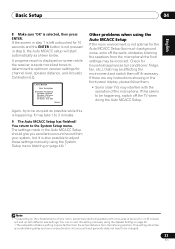
... Analyzing Surround Analyzing Speaker System Speaker Distance Channel Level Acoustic Cal EQ Return Other problems when using the Auto MCACC Setup If the room environment is not optimal for 10 seconds and the ENTER button is not pressed in step 8, the Auto MCACC setup will end up with the operation of your system, but it is also possible to adjust these settings manually using the System Setup menu (starting...
... Analyzing Surround Analyzing Speaker System Speaker Distance Channel Level Acoustic Cal EQ Return Other problems when using the Auto MCACC Setup If the room environment is not optimal for 10 seconds and the ENTER button is not pressed in step 8, the Auto MCACC setup will end up with the operation of your system, but it is also possible to adjust these settings manually using the System Setup menu (starting...

Owner's Manual
Page 34
... are playing a stereo source, you want to play. You can use the input function buttons on the remote control, INPUT SELECT, or the front panel INPUT SELECTOR dial.2 3 Press AUTO/DIRECT to select 'AUTO SURROUND' and start playback of the source.3 If you're playing a Dolby Digital or DTS surround sound DVD disc, you may not be set to a multichannel listening mode if you will only hear sound from the speakers connected to this receiver (for playing a source (such as a DVD disc) with your home theater system. 1 Switch on your DVD player or source discs...
... are playing a stereo source, you want to play. You can use the input function buttons on the remote control, INPUT SELECT, or the front panel INPUT SELECTOR dial.2 3 Press AUTO/DIRECT to select 'AUTO SURROUND' and start playback of the source.3 If you're playing a Dolby Digital or DTS surround sound DVD disc, you may not be set to a multichannel listening mode if you will only hear sound from the speakers connected to this receiver (for playing a source (such as a DVD disc) with your home theater system. 1 Switch on your DVD player or source discs...
Owner's Manual
Page 40
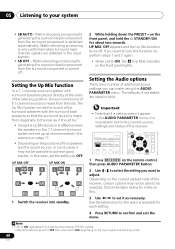
... the options available for about two seconds. RECEIVER SLEEP TV SOURCE CONTROL AUDIO PARAMETER TOP MENU TUNE TUNER EDIT MASTER TOOLS VOLUME MENU PRESET PRESET RECEIVER INPUT SELECT INPUT ENTER BD DVD TV HOME MENU SETUP iPod CTRL C GO TUNE BAND RETURN 1 Press RECEIVER on the remote control, then press AUDIO PARAMETER button. 2 Use / to select the setting you want to confirm and exit the menu. UP MIX: OFF appears and the Up Mix function turns off . 2 While holding down the...
... the options available for about two seconds. RECEIVER SLEEP TV SOURCE CONTROL AUDIO PARAMETER TOP MENU TUNE TUNER EDIT MASTER TOOLS VOLUME MENU PRESET PRESET RECEIVER INPUT SELECT INPUT ENTER BD DVD TV HOME MENU SETUP iPod CTRL C GO TUNE BAND RETURN 1 Press RECEIVER on the remote control, then press AUDIO PARAMETER button. 2 Use / to select the setting you want to confirm and exit the menu. UP MIX: OFF appears and the Up Mix function turns off . 2 While holding down the...
Owner's Manual
Page 43
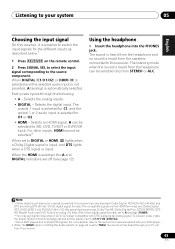
... play back Dolby Digital, PCM (32 kHz to 192 kHz sampling frequencies), Dolby TrueHD, Dolby Digital Plus, DTS-EXPRESS, DTSHD Master Audio and DVD Audio (including 192 kHz). Selects an HDMI signal. Using the headphone • Insert the headphone into the PHONES jack. The compatible signals via the HDMI terminals are off (see page 12). With other inputs, HDMI cannot be selected only from the speakers connected to this receiver can be selected.2 When set to DIGITAL or HDMI, 2 lights when a Dolby Digital signal...
... play back Dolby Digital, PCM (32 kHz to 192 kHz sampling frequencies), Dolby TrueHD, Dolby Digital Plus, DTS-EXPRESS, DTSHD Master Audio and DVD Audio (including 192 kHz). Selects an HDMI signal. Using the headphone • Insert the headphone into the PHONES jack. The compatible signals via the HDMI terminals are off (see page 12). With other inputs, HDMI cannot be selected only from the speakers connected to this receiver can be selected.2 When set to DIGITAL or HDMI, 2 lights when a Dolby Digital signal...
Owner's Manual
Page 44
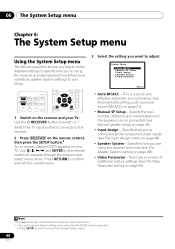
... connects to your liking. This is selected. • Press SETUP at any time to exit the System Setup menu. 44 En RECEIVER SLEEP TV SOURCE CONTROL RECEIVER INPUT SELECT BD DVD TV INPUT AUDIO PARAMETER TOP MENU TUNE TUNER EDIT MASTER TOOLS VOLUME MENU PRESET PRESET ENTER HOME MENU SETUP iPod CTRL CATEGORY TUNE BAND RETURN DTV/ TV MUTE 1 Switch on page 31). • Manual SP Setup - System Setup 1.Auto MCACC 2.Manual SP Setup 3.Input Assign 4.Speaker System 5.Video Parameter Return • Auto MCACC - 06 The System Setup menu Chapter 6: The System Setup menu Using...
... connects to your liking. This is selected. • Press SETUP at any time to exit the System Setup menu. 44 En RECEIVER SLEEP TV SOURCE CONTROL RECEIVER INPUT SELECT BD DVD TV INPUT AUDIO PARAMETER TOP MENU TUNE TUNER EDIT MASTER TOOLS VOLUME MENU PRESET PRESET ENTER HOME MENU SETUP iPod CTRL CATEGORY TUNE BAND RETURN DTV/ TV MUTE 1 Switch on page 31). • Manual SP Setup - System Setup 1.Auto MCACC 2.Manual SP Setup 3.Input Assign 4.Speaker System 5.Video Parameter Return • Auto MCACC - 06 The System Setup menu Chapter 6: The System Setup menu Using...
Owner's Manual
Page 45
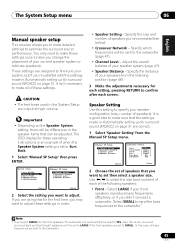
...; The test tones used in the speaker items that you didn't connect a subwoofer. System Setup 1.Auto MCACC 2.Manual SP Setup 3.Input Assign 4.Speaker System 5.Video Parameter 2.Manual SP Setup a.Speaker Setting b.Crossover Network c.Channel Level d.Speaker Distance Return Return 2 Select the setting you want to adjust these settings in Automatically setting up for surround sound (MCACC) on page 31, it isn't necessary to make sure that the settings made in order: • Speaker Setting - Select LARGE if your speaker system (page 47). • Speaker Distance...
...; The test tones used in the speaker items that you didn't connect a subwoofer. System Setup 1.Auto MCACC 2.Manual SP Setup 3.Input Assign 4.Speaker System 5.Video Parameter 2.Manual SP Setup a.Speaker Setting b.Crossover Network c.Channel Level d.Speaker Distance Return Return 2 Select the setting you want to adjust these settings in Automatically setting up for surround sound (MCACC) on page 31, it isn't necessary to make sure that the settings made in order: • Speaker Setting - Select LARGE if your speaker system (page 47). • Speaker Distance...
Owner's Manual
Page 47
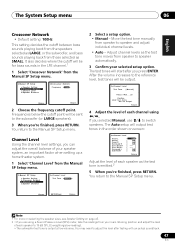
... The Auto setup will be output Return 4 Adjust the level of each channel using a Sound Pressure Level (SPL) meter, take the readings from speaker to speaker automatically. 3 Confirm your speaker system, an important factor when setting up a home theater system. 1 Select 'Channel Level' from the Manual SP Setup menu. 2.Manual SP Setup a.Speaker Setting b.Crossover Network c.Channel Level d.Speaker Distance 2b.Crossover Network Frequency 100Hz Return Return 2 Choose the frequency cutoff point. Frequencies below the cutoff point will output test tones in the LFE channel...
... The Auto setup will be output Return 4 Adjust the level of each channel using a Sound Pressure Level (SPL) meter, take the readings from speaker to speaker automatically. 3 Confirm your speaker system, an important factor when setting up a home theater system. 1 Select 'Channel Level' from the Manual SP Setup menu. 2.Manual SP Setup a.Speaker Setting b.Crossover Network c.Channel Level d.Speaker Distance 2b.Crossover Network Frequency 100Hz Return Return 2 Choose the frequency cutoff point. Frequencies below the cutoff point will output test tones in the LFE channel...

Owner's Manual
Page 48
... the component you've connected (or else you may see Using the component video jacks on page 28. 1 Press RECEIVER on the remote control, then press the SETUP button. System Setup 1.Auto MCACC 2.Manual SP Setup 3.Input Assign 4.Speaker System 5.Video Parameter Return 48 En An on-screen display (OSD) appears on the remote control to navigate through the screens and select menu items. Press RETURN to the Manual SP Setup menu. For more on the remote control. 06 The System Setup menu...
... the component you've connected (or else you may see Using the component video jacks on page 28. 1 Press RECEIVER on the remote control, then press the SETUP button. System Setup 1.Auto MCACC 2.Manual SP Setup 3.Input Assign 4.Speaker System 5.Video Parameter Return 48 En An on-screen display (OSD) appears on the remote control to navigate through the screens and select menu items. Press RETURN to the Manual SP Setup menu. For more on the remote control. 06 The System Setup menu...
Owner's Manual
Page 57
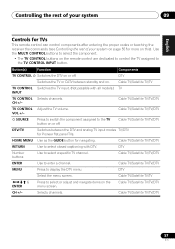
... DTV and analog TV input modes TV/DTV for navigating. Press to switch the component assigned to the TV button on or off . HOME MENU Use as the GUIDE button for Pioneer flat panel TVs. English Deutsch Français Italiano Nederlands Español Controlling the rest of your system 09 Controls for TVs This remote control can control components after entering the proper codes or teaching the receiver the commands...
... DTV and analog TV input modes TV/DTV for navigating. Press to switch the component assigned to the TV button on or off . HOME MENU Use as the GUIDE button for Pioneer flat panel TVs. English Deutsch Français Italiano Nederlands Español Controlling the rest of your system 09 Controls for TVs This remote control can control components after entering the proper codes or teaching the receiver the commands...

Owner's Manual
Page 73
... output when position. from • Set the SIGNAL SEL to HDMI, C1/O1/O2 (DIGITAL) or A (analog) other components, but not according to the type of a • Move the cassette deck away from surround or • Connect the speakers properly (refer to the instruction manual supplied with the DVD player. • Set the input signal type to page 43). Refer to the instruction manual supplied with the DVD player. No sound from your subwoofer...
... output when position. from • Set the SIGNAL SEL to HDMI, C1/O1/O2 (DIGITAL) or A (analog) other components, but not according to the type of a • Move the cassette deck away from surround or • Connect the speakers properly (refer to the instruction manual supplied with the DVD player. • Set the input signal type to page 43). Refer to the instruction manual supplied with the DVD player. No sound from your subwoofer...

Owner's Manual
Page 74
... it. compatible CD player. Everything seems to direct light. After using the object emitting the wireless technology device electromagnetic waves. Switch off . • Press DIMMER on the front panel to be connected or operated. Or, stop using the Auto • Low-frequency noise could have been caused by an air conditioner or MCACC Setup, the speaker motor. is not emitted or the sound • Check...
... it. compatible CD player. Everything seems to direct light. After using the object emitting the wireless technology device electromagnetic waves. Switch off . • Press DIMMER on the front panel to be connected or operated. Or, stop using the Auto • Low-frequency noise could have been caused by an air conditioner or MCACC Setup, the speaker motor. is not emitted or the sound • Check...
Owner's Manual
Page 75
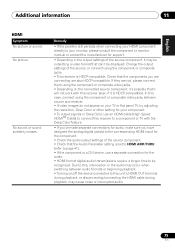
... HDMI AMP/THRU (refer to page 41). • If the component is HDCP-compatible. Change the output settings of the source, or connect using the component or composite jacks. • This receiver is a DVI device, use an HDMI cable (High Speed HDMITM Cable) to be recognized. Check that can't be outputting a video format that the components you have assigned the analog/digital jack(s) to the corresponding HDMI input for the audio. • HDMI format digital audio transmissions require a longer time...
... HDMI AMP/THRU (refer to page 41). • If the component is HDCP-compatible. Change the output settings of the source, or connect using the component or composite jacks. • This receiver is a DVI device, use an HDMI cable (High Speed HDMITM Cable) to be recognized. Check that can't be outputting a video format that the components you have assigned the analog/digital jack(s) to the corresponding HDMI input for the audio. • HDMI format digital audio transmissions require a longer time...


