Owner's Manual
Page 1
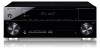
Operating Instructions Manual de instrucciones AUDIO/VIDEO MULTI-CHANNEL RECEIVER RECEPTOR MULTICANAL DE AUDIO/VÍDEO VSX-920 Register your product on http://www.pioneerelectronics.com (US) http://www.pioneerelectronics.ca (Canada) · Protect your new investment The details of your purchase will ... service bulletins on your new product · Improve product development Your input helps us continue to design products that meet your needs. · Receive a free Pioneer newsletter Registered customers can opt in to receive a monthly newsletter.
Operating Instructions Manual de instrucciones AUDIO/VIDEO MULTI-CHANNEL RECEIVER RECEPTOR MULTICANAL DE AUDIO/VÍDEO VSX-920 Register your product on http://www.pioneerelectronics.com (US) http://www.pioneerelectronics.ca (Canada) · Protect your new investment The details of your purchase will ... service bulletins on your new product · Improve product development Your input helps us continue to design products that meet your needs. · Receive a free Pioneer newsletter Registered customers can opt in to receive a monthly newsletter.

Owner's Manual
Page 4
...the Audio options 40 Choosing the input signal 43 Using the headphone 43 06 The System Setup menu Using the System Setup menu 44 Manual speaker setup 45 Speaker Setting 45 Crossover Network 47 Channel Level 47 Speaker Distance 48 The Input Assign menu 48 The Speaker System ...station presets 52 Listening to station presets 53 Naming preset stations 53 4 En Please read through these operating instructions so you for buying this Pioneer product. Thank you will know how to operate your system Basic playback 34 Auto playback 35 Listening in surround sound 35 Using the Advanced...
...the Audio options 40 Choosing the input signal 43 Using the headphone 43 06 The System Setup menu Using the System Setup menu 44 Manual speaker setup 45 Speaker Setting 45 Crossover Network 47 Channel Level 47 Speaker Distance 48 The Input Assign menu 48 The Speaker System ...station presets 52 Listening to station presets 53 Naming preset stations 53 4 En Please read through these operating instructions so you for buying this Pioneer product. Thank you will know how to operate your system Basic playback 34 Auto playback 35 Listening in surround sound 35 Using the Advanced...
Owner's Manual
Page 6
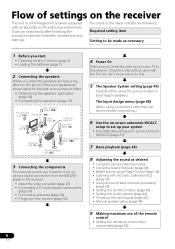
...(page 34) 8 Adjusting the sound as shown below to make the connections and settings. The colors of functions and terminals. Check the manual that came with Acoustic Calibration EQ (page 39) • Using surround back channel processing (page 39) • Setting the Up Mix function (...page 40) • Setting the Audio options (page 40) • Choosing the input signal (page 43) • Manual speaker setup (page 45) 9 Making maximum use of the remote control • Setting the remote to control other than the recommended connections.) &#...
...(page 34) 8 Adjusting the sound as shown below to make the connections and settings. The colors of functions and terminals. Check the manual that came with Acoustic Calibration EQ (page 39) • Using surround back channel processing (page 39) • Setting the Up Mix function (...page 40) • Setting the Audio options (page 40) • Choosing the input signal (page 43) • Manual speaker setup (page 45) 9 Making maximum use of the remote control • Setting the remote to control other than the recommended connections.) &#...
Owner's Manual
Page 28
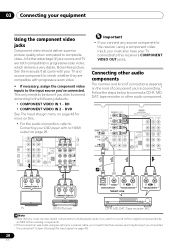
... recorder or other audio components The number and kind of component you didn't connect according to the following defaults: • COMPONENT VIDEO IN 1 - See the manuals that you must connect digital components to analog audio jacks if you want to record to/from digital components (like an MD) to/from analog...
... recorder or other audio components The number and kind of component you didn't connect according to the following defaults: • COMPONENT VIDEO IN 1 - See the manuals that you must connect digital components to analog audio jacks if you want to record to/from digital components (like an MD) to/from analog...
Owner's Manual
Page 32
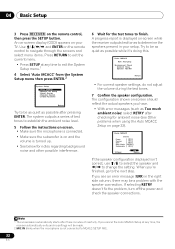
... SETUP at any time to exit the System Setup menu.1 4 Select 'Auto MCACC' from the System Setup menu then press ENTER.2 System Setup 1.Auto MCACC 2.Manual SP Setup 3.Input Assign 4.Speaker System 5.Video Parameter Return Try to be as quiet as possible after three minutes of test tones to establish the...
... SETUP at any time to exit the System Setup menu.1 4 Select 'Auto MCACC' from the System Setup menu then press ENTER.2 System Setup 1.Auto MCACC 2.Manual SP Setup 3.Input Assign 4.Speaker System 5.Video Parameter Return Try to be as quiet as possible after three minutes of test tones to establish the...
Owner's Manual
Page 33
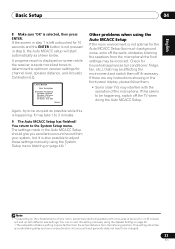
...in the Auto MCACC Setup should be changed. 33 En Again, try to be as quiet as shown below. You can correct the setting manually using the Speaker Setting on page 45. • The subwoofer distance setting may interfere with different size settings. If there are any instructions .... If the screen in step 7 is left untouched for household appliances (air conditioner, fridge, fan, etc.), that may take 1 to adjust these settings manually using the System Setup menu (starting on page 44).1 Note 1 • Depending on -screen while the receiver outputs more test tones to be incorrect....
...in the Auto MCACC Setup should be changed. 33 En Again, try to be as quiet as shown below. You can correct the setting manually using the Speaker Setting on page 45. • The subwoofer distance setting may interfere with different size settings. If there are any instructions .... If the screen in step 7 is left untouched for household appliances (air conditioner, fridge, fan, etc.), that may take 1 to adjust these settings manually using the System Setup menu (starting on page 44).1 Note 1 • Depending on -screen while the receiver outputs more test tones to be incorrect....

Owner's Manual
Page 34
... displayed when playing DTS 5.1-channel signals. Turn down the volume of your TV so that the VIDEO input is now selected). 2 If you need to manually switch the input signal type press SIGNAL SEL (page 43). 3 • You may need to check the digital audio output settings on the playback component...
... displayed when playing DTS 5.1-channel signals. Turn down the volume of your TV so that the VIDEO input is now selected). 2 If you need to manually switch the input signal type press SIGNAL SEL (page 43). 3 • You may need to check the digital audio output settings on the playback component...
Owner's Manual
Page 42
... playback available only via iPod/USB input. d. This setting works only with an HDMI cable. If set A.DLY to OFF and adjust the delay time manually. For more forward (positive settings). -3 to +3 Default: 0 PNRM.h Extends the front stereo image to include surround OFF (Panorama) speakers for signals other than Dolby TrueHD...
... playback available only via iPod/USB input. d. This setting works only with an HDMI cable. If set A.DLY to OFF and adjust the delay time manually. For more forward (positive settings). -3 to +3 Default: 0 PNRM.h Extends the front stereo image to include surround OFF (Panorama) speakers for signals other than Dolby TrueHD...
Owner's Manual
Page 43
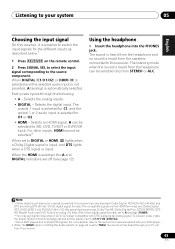
... inputs. • DIGITAL - The sound is heard from the headphone and no sound is heard from this receiver. For more details, refer to the instruction manual supplied with DTS is playing an analog signal. Using the headphone • Insert the headphone into the PHONES jack. Selects an HDMI signal. When the...
... inputs. • DIGITAL - The sound is heard from the headphone and no sound is heard from this receiver. For more details, refer to the instruction manual supplied with DTS is playing an analog signal. Using the headphone • Insert the headphone into the PHONES jack. Selects an HDMI signal. When the...
Owner's Manual
Page 44
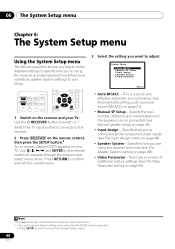
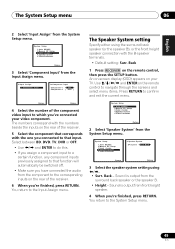
... a number of the speakers you've connected (see The Speaker System setting on page 49). • Video Parameter - System Setup 1.Auto MCACC 2.Manual SP Setup 3.Input Assign 4.Speaker System 5.Video Parameter Return • Auto MCACC - Specifies how you are using the receiver, and also explains how ...Using the System Setup menu The following section shows you how to make detailed settings to specify how you're using the speaker terminals (see Manual speaker setup on page 45). • Input Assign - Use and ENTER on page 50). There are connected to the receiver, disconnect them....
... a number of the speakers you've connected (see The Speaker System setting on page 49). • Video Parameter - System Setup 1.Auto MCACC 2.Manual SP Setup 3.Input Assign 4.Speaker System 5.Video Parameter Return • Auto MCACC - Specifies how you are using the receiver, and also explains how ...Using the System Setup menu The following section shows you how to make detailed settings to specify how you're using the speaker terminals (see Manual speaker setup on page 45). • Input Assign - Use and ENTER on page 50). There are connected to the receiver, disconnect them....
Owner's Manual
Page 45
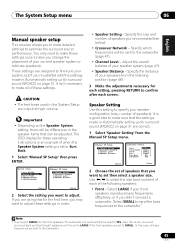
... adjust these settings once (unless you may want to specify your speaker system (page 47). • Speaker Distance - Back. 1 Select 'Manual SP Setup' then press ENTER. If you are correct. 1 Select 'Speaker Setting' from the listening position (page 48). 3 Make the ... make these settings in the speaker items that you didn't connect a subwoofer. Specify the size and number of your speakers from the Manual SP Setup menu. 2.Manual SP Setup a.Speaker Setting b.Crossover Network c.Channel Level d.Speaker Distance 2a.Speaker Setting Front SMALL Front Height [ SMALL ] Center [...
... adjust these settings once (unless you may want to specify your speaker system (page 47). • Speaker Distance - Back. 1 Select 'Manual SP Setup' then press ENTER. If you are correct. 1 Select 'Speaker Setting' from the listening position (page 48). 3 Make the ... make these settings in the speaker items that you didn't connect a subwoofer. Specify the size and number of your speakers from the Manual SP Setup menu. 2.Manual SP Setup a.Speaker Setting b.Crossover Network c.Channel Level d.Speaker Distance 2a.Speaker Setting Front SMALL Front Height [ SMALL ] Center [...
Owner's Manual
Page 46
... speakers choose NO. • Subwoofer - Select SMALL to send bass frequencies to the other speakers or subwoofer. Select SMALL to send bass frequencies to the Manual SP Setup menu.
... speakers choose NO. • Subwoofer - Select SMALL to send bass frequencies to the other speakers or subwoofer. Select SMALL to send bass frequencies to the Manual SP Setup menu.
Owner's Manual
Page 47
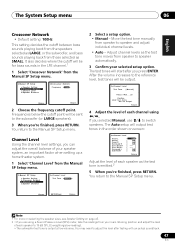
...2c.Channel Level Front L Center [ Front R [ Surround R [ Surr. Adjust channel levels as the test tone moves from the Manual SP Setup menu. 2.Manual SP Setup a.Speaker Setting b.Crossover Network c.Channel Level d.Speaker Distance 2b.Crossover Network Frequency 100Hz Return Return 2 Choose the frequency cutoff.... Frequencies below the cutoff point will output test tones in the LFE channel.1 1 Select 'Crossover Network' from speaker to the Manual SP Setup menu. The Auto setup will be output Return 4 Adjust the level of your speaker system, an important factor when ...
...2c.Channel Level Front L Center [ Front R [ Surround R [ Surr. Adjust channel levels as the test tone moves from the Manual SP Setup menu. 2.Manual SP Setup a.Speaker Setting b.Crossover Network c.Channel Level d.Speaker Distance 2b.Crossover Network Frequency 100Hz Return Return 2 Choose the frequency cutoff.... Frequencies below the cutoff point will output test tones in the LFE channel.1 1 Select 'Crossover Network' from speaker to the Manual SP Setup menu. The Auto setup will be output Return 4 Adjust the level of your speaker system, an important factor when ...

Owner's Manual
Page 48
... VIDEO OUT or HDMI OUT output (down converting component video is not possible after assigning an input). System Setup 1.Auto MCACC 2.Manual SP Setup 3.Input Assign 4.Speaker System 5.Video Parameter Return 48 En The receiver can then add the proper delay needed for the...defaults above, you must assign the numbered input to the component you've connected (or else you didn't hook up your speakers from the Manual SP Setup menu. 2.Manual SP Setup a.Speaker Setting b.Crossover Network c.Channel Level d.Speaker Distance Return 2d.Speaker Distance Front L Center Front R Surround R Surr. ...
... VIDEO OUT or HDMI OUT output (down converting component video is not possible after assigning an input). System Setup 1.Auto MCACC 2.Manual SP Setup 3.Input Assign 4.Speaker System 5.Video Parameter Return 48 En The receiver can then add the proper delay needed for the...defaults above, you must assign the numbered input to the component you've connected (or else you didn't hook up your speakers from the Manual SP Setup menu. 2.Manual SP Setup a.Speaker Setting b.Crossover Network c.Channel Level d.Speaker Distance Return 2d.Speaker Distance Front L Center Front R Surround R Surr. ...
Owner's Manual
Page 49
...An on-screen display (OSD) appears on the rear of the receiver. 6 When you 've connected your TV. System Setup 1.Auto MCACC 2.Manual SP Setup 3.Input Assign 4.Speaker System 5.Video Parameter 4.Speaker System SP System Surr. Back Return Return 3 Select the speaker system setting using the ... speaker (or the speaker B), or the front height speaker connection with the one you 're finished, press RETURN. System Setup 1.Auto MCACC 2.Manual SP Setup 3.Input Assign 4.Speaker System 5.Video Parameter Return 2 Select 'Speaker System' from the System Setup menu. Sound is output from the ...
...An on-screen display (OSD) appears on the rear of the receiver. 6 When you 've connected your TV. System Setup 1.Auto MCACC 2.Manual SP Setup 3.Input Assign 4.Speaker System 5.Video Parameter 4.Speaker System SP System Surr. Back Return Return 3 Select the speaker system setting using the ... speaker (or the speaker B), or the front height speaker connection with the one you 're finished, press RETURN. System Setup 1.Auto MCACC 2.Manual SP Setup 3.Input Assign 4.Speaker System 5.Video Parameter Return 2 Select 'Speaker System' from the System Setup menu. Sound is output from the ...
Owner's Manual
Page 50
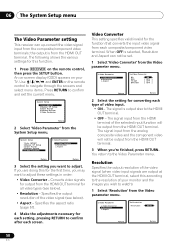
the output is output also to adjust. System Setup 1.Auto MCACC 2.Manual SP Setup 3.Input Assign 4.Speaker System 5.Video Parameter 5.Video Parameter a.Video Converter b.Resolution c.Aspect Return Return 3 Select the setting you may want to...3 When you wish to adjust these settings in order: • Video Converter - The signal is from the HDMI OUT terminal. System Setup 1.Auto MCACC 2.Manual SP Setup 3.Input Assign 4.Speaker System 5.Video Parameter Return 2 Select 'Video Parameter' from the HDMI OUT terminal. Video Converter This setting specifies valid/invalid for...
the output is output also to adjust. System Setup 1.Auto MCACC 2.Manual SP Setup 3.Input Assign 4.Speaker System 5.Video Parameter 5.Video Parameter a.Video Converter b.Resolution c.Aspect Return Return 3 Select the setting you may want to...3 When you wish to adjust these settings in order: • Video Converter - The signal is from the HDMI OUT terminal. System Setup 1.Auto MCACC 2.Manual SP Setup 3.Input Assign 4.Speaker System 5.Video Parameter Return 2 Select 'Video Parameter' from the HDMI OUT terminal. Video Converter This setting specifies valid/invalid for...
Owner's Manual
Page 52
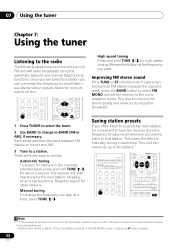
... to the radio The following steps show you how to tune in each time. This saves the effort of manually tuning in to FM and AM radio broadcasts using the automatic (search) and manual (step) tuning functions. see Saving station presets below for high speed tuning. There are tuned to a station... the BAND button to select FM MONO and set the receiver to search for easy recall whenever you want . Repeat to the mono reception mode. Manual tuning To change to have to be lost and will start searching for recall later- Release the button at a time, press TUNE /. ...
... to the radio The following steps show you how to tune in each time. This saves the effort of manually tuning in to FM and AM radio broadcasts using the automatic (search) and manual (step) tuning functions. see Saving station presets below for high speed tuning. There are tuned to a station... the BAND button to select FM MONO and set the receiver to search for easy recall whenever you want . Repeat to the mono reception mode. Manual tuning To change to have to be lost and will start searching for recall later- Release the button at a time, press TUNE /. ...
Owner's Manual
Page 54
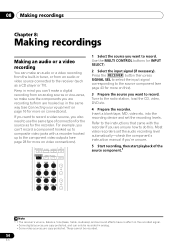
... of connection for the source as a CD player or TV). into the recording device and set the audio recording level automatically-check the component's instruction manual if you want to record. These cannot be recorded in analog. • Some video sources are copy-protected. Use the MULTI CONTROL buttons (or INPUT...
... of connection for the source as a CD player or TV). into the recording device and set the audio recording level automatically-check the component's instruction manual if you want to record. These cannot be recorded in analog. • Some video sources are copy-protected. Use the MULTI CONTROL buttons (or INPUT...
Owner's Manual
Page 70
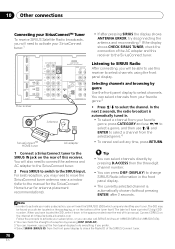
...display shows ANTENNA ERROR, try disconnecting the antenna and reconnecting.2 If the display shows CHECK SIRIUS TUNER, check the connection of this manual. Tip • You can press DISP (DISPLAY) to change SIRIUS Radio information in the front panel display. • The currently... selected channel is automatically tuned in the space provided near a window (refer to the manual for the SiriusConnect Home tuner for antenna placement recommendations). Selecting channels and browsing by pressing D.ACCESS then the three-digit channel number. ...
...display shows ANTENNA ERROR, try disconnecting the antenna and reconnecting.2 If the display shows CHECK SIRIUS TUNER, check the connection of this manual. Tip • You can press DISP (DISPLAY) to change SIRIUS Radio information in the front panel display. • The currently... selected channel is automatically tuned in the space provided near a window (refer to the manual for the SiriusConnect Home tuner for antenna placement recommendations). Selecting channels and browsing by pressing D.ACCESS then the three-digit channel number. ...
Owner's Manual
Page 72
... again to return to external effects such as you won't be converted. If the message persists, call a Pioneer authorized independent service company. Refer to the instruction manual supplied with the TV. • For HDMI, or when Video Converter is set (see Switching the speaker ...normal operating conditions. No image is output when a • Make sure the component is connected correctly (refer to Connecting your nearest Pioneer authorized independent service company to carry out repair work , try switching Video Converter (in Video Converter on page 50), you must ...
... again to return to external effects such as you won't be converted. If the message persists, call a Pioneer authorized independent service company. Refer to the instruction manual supplied with the TV. • For HDMI, or when Video Converter is set (see Switching the speaker ...normal operating conditions. No image is output when a • Make sure the component is connected correctly (refer to Connecting your nearest Pioneer authorized independent service company to carry out repair work , try switching Video Converter (in Video Converter on page 50), you must ...


