Owner's Manual
Page 4
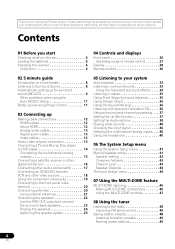
... 6 Installing the receiver 6 Ventilation 6 04 Controls and displays Front panel 26 Operating range of remote control 27 Display 28 Remote control 30 02 5 minute guide Introduction to home theater 8 Listening to Surround Sound 8 Automatically setting up Making cable connections 12 HDMI cables 12 About HDMI 12 Analog audio cables 13 Digital audio cables 13 Video cables 13 About video outputs connection 13 Connecting a TV and Blu-ray Disc player or DVD player 14 Connecting the multichannel analog outputs 15 Connecting a satellite receiver or other digital set-top box 16...
... 6 Installing the receiver 6 Ventilation 6 04 Controls and displays Front panel 26 Operating range of remote control 27 Display 28 Remote control 30 02 5 minute guide Introduction to home theater 8 Listening to Surround Sound 8 Automatically setting up Making cable connections 12 HDMI cables 12 About HDMI 12 Analog audio cables 13 Digital audio cables 13 Video cables 13 About video outputs connection 13 Connecting a TV and Blu-ray Disc player or DVD player 14 Connecting the multichannel analog outputs 15 Connecting a satellite receiver or other digital set-top box 16...
Owner's Manual
Page 9
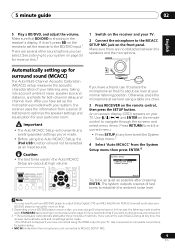
... exit the System Setup menu.3 4 Select 'Auto MCACC' from a series of test tones to optimize the speaker settings and equalization for your TV. 5 minute guide 02 English Deutsch Français Italiano Nederlands Español PRESET 5 Play a BD/DVD, and adjust the volume. Use and ENTER on page 33 for both channel delay and channel level. After you need to set up for surround sound (MCACC) The Auto Multi-Channel Acoustic Calibration (MCACC) setup measures the acoustic...
... exit the System Setup menu.3 4 Select 'Auto MCACC' from a series of test tones to optimize the speaker settings and equalization for your TV. 5 minute guide 02 English Deutsch Français Italiano Nederlands Español PRESET 5 Play a BD/DVD, and adjust the volume. Use and ENTER on page 33 for both channel delay and channel level. After you need to set up for surround sound (MCACC) The Auto Multi-Channel Acoustic Calibration (MCACC) setup measures the acoustic...
Owner's Manual
Page 10
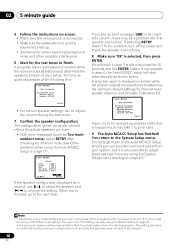
... setting manually using the System Setup menu (starting on page 41).1 Note 1 • Depending on -screen while the receiver outputs more test tones to determine the optimum receiver settings for 10 seconds and the ENTER button is selected, then press ENTER. A progress report is also possible to determine the speakers present in step 7 is left untouched for channel level, speaker distance, and Acoustic Calibration EQ. 1.Auto MCACC Now Analyzing Surround Analyzing Speaker...
... setting manually using the System Setup menu (starting on page 41).1 Note 1 • Depending on -screen while the receiver outputs more test tones to determine the optimum receiver settings for 10 seconds and the ENTER button is selected, then press ENTER. A progress report is also possible to determine the speakers present in step 7 is left untouched for channel level, speaker distance, and Acoustic Calibration EQ. 1.Auto MCACC Now Analyzing Surround Analyzing Speaker...
Owner's Manual
Page 11
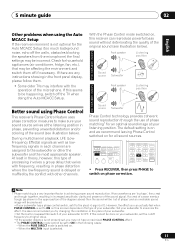
... sound sources. Note 1 Phase matching is selected. 11 En When the MULTI IN input is a very important factor in the front panel display, please follow them off the walls, obstacles blocking the speakers from the microphone) the final settings may interfere with other the subwoofer and the most appropriate speaker. If two waveforms are any instructions showing in achieving proper sound reproduction. When the PURE DIRECT mode...
... sound sources. Note 1 Phase matching is selected. 11 En When the MULTI IN input is a very important factor in the front panel display, please follow them off the walls, obstacles blocking the speakers from the microphone) the final settings may interfere with other the subwoofer and the most appropriate speaker. If two waveforms are any instructions showing in achieving proper sound reproduction. When the PURE DIRECT mode...
Owner's Manual
Page 12
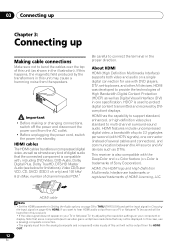
... DVD-Video, DVD-Audio, Dolby Digital Plus, Dolby TrueHD, DTS-HD Master Audio (see below for use a (analog) composite connection. • The signals input from the analog (composite and component) video inputs of this unit will be heard from the speakers. HDMI was developed to provide the technologies of HDMI Licensing, LLC. If this case, use with the DeepColor and x.v.Color feature (x.v.Color is used to multi-channel surround-sound audio. About HDMI HDMI (High Definition Multimedia Interface) supports...
... DVD-Video, DVD-Audio, Dolby Digital Plus, Dolby TrueHD, DTS-HD Master Audio (see below for use a (analog) composite connection. • The signals input from the analog (composite and component) video inputs of this unit will be heard from the speakers. HDMI was developed to provide the technologies of HDMI Licensing, LLC. If this case, use with the DeepColor and x.v.Color feature (x.v.Color is used to multi-channel surround-sound audio. About HDMI HDMI (High Definition Multimedia Interface) supports...
Owner's Manual
Page 18
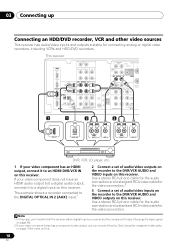
... digital input you connected the component to (see Choosing the input signal on this receiver. The example shows a recorder connected to the DIGITAL OPTICAL IN 2 (AUX) input.1 2 Connect a set of audio/video outputs on the recorder to a digital input on this receiver. 03 Connecting up Connecting an HDD/DVD recorder, VCR and other video sources This receiver has audio/video inputs and outputs suitable for the video connection. If your video component has an HDMI output, connect it to the DVR/VCR AUDIO and VIDEO inputs on this receiver. Use a stereo RCA phono cable...
... digital input you connected the component to (see Choosing the input signal on this receiver. The example shows a recorder connected to the DIGITAL OPTICAL IN 2 (AUX) input.1 2 Connect a set of audio/video outputs on the recorder to a digital input on this receiver. 03 Connecting up Connecting an HDD/DVD recorder, VCR and other video sources This receiver has audio/video inputs and outputs suitable for the video connection. If your video component has an HDMI output, connect it to the DVR/VCR AUDIO and VIDEO inputs on this receiver. Use a stereo RCA phono cable...
Owner's Manual
Page 20
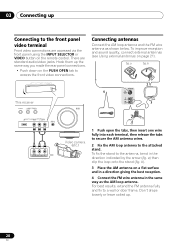
...and sound quality, connect external antennas (see Using external antennas on the PUSH OPEN tab to access the front video connections. fig. Hook them up the same way you made the rear panel connections. • Push down on page 21). a fig. For best results, extend the FM antenna fully and fix to the attached stand. b USB iPod VIDEO INPUT VIDEO L AUDIO R 2 ANTENNA 4 This receiver SPEAKERS MULTI-ZONE CONTROL ON/OFF USB iPod VIDEO INPUT VIDEO L AUDIO R MCACC SETUP MIC VIDEO L R AUDIO/VIDEO OUTPUT MASTER VOLUME AM LOOP 3 1 Video camera (etc.) 1 Push open the...
...and sound quality, connect external antennas (see Using external antennas on the PUSH OPEN tab to access the front video connections. fig. Hook them up the same way you made the rear panel connections. • Push down on page 21). a fig. For best results, extend the FM antenna fully and fix to the attached stand. b USB iPod VIDEO INPUT VIDEO L AUDIO R 2 ANTENNA 4 This receiver SPEAKERS MULTI-ZONE CONTROL ON/OFF USB iPod VIDEO INPUT VIDEO L AUDIO R MCACC SETUP MIC VIDEO L R AUDIO/VIDEO OUTPUT MASTER VOLUME AM LOOP 3 1 Video camera (etc.) 1 Push open the...

Owner's Manual
Page 30
... SURR Switches between stereo playback, Auto level control stereo mode (page 35) and Front Stage Surround Advance modes (page 35). 04 Controls and displays Remote control 1 RECEIVER INPUT SELECT SOURCE 2 12 ZONE 2 3 RECEIVER ON/OFF TV CONTROL INPUT 4 BD TV DVR 13 CD CD-R TUNER CH 5 VIDEO MULTI IN AUX iPod USB SIRIUS SIGNAL SEL VOL 6 BD MENU AUTO/ STEREO/ 7 DIRECT A.L.C. Also use this button to set up surround sound (page 41) or Audio parameters (page 38). 4 ZONE 2 ON/OFF Switches zone 2 of a source (page 36). Stream Direct playback bypasses the tone controls for...
... SURR Switches between stereo playback, Auto level control stereo mode (page 35) and Front Stage Surround Advance modes (page 35). 04 Controls and displays Remote control 1 RECEIVER INPUT SELECT SOURCE 2 12 ZONE 2 3 RECEIVER ON/OFF TV CONTROL INPUT 4 BD TV DVR 13 CD CD-R TUNER CH 5 VIDEO MULTI IN AUX iPod USB SIRIUS SIGNAL SEL VOL 6 BD MENU AUTO/ STEREO/ 7 DIRECT A.L.C. Also use this button to set up surround sound (page 41) or Audio parameters (page 38). 4 ZONE 2 ON/OFF Switches zone 2 of a source (page 36). Stream Direct playback bypasses the tone controls for...

Owner's Manual
Page 31
... selected the corresponding MULTI CONTROL button (BD, TV, etc.). Press RECEIVER first to access: BASS -/+ Use to adjust Bass1 TRE -/+ Use to adjust Treble1 Press TV first to access: ANT Use to change the name (page 49). Press BD or DVR first to control BD/DVD menus/options. When TUNER is pressed, also used to access: TOP MENU Displays the disc 'top' menu of Blu-ray Disc player. Press iPod USB first to access: T.EDIT Memorizes stations...
... selected the corresponding MULTI CONTROL button (BD, TV, etc.). Press RECEIVER first to access: BASS -/+ Use to adjust Bass1 TRE -/+ Use to adjust Treble1 Press TV first to access: ANT Use to change the name (page 49). Press BD or DVR first to control BD/DVD menus/options. When TUNER is pressed, also used to access: TOP MENU Displays the disc 'top' menu of Blu-ray Disc player. Press iPod USB first to access: T.EDIT Memorizes stations...

Owner's Manual
Page 36
... SELECT SLEEP 4 5 6 CH SB CH PHASE 7 8 MIDNIGHT 9 CH • While listening to a source, press RECEIVER, then press EQ to the number of a source. The MCACC indicator on the front panel lights when Acoustic Calibration EQ is active.4 Note 1 In the DIRECT mode, Phase Control, Acoustic Calibration EQ, Sound Delay, Auto Delay, LFE Attenuate and Center image functions are available. 2 There are heard according to the settings made in the Surround Setup (speaker setting, channel level, speaker...
... SELECT SLEEP 4 5 6 CH SB CH PHASE 7 8 MIDNIGHT 9 CH • While listening to a source, press RECEIVER, then press EQ to the number of a source. The MCACC indicator on the front panel lights when Acoustic Calibration EQ is active.4 Note 1 In the DIRECT mode, Phase Control, Acoustic Calibration EQ, Sound Delay, Auto Delay, LFE Attenuate and Center image functions are available. 2 There are heard according to the settings made in the Surround Setup (speaker setting, channel level, speaker...

Owner's Manual
Page 37
... 5.1 format for which it was originally encoded (in the example on page 24. • Depending on the front panel, and hold the STANDBY/ON for about two seconds. Automatically switches to cycle the surround back channel options. RECEIVER INPUT SELECT SOURCE ZONE 2 RECEIVER ON/OFF TV CONTROL INPUT HDD 1 DVD 2 VCR DISPLAY 3 S.RETRIEVER EQ CH SELECT SLEEP 4 5 6 CH SB CH PHASE 7 8 MIDNIGHT 9 CH Setting the Up Mix function...
... 5.1 format for which it was originally encoded (in the example on page 24. • Depending on the front panel, and hold the STANDBY/ON for about two seconds. Automatically switches to cycle the surround back channel options. RECEIVER INPUT SELECT SOURCE ZONE 2 RECEIVER ON/OFF TV CONTROL INPUT HDD 1 DVD 2 VCR DISPLAY 3 S.RETRIEVER EQ CH SELECT SLEEP 4 5 6 CH SB CH PHASE 7 8 MIDNIGHT 9 CH Setting the Up Mix function...

Owner's Manual
Page 39
... the center channel between components connected with an HDMI cable. AMP THRU A.DLY This feature automatically corrects the audio-to-video delay OFF (Auto Delay) between the front right and left speakers) to 10 (center channel sent to the center using MIDNIGHT button. ON C.IMGh Adjust the center image to create a wider stereo effect with dual mono encoded Dolby Digital and DTS soundtracks. You can change the Sound Retriever feature at any time by using a center speaker) speaker only...
... the center channel between components connected with an HDMI cable. AMP THRU A.DLY This feature automatically corrects the audio-to-video delay OFF (Auto Delay) between the front right and left speakers) to 10 (center channel sent to the center using MIDNIGHT button. ON C.IMGh Adjust the center image to create a wider stereo effect with dual mono encoded Dolby Digital and DTS soundtracks. You can change the Sound Retriever feature at any time by using a center speaker) speaker only...
Owner's Manual
Page 44
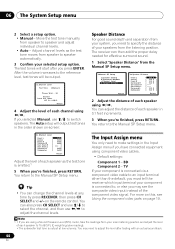
... component video jacks on this, see the composite video input instead of your speakers from speaker to speaker automatically. 3 Confirm your system, you need to speaker and adjust individual channel levels. • Auto - You can change the channel levels at low volumes. Note 1 • If you have connected equipment using a Sound Pressure Level (SPL) meter, take the readings from the Manual SP Setup menu. 2.Manual SP Setup a.Speaker Setting b.Crossover Network c.Channel Level d.Speaker Distance Return 2d.Speaker Distance Front L Center Front R Surround R Surr. The test...
... component video jacks on this, see the composite video input instead of your speakers from speaker to speaker automatically. 3 Confirm your system, you need to speaker and adjust individual channel levels. • Auto - You can change the channel levels at low volumes. Note 1 • If you have connected equipment using a Sound Pressure Level (SPL) meter, take the readings from the Manual SP Setup menu. 2.Manual SP Setup a.Speaker Setting b.Crossover Network c.Channel Level d.Speaker Distance Return 2d.Speaker Distance Front L Center Front R Surround R Surr. The test...
Owner's Manual
Page 47
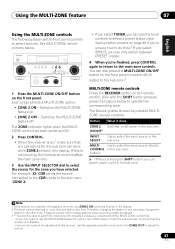
... remote controls: Button What it does ZONE 2 Switches on/off power in standby. • Volume level cannot be able to switch the main zone off completely unless you've switched off the power in both the sub and main rooms so that any operations for the sub zone are done while ZONE 2 shows in the other zone. TUNE + TUNER EDIT AUTO SURROUND/ STREAM DIRECT STEREO/ A.L.C. STANDBY/ON INPUT SELECTOR AUDIO/ VIDEO MULTI- PRESET + SPEAKERS MULTI-ZONE CONTROL ON/OFF ENTER MASTER VOLUME PHONES USB iPod VIDEO INPUT VIDEO L AUDIO R PORTABLE SPEAKERS MULTI-ZONE CONTROL...
... remote controls: Button What it does ZONE 2 Switches on/off power in standby. • Volume level cannot be able to switch the main zone off completely unless you've switched off the power in both the sub and main rooms so that any operations for the sub zone are done while ZONE 2 shows in the other zone. TUNE + TUNER EDIT AUTO SURROUND/ STREAM DIRECT STEREO/ A.L.C. STANDBY/ON INPUT SELECTOR AUDIO/ VIDEO MULTI- PRESET + SPEAKERS MULTI-ZONE CONTROL ON/OFF ENTER MASTER VOLUME PHONES USB iPod VIDEO INPUT VIDEO L AUDIO R PORTABLE SPEAKERS MULTI-ZONE CONTROL...
Owner's Manual
Page 58
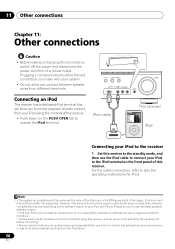
..., compatibility may be controlled using the controls of this receiver, and we recommend switching the equalizer off the power and disconnect the power cord from the power outlet. USB iPod VIDEO INPUT VIDEO L AUDIO R MCACC SETUP MIC Connecting an iPod This receiver has a dedicated iPod terminal that some models. Please be the last PRESET - Plugging in components should be sure to use the iPod cable to connect your system. 11 Other connections Chapter 11: Other connections Caution USB iPod VIDEO INPUT VIDEO L AUDIO R • Before making or changing the...
..., compatibility may be controlled using the controls of this receiver, and we recommend switching the equalizer off the power and disconnect the power cord from the power outlet. USB iPod VIDEO INPUT VIDEO L AUDIO R MCACC SETUP MIC Connecting an iPod This receiver has a dedicated iPod terminal that some models. Please be the last PRESET - Plugging in components should be sure to use the iPod cable to connect your system. 11 Other connections Chapter 11: Other connections Caution USB iPod VIDEO INPUT VIDEO L AUDIO R • Before making or changing the...

Owner's Manual
Page 64
... displayed because this receiver. Note 1 • Remote operation may not use the IR terminology. Refer to the manual that other manufacturers may not be accessed by the SiriusConnect tuner. 11 Other connections Saving channel presets This receiver can also use the number buttons to select a preset. 4 Press ENTER. Connecting an IR receiver If you keep your stereo components in a closed cabinet or shelving unit, or you wish to use the sub zone remote control in Resetting...
... displayed because this receiver. Note 1 • Remote operation may not use the IR terminology. Refer to the manual that other manufacturers may not be accessed by the SiriusConnect tuner. 11 Other connections Saving channel presets This receiver can also use the number buttons to select a preset. 4 Press ENTER. Connecting an IR receiver If you keep your stereo components in a closed cabinet or shelving unit, or you wish to use the sub zone remote control in Resetting...
Owner's Manual
Page 65
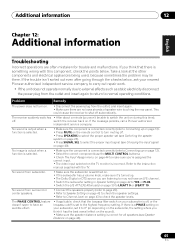
... selected. No sound is output when a function is selected. • Make sure the component is connected correctly (refer to Connecting up on page 12). • Press MUTE on the remote control to turn on during this component, check the points below , ask your subwoofer is off . • Press SPEAKERS to select the proper speaker set it 's turned up on page 12). • Select the correct component (use the MULTI CONTROL buttons). • Check The Input Assign menu...
... selected. No sound is output when a function is selected. • Make sure the component is connected correctly (refer to Connecting up on page 12). • Press MUTE on the remote control to turn on during this component, check the points below , ask your subwoofer is off . • Press SPEAKERS to select the proper speaker set it 's turned up on page 12). • Select the correct component (use the MULTI CONTROL buttons). • Check The Input Assign menu...

Owner's Manual
Page 66
... is output when software with DTS is played back. • Set the digital volume level of a cassette deck. • Move the cassette deck away from LD or DVD player. • Set the SIGNAL SEL to HDMI, C1/O1/O2 (DIGITAL) or A (analog) according to the default. 66 En Refer to the instruction manual supplied with the corresponding terminals on the speakers (see Choosing the input signal on . subwoofer output). The display is...
... is output when software with DTS is played back. • Set the digital volume level of a cassette deck. • Move the cassette deck away from LD or DVD player. • Set the SIGNAL SEL to HDMI, C1/O1/O2 (DIGITAL) or A (analog) according to the default. 66 En Refer to the instruction manual supplied with the corresponding terminals on the speakers (see Choosing the input signal on . subwoofer output). The display is...
Owner's Manual
Page 67
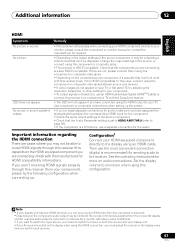
... the problem still persists when connecting your HDMI component directly to your HDMI-equipped component directly to the corresponding HDMI input for the component. • Check the audio output settings of channels available from the connected display unit (for audio, make sure you switch input sources. 67 En Use component or composite connections when setting up . See the operating instructions for HDMI compatibility information). English Deutsch Français Italiano Nederlands Español Additional information 12 HDMI Symptom No picture or sound...
... the problem still persists when connecting your HDMI component directly to your HDMI-equipped component directly to the corresponding HDMI input for the component. • Check the audio output settings of channels available from the connected display unit (for audio, make sure you switch input sources. 67 En Use component or composite connections when setting up . See the operating instructions for HDMI compatibility information). English Deutsch Français Italiano Nederlands Español Additional information 12 HDMI Symptom No picture or sound...

Owner's Manual
Page 69
...) Digital In/Out Section HDMI terminal 19-pin (Not DVI) HDMI output type 5 V, 100 mA USB terminal . . . . . OK? OK appears in the display, press 'AUTO SURROUND/STREAM DIRECT'. USB2.0 Full Speed (Type A) iPod terminal. . . . . USB, and Video (Composite) SIRIUS antenna cable . . . . 8-pin mini DIN cable Integrated control section Control (IR) terminal . . . ∅ 3.5 Mini-jack (MONO) IR signal High Active (High Level : 2.0 V) Miscellaneous Power Requirements AC 120 V, 60 Hz Power Consumption 250 W In standby...
...) Digital In/Out Section HDMI terminal 19-pin (Not DVI) HDMI output type 5 V, 100 mA USB terminal . . . . . OK? OK appears in the display, press 'AUTO SURROUND/STREAM DIRECT'. USB2.0 Full Speed (Type A) iPod terminal. . . . . USB, and Video (Composite) SIRIUS antenna cable . . . . 8-pin mini DIN cable Integrated control section Control (IR) terminal . . . ∅ 3.5 Mini-jack (MONO) IR signal High Active (High Level : 2.0 V) Miscellaneous Power Requirements AC 120 V, 60 Hz Power Consumption 250 W In standby...


