Owner's Manual
Page 2
...IS FOR YOUR SECURITY. D8-10-1-2_En This Class B digital apparatus complies with part 15 of the available power supply differs according to radio or television reception, which the receiver is properly disposed of time (for help. D8-10-2_En CAUTION: This product satisfies FCC regulations when shielded ...D8-10-3a_En FEDERAL COMMUNICATIONS COMMISSION DECLARATION OF CONFORMITY This device complies with Canadian ICES-003. Product Name: AUDIO/VIDEO MULTI-CHANNEL RECEIVER Model Number: VSX-819H-K Responsible Party Name: PIONEER ELECTRONICS SERVICE, INC. Phone: 1-800-421-1404
...IS FOR YOUR SECURITY. D8-10-1-2_En This Class B digital apparatus complies with part 15 of the available power supply differs according to radio or television reception, which the receiver is properly disposed of time (for help. D8-10-2_En CAUTION: This product satisfies FCC regulations when shielded ...D8-10-3a_En FEDERAL COMMUNICATIONS COMMISSION DECLARATION OF CONFORMITY This device complies with Canadian ICES-003. Product Name: AUDIO/VIDEO MULTI-CHANNEL RECEIVER Model Number: VSX-819H-K Responsible Party Name: PIONEER ELECTRONICS SERVICE, INC. Phone: 1-800-421-1404
Owner's Manual
Page 3
... REFER SERVICING TO QUALIFIED SERVICE PERSONNEL. Servicing is required when the apparatus has been damaged in the literature accompanying the appliance. Since the power cord serves as radiators, heat registers, stoves, or other . Therefore, make sure to improve heat radiation (at least 60 cm at ...flame sources (such as a lighted candle) on this unit will need to persons. less than the other apparatus (including amplifiers) that the power cord can be used , use attachments/accessories specified by the manufacturer. 12) Use only with the cart, stand, tripod, bracket, or ...
... REFER SERVICING TO QUALIFIED SERVICE PERSONNEL. Servicing is required when the apparatus has been damaged in the literature accompanying the appliance. Since the power cord serves as radiators, heat registers, stoves, or other . Therefore, make sure to improve heat radiation (at least 60 cm at ...flame sources (such as a lighted candle) on this unit will need to persons. less than the other apparatus (including amplifiers) that the power cord can be used , use attachments/accessories specified by the manufacturer. 12) Use only with the cart, stand, tripod, bracket, or ...
Owner's Manual
Page 5
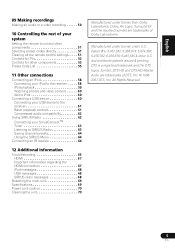
... SiriusConnectTM Tuner 63 Listening to SIRIUS Radio 63 Saving channel presets 64 Using the SIRIUS Menu 64 Connecting an IR receiver 64 12 Additional information Troubleshooting 65 HDMI 67 Important information regarding the HDMI connection 67 iPod messages 68 USB messages ...68 SIRIUS radio messages 68 Resetting the main unit 69 Specifications 69 Power cord caution 70 Cleaning the unit 70 Manufactured under U.S. All Rights Reserved. 5 En EnglEisnhglishDeutschItaliaFnraonçais FraItnalçiaanios ...
... SiriusConnectTM Tuner 63 Listening to SIRIUS Radio 63 Saving channel presets 64 Using the SIRIUS Menu 64 Connecting an IR receiver 64 12 Additional information Troubleshooting 65 HDMI 67 Important information regarding the HDMI connection 67 iPod messages 68 USB messages ...68 SIRIUS radio messages 68 Resetting the main unit 69 Specifications 69 Power cord caution 70 Cleaning the unit 70 Manufactured under U.S. All Rights Reserved. 5 En EnglEisnhglishDeutschItaliaFnraonçais FraItnalçiaanios ...
Owner's Manual
Page 8
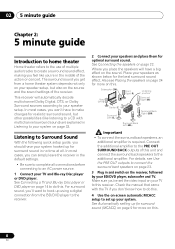
... quick setup guide, you should have your system hooked up for surround sound in no time at all connections before connecting to an AC power source. 1 Connect your speakers and place them for the best surround sound effect. Check the manual that came with multichannel surround sound)... are explained in Listening to this . 4 Use the on the sound. For surround sound, you can simply leave the receiver in and switch on this . 8 En The surround sound you place the speakers will automatically decode multichannel Dolby Digital, DTS, or Dolby Surround ...
... quick setup guide, you should have your system hooked up for surround sound in no time at all connections before connecting to an AC power source. 1 Connect your speakers and place them for the best surround sound effect. Check the manual that came with multichannel surround sound)... are explained in Listening to this . 4 Use the on the sound. For surround sound, you can simply leave the receiver in and switch on this . 8 En The surround sound you place the speakers will automatically decode multichannel Dolby Digital, DTS, or Dolby Surround ...
Owner's Manual
Page 10
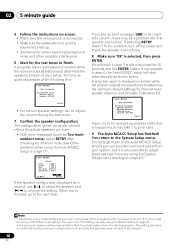
...see Other problems when using the Auto MCACC Setup on page 11). 1.Auto MCACC Check! A progress report is displayed on-screen while the receiver outputs more test tones to be accurate (taking delay and room characteristics into account) and generally does not need to determine the optimum... be farther than the actual distance from your system, but it 's doing this is happening. If selecting RETRY doesn't fix the problem, turn off the power and check the speaker connections. 8 Make sure 'OK' is selected, then press ENTER. Try to finish. 02 5 minute guide 5 Follow the instructions ...
...see Other problems when using the Auto MCACC Setup on page 11). 1.Auto MCACC Check! A progress report is displayed on-screen while the receiver outputs more test tones to be accurate (taking delay and room characteristics into account) and generally does not need to determine the optimum... be farther than the actual distance from your system, but it 's doing this is happening. If selecting RETRY doesn't fix the problem, turn off the power and check the speaker connections. 8 Make sure 'OK' is selected, then press ENTER. Try to finish. 02 5 minute guide 5 Follow the instructions ...
Owner's Manual
Page 11
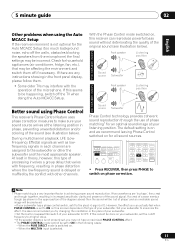
... mode switched on phase correction. Set your listening position. When the MULTI IN input is a very important factor in achieving proper sound reproduction. RECEIVER INPUT SELECT SOURCE RECEIVER ZONE 2 ON/OFF TV CONTROL INPUT BD TV DVR HDD 1 DVD 2 VCR DISPLAY 3 S.RETRIEVER EQ CH SELECT SLEEP 4 5 6 ... distortion where the low-frequency sound is set to OFF. When the PURE DIRECT mode is not properly set, you can reproduce powerful bass sound without deteriorating the quality of your subwoofer, set the cutoff frequency to a higher value. • If the speaker ...
... mode switched on phase correction. Set your listening position. When the MULTI IN input is a very important factor in achieving proper sound reproduction. RECEIVER INPUT SELECT SOURCE RECEIVER ZONE 2 ON/OFF TV CONTROL INPUT BD TV DVR HDD 1 DVD 2 VCR DISPLAY 3 S.RETRIEVER EQ CH SELECT SLEEP 4 5 6 ... distortion where the low-frequency sound is set to OFF. When the PURE DIRECT mode is not properly set, you can reproduce powerful bass sound without deteriorating the quality of your subwoofer, set the cutoff frequency to a higher value. • If the speaker ...
Owner's Manual
Page 12
...HDMI logo and High-Definition Multimedia Interface are trademarks or registered trademarks of several cables and connectors), and communication between the AV source and AV devices such as video game units) have resolutions that the connected component is used to multi-channel surround-sound audio...., switch the power into standby. Note that some components (such as DTVs. HDMI has the capability to support standard, enhanced, or high-definition video plus standard to protect digital content transmitted and received by the transformers in the illustration). HDMI cable Note 1 • ...
...HDMI logo and High-Definition Multimedia Interface are trademarks or registered trademarks of several cables and connectors), and communication between the AV source and AV devices such as video game units) have resolutions that the connected component is used to multi-channel surround-sound audio...., switch the power into standby. Note that some components (such as DTVs. HDMI has the capability to support standard, enhanced, or high-definition video plus standard to protect digital content transmitted and received by the transformers in the illustration). HDMI cable Note 1 • ...

Owner's Manual
Page 22
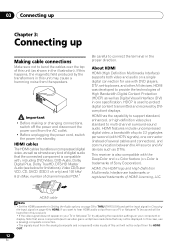
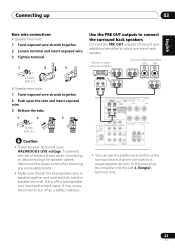
... Switching the speaker system on page 24 when placing the speakers in another room. Make sure to a value between 6 Ω and 16 Ω. The receiver will vary. SW Powered subwoofer Front speakers L R Center speaker C Surround speakers SL SR SURROUND AUDIO SPEAKERS A R BACK L (Single) PRE OUT FRONT R L SURROUND R L IN ZONE2 SUBWOOFER OUT PRE... Connecting up Connecting the speakers A complete setup of six speakers (including the subwoofer) is best for the listening options with this unit to the AC power source. Make sure you have in another room.
... Switching the speaker system on page 24 when placing the speakers in another room. Make sure to a value between 6 Ω and 16 Ω. The receiver will vary. SW Powered subwoofer Front speakers L R Center speaker C Surround speakers SL SR SURROUND AUDIO SPEAKERS A R BACK L (Single) PRE OUT FRONT R L SURROUND R L IN ZONE2 SUBWOOFER OUT PRE... Connecting up Connecting the speakers A complete setup of six speakers (including the subwoofer) is best for the listening options with this unit to the AC power source. Make sure you have in another room.
Owner's Manual
Page 23
... outputs to connect the surround back speakers Connect the PRE OUT outputs of the bare speaker wire touches the back panel it may cause the power to add a surround back speaker. In this case plug the amplifier into the speaker terminal. If any uninsulated parts. • Make sure that all the... fully into the left (L (Single)) terminal only. 23 En To prevent the risk of electric shock when connecting or disconnecting the speaker cables, disconnect the power cord before touching any of the unit and additional amplifier to cut off as well.
... outputs to connect the surround back speakers Connect the PRE OUT outputs of the bare speaker wire touches the back panel it may cause the power to add a surround back speaker. In this case plug the amplifier into the speaker terminal. If any uninsulated parts. • Make sure that all the... fully into the left (L (Single)) terminal only. 23 En To prevent the risk of electric shock when connecting or disconnecting the speaker cables, disconnect the power cord before touching any of the unit and additional amplifier to cut off as well.
Owner's Manual
Page 32
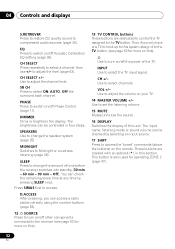
...). SPEAKERS Use to select the TV input signal. INPUT Use to change the amount of time before the receiver switches into standby (30 min - 60 min - 90 min - Use to switch on /off the power of this unit. This button is also used for more on your TV. 14 MASTER VOLUME +/- EQ... check the remaining sleep time at any time by selecting an input source. 17 SHIFT Press to turn on/off other components connected to the receiver (see page 52 for operating ZONE 2 (page 47). 32 En Use to adjust the channel level. These buttons are dedicated to control the TV assigned...
...). SPEAKERS Use to select the TV input signal. INPUT Use to change the amount of time before the receiver switches into standby (30 min - 60 min - 90 min - Use to switch on /off the power of this unit. This button is also used for more on your TV. 14 MASTER VOLUME +/- EQ... check the remaining sleep time at any time by selecting an input source. 17 SHIFT Press to turn on/off other components connected to the receiver (see page 52 for operating ZONE 2 (page 47). 32 En Use to adjust the channel level. These buttons are dedicated to control the TV assigned...

Owner's Manual
Page 40
..., and the optical 1 or 2 audio input is heard from the headphone can be selected for the different inputs as described below.1 1 Press RECEIVER on the remote control. H can be selected only from STEREO or A.L.C.. To cancel playback from the multichannel inputs, switches to C1/O1/O2 ... the playback component. 2 Turn on the power of the speakers connected to the source component. Selecting the multichannel analog inputs If you have connected a decoder or a BD/DVD player with multichannel analog outputs according to the number of the receiver. 3 Select the source you must select ...
..., and the optical 1 or 2 audio input is heard from the headphone can be selected for the different inputs as described below.1 1 Press RECEIVER on the remote control. H can be selected only from STEREO or A.L.C.. To cancel playback from the multichannel inputs, switches to C1/O1/O2 ... the playback component. 2 Turn on the power of the speakers connected to the source component. Selecting the multichannel analog inputs If you have connected a decoder or a BD/DVD player with multichannel analog outputs according to the number of the receiver. 3 Select the source you must select ...

Owner's Manual
Page 46
... rooms after you have made the proper MULTI-ZONE connections. You should have independent power (the main zone power can be controlled by the remote or front panel controls. The main and sub zones have a pair of this receiver. Basic MULTI-ZONE setup (ZONE 2) • Connect a separate amplifier to the ZONE 2 ...used. MULTI-ZONE listening options The following illustration. 07 Using the MULTI-ZONE feature Chapter 7: Using the MULTI-ZONE feature MULTI-ZONE listening This receiver can power up to two independent systems in tuner and other analog audio sources.a a.
... rooms after you have made the proper MULTI-ZONE connections. You should have independent power (the main zone power can be controlled by the remote or front panel controls. The main and sub zones have a pair of this receiver. Basic MULTI-ZONE setup (ZONE 2) • Connect a separate amplifier to the ZONE 2 ...used. MULTI-ZONE listening options The following illustration. 07 Using the MULTI-ZONE feature Chapter 7: Using the MULTI-ZONE feature MULTI-ZONE listening This receiver can power up to two independent systems in tuner and other analog audio sources.a a.
Owner's Manual
Page 47
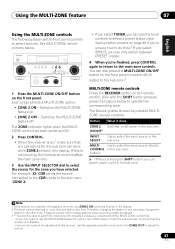
... controls affect the main zone only. 3 Use the INPUT SELECTOR dial to use the front panel controls to operate the corresponding zone. CHANNEL RECEIVER VSX-819H PHASE CONTROL BAND TUNE - TUNE + TUNER EDIT AUTO SURROUND/ STREAM DIRECT STEREO/ A.L.C. If this is dimmed, and ZONE2 ON continues to...feature 07 Using the MULTI-ZONE controls The following table shows the possible MULTIZONE remote controls: Button What it does ZONE 2 Switches on/off power in the sub zone. See MULTI-ZONE remote controls below to select sources. Each press selects a MULTI-ZONE option: • ZONE 2...
... controls affect the main zone only. 3 Use the INPUT SELECTOR dial to use the front panel controls to operate the corresponding zone. CHANNEL RECEIVER VSX-819H PHASE CONTROL BAND TUNE - TUNE + TUNER EDIT AUTO SURROUND/ STREAM DIRECT STEREO/ A.L.C. If this is dimmed, and ZONE2 ON continues to...feature 07 Using the MULTI-ZONE controls The following table shows the possible MULTIZONE remote controls: Button What it does ZONE 2 Switches on/off power in the sub zone. See MULTI-ZONE remote controls below to select sources. Each press selects a MULTI-ZONE option: • ZONE 2...

Owner's Manual
Page 48
... and allow you how to tune in to FM and AM radio broadcasts using the automatic (search) and manual (step) tuning functions. The receiver will have the receiver store the frequency for stations in each time. The display shows PRESET, then a blinking MEM and station preset. Manual tuning To change to... stereo sound If the TUNE or ST indicators don't light when tuning to an FM station because the signal is left disconnected from the AC power outlet for over a month, the station memories will be lost and will start searching for more on how to do this . There are tuned...
... and allow you how to tune in to FM and AM radio broadcasts using the automatic (search) and manual (step) tuning functions. The receiver will have the receiver store the frequency for stations in each time. The display shows PRESET, then a blinking MEM and station preset. Manual tuning To change to... stereo sound If the TUNE or ST indicators don't light when tuning to an FM station because the signal is left disconnected from the AC power outlet for over a month, the station memories will be lost and will start searching for more on how to do this . There are tuned...
Owner's Manual
Page 51
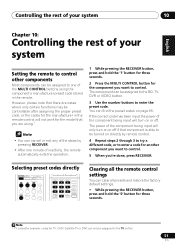
... through 3 to try a different code, or to enter a code for another component you want to control. If the correct code has been input the power of the component being input will turn on page 55. Note 1 TV codes (for example, codes for TV, CATV, Satellite TV or DTV) can...MIDNIGHT 9 CH SHIFT ENTER Clearing all the remote control settings You can clear all presets and restore the factory default settings. • While pressing the RECEIVER button, press and hold the '1' button for three seconds. 2 Press the MULTI CONTROL button for the component you want to control. 5 When you...
... through 3 to try a different code, or to enter a code for another component you want to control. If the correct code has been input the power of the component being input will turn on page 55. Note 1 TV codes (for example, codes for TV, CATV, Satellite TV or DTV) can...MIDNIGHT 9 CH SHIFT ENTER Clearing all the remote control settings You can clear all presets and restore the factory default settings. • While pressing the RECEIVER button, press and hold the '1' button for three seconds. 2 Press the MULTI CONTROL button for the component you want to control. 5 When you...
Owner's Manual
Page 58
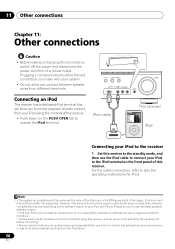
...; Push down on the software version of this receiver. 11 Other connections Chapter 11: Other connections Caution USB iPod VIDEO INPUT VIDEO L AUDIO R • Before making or changing the connections, switch off before connecting. • Pioneer cannot under any inconvenience or loss of audio content from ...audio and the video of the functions may vary depending on the PUSH OPEN tab to control playback of recorded material resulting from the power outlet. Note 1 • This system is legally permitted to reproduce. • Features such as the equalizer cannot be sure to...
...; Push down on the software version of this receiver. 11 Other connections Chapter 11: Other connections Caution USB iPod VIDEO INPUT VIDEO L AUDIO R • Before making or changing the connections, switch off before connecting. • Pioneer cannot under any inconvenience or loss of audio content from ...audio and the video of the functions may vary depending on the PUSH OPEN tab to control playback of recorded material resulting from the power outlet. Note 1 • This system is legally permitted to reproduce. • Features such as the equalizer cannot be sure to...
Owner's Manual
Page 60
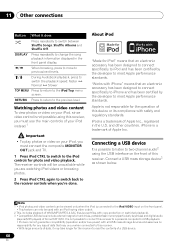
... repeatedly to change the song playback information displayed in the U.S. When browsing, press to move to two-channel audio2 using this receiver, you must connect the composite MONITOR OUT jack and TV. 1 Press iPod CTRL to switch to meet Apple performance standards. It... is not responsible for the operation of Apple Inc. iPod is a trademark of this receiver to a personal computer for USB playback. • Pioneer cannot guarantee compatibility (operation and/or bus power) with safety and regulatory standards. Connect a USB mass storage device3 as shown below. RETURN...
... repeatedly to change the song playback information displayed in the U.S. When browsing, press to move to two-channel audio2 using this receiver, you must connect the composite MONITOR OUT jack and TV. 1 Press iPod CTRL to switch to meet Apple performance standards. It... is not responsible for the operation of Apple Inc. iPod is a trademark of this receiver to a personal computer for USB playback. • Pioneer cannot guarantee compatibility (operation and/or bus power) with safety and regulatory standards. Connect a USB mass storage device3 as shown below. RETURN...
Owner's Manual
Page 61
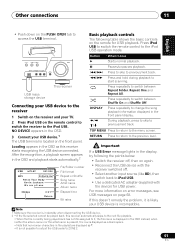
... starts automatically.2 U S B P L AY 001/004 MP3 R:Fld S:On R e l a x Yo u r B o dy Kevin Jackson We are displayed as this receiver automatically skips to the next file playable. • When the file currently being played back has no title assigned to iPod USB. • Use a dedicated...;ais Italiano Nederlands Español • Push down on the remote for USB power. USB iPod VIDEO INPUT VIDEO L AUDIO R Basic playback controls The following the points below: • Switch the receiver off . • Select another input source (like BD), then switch back to ...
... starts automatically.2 U S B P L AY 001/004 MP3 R:Fld S:On R e l a x Yo u r B o dy Kevin Jackson We are displayed as this receiver automatically skips to the next file playable. • When the file currently being played back has no title assigned to iPod USB. • Use a dedicated...;ais Italiano Nederlands Español • Push down on the remote for USB power. USB iPod VIDEO INPUT VIDEO L AUDIO R Basic playback controls The following the points below: • Switch the receiver off . • Select another input source (like BD), then switch back to ...
Owner's Manual
Page 65
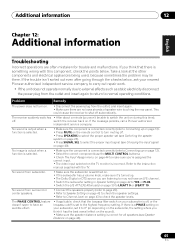
... No sound from subwoofer. If there is a PHASE setting on your subwoofer, set it to normal operating conditions. This could cause the receiver to turn on page 40). No image is output when a function is connected correctly (refer to Connecting up on page 12). •...automatically. If the trouble isn't sorted out even after going through the checks below . If the message persists, call a Pioneer authorized independent service company. Problem Remedy The power does not turn muting off , or the lowpass cutoff is incorrect. No sound is output when a function is selected....
... No sound from subwoofer. If there is a PHASE setting on your subwoofer, set it to normal operating conditions. This could cause the receiver to turn on page 40). No image is output when a function is connected correctly (refer to Connecting up on page 12). •...automatically. If the trouble isn't sorted out even after going through the checks below . If the message persists, call a Pioneer authorized independent service company. Problem Remedy The power does not turn muting off , or the lowpass cutoff is incorrect. No sound is output when a function is selected....
Owner's Manual
Page 68
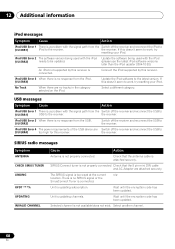
... reconnect the USB to (I /U ERR1) USB to the receiver. An iPod not supported by this receiver. No Track When there are Switch off the receiver and reconnect the USB to work , try resetting your iPod. iPod/USB Error 4 The power requirements of the USB device are no response from the USB. ...(I /U ERR1) iPod to the receiver. SIRIUS Connect tuner is connected. Unit is no tracks in the category selected on the iPod. Wait ...
... reconnect the USB to (I /U ERR1) USB to the receiver. An iPod not supported by this receiver. No Track When there are Switch off the receiver and reconnect the USB to work , try resetting your iPod. iPod/USB Error 4 The power requirements of the USB device are no response from the USB. ...(I /U ERR1) iPod to the receiver. SIRIUS Connect tuner is connected. Unit is no tracks in the category selected on the iPod. Wait ...


