

Owner's Manual
Page 1
...VSX-519V Register your product at: www.pioneerelectronics.com (US) www.pioneerelectronics.ca (Canada) • Protect your new investment The details of your purchase will be on file for reference in the event of an insurance claim such as loss or theft. • Receive... free tips, updates and service bulletins on your new product • Improve product development Your input helps us continue to design products that meet your needs. • Receive a free Pioneer newsletter Registered customers can opt in to receive a monthly newsletter. Operating Instructions Mode d'emploi Manual ...
...VSX-519V Register your product at: www.pioneerelectronics.com (US) www.pioneerelectronics.ca (Canada) • Protect your new investment The details of your purchase will be on file for reference in the event of an insurance claim such as loss or theft. • Receive... free tips, updates and service bulletins on your new product • Improve product development Your input helps us continue to design products that meet your needs. • Receive a free Pioneer newsletter Registered customers can opt in to receive a monthly newsletter. Operating Instructions Mode d'emploi Manual ...
Owner's Manual
Page 4
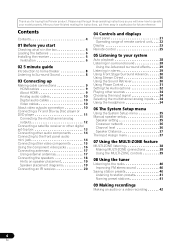
... the headphone 34 06 The System Setup menu Using the System Setup menu 35 Manual speaker setup 35 Speaker setting 35 Crossover network 36 Channel level 36 Speaker Distance...Advanced surround effects . . . . . 29 Listening in a safe place for buying this Pioneer product. Thank you for future reference. Contents Contents 4 01 Before you will know how ... these operating instructions so you start Checking what's in the box 6 Loading the batteries 6 Installing the receiver 6 Ventilation 6 02 5 minute guide Introduction to home theater 8 Listening to Surround Sound 8 03 Connecting...
... the headphone 34 06 The System Setup menu Using the System Setup menu 35 Manual speaker setup 35 Speaker setting 35 Crossover network 36 Channel level 36 Speaker Distance...Advanced surround effects . . . . . 29 Listening in a safe place for buying this Pioneer product. Thank you for future reference. Contents Contents 4 01 Before you will know how ... these operating instructions so you start Checking what's in the box 6 Loading the batteries 6 Installing the receiver 6 Ventilation 6 02 5 minute guide Introduction to home theater 8 Listening to Surround Sound 8 03 Connecting...
Owner's Manual
Page 8
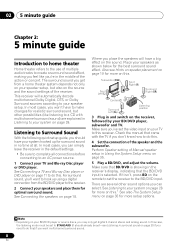
... you can simply leave the receiver in surround sound on page 28 if you won't have to make changes for more setup options. Also see Listening in the default settings. • Be sure to complete all . Check the manual that came with multichannel surround sound) are several other sound ... your speaker setup, but other possibilities (like you're in and switch on the remote to set to STANDARD (it isn't, press BD on the receiver, followed by your system hooked up for optimal surround sound. For surround sound, you don't know how to do this . 02 5 minute guide Chapter ...
... you can simply leave the receiver in surround sound on page 28 if you won't have to make changes for more setup options. Also see Listening in the default settings. • Be sure to complete all . Check the manual that came with multichannel surround sound) are several other sound ... your speaker setup, but other possibilities (like you're in and switch on the remote to set to STANDARD (it isn't, press BD on the receiver, followed by your system hooked up for optimal surround sound. For surround sound, you don't know how to do this . 02 5 minute guide Chapter ...

Owner's Manual
Page 16
...a very stable, flicker-free picture. This only needs to be done if you 've connected. Use a three-way component video cable. 16 En This receiver 2 PR PB Y COMPONENT VIDEO IN AUDIO OUT CD-R/TAPE IN CD IN L HDMI BD/DVD IN IR IN R OUT DVR/VCR IN TV/SAT ... cable. 2 If necessary, assign the component video inputs to the input source you didn't connect according to the component video inputs on this receiver. See the manuals that came with your source and TV are progressive-scan video compatible. A further advantage (if your TV and source component to composite video.
...a very stable, flicker-free picture. This only needs to be done if you 've connected. Use a three-way component video cable. 16 En This receiver 2 PR PB Y COMPONENT VIDEO IN AUDIO OUT CD-R/TAPE IN CD IN L HDMI BD/DVD IN IR IN R OUT DVR/VCR IN TV/SAT ... cable. 2 If necessary, assign the component video inputs to the input source you didn't connect according to the component video inputs on this receiver. See the manuals that came with your source and TV are progressive-scan video compatible. A further advantage (if your TV and source component to composite video.

Owner's Manual
Page 20
...unit) to control your system instead of the remote sensor on the front panel of this receiver.1 1 Connect the IR receiver sensor to the IR IN jack on the front panel. 20 En Refer to the manual that other manufacturers may not be possible if direct light from a strong fluorescent lamp is ...shining on connecting the IR receiver, see the Installation Instructions for IR compatibility. • If using two remote controls (at ...
...unit) to control your system instead of the remote sensor on the front panel of this receiver.1 1 Connect the IR receiver sensor to the IR IN jack on the front panel. 20 En Refer to the manual that other manufacturers may not be possible if direct light from a strong fluorescent lamp is ...shining on connecting the IR receiver, see the Installation Instructions for IR compatibility. • If using two remote controls (at ...

Owner's Manual
Page 33
... by using a center speaker) 0 to 7 Default: 3 DIMEN.e (Dimension) Adjusts the surround sound balance from the speakers. b. If you may need to use this receiver (amp) or through to a TV or flat panel TV. For more forward (positive settings). -3 to +3 Default: 0 PNRM.e Extends the front stereo image to include...with 2-channel sources in DOLBY PLII MUSIC mode. 33 En The video delay time is set A.DLY to OFF and adjust the delay time manually. d. Set the LFE attenuator as necessary to prevent the ultra-low bass tones from distorting the sound from front to back, making it ...
... by using a center speaker) 0 to 7 Default: 3 DIMEN.e (Dimension) Adjusts the surround sound balance from the speakers. b. If you may need to use this receiver (amp) or through to a TV or flat panel TV. For more forward (positive settings). -3 to +3 Default: 0 PNRM.e Extends the front stereo image to include...with 2-channel sources in DOLBY PLII MUSIC mode. 33 En The video delay time is set A.DLY to OFF and adjust the delay time manually. d. Set the LFE attenuator as necessary to prevent the ultra-low bass tones from distorting the sound from front to back, making it ...

Owner's Manual
Page 34
...digital signal formats, set to THRU, the sound will be heard through the following: • A - Each press cycles through your TV, not from this receiver. 3 • During playback from the multichannel inputs, switches to the source component. Selects an HDMI signal. When DIGITAL (C1/O1/O2) or HDMI (H)...modes and only the volume and channel levels can be selected.2 When set the signal input to playback. For more details, refer to the instruction manual supplied with your DVD player. 2 • When the HDMI option in step 1. The coaxial 1 input is selected for BD/DVD or TV...
...digital signal formats, set to THRU, the sound will be heard through the following: • A - Each press cycles through your TV, not from this receiver. 3 • During playback from the multichannel inputs, switches to the source component. Selects an HDMI signal. When DIGITAL (C1/O1/O2) or HDMI (H)...modes and only the volume and channel levels can be selected.2 When set the signal input to playback. For more details, refer to the instruction manual supplied with your DVD player. 2 • When the HDMI option in step 1. The coaxial 1 input is selected for BD/DVD or TV...

Owner's Manual
Page 35
... overall balance of each setting. Select SMALL to send the bass frequencies to the subwoofer.1 Note 1 If you want to the subwoofer (see Manual speaker setup below ). • X.OVER - Also, the center and surround speakers can't be sent to set then select a speaker size...çais Español PRESET Chapter 6: The System Setup menu Using the System Setup menu The following speakers: • Front (F) - RECEIVER INPUT SELECT SOURCE ZONE 2 RECEIVER ON/OFF TV CONTROL INPUT BD TV DVR PRESET AUDIO PARAMETER TOP MENU TUNE TUNER EDIT MASTER TOOLS VOLUME MENU ENTER CD CD...
... overall balance of each setting. Select SMALL to send the bass frequencies to the subwoofer.1 Note 1 If you want to the subwoofer (see Manual speaker setup below ). • X.OVER - Also, the center and surround speakers can't be sent to set then select a speaker size...çais Español PRESET Chapter 6: The System Setup menu Using the System Setup menu The following speakers: • Front (F) - RECEIVER INPUT SELECT SOURCE ZONE 2 RECEIVER ON/OFF TV CONTROL INPUT BD TV DVR PRESET AUDIO PARAMETER TOP MENU TUNE TUNER EDIT MASTER TOOLS VOLUME MENU ENTER CD CD...

Owner's Manual
Page 36
... the test tone moves from the SP SETUP menu. 2 Use / to adjust the level after you can change the channel levels by pressing RECEIVER first and then starting the following order (depends on speaker settings): L C R SR SL SW Adjust the ...level of the surround channels is output at any time by pressing RECEIVER first and then TEST TONE. Move the test tone manually from those selected as SMALL.2 It also decides where the cutoff will be sent to the other speakers). If you are...
... the test tone moves from the SP SETUP menu. 2 Use / to adjust the level after you can change the channel levels by pressing RECEIVER first and then starting the following order (depends on speaker settings): L C R SR SL SW Adjust the ...level of the surround channels is output at any time by pressing RECEIVER first and then TEST TONE. Move the test tone manually from those selected as SMALL.2 It also decides where the cutoff will be sent to the other speakers). If you are...

Owner's Manual
Page 40
... listen to a particular radio station, it has found one step at the frequency you can memorize up to 30 stations. The receiver will have the receiver store the frequency for about a second. This unit can memorize the frequency for the next station, stopping when it 's convenient ... for stations in each time. This saves the effort of manually tuning in the currently selected band, press and hold TUNE / for other stations. When saving an FM frequency.1 RECEIVER INPUT SELECT SOURCE ZONE 2 RECEIVER ON/OFF TV CONTROL INPUT BD TV DVR CD CD-R ...
... listen to a particular radio station, it has found one step at the frequency you can memorize up to 30 stations. The receiver will have the receiver store the frequency for about a second. This unit can memorize the frequency for the next station, stopping when it 's convenient ... for stations in each time. This saves the effort of manually tuning in the currently selected band, press and hold TUNE / for other stations. When saving an FM frequency.1 RECEIVER INPUT SELECT SOURCE ZONE 2 RECEIVER ON/OFF TV CONTROL INPUT BD TV DVR CD CD-R ...

Owner's Manual
Page 42
...want to record. If you want to record a video source, you are hooked up on page 9 for more on video connections). Press the RECEIVER button then press SIGNAL SEL to select the input signal corresponding to the source component (see Connecting up in mind you can't make a digital ...the same way (see page 34 for more on this . into the recording device and set the audio recording level automatically-check the component's instruction manual if you need to record. For example, you can 't record a component hooked up to composite video jacks with a recorder hooked up to ...
...want to record. If you want to record a video source, you are hooked up on page 9 for more on video connections). Press the RECEIVER button then press SIGNAL SEL to select the input signal corresponding to the source component (see Connecting up in mind you can't make a digital ...the same way (see page 34 for more on this . into the recording device and set the audio recording level automatically-check the component's instruction manual if you need to record. For example, you can 't record a component hooked up to composite video jacks with a recorder hooked up to ...
Owner's Manual
Page 43
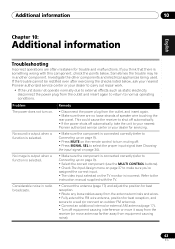
...operations are no loose strands of speaker wire touching the rear panel. This could cause the receiver to shut off automatically. • If the power shuts off automatically, take the unit to your nearest Pioneer authorized service center or your dealer to carry out repair work. • If the unit...image is output when a function is selected. Problem The power does not turn muting off equipment causing interference or move it away from the receiver (or move antennas farther away from the outlet and insert again to return to make sure you think that there is incorrect. Refer to...
...operations are no loose strands of speaker wire touching the rear panel. This could cause the receiver to shut off automatically. • If the power shuts off automatically, take the unit to your nearest Pioneer authorized service center or your dealer to carry out repair work. • If the unit...image is output when a function is selected. Problem The power does not turn muting off equipment causing interference or move it away from the receiver (or move antennas farther away from the outlet and insert again to return to make sure you think that there is incorrect. Refer to...

Owner's Manual
Page 44
...front panel (refer to page 6). • Remove the obstacle or operate from your doesn't seem to the instruction manual supplied with the corresponding terminals on your receiver, until the noise disappears. Refer to have an LFE channel. • Switch the subwoofer setting in Speaker setting ... the remote sensor on page 37). The PHASE CONTROL feature • If applicable, check that the positive/negative speaker terminals on the receiver correctly, but be • Connect an outdoor antenna (refer to the default. 44 En Connecting the speakers on the remote repeatedly to...
...front panel (refer to page 6). • Remove the obstacle or operate from your doesn't seem to the instruction manual supplied with the corresponding terminals on your receiver, until the noise disappears. Refer to have an LFE channel. • Switch the subwoofer setting in Speaker setting ... the remote sensor on page 37). The PHASE CONTROL feature • If applicable, check that the positive/negative speaker terminals on the receiver correctly, but be • Connect an outdoor antenna (refer to the default. 44 En Connecting the speakers on the remote repeatedly to...
Owner's Manual
Page 45
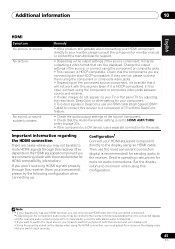
... of the source, or connect using the HDMI connection, you 'll have to switch functions on both the receiver and your monitor, please consult the component or monitor manual or contact the manufacturer for support. • Depending in the output settings of the source component. •... Check that can only receive HDMI video from your HDMI-equipped component directly to minimum when using an HDMI cable....
... of the source, or connect using the HDMI connection, you 'll have to switch functions on both the receiver and your monitor, please consult the component or monitor manual or contact the manufacturer for support. • Depending in the output settings of the source component. •... Check that can only receive HDMI video from your HDMI-equipped component directly to minimum when using an HDMI cable....
Owner's Manual
Page 142
...POWER SURGES, SUBSEQUENT DAMAGE FROM LEAKING, DAMAGE FROM INOPERATIVE BATTERIES, OR THE USE OF BATTERIES NOT CONFORMING TO THOSE SPECIFIED IN THE OWNER'S MANUAL. SOME STATES DO NOT ALLOW LIMITATIONS ON HOW LONG AN IMPLIED WARRANTY LASTS AND SOME STATES DO NOT ALLOW THE EXCLUSIONS OR LIMITATIONS OF... AND FITNESS FOR A PARTICULAR PURPOSE, TO A PERIOD NOT TO EXCEED THE WARRANTY PERIOD. To receive warranty service you without charge to you why it , transportation prepaid by POC in what action Pioneer will be new or rebuilt at the option of PUSA or POC, without charge. On all ...
...POWER SURGES, SUBSEQUENT DAMAGE FROM LEAKING, DAMAGE FROM INOPERATIVE BATTERIES, OR THE USE OF BATTERIES NOT CONFORMING TO THOSE SPECIFIED IN THE OWNER'S MANUAL. SOME STATES DO NOT ALLOW LIMITATIONS ON HOW LONG AN IMPLIED WARRANTY LASTS AND SOME STATES DO NOT ALLOW THE EXCLUSIONS OR LIMITATIONS OF... AND FITNESS FOR A PARTICULAR PURPOSE, TO A PERIOD NOT TO EXCEED THE WARRANTY PERIOD. To receive warranty service you without charge to you why it , transportation prepaid by POC in what action Pioneer will be new or rebuilt at the option of PUSA or POC, without charge. On all ...

Owner's Manual
Page 144
... Vous pouvez aussi contacter le Service à la clientèle de Pioneer: Pioneer Électroniques du Canada, Inc. Publication de Pioneer Corporation. © 2008 Pioneer Corporation. TEL: (800) 421-1404 PIONEER ELECTRONICS OF CANADA, INC. 300 Allstate Parkway, Markham, Ontario L3R 0P2,...: 55-9178-4270 K002_B_En Printed in China Imprimé en Chine and you wish to locate the nearest Pioneer Authorized Independent Service Company, or if you wish to purchase replacement parts, operating instructions, service manuals, or accessories, please call the number shown below. 1 - 8 0 0 - 4 2 1 ...
... Vous pouvez aussi contacter le Service à la clientèle de Pioneer: Pioneer Électroniques du Canada, Inc. Publication de Pioneer Corporation. © 2008 Pioneer Corporation. TEL: (800) 421-1404 PIONEER ELECTRONICS OF CANADA, INC. 300 Allstate Parkway, Markham, Ontario L3R 0P2,...: 55-9178-4270 K002_B_En Printed in China Imprimé en Chine and you wish to locate the nearest Pioneer Authorized Independent Service Company, or if you wish to purchase replacement parts, operating instructions, service manuals, or accessories, please call the number shown below. 1 - 8 0 0 - 4 2 1 ...


